

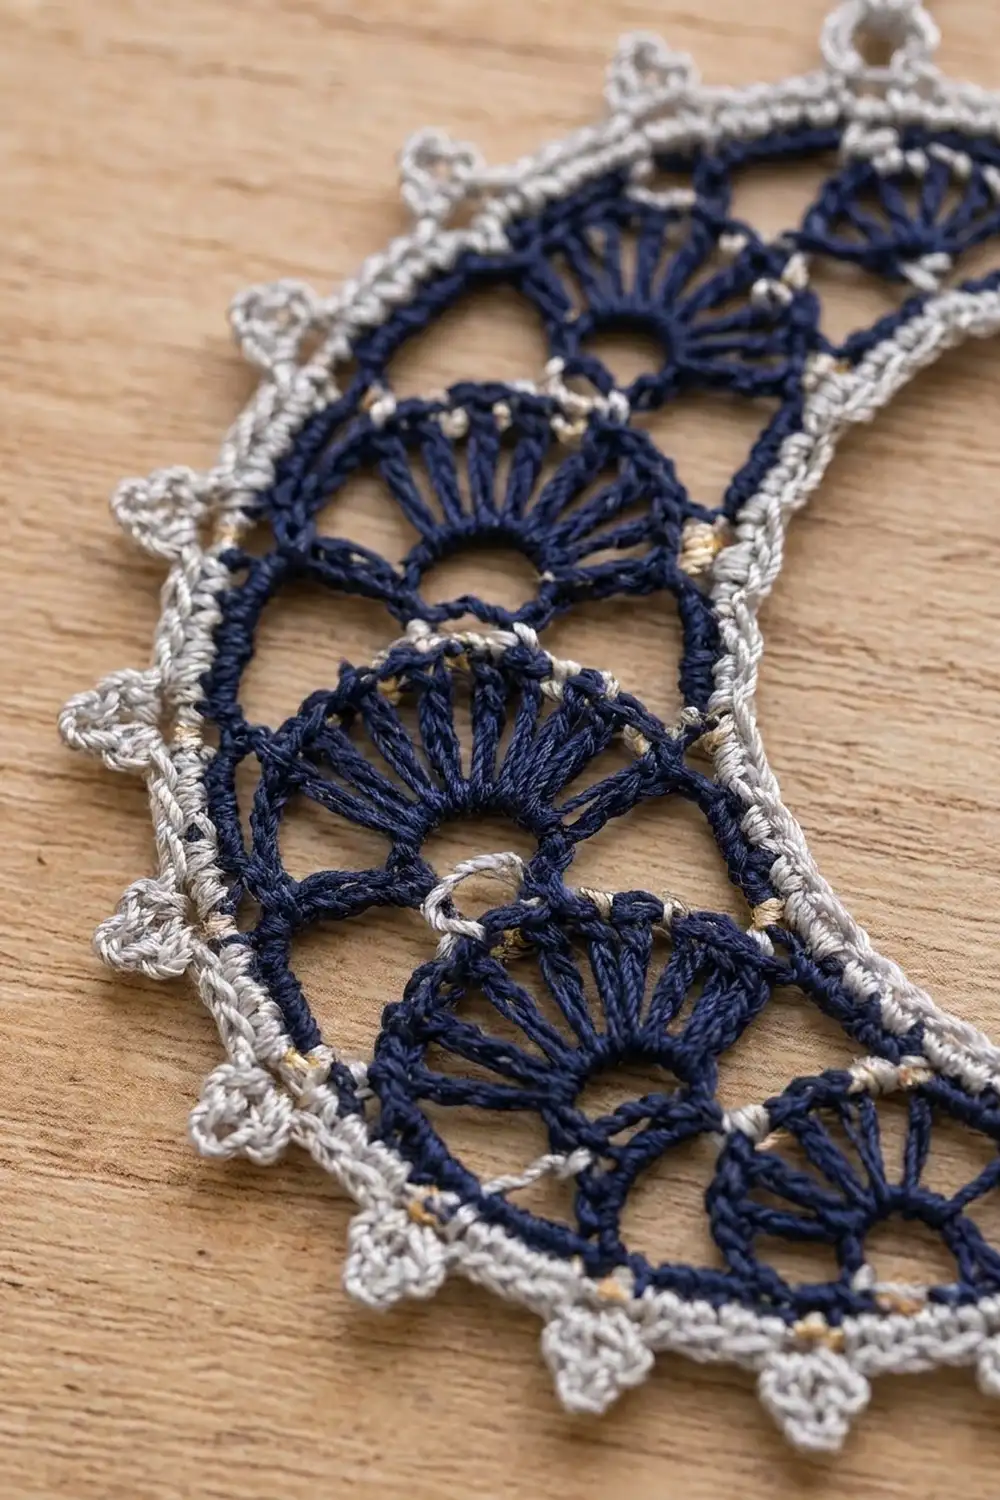
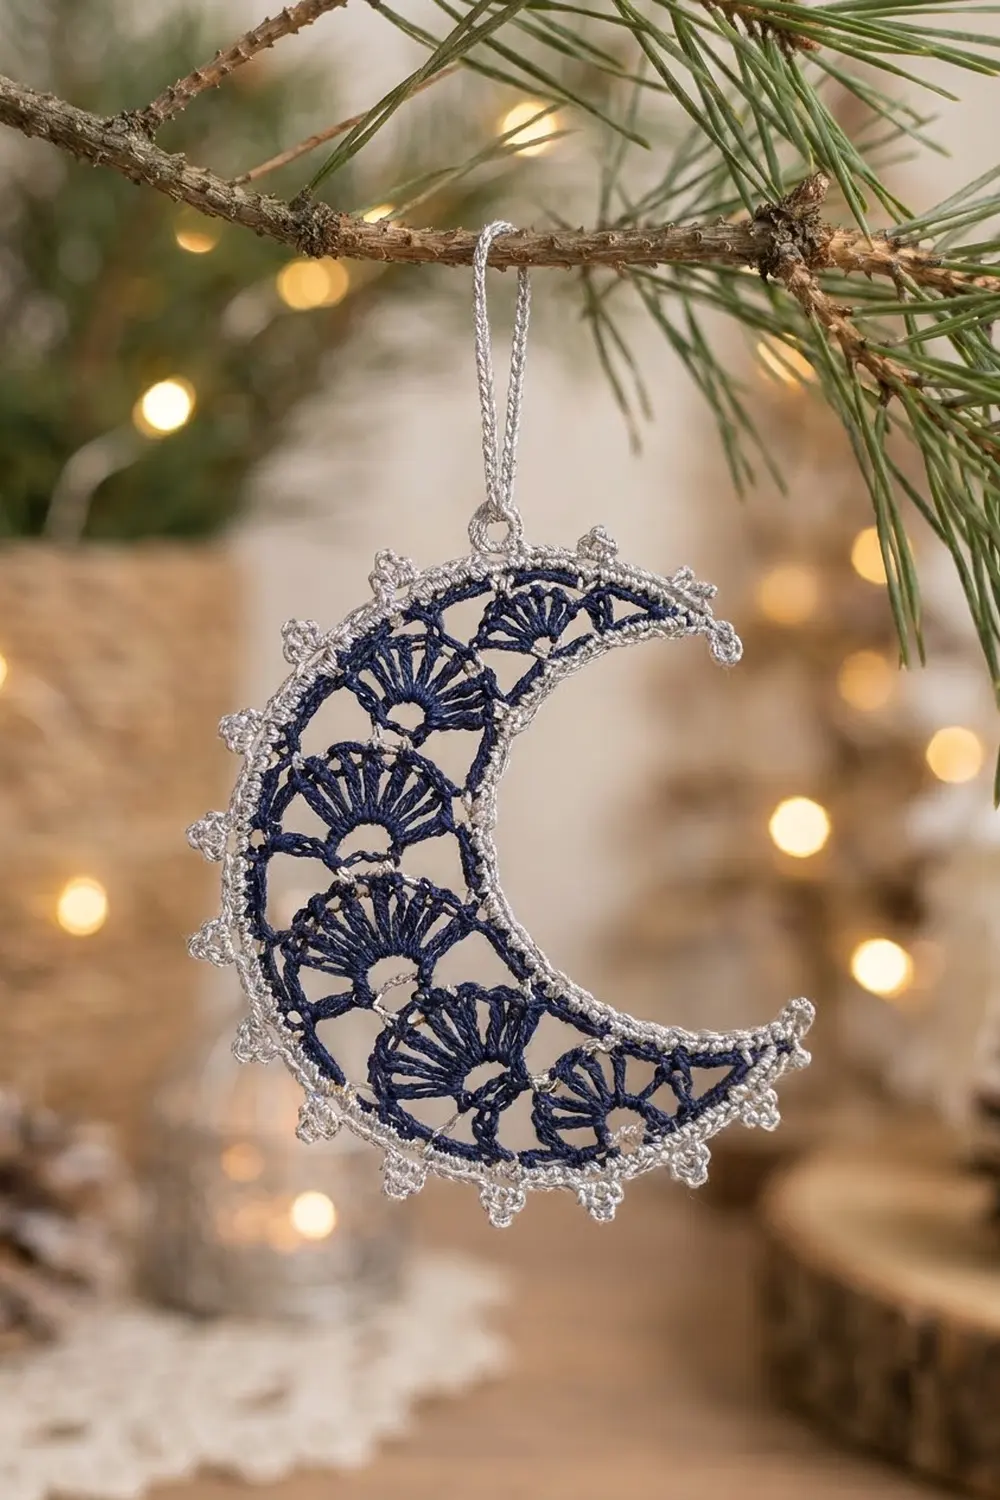
The Midnight Lace Crescent Moon is a small, delicate ornament worked in fine cotton thread. A curved strip of navy fans forms the body of the moon. A crisp silver outline with tiny trefoil picots finishes the edge, so the moon looks like it is catching starlight.
The two-color scheme is simple: deep navy for the lace center and a soft silver-gray for the outline, picots, and hanging loop. The fans get bigger toward the middle and shrink toward the tips, which gives the crescent its shape without any extra shaping rows.
This pattern uses US crochet terms. The finished ornament measures about 4 in (10.2 cm) from tip to tip and 2.75 in (7.0 cm) at its widest point. The hanging loop adds 1.5 in (3.8 cm).
The construction is straightforward. You crochet a straight foundation strip, and a row of graded fans makes it curve naturally into a crescent. A navy finishing row tidies the outer edge. Then two silver rounds go all the way around: a single crochet outline, followed by a picot round on the outer curve and tips. Last comes a chain loop for hanging.
Finished Size and Construction
- Finished size: 4 in (10.2 cm) tip to tip × 2.75 in (7.0 cm) wide
- Skill level: Intermediate (thread crochet)
- Terminology: US crochet terms
- Yarn weight: Size 10 cotton crochet thread (Lace, weight 0)
- Hook: 1.5 mm steel hook
- Number of pieces: 1 (single motif)
- Layout: One crescent worked as a flat strip, with no joining
- Piece size before border: 3.25 in (8.3 cm) tip to tip × 2 in (5.1 cm) wide
- Border depth: about 0.375 in (1.0 cm) on each edge (0.125 in / 0.3 cm of single crochet plus 0.25 in / 0.6 cm of picots)
- Hanging loop: 1.5 in (3.8 cm)
Materials
Yarn advice: Use a mercerized size 10 cotton thread. It holds the fan shapes crisply and takes starch well. Avoid fuzzy or very soft threads, because the picots will lose their definition.
- Color A – Navy: 4 g, about 18 m (about 20 yd)
- Color B – Silver-gray: 4 g, about 18 m (about 20 yd)
Both quantities include a generous margin for a gauge swatch and weaving in ends. One ornament uses roughly half of each amount.
Tools:
– 1.5 mm steel crochet hook
– Fine tapestry needle
– Small sharp scissors
– Rust-proof pins
– Blocking foam or a folded towel
– Fabric stiffener or spray starch
– Ruler or tape measure
Abbreviations (US Terms)
- ch – chain
- sl st – slip stitch
- sc – single crochet
- hdc – half double crochet
- dc – double crochet
- tr – treble crochet
- sk – skip
- sp – space
- st(s) – stitch(es)
- RS – right side
- rep – repeat
Special stitch – Trefoil (tref): Work 1 sc in the indicated stitch. Then [ch 3, sl st in 3rd ch from hook] 3 times, making three picots in a small cluster. Finish with a sl st into the top of that same sc. A trefoil is worked into 1 base stitch and counts as 1 stitch.
Fan sizes:
– Fan A (small): 5 hdc in the same stitch
– Fan B (medium): 7 dc in the same stitch
– Fan C (large): 9 tr in the same stitch
Gauge and Checkpoints
Gauge: 8 sc = 1 in (2.5 cm) with size 10 thread and a 1.5 mm hook. Gauge is not critical for an ornament, but it controls the final size and how strongly the strip curves.
Test first: Work Row 1 and lay it flat before you go any further. That one row tells you most of what you need to know.
Checkpoints:
– After Row 1: the straight strip measures about 4.625 in (11.7 cm).
– After Row 2: the strip curves on its own into a crescent about 3.5 in (8.9 cm) tip to tip. The Fan C fans stand about 0.75 in (1.9 cm) tall.
– After Row 3: the navy piece measures 3.25 in (8.3 cm) tip to tip × 2 in (5.1 cm) wide when pressed flat.
– After the border: 4 in (10.2 cm) × 2.75 in (7.0 cm).
If it’s too big: go down to a 1.25 mm hook, or work the tr stitches a little tighter.
If it’s too small or stiff: go up to a 1.75 mm hook. If the strip won’t curve, your fans are probably too tight. Relax the yarn-overs on the dc and tr stitches.
Navy Lace Center
Work with Color A (navy).
Foundation: Ch 38.
Row 1: Sc in 2nd ch from hook and in each ch across. Turn. (37 sc)
This row becomes the inner curve of the moon. Work it evenly, because its free loops will hold the silver outline later.
Row 2 (fan row): Ch 1. Sc in first sc.
– Sk 2 sc, Fan A in next sc, sk 2 sc, sc in next sc.
– Sk 2 sc, Fan B in next sc, sk 2 sc, sc in next sc.
– Sk 2 sc, Fan C in next sc, sk 2 sc, sc in next sc.
– Sk 2 sc, Fan C in next sc, sk 2 sc, sc in next sc.
– Sk 2 sc, Fan B in next sc, sk 2 sc, sc in next sc.
– Sk 2 sc, Fan A in next sc, sk 2 sc, sc in last sc.
Turn.
Stitch count: 7 sc + (5 + 7 + 9 + 9 + 7 + 5) fan sts = 49 sts total, in 6 fans.
Base check: 1 starting sc + 6 repeats × 6 base sts (sk 2, fan, sk 2, sc) = 37, which uses every stitch of Row 1.
The fans flare outward, so the outer edge of the strip is now much longer than the inner edge. That difference is what makes the strip curve. The short hdc fans make the tapered tips, and the tall tr fans make the wide middle of the crescent.
Row 3 (outer finishing row): Ch 1. Sc in first sc.
– Ch 1, sc in each st of the next fan, ch 1, sc in the next sc between fans. Rep from * 5 more times, ending with sc in the last sc.
Fasten off navy.
Stitch count: 7 sc (between fans and at the ends) + 42 sc (on the fans) = 49 sc, plus 12 ch-1 sps.
The ch-1 spaces let the outer edge spread without cupping, and they leave small open gaps between the fans that give the lacy look. Press the piece lightly with your fingers and check it against the size checkpoint above.
Border
Work with Color B (silver-gray).
Border gauge: the same 8 sc = 1 in (2.5 cm). Round 1 adds about 0.125 in (0.3 cm) all around. The trefoils on the outer curve and tips stick out a further 0.25 in (0.6 cm).
Round 1 (outline): With the RS facing, join silver with a standing sc in the first sc of Row 3 at one tip (call this Tip A).
- Outer curve: Work 1 sc in each sc and 1 sc in each ch-1 sp across Row 3. That gives 61 sc (49 + 12), including the standing sc.
- Tip B: Work 3 sc evenly across the row-ends of the tip: an outer corner, a point, and an inner corner.
- Inner curve: Work 1 sc in each free loop of the foundation chain. That gives 37 sc.
- Tip A: Work 3 sc evenly across the row-ends: an inner corner, a point, and an outer corner.
Join with a sl st to the first sc.
Stitch count: 61 + 3 + 37 + 3 = 104 sc.
Segments for Round 2:
– Outer segment: 1 corner + 61 + 1 corner = 63 sts between the two point stitches.
– Inner segment: 1 corner + 37 + 1 corner = 39 sts.
– Points: 2 stitches, one at each tip.
– Total: 63 + 39 + 2 = 104.
Corner stitches are counted once only, inside their own segment.
Round 2 (trefoil round): Ch 1, then work in this order:
1. Sc in the same st as the join and in the next sc (2 sc).
2. Tref in the next sc.
3. Sc in the next 3 sts, tref in the next st. Rep from * 13 more times (14 trefoils in this repeat).
4. Sc in the next 3 sts. The last of these is the Tip B outer corner.
5. Tip B point: Tref in the point st.
6. Inner curve: Sc in each of the next 39 sts.
7. Tip A point: Tref in the point st.
8. Sc in the last st (the Tip A outer corner).
Join with a sl st to the first sc. Do not fasten off yet.
Why the math works: The outer segment is 1 corner sc from the end of the round + 2 sc at the start + 1 tref + 14 × (3 sc + 1 tref) + 3 sc = 1 + 2 + 1 + 56 + 3 = 63 ✓. Each end of the outer segment has 3 sc before its first trefoil, so the spacing is symmetrical: 15 trefoils, each separated by 3 sc. The inner segment is 39 sc. Add the 2 tip trefoils and the round uses all 104 stitches: 87 sc + 17 trefoils.
Hanging loop: Sl st along the outer curve to the sc between the 4th and 5th trefoils from Tip B. This is the top of the moon when it hangs.
1. Ch 36.
2. Sl st into the same sc to form the loop.
3. Sl st in each ch around the loop to firm it up.
4. Sl st into the base sc.
Fasten off.
The loop measures about 1.5 in (3.8 cm). Weave in all ends along the stitches of the same color.
Final Blocking
- Soak the ornament in fabric stiffener, or dampen it and get it ready for spray starch.
- Gently squeeze out the extra liquid in a towel. Don’t wring it.
- Lay it on blocking foam with the RS up. Shape the crescent to 4 in (10.2 cm) tip to tip and 2.75 in (7.0 cm) wide.
- Pin each tip to a sharp point.
- Open each navy fan evenly with the tip of a pin.
- Pin the center picot of each trefoil so it points straight outward.
- Keep the inner curve smooth and pin it every 0.5 in (1.3 cm).
- Lay the hanging loop flat and straight.
- Let it dry completely, at least 12 hours, before you unpin it.
Final Quality-Control Checklist
- Row 1 has 37 sc, with no twists in the foundation chain.
- There are 6 fans in the order A, B, C, C, B, A, and their stitch counts are 5, 7, 9, 9, 7, 5.
- Row 3 has 49 sc and 12 ch-1 sps.
- Round 1 has 104 sc: 61 outer + 3 + 37 inner + 3.
- Round 2 has 15 trefoils on the outer curve, 1 on each tip, and a plain inner curve.
- The hanging loop is centered over the upper part of the outer curve.
- The finished size is 4 in (10.2 cm) × 2.75 in (7.0 cm).
- The ends are woven in securely and are invisible from the RS.
Troubleshooting
- The strip doesn’t curve: Your fans are too tight. Redo Row 2 with looser tall stitches, or use a hook one size larger for Row 2 only.
- The crescent curls into a ring: Your fans are too loose, or your Row 1 is too tight. Work Row 1 more loosely, or use hdc in place of tr for Fan C.
- The border ruffles on the outer curve: You may have worked 2 sc into some ch-1 spaces. Recount to make sure you have exactly 61.
- The inner curve puckers: Make sure you work into the free loops of the foundation chain, not into the sc stitches of Row 1.
- The trefoils lean or twist: Close each one with the sl st into the top of its own sc, then pin the trefoils firmly when you block.
- The tips look blunt: Work the 3 tip sc closely together, and pin the tips to a sharp point while blocking.
Care
Spot clean only with a damp cloth. Store the ornament flat in tissue paper, and re-starch it if it softens over time.
Final Notes
The measurement chain is short and easy to check:
– Row 1: 37 sc, measuring 4.625 in (11.7 cm) flat.
– Graded fans curve the strip into a navy crescent of 3.25 in × 2 in (8.3 cm × 5.1 cm).
– Round 1 adds 104 silver sc.
– Round 2 adds 17 trefoils.
– The finished moon measures 4 in × 2.75 in (10.2 cm × 7.0 cm), plus a 1.5 in (3.8 cm) hanging loop.
Check your counts at each stage and block it carefully, and you’ll have a little moon for your tree, a window, or a gift tag.
Happy crocheting!