

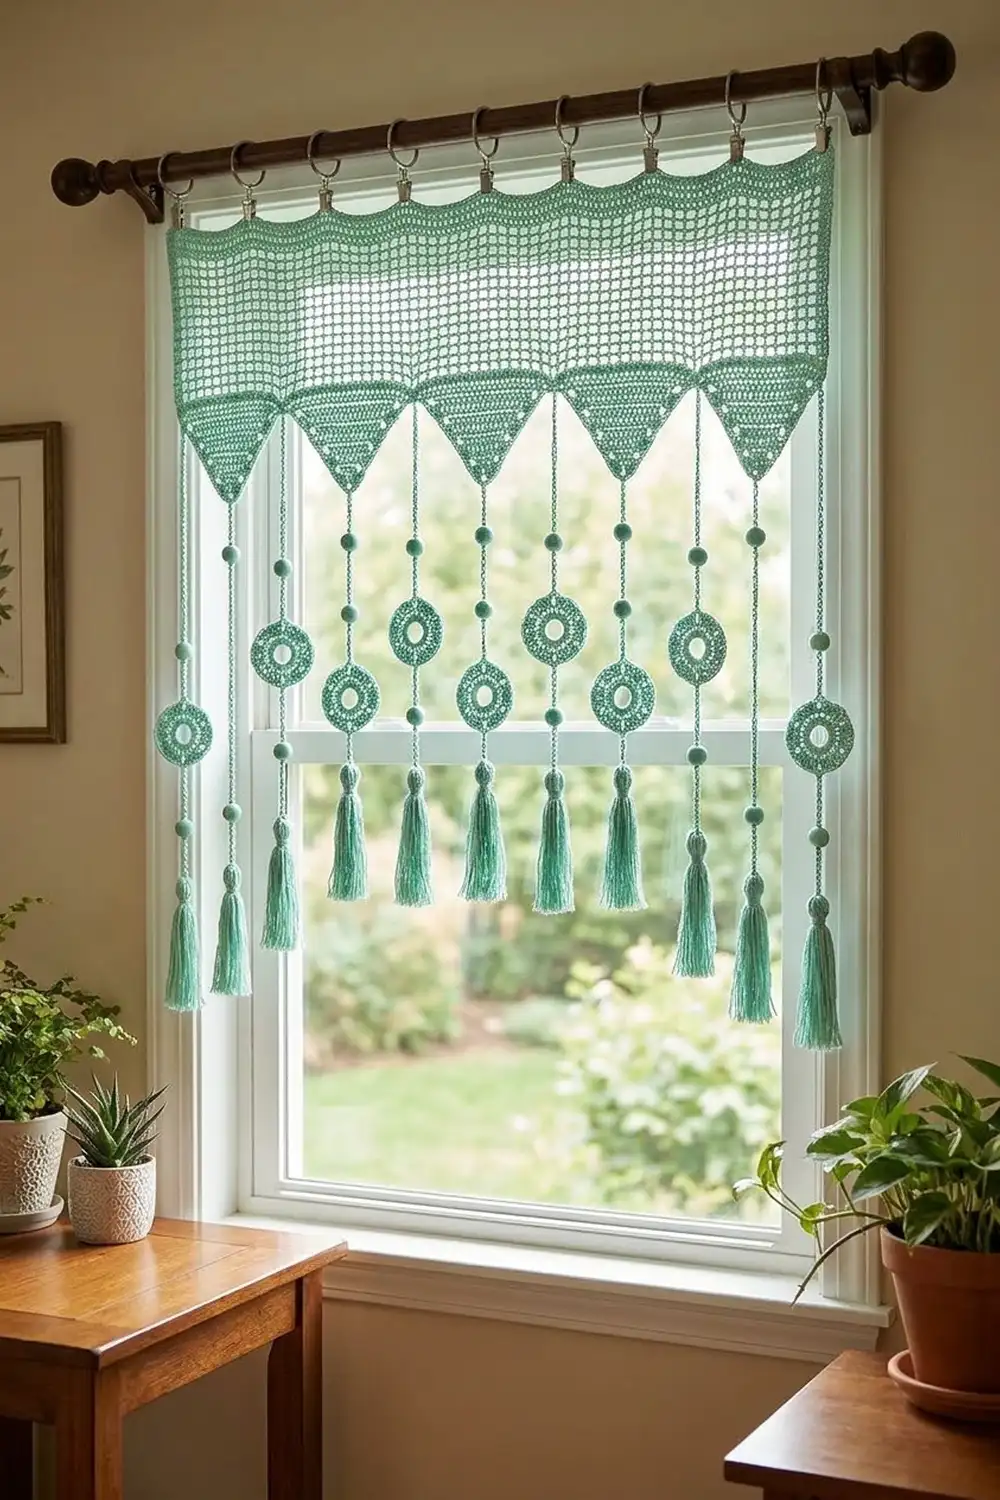
This valance hangs across the top of a window like a lace fringe. A band of filet mesh holds the curtain rings and small triangle points finish its lower edge. A chain strand drops from each point tip, decorated with round beads, open-centered lace medallions and full cotton tassels.
The whole valance is worked in one soft mint green, so the openwork and the light coming through it do the decorating. The style is cottage and boho. This pattern uses US crochet terms.
The finished valance measures 36.8 in (93.5 cm) wide and 26.2 in (66.5 cm) long from the top edge to the tassel tips.
You crochet the mesh header in rows, add nine sc points to its lower edge, then work a two-row sc border along the top and sides. The medallions, beads and tassels are made separately, and you chain each strand straight down from its point tip.
Finished Size and Construction
- Finished size: 36.8 in (93.5 cm) wide x 26.2 in (66.5 cm) long
- Skill level: Intermediate
- Terminology: US crochet terms
- Yarn weight: DK (weight 3) cotton
- Hook: 4.0 mm (G-6)
- Number of pieces: 1 header, 5 medallions, 35 beads, 9 tassels, 9 chain strands
- Layout: 9 strands from 9 points, alternating 5 medallion strands (1, 3, 5, 7, 9) with 4 bead strands (2, 4, 6, 8)
- Piece sizes: medallion 4 in (10.2 cm); bead 1 in (2.5 cm); tassel 4 in (10.2 cm); strand drop 20 in (50.8 cm)
- Header size before border: 36 in (91.4 cm) x 4 in (10.2 cm), plus points 1.8 in (4.6 cm) deep
- Border depth: 0.4 in (1.0 cm)
Materials
Choose a smooth mercerized or combed DK cotton. Cotton keeps the mesh square and the medallions crisp, and the strands won’t stretch much under the weight of the tassels.
- Mint green DK cotton: 200 g, approximately 440 m (four 50 g / 110 m balls)
Tools: 4.0 mm (G-6) hook, tapestry needle, scissors, 10 stitch markers, a stiff card 4.5 in (11.4 cm) tall for the tassels, tape measure, blocking mats and rust-proof pins, 10 clip curtain rings and a rod.
The yarn quantity includes a margin of about 15 percent for swatching and tassel trimming.
Abbreviations (US Terms)
- ch – chain
- sl st – slip stitch
- sc – single crochet
- hdc – half double crochet
- dc – double crochet
- sc2tog / sc3tog – single crochet 2 / 3 together
- sk – skip
- sp – space
- st(s) – stitch(es)
- RS – right side
Special stitch – Picot: ch 3, left open (not closed with a sl st) so it forms a joining loop at each petal tip.
Mesh square: ch 2, sk 2 sts, dc in next st. Each square uses 3 sts of the row below.
Gauge and Checkpoints
- Dc gauge: 18 dc and 9 rows = 4 in (10.2 cm)
- Sc gauge: 18 sc and 20 rows = 4 in (10.2 cm)
- Chain gauge: 9 ch = 2 in (5.1 cm)
Test one piece first. Make one medallion before anything else. It uses every stitch in the decorations and shows your tension quickly.
- Medallion after Round 2: 2 in (5.1 cm)
- Medallion after Round 3: 3 in (7.6 cm)
- Medallion after Round 5: 4 in (10.2 cm), picot to picot
- Header after Row 2: 36 in (91.4 cm) wide
- Header after Row 9: 4 in (10.2 cm) tall
- Each point: 3.8 in (9.7 cm) wide at the base, 1.8 in (4.6 cm) deep
Too big? Go down 0.5 mm in hook size. Too small? Go up 0.5 mm. Check the medallion again after any change, because a small error multiplies across the 36 in (91.4 cm) header.
Header
Ch 165.
Row 1 (RS): Dc in 4th ch from hook (skipped ch count as first dc), dc in each ch across, turn. (163 dc)
Row 2: Ch 3 (counts as dc throughout), dc in each st across, turn. (163 dc)
Checkpoint: 36 in (91.4 cm) wide.
Row 3: Ch 5 (counts as dc + ch 2), sk next 2 dc, dc in next dc, ch 2, sk 2 dc, dc in next dc, repeat from * across, ending in top of turning ch, turn. (55 dc, 54 mesh squares)
The math: 1 starting dc + 54 repeats of 3 sts = 163 sts.
Rows 4–8: Ch 5 (counts as dc + ch 2), dc in next dc, ch 2, dc in next dc, repeat across, turn. (55 dc, 54 mesh squares)
Row 9: Ch 3, 2 dc in next ch-2 sp, dc in next dc, repeat across. Fasten off. (1 + 54 x 3 = 163 dc)
Checkpoint: 4 in (10.2 cm) tall.
Points
The 163 sts of Row 9 divide as 1 skipped st, then 9 repeats of (17 point sts + 1 skipped st): 1 + 9 x 18 = 163. The points sit 18 sts, or 4 in (10.2 cm), apart, with one free st between them.
Number the Row 9 sts from right to left with the RS facing. Point 1 uses sts 2–18, Point 2 uses sts 20–36, and so on to Point 9 on sts 146–162.
Row 1: With RS facing, join yarn in st 2, ch 1, sc in same st and next 16 sts, turn. (17 sc)
Row 2: Ch 1, sc2tog, sc to last 2 sts, sc2tog, turn. (15 sc)
Rows 3–8: Repeat Row 2. (13, 11, 9, 7, 5, 3 sc)
Row 9: Ch 1, sc3tog. (1 st) Fasten off.
Skip 1 st and repeat Rows 1–9 for the remaining 8 points. Each point ends in a single tip st.
Border
The border runs along the top and both short sides of the header body. The pointed lower edge stays plain.
Border gauge: 18 sc per 4 in (10.2 cm). Along the top, 1 sc per foundation ch matches the 18-dc body gauge exactly. On the sides, each dc row is about 0.44 in (1.1 cm) tall and 2 sc also measure about 0.44 in (1.1 cm), so 2 sc per row-end lies flat.
Border Row 1: With RS facing, join yarn at the lower right corner of the header body. Work 2 sc in each row-end up the side (18 sc). Working into the foundation ch, 3 sc in first ch, sc in next 161 ch, 3 sc in last ch. Work 2 sc in each row-end down the left side (18 sc), turn.
Count: side 18, top edge 167 (161 + 3 + 3 corner sts), side 18. Total 203 sc.
Border Row 2: Ch 1, sc in each st, working 3 sc in the center sc of each corner group. Fasten off.
Count: side 18, top edge 171 (161 + 5 + 5 corner sts), side 18. Total 207 sc.
The border adds 0.4 in (1.0 cm) to each side and to the top. The header body now measures 36.8 in (93.5 cm) x 4.4 in (11.2 cm), and 6.2 in (15.7 cm) to the point tips.
Medallion (make 5)
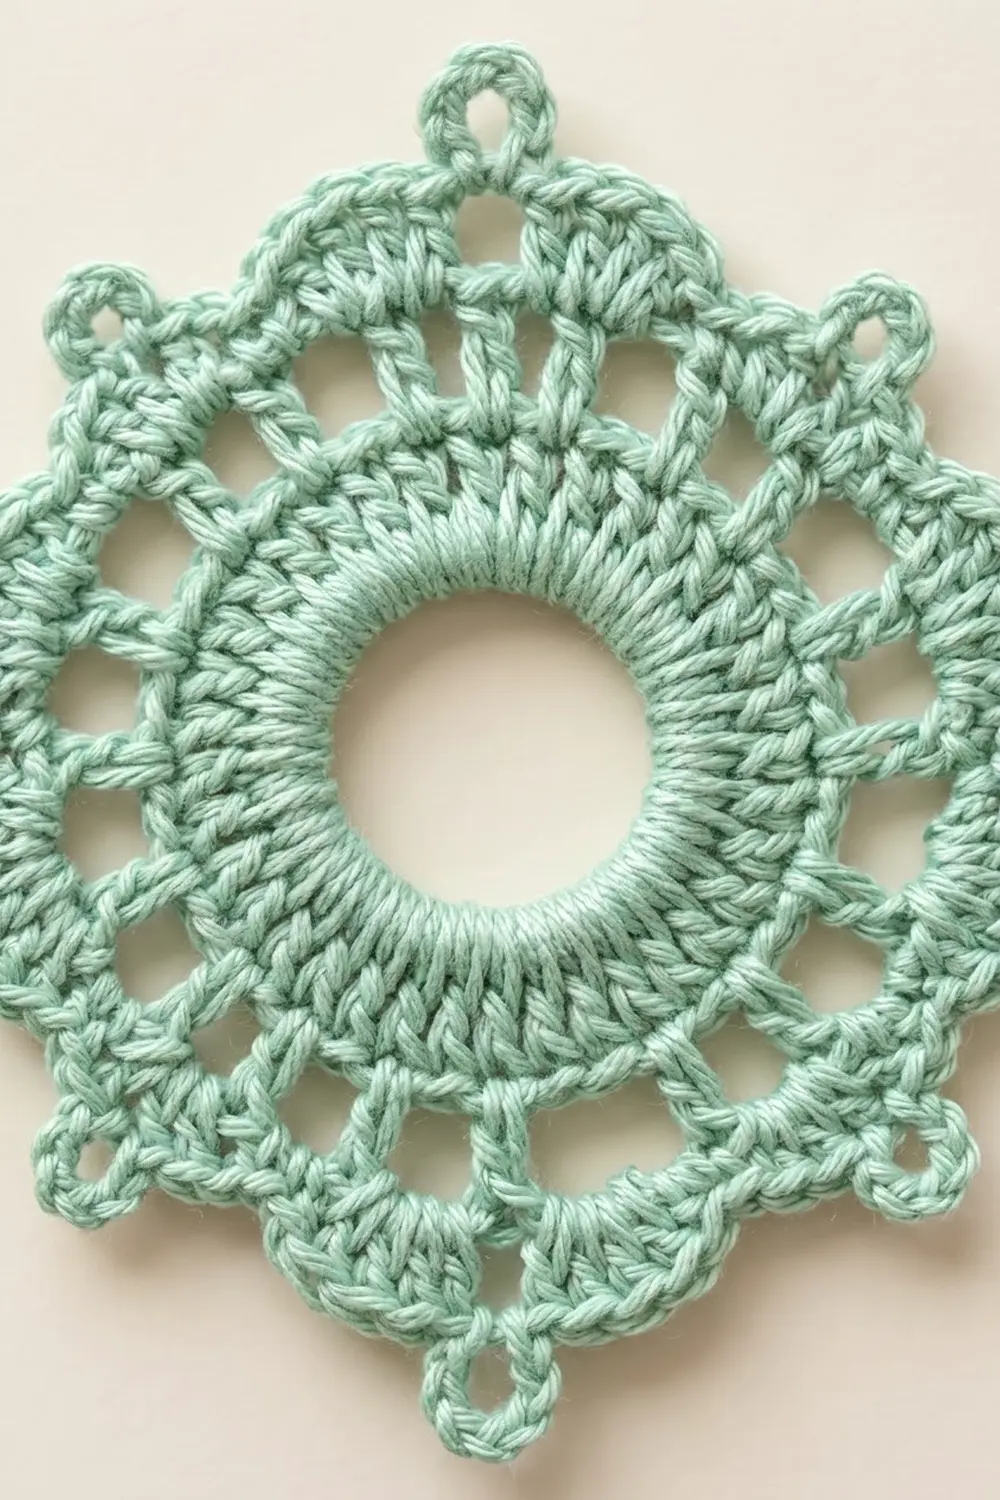
Each medallion has an open center, a dense dc ring, a round of dc spokes, a round of chain loops and eight petals with picot tips.
Ch 16, sl st to first ch to form a ring.
Round 1: Ch 3 (counts as dc), 31 dc into ring, sl st to top of ch-3. (32 dc)
Slide the stitches around the ring so they pack evenly. The center stays open, about 1 in (2.5 cm) across.
Round 2: Ch 3, dc in each dc around, sl st to top of ch-3. (32 dc) Checkpoint: 2 in (5.1 cm).
Round 3: Ch 5 (counts as dc + ch 2), sk next dc, dc in next dc, ch 2, sk next dc, repeat from * 14 more times, sl st to 3rd ch of ch-5. (16 dc, 16 ch-2 sps) Checkpoint: 3 in (7.6 cm).
Round 4: Sl st into first ch-2 sp, ch 1, sc in same sp, ch 5, sk next ch-2 sp, sc in next ch-2 sp, repeat from * 6 more times, ch 5, sl st to first sc. (8 sc, 8 ch-5 loops)
Round 5: In each ch-5 loop work (sc, hdc, 3 dc, picot, 3 dc, hdc, sc), sl st to first sc. Fasten off. (8 petals of 10 sts each = 80 sts, plus 8 picots)
Checkpoint: 4 in (10.2 cm). Mark the first petal’s picot as the top picot. Mark the fifth petal’s picot, directly opposite, as the bottom picot.
Bead (make 35)
Magic ring, ch 2 (does not count), 12 dc into ring, pull closed, sl st to first dc. (12 dc) Fasten off, leaving an 8 in (20.3 cm) sewing tail. Each bead is a solid circle about 1 in (2.5 cm) across.
Tassel (make 9)
Wrap yarn 20 times around the 4.5 in (11.4 cm) card. Tie a 10 in (25.4 cm) strand tightly under the wraps at the top, leaving long ends. Cut the bottom loops. Wrap a separate strand 6 times around the tassel 0.5 in (1.3 cm) below the top, knot it, and bury the ends inside. Trim to 4 in (10.2 cm).
Make All Pieces
- Medallions: 5, mint green
- Beads: 35, mint green (15 for medallion strands, 20 for bead strands)
- Tassels: 9, mint green
- Strands: 9, chained directly from the points
Layout, Point 1 to Point 9:
Point:   1   2   3   4   5   6   7   8   9
Strand:  M   B   M   B   M   B   M   B   M
M = bead, bead, medallion, bead, tassel
B = bead, bead, bead, bead, bead, tassel
Joining
Medallion strands (1, 3, 5, 7, 9): Join yarn with a sl st in the point’s tip st. Ch 36 and check that it measures 8 in (20.3 cm). Sl st into the top picot of a medallion and fasten off. Join yarn in the bottom picot and ch 18, checking for 4 in (10.2 cm). Fasten off, leaving a 6 in (15.2 cm) tail. Knot the tassel’s top ties around the last ch and bury the ends in the tassel head. Sew beads over the upper chain at ch 12 and ch 24, and over the lower chain at ch 9.
Bead strands (2, 4, 6, 8): Join yarn in the point’s tip st and ch 72, checking for 16 in (40.6 cm). Fasten off and attach a tassel as above. Sew beads over the chain at ch 12, 24, 36, 48 and 60.
Stitch-to-stitch logic: each strand starts in the single st left by the sc3tog, so it hangs from the exact center of its point. Each bead is sewn through its center and around the chain behind it, so the chain seems to go in at the top of the bead and come out at the bottom.
Tension: keep the chains firm and even. A loose chain stretches under the tassel, and that strand will hang low.
Size checkpoint: every strand drops 20 in (50.8 cm) from point tip to tassel tip. For medallion strands that is 8 + 4 + 4 + 4 in (20.3 + 10.2 + 10.2 + 10.2 cm), and for bead strands 16 + 4 in (40.6 + 10.2 cm).
Rings: clip 10 rings to the top border above foundation sts 1, 19, 37 and every 18 sts after, ending at st 163. They sit 4 in (10.2 cm) apart.
Final Blocking
- Soak the valance in cool water for 15 minutes and press it in a towel. Do not wring.
- Pin the header body to 36.8 in (93.5 cm) x 4.4 in (11.2 cm), keeping the mesh lines straight.
- Pin each point to a sharp tip 1.8 in (4.6 cm) below the body.
- Pin each medallion’s 8 picots out to 4 in (10.2 cm). Put a pin in the center opening to keep it round.
- Let everything dry flat.
- Hang the valance for a day so the strands settle, then steam the tassels and trim the tips level.
Final Quality-Control Checklist
- Header body is 36.8 in (93.5 cm) x 4.4 in (11.2 cm)
- 54 even mesh squares in every mesh row
- 9 points, one free st between each
- 5 medallions at 4 in (10.2 cm), picots lined up with the strand
- 35 beads centered over their chains
- 9 tassels at 4 in (10.2 cm)
- Every strand drops 20 in (50.8 cm)
- All ends woven in
Troubleshooting
Header waves: your dc gauge is loose. Check it again against 18 dc per 4 in (10.2 cm) and go down a hook size.
Mesh squares lean: work each dc into the dc below, never into a chain space.
Points curl: keep the decreases snug and block firmly.
Medallion cups: use ch 3 instead of ch 2 in Round 3 and check the 3 in (7.6 cm) measurement again.
Medallion ruffles: tighten the ch-5 loops in Round 4.
Strands uneven: recount the chains and let the valance hang before trimming.
Care
Hand wash in cool water with mild soap and dry flat, blocking the header again. Shake out the tassels gently while damp.
Final Notes
The measurement chain is simple. A 4 in (10.2 cm) medallion confirms your gauge. The header’s 163 sts hold 54 mesh squares across 36 in (91.4 cm), and the border brings it to 36.8 in (93.5 cm). Nine 18-st points fit exactly. Nine 20 in (50.8 cm) strands below the 6.2 in (15.7 cm) header give the full 26.2 in (66.5 cm) length.
Happy crocheting!