

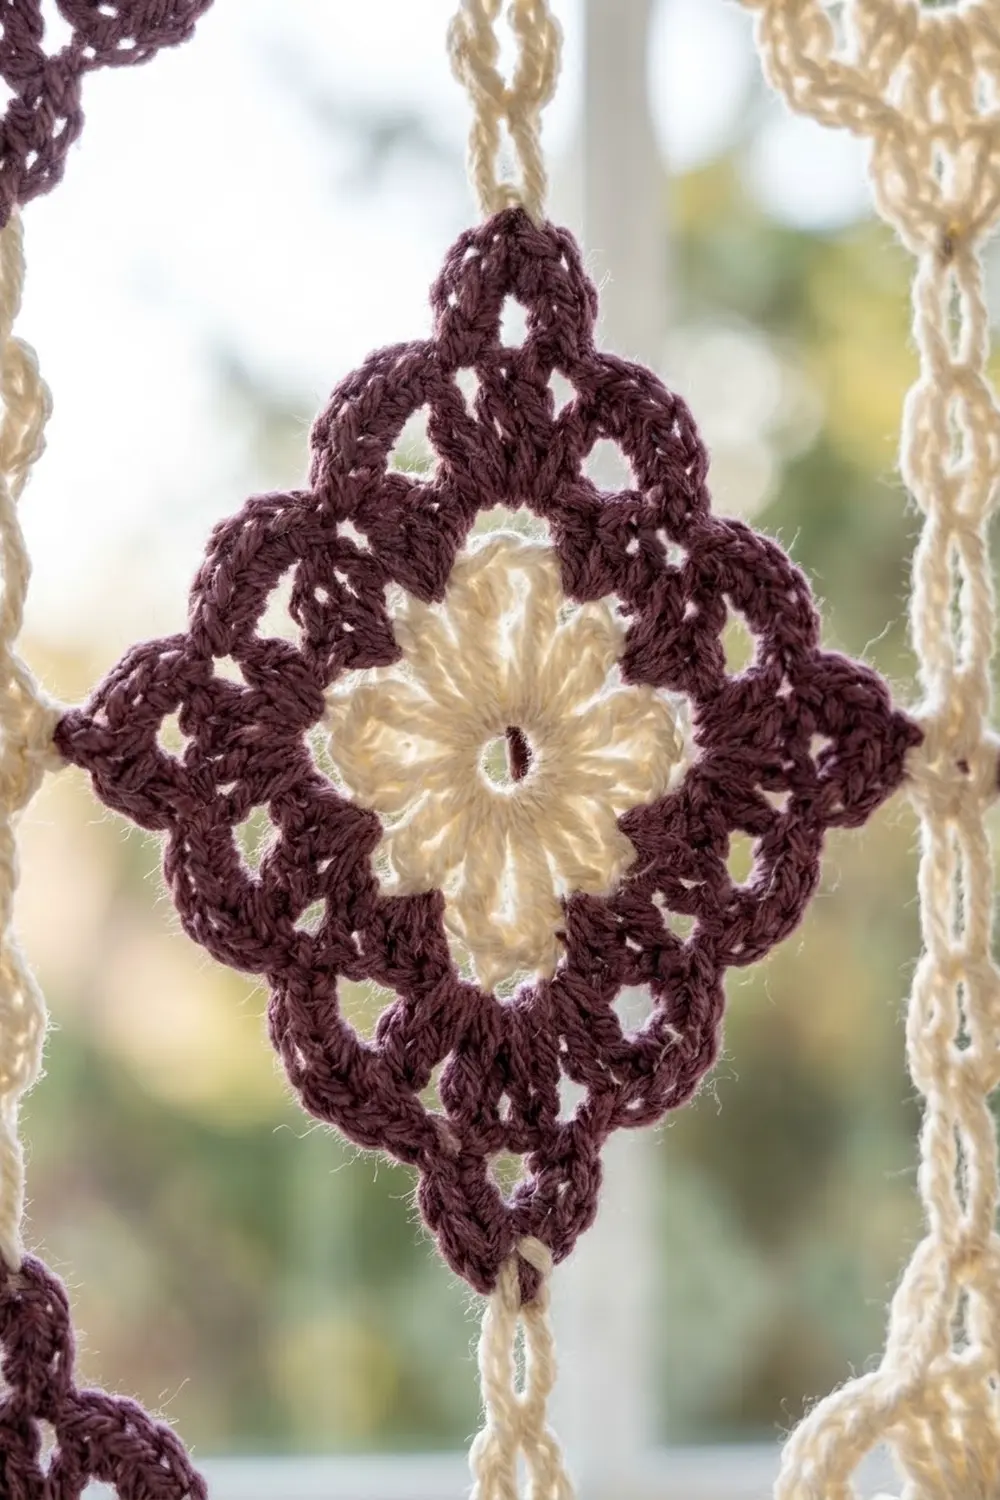
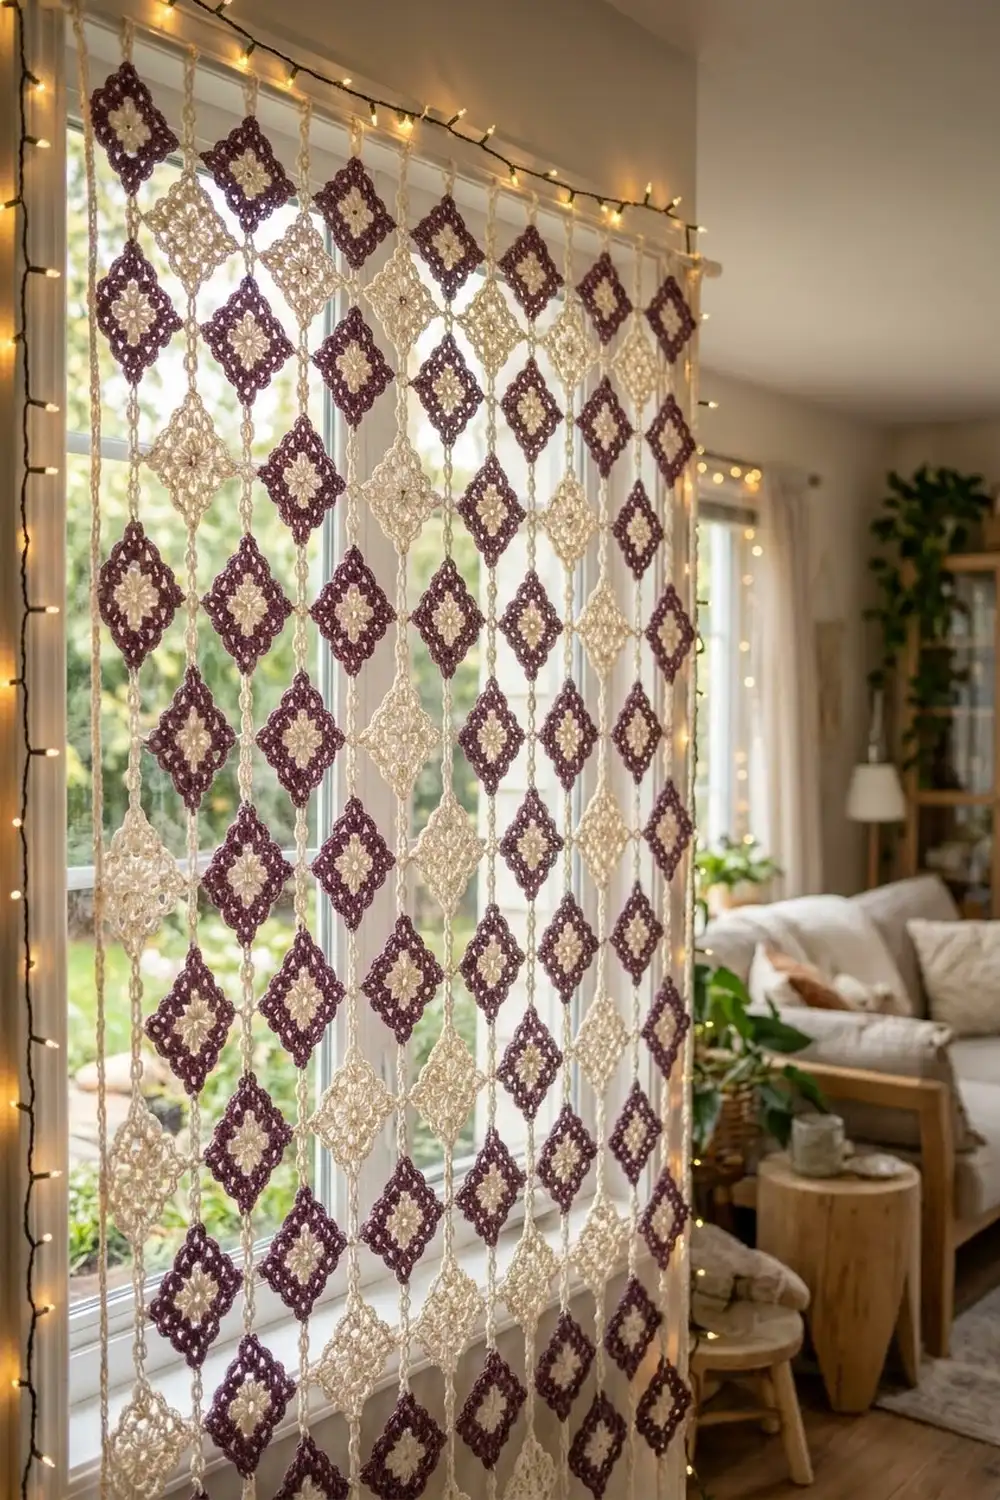
The Mulberry Lattice Curtain is a single large hanging made of 42 joined diamond motifs that glow against window light. Each motif is a granny square turned on point. It has a solid outer diamond, an open lattice middle, and a popcorn flower at the center.
The outer diamonds alternate between burgundy and cream in a checkerboard. Each center flower is worked in the contrasting color: cream flowers in burgundy motifs, burgundy flowers in cream motifs. Delicate cream chain-link strands connect the motifs point to point, forming seven vertical columns that hang from a cream header band.
This pattern uses US crochet terms. The finished curtain measures 55 in (139.7 cm) wide by 55.5 in (141.0 cm) long, including a 1.5 in (3.8 cm) rod-pocket header.
Construction is simple. You make 42 motifs in the round, then link them into seven columns with chain-link strands. Last, you crochet a header band, fold it into a rod pocket, and sew the top of each column to it.
Finished Size and Construction
- Finished size: 55 in (139.7 cm) wide × 55.5 in (141.0 cm) long
- Skill level: Intermediate
- Terminology: US crochet terms
- Yarn weight: #3 light (DK) cotton
- Hooks: 3.5 mm (E-4) for motifs and strands; 4.0 mm (G-6) for the header
- Number of pieces: 42 motifs, 42 chain-link strands, 1 header band
- Layout: 7 columns × 6 motifs, hung on point
- Motif size: 5 in (12.7 cm) per side, about 7 in (17.8 cm) point to point
- Size before border: 55 in (139.7 cm) wide × 54 in (137.2 cm) long (motifs plus strands)
- Border depth: 1.5 in (3.8 cm) folded header, top edge only
Materials
Use a smooth, mercerized or milk cotton in DK weight. Cotton holds the crisp diamond shape and hangs straight without stretching. Avoid fuzzy yarns, because they blur the lattice.
- Burgundy: 300 g (about 750 m), based on 125 m per 50 g
- Cream: 400 g (about 1,000 m), based on 125 m per 50 g
Tools:
– 3.5 mm (E-4) hook
– 4.0 mm (G-6) hook
– Tapestry needle
– Stitch markers
– Rust-proof pins and a blocking mat
– Measuring tape
– Spray bottle
Quantities include a margin of about 10 percent for swatching and gauge differences.
Abbreviations (US Terms)
- ch – chain
- sl st – slip stitch
- sc – single crochet
- dc – double crochet
- sp(s) – space(s)
- st(s) – stitch(es)
- rep – repeat
Popcorn (pc): Work 5 dc in the indicated space. Remove the hook from the loop, insert it front to back through the top of the first dc, pick up the dropped loop, and pull it through. Ch 1 to close.
Beginning popcorn (beg pc): Ch 3 (counts as the first dc), then work 4 dc. Finish as for a popcorn, inserting the hook into the top of the ch-3.
Link unit: Ch 2, ch 5, sl st in 5th ch from hook. This forms one small ring, about 0.5 in (1.3 cm) long.
Gauge and Checkpoints
Make one complete motif before committing to all 42. Block it, then measure it against these checkpoints:
- After Rnd 1: flower is 1.5 in (3.8 cm) across
- After Rnd 2: 2 in (5.1 cm) per side
- After Rnd 3: 3 in (7.6 cm) per side
- After Rnd 4: 3.75 in (9.5 cm) per side
- After Rnd 5: 4.5 in (11.4 cm) per side
- After Rnd 6: 5 in (12.7 cm) per side, about 7 in (17.8 cm) point to point
Header gauge (4.0 mm hook): 5 sc and 5 rows = 1 in (2.5 cm). Swatch 20 sc × 10 rows. It should measure 4 in (10.2 cm) × 2 in (5.1 cm).
If your motif is too big: go down 0.25 mm in hook size, or tighten the ch-3 lattice spaces.
If your motif is too small: go up 0.25 mm in hook size.
A difference of 0.25 in (0.6 cm) per motif adds up to 1.5 in (3.8 cm) down a column, so match the gauge closely.
Diamond Motif
Work with the 3.5 mm hook. Color A is the flower color and Color B is the outer color. For burgundy motifs, A is cream and B is burgundy. For cream motifs, A is burgundy and B is cream.
Rnd 1 (Color A, popcorn flower): Make a magic ring. Work beg pc in the ring, ch 3. Then work [pc in ring, ch 3] 7 times. Sl st to the top of the beg pc and fasten off.
(8 popcorns, 8 ch-3 sps)
Rnd 2 (Color B, lattice): Join B in any ch-3 sp. Ch 3 (counts as dc), then work (2 dc, ch 3, 3 dc) in the same sp for the first corner. Ch 3, sc in the next sp, ch 3. Work (3 dc, ch 3, 3 dc) in the next sp, ch 3, sc in the next sp, ch 3. Rep from * 2 more times. Sl st to the top of the beg ch-3.
(24 dc, 4 sc, 4 corner ch-3 sps, 8 side ch-3 sps. Each side has 3 dc, 2 ch-3 sps, 1 sc, 3 dc.)*
Rnd 3 (lattice): Sl st in the next 2 dc and into the corner sp. Ch 3, then work (2 dc, ch 3, 3 dc) in the same sp. Work [ch 3, sc in next ch-3 sp] 2 times, ch 3, then (3 dc, ch 3, 3 dc) in the corner sp. Rep from * 2 more times. Work [ch 3, sc in next ch-3 sp] 2 times, ch 3, and sl st to the top of the beg ch-3.
(24 dc, 8 sc, 12 side ch-3 sps, or 3 per side)*
Rnd 4 (lattice): Work as Rnd 3, but repeat the [ch 3, sc in next ch-3 sp] bracket 3 times on each side.
(24 dc, 12 sc, 16 side ch-3 sps, or 4 per side)
The dc corner groups keep the square sharp. The ch-3 mesh between them forms the open lattice.
Rnd 5 (solid outer diamond, conversion round): Sl st in the next 2 dc and into the corner sp. Ch 3, then work (dc, ch 2, 2 dc) in the same sp. Dc in each of the next 3 dc. Work [3 dc in next ch-3 sp, dc in next sc] 3 times, then 3 dc in the next ch-3 sp. Dc in each of the next 3 dc. Work (2 dc, ch 2, 2 dc) in the corner sp. Rep from , omitting the last corner on the final repeat. Sl st to the top of the beg ch-3.
This round converts the lattice into solid fabric. It does not continue the lattice growth. Here is the count:
- 24 dc, worked 1 into each existing dc
- 12 dc, worked 1 into each sc
- 48 dc, worked 3 into each of the 16 ch-3 sps
- 16 dc, worked 4 at each of the 4 corners
- Total: 100 dc, plus 4 ch-2 corner sps. Each side has 25 dc between corner sps.
Rnd 6 (trim): Ch 1. Sc in each dc around, and work 3 sc in each ch-2 corner sp. Sl st to the first sc and fasten off.
The count is 100 sc (1 per existing dc) plus 12 sc (3 per corner) = 112 sc. Each side has 29 sc, including the center corner sc at each end. Each center corner sc is shared by two sides, so 4 × 29 − 4 = 112.
The center sc of each corner is a point stitch. Mark the top and bottom point stitches; the strands attach there.
Weave in the ends. Wet block the motif to 5 in (12.7 cm) per side and let it dry.
Make All Pieces
Motifs:
– 21 burgundy-outer motifs (Color A cream, Color B burgundy)
– 21 cream-outer motifs (Color A burgundy, Color B cream)
Strands (cream):
– 35 link strands between motifs (5 per column)
– 7 hanger strands (1 per column)
Header: 1 cream band
Layout grid (rows listed top to bottom; colors refer to the outer diamond):
ROW 1: BURGUNDY CREAM BURGUNDY CREAM BURGUNDY CREAM BURGUNDY
ROW 2: CREAM BURGUNDY CREAM BURGUNDY CREAM BURGUNDY CREAM
ROW 3: BURGUNDY CREAM BURGUNDY CREAM BURGUNDY CREAM BURGUNDY
ROW 4: CREAM BURGUNDY CREAM BURGUNDY CREAM BURGUNDY CREAM
ROW 5: BURGUNDY CREAM BURGUNDY CREAM BURGUNDY CREAM BURGUNDY
ROW 6: CREAM BURGUNDY CREAM BURGUNDY CREAM BURGUNDY CREAM
Burgundy rows 1, 3, and 5 hold 4 burgundy motifs each, for 12. Rows 2, 4, and 6 hold 3 each, for 9. That gives 21 burgundy motifs, and the same logic gives 21 cream.
Joining
Lay out each column on a flat surface, with motifs on point and spaced 2 in (5.1 cm) apart point to point.
Link strand (between motifs): With the 3.5 mm hook, join cream with a sl st in the bottom point stitch of the upper motif. Work 4 link units, then ch 2. Sl st in the top point stitch of the motif below and fasten off.
Hanger strand (top of each column): Join cream in the top point stitch of the column’s first motif. Work 4 link units, then ch 2. Fasten off, leaving an 8 in (20.3 cm) tail for sewing to the header.
Stitch-to-stitch logic: Strands attach only at the center corner sc of Rnd 6. Never attach in a side stitch. Attaching off-center tilts the diamond and breaks the straight column line.
Tension: Keep your chains even and slightly firm. Loose chains stretch under the weight of the motifs and lengthen the column.
Checkpoint: Hang each finished column from its hanger tail for 10 minutes. It should measure 54 in (137.2 cm) from the hanger end to the bottom point:
- 6 motifs × 7 in (17.8 cm) = 42 in (106.7 cm)
- 6 strands × 2 in (5.1 cm) = 12 in (30.5 cm)
If a column hangs long, rework its strands with 3 link units plus ch 3.
Border (Top Header Band)
The header is the curtain’s only border, worked along the top edge. It is worked on its own foundation chain with the 4.0 mm hook, at 5 sc per inch. It is not picked up from the motif edges, so the motif stitch counts do not enter its count.
Row 1: Ch 276. Sc in the 2nd ch from the hook and in each ch across. Turn.
(275 sc)
Rows 2–15: Ch 1, sc in each st across, turn.
(275 sc per row)
The band now measures 55 in (139.7 cm) × 3 in (7.6 cm). Each long edge has 275 sts, and each short end has 15 rows.
Row 16 (seam row): Fold the band along Row 8 so Row 15 lies against the foundation chain. Working through both layers, sl st in each st across.
(275 sl st)
Leave both short ends open. The folded header is 1.5 in (3.8 cm) deep and fits a rod up to 0.75 in (1.9 cm) in diameter.
Attach the columns: Sew each hanger tail securely to the seam row at stitches 18, 58, 98, 138, 178, 218, and 258, in that order from left to right.
Why the math works:
- Each column is 7 in (17.8 cm) wide, with a 1 in (2.5 cm) gap between columns. That makes an 8 in (20.3 cm) pitch, or 40 sts at 5 sc per inch.
- Six pitches use 240 sts.
- The remaining 35 sts split as 17 margin sts on each end, plus half of each end column’s attachment stitch. That equals 3.5 in (8.9 cm), exactly half a motif width.
- As a result, the outer motif points align with the header ends: 240 + 17 + 17 + 1 = 258, and 258 + 17 = 275.
- Stitch 138 is the exact center of 275 sts, so the layout is symmetrical.
Final Blocking
- Hang the curtain from its rod, or lay it flat on a large clean surface.
- Mist all motifs and strands until damp, but not soaked.
- If the curtain is flat, pin each motif to 5 in (12.7 cm) per side, with the points aligned vertically.
- Straighten the strands to 2 in (5.1 cm) each, without overstretching them.
- Steam the header lightly so it lies flat and the fold is crisp.
- Let the curtain dry completely, about 24 hours.
- Rehang it and confirm the length is 55.5 in (141.0 cm) overall.
Final Quality-Control Checklist
- [ ] There are 42 motifs, each 5 in (12.7 cm) per side.
- [ ] The checkerboard matches the layout grid.
- [ ] Every flower contrasts with its outer diamond.
- [ ] All strands attach at point stitches.
- [ ] All columns hang at 54 in (137.2 cm).
- [ ] The header has 275 sts and measures 55 in (139.7 cm).
- [ ] The columns are attached at stitches 18, 58, 98, 138, 178, 218, and 258.
- [ ] All ends are woven in securely.
Troubleshooting
Motif cups or bowls: Your lattice chains are too tight. Loosen the ch-3 spaces or go up a hook size.
Motif ruffles: Your Rnd 5 dc is too loose. Check that you are working exactly 3 dc per ch-3 sp.
Popcorns lie flat: Close each popcorn firmly, and push it to the right side before working the next one.
Diamonds tilt: A strand is attached off-center. Reattach it to the center corner sc.
Columns are uneven in length: Count the link units on every strand, then re-block the curtain while it hangs.
Header too long or short: Recheck your 5 sc per inch gauge. Remake the header rather than adjusting the attachment points.
Columns twist: Block the curtain while it hangs, and make sure all motifs face the right side out.
Care
Hand wash in cool water with mild soap. Roll the curtain in a towel to remove water, then dry it flat or rehang it to dry.
Final Notes
The whole curtain depends on one measurement chain. Each motif is 5 in (12.7 cm) per side and 7 in (17.8 cm) point to point. Six motifs and six 2 in (5.1 cm) strands make a 54 in (137.2 cm) column. Seven columns at an 8 in (20.3 cm) pitch fill a 275-stitch, 55 in (139.7 cm) header. The 1.5 in (3.8 cm) header brings the total length to 55.5 in (141.0 cm).
Optional: for a wider window, add columns in pairs and extend the header by 40 sc per column.
Check your gauge at every stage, and the pieces will fit together exactly.
Happy crocheting!