

This runner is a strip of lacy diamonds in deep burgundy cotton. Each diamond is a small square motif turned on point. It has an open center ring, a four-petal flower of fanned treble crochet, a chain-loop frame and a sturdy edge of single crochet. The motifs touch only at their tips, so the table shows through the diamond-shaped windows between them.
The design uses one color, and all the texture comes from the stitches. Glossy mercerized cotton shows off the petals and the rope-like edges, and the tassels give each end some weight so the runner hangs neatly over the table edge. It suits a holiday table, but it also works year-round in other colors.
The pattern uses US crochet terms. The finished runner is 15 in (38.1 cm) wide and 60 in (152.4 cm) long from point to point. With a 4 in (10.2 cm) tassel at each end, the total length is 68 in (172.7 cm).
You make 36 identical motifs and join them as you go in the last round of each motif. The layout is 3 motifs wide and 12 motifs long, and each motif joins its neighbors only at the corner loops. To finish, you add six tassels and block the runner.
Finished Size and Construction
- Finished size: 15 in x 60 in (38.1 cm x 152.4 cm), plus tassels: 15 in x 68 in (38.1 cm x 172.7 cm) in total
- Skill level: Intermediate
- Terminology: US crochet terms
- Yarn weight: DK (light worsted, #3) mercerized cotton
- Hook: 4.0 mm (G-6)
- Number of pieces: 36 motifs plus 6 tassels
- Layout: 3 motifs wide x 12 motifs long, set on point
- Motif size: 5 in (12.7 cm) point to point, sides 3.5 in (8.9 cm)
- Size before border: 15 in x 60 in (38.1 cm x 152.4 cm). This is also the final size, because no separate border is added.
- Border depth: 0 in (0 cm). Round 6 of each motif is the edge.
Materials
Yarn: Use a smooth DK mercerized cotton or cotton blend at about 113 m per 50 g. Mercerized cotton holds the petal shapes and blocks crisply. A soft, fuzzy yarn would hide the lace.
- Burgundy: 300 g, about 678 m. That covers about 216 g for the motifs, about 36 g for the tassels, and the rest as a margin.
All quantities include a safety margin of about 15%. Buy all the yarn from the same dye lot.
Tools:
– 4.0 mm (G-6) crochet hook
– Tapestry needle
– Sharp scissors
– A stiff card 4.5 in (11.4 cm) tall, for the tassels
– Blocking mats and rustproof pins
– Spray bottle
– Measuring tape
Abbreviations (US Terms)
- ch: chain
- sl st: slip stitch
- sc: single crochet
- tr: treble crochet
- sp(s): space(s)
- st(s): stitch(es)
- rep: repeat
- JAYGO: join-as-you-go
Special stitch: joined corner. Work 3 sc in the corner loop and ch 1. Remove your hook and insert it from front to back through the matching ch-3 corner loop of the finished neighbor motif. Pick up the dropped loop and sl st. Then ch 1 and work 3 sc in the same corner loop of the current motif. The ch 1 + sl st + ch 1 takes the place of the ch-3, so the stitch counts don’t change.
Gauge and Checkpoints
Make one complete motif and block it before you start the full runner. Use these checkpoints:
- After Round 1: the ring is about 1 in (2.5 cm) across.
- After Round 3: the flower is about 2.75 in (7.0 cm) from one petal tip to the opposite tip.
- After Round 5: the motif is about 4.5 in (11.4 cm) point to point.
- After Round 6: the motif is 5 in (12.7 cm) point to point, with 3.5 in (8.9 cm) sides.
The Round 6 edge gauge is 6 sc = 1 in (2.5 cm), so the 21 sc on each side measure 3.5 in (8.9 cm).
If your motif is too big: go down to a 3.75 mm hook and keep the Round 4 and Round 5 chains snug.
If your motif is too small: go up to a 4.5 mm hook.
Each 0.25 in (0.6 cm) of difference per motif adds up to 3 in (7.6 cm) over the 12-motif length, so match the gauge before you continue.
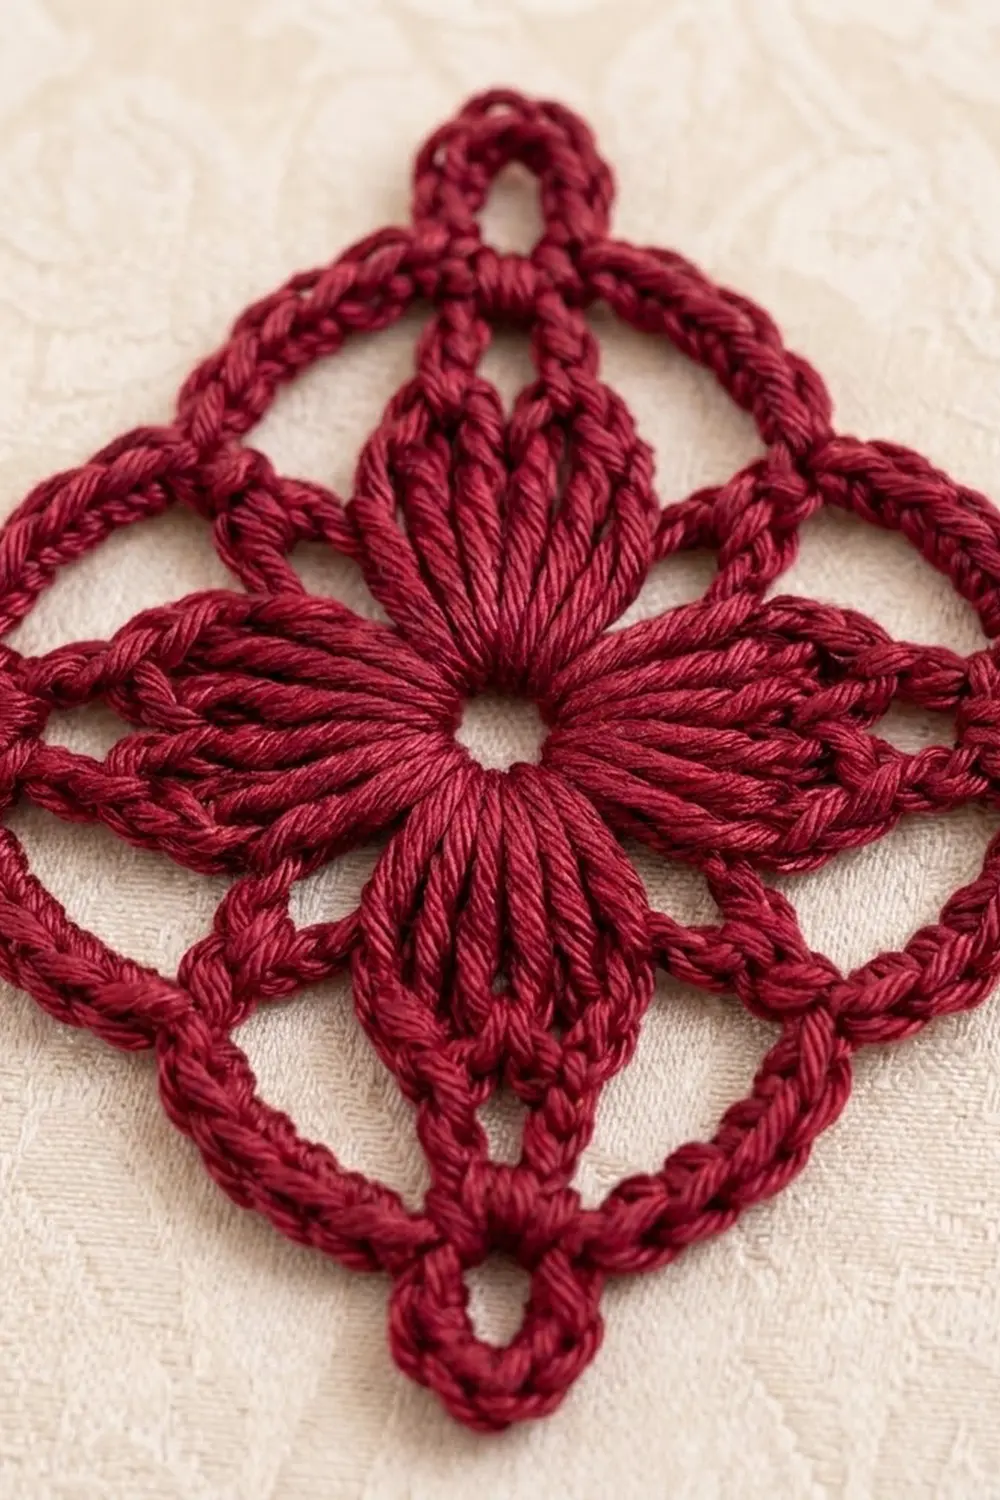
Motif (make 36)
You work every motif in joined rounds with the right side facing. Don’t turn between rounds.
Round 1: Ch 6 and sl st to the first ch to form a ring. Ch 1, then work 16 sc into the ring. Sl st to the first sc. (16 sc)
Round 2: Ch 1. Sc in the same st, then ch 5 and skip the next 3 sts. Sc in the next st, ch 5, skip 3 sts. Rep from * twice more. Sl st to the first sc. (4 sc, 4 ch-5 sps)
The 4 sc mark the spaces between the petals, and each ch-5 sp will hold one petal.
Round 3 (petals): Sl st into the first ch-5 sp. Ch 4 (counts as the first tr), then work 8 tr in the same sp. Sc in the next sc. Work 9 tr in the next ch-5 sp, then sc in the next sc. Rep from * twice more. The last sc goes into the base sc from Round 2. Sl st to the top of the beginning ch-4. (36 tr in 4 petals of 9 tr, 4 sc = 40 sts)
Each 9-tr fan opens out from the center and forms one petal. The 5th tr of each fan is the petal tip, and each tip becomes a corner of the diamond.
Round 4 (spokes): Sl st in each of the next 4 tr so you reach the 5th tr of the petal. Ch 1, then work (sc, ch 3, sc) in the same st for the corner. Ch 4, tr in the next sc between petals, ch 4, (sc, ch 3, sc) in the 5th tr of the next petal. Rep from * twice more. Ch 4, tr in the last sc between petals, ch 4, and sl st to the first sc. (8 sc, 4 tr, 4 ch-3 corner sps, 8 ch-4 sps)
The tr between the petals are the short spokes, and they push the middle of each side outward.
Round 5 (lace frame): Sl st into the first ch-3 corner sp. Ch 1, then work (sc, ch 5, sc) in the same sp. [Ch 4, sc in the next ch-4 sp] twice, ch 4, (sc, ch 5, sc) in the next corner sp. Rep from * twice more. [Ch 4, sc in the next ch-4 sp] twice, ch 4, and sl st to the first sc. (16 sc, 4 ch-5 corner loops, 12 ch-4 loops: 3 per side)
Round 6 (rope edge): Sl st into the first ch-5 corner loop. Ch 1, then work (3 sc, ch 3, 3 sc) in the same loop. Work 5 sc in each of the next 3 ch-4 loops, then (3 sc, ch 3, 3 sc) in the next corner loop. Rep from * twice more. Work 5 sc in each of the last 3 ch-4 loops and sl st to the first sc. Fasten off.
Counts per side: 3 + 15 + 3 = 21 sc. The 4 ch-3 corner loops are separate and are not counted as stitches. (84 sc in total)
The sc packed over the chain loops make the firm, rope-like edge, and the ch-3 loops sit at the 4 points of the diamond.
For the first motif, follow the pattern as written. From the second motif on, work Round 6 with joined corners as described below.
Make All Pieces
- Burgundy motifs: 36 (3 per row, 12 rows)
- Tassels: 6 (3 per end)
Layout grid (columns A–C, rows 1–12; ◆ = one motif on point):
     A   B   C
 1   ◆   ◆   ◆
 2   ◆   ◆   ◆
 3   ◆   ◆   ◆
 4   ◆   ◆   ◆
 5   ◆   ◆   ◆
 6   ◆   ◆   ◆
 7   ◆   ◆   ◆
 8   ◆   ◆   ◆
 9   ◆   ◆   ◆
10   ◆   ◆   ◆
11   ◆   ◆   ◆
12   ◆   ◆   ◆
Every motif’s points face up, down, left and right. Its left and right points touch the neighbors in its row, and its top and bottom points touch the motifs above and below it in its column.
Joining
Method: join as you go in Round 6, at the corner loops only. The sides never join, so each side keeps all 21 sc and the diamond-shaped openings stay clear.
Order: work across each row from left to right, A, then B, then C.
- A1: Make it complete, with no joins.
- B1: Join its left corner to A1’s right corner.
- C1: Join its left corner to B1’s right corner.
- A2: Join its top corner to A1’s bottom corner.
- B2: Join its top corner to B1’s bottom corner and its left corner to A2’s right corner.
- C2: Join its top corner to C1’s bottom corner and its left corner to B2’s right corner.
- Continue the same way down to row 12.
A motif never needs more than 2 joins (top and left), so it’s easy to keep track of which corner you’re on. Before you start Round 6, rotate the motif so the corner you’ll join is in the right position.
Stitch-to-stitch logic: each join replaces one ch-3 loop with ch 1, sl st, ch 1. The 3 sc on each side of the corner stay the same, so both motifs keep their 21-sc sides. The joined loops meet tip to tip, so the motifs are spaced exactly 5 in (12.7 cm) apart, center to center.
Total joins: 3 columns x 11 vertical joins = 33. Then 2 joins per row x 12 rows = 24. That makes 57 joins in total.
Tension: keep the ch 1 on each side of the sl st as loose as a normal chain. If you pull them tight, the points pucker and the runner gets shorter.
Size checkpoint: after row 2, the runner should be 15 in (38.1 cm) wide from the left point of A to the right point of C. It should be 10 in (25.4 cm) long from the top points of row 1 to the bottom points of row 2. After row 6 it should be 30 in (76.2 cm) long.
Border and Tassels
This runner has no added border. Round 6 of each motif is the finished edge, and that zigzag edge is part of the design. The border gauge is the Round 6 gauge: 6 sc = 1 in (2.5 cm).
Exposed edge counts:
– Each long side: 12 motifs x 2 outer sides x 21 sc = 504 sc. The 12 outer side points (the left points of column A, or the right points of column C) stay unjoined.
– Each short end: 3 motifs x 2 outer sides x 21 sc = 126 sc, with 3 unjoined end points.
Why the math works: because there are no extra seam stitches or border rounds, the size depends only on how many motifs there are and how far apart they sit. The width is 3 x 5 in = 15 in (38.1 cm). The length is 12 x 5 in = 60 in (152.4 cm).
Tassels (make 6):
1. Wrap the yarn 30 times around the 4.5 in (11.4 cm) card.
2. Slide a 12 in (30.5 cm) strand under the wraps at the top edge and tie it tightly. Leave both tails long.
3. Cut through the wraps at the bottom edge.
4. Tie the neck 0.75 in (1.9 cm) below the top using a 20 in (50.8 cm) strand. Wrap it 6 times, knot it, and hide the ends inside the tassel.
5. Trim the bottom evenly so the tassel is 4 in (10.2 cm) long.
6. Use the top tails to tie one tassel through each of the 3 unjoined end-point loops at both ends of the runner. Knot securely and bury the tails inside the tassel head.
Final Blocking
- Weave in every tail along the sc edges, then trim.
- Wet the runner, roll it in a towel and press out the extra water.
- Lay it flat on blocking mats and measure the width: 15 in (38.1 cm).
- Pin the 12 points along each long side in straight lines, keeping the joins 5 in (12.7 cm) apart.
- Pin the 3 end points at each end, then stretch the length to 60 in (152.4 cm).
- Open each petal and pin out every diamond window so it’s square.
- Leave the tassels unpinned. Comb them straight with your fingers and mist them.
- Let everything dry completely before you unpin.
Final Quality-Control Checklist
- [ ] There are 36 motifs, 3 x 12, each with 84 sc and 21 sc per side.
- [ ] Every petal has 9 tr.
- [ ] There are 57 joins, all made at corners only.
- [ ] The width is 15 in (38.1 cm) and the length is 60 in (152.4 cm).
- [ ] The runner is 68 in (172.7 cm) long including the tassels.
- [ ] All 6 tassels are 4 in (10.2 cm) long and tied securely.
- [ ] No tails show on the right side.
Troubleshooting
- The petals cup or ruffle: your Round 2 ch-5 loops are too long. Make them snugger, or use a smaller hook.
- The motif curls into a bowl: the Round 4 and 5 chains are too tight. Loosen them, or add 1 ch to each ch-4 loop. Check the gauge afterward.
- The points look blunt: make sure the corners are on the 5th tr of each petal and that the ch-3 corner loops are complete.
- The runner slants: at least one motif was joined at the wrong corner. Check the grid against your work.
- The tassels are uneven: after blocking, trim them again against a ruler.
Care
Hand wash in cool water with mild soap, and lay the runner flat to dry. Reshape the points while it’s damp. Don’t tumble dry it.
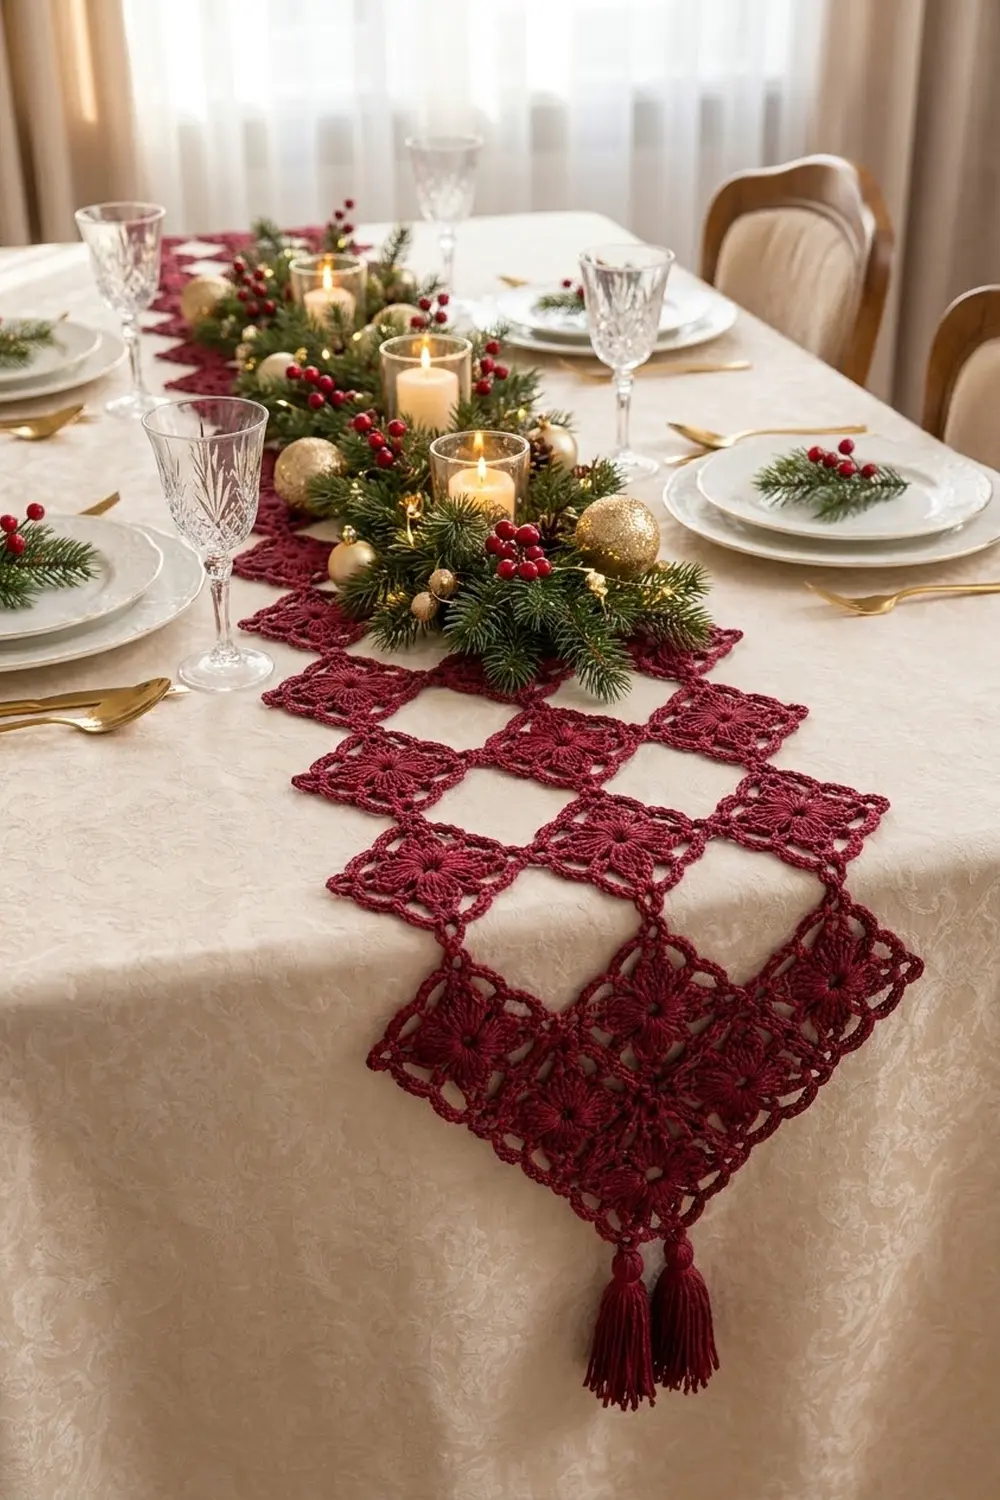
Final Notes
Every measurement in this runner depends on one motif. Each side has 21 sc at 6 sc per inch, which makes it 3.5 in (8.9 cm) long, and the motif measures 5 in (12.7 cm) point to point. Three motifs give the 15 in (38.1 cm) width and twelve give the 60 in (152.4 cm) length. The tassels add 4 in (10.2 cm) at each end, for a total of 68 in (172.7 cm). If your first motif meets the gauge, the rest of the runner will too.
Happy crocheting!