

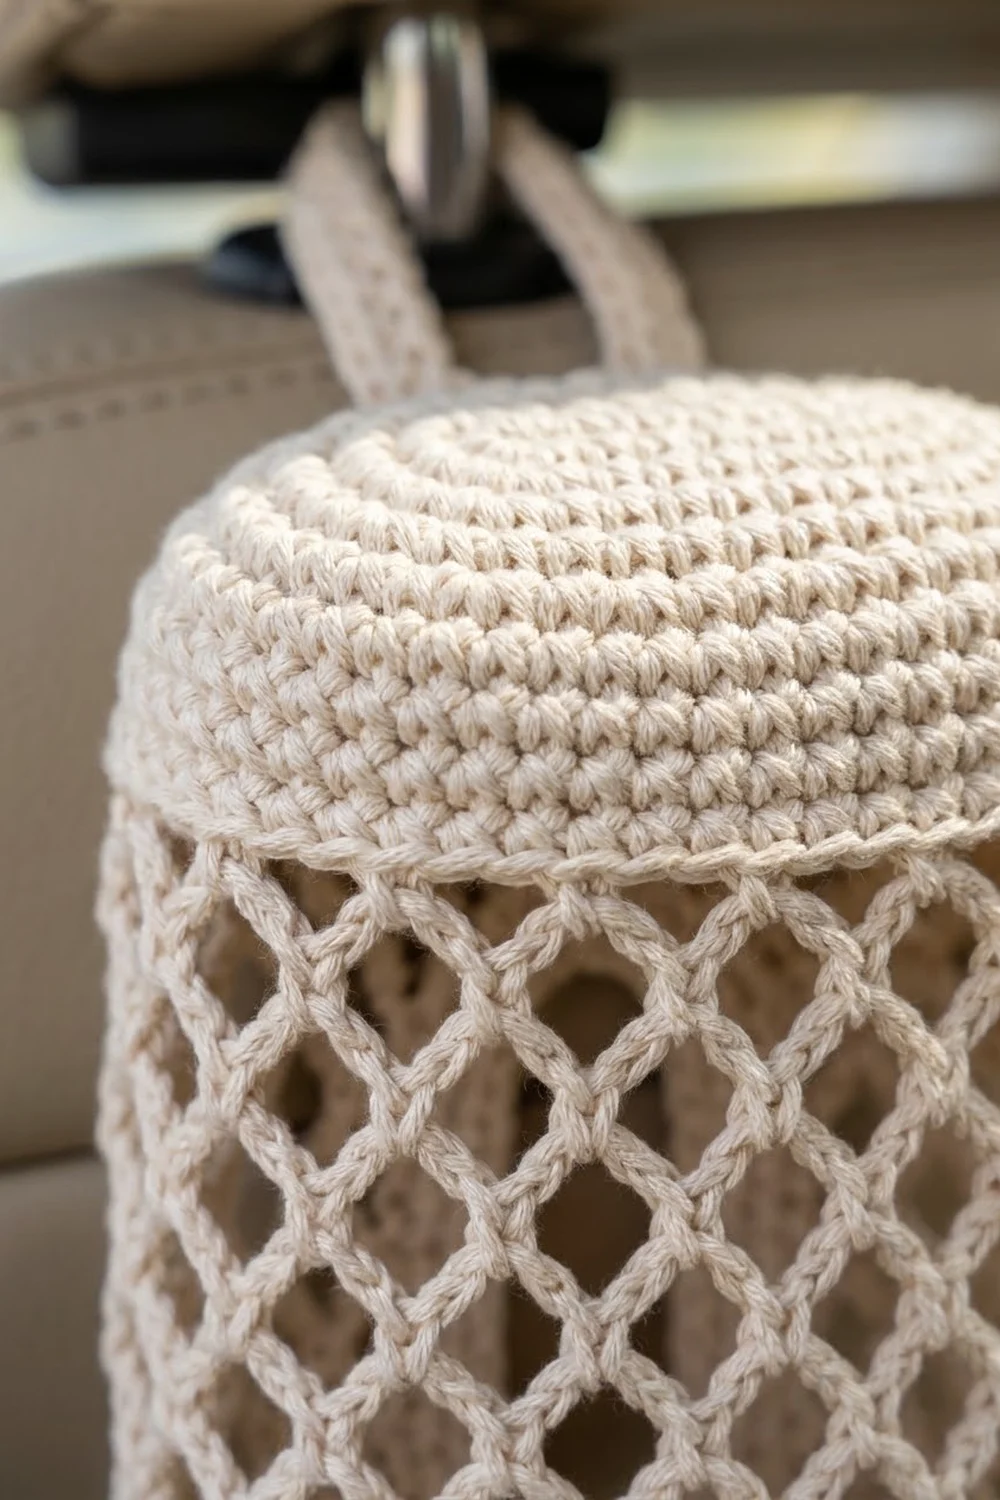
The Open Road Mesh Car Tissue Holder is a slim, open-net pouch that hangs from a headrest post and keeps tissues within reach of the back seat. It has a solid oval base, a diamond net body, a neat slot framed with a raised rim, and a sturdy strap loop at the top.
It’s made in a single creamy ivory cotton. The look is light and a little coastal: the net shows off the stitch texture, and the solid base, cap, and rim keep it tidy and structured.
All instructions use US crochet terms. Finished, the body is about 4 in (10.2 cm) wide, 1.75 in (4.4 cm) deep, and 9.5 in (24.1 cm) tall. With the loop, it hangs about 12.5 in (31.8 cm) long.
You work it in one piece from the bottom up. First you make a flat oval base, then a short solid wall. The mesh body comes next, and a few rows are worked flat to leave the slot open. Finally you close the top and work the strap straight off the cap. A two-round rim around the slot finishes the piece.
Finished Size and Construction
- Finished size: 4 in (10.2 cm) wide x 1.75 in (4.4 cm) deep x 9.5 in (24.1 cm) tall, body only
- Hanging length with loop: about 12.5 in (31.8 cm)
- Skill level: Intermediate
- Terminology: US
- Yarn weight: Fine (2) / sport-weight mercerized cotton
- Hook: 2.75 mm (C-2)
- Number of pieces: 1, worked continuously
- Layout: Upright tube with an oval base, a closed top, and a strap loop
- Body circumference: 10 in (25.4 cm), which is 60 sc or 15 mesh loops
- Slot before rim: about 1.3 x 3.5 in (3.3 x 8.9 cm)
- Rim depth: 2 rounds, about 0.3 in (0.8 cm)
- Finished slot opening: about 0.75 x 3 in (1.9 x 7.6 cm)
Materials
Yarn: Use a smooth, mercerized cotton in sport weight. Mercerized cotton holds the net’s shape and won’t fuzz from being handled in a car. Avoid acrylic, because the mesh will sag over time.
- Ivory/cream: 35 g, about 105 m (115 yd)
This quantity includes a margin of about 20% for your gauge swatch and small differences in tension.
Tools:
- 2.75 mm (C-2) crochet hook
- 4 locking stitch markers
- Tapestry needle
- Scissors
- Measuring tape
- Rustproof pins and a blocking mat
- Spray bottle with water
Abbreviations (US Terms)
- ch – chain
- sl st – slip stitch
- sc – single crochet
- dc – double crochet
- inc – 2 sc in the same stitch
- sc2tog – single crochet 2 together
- BLO – back loop only
- st(s) – stitch(es)
- sp – space
- tch – turning chain
- Rnd – round
- RS / WS – right side / wrong side
Special stitch – mesh loop: a ch-5 that is anchored on both ends by an sc worked into the center of a loop from the round below.
Closing loop: ch 2, then dc in the first sc of the round. This makes the last loop of the round and leaves your hook in the center of that loop, ready for the next round.
Gauge and Checkpoints
- Solid gauge: 6 sc and 7 rnds = 1 in (2.5 cm)
- Mesh gauge: 15 loops around = 10 in (25.4 cm), and 2 mesh rounds = 1 in (2.5 cm)
The base is your gauge swatch, so test it first before you go any further.
Checkpoints:
- After Rnd 6: the base measures 4 x 1.75 in (10.2 x 4.4 cm).
- After Rnd 14: the tube is 10 in (25.4 cm) around and the mesh is 2.5 in (6.4 cm) tall.
- After Slot Row 7: the slot gap is about 3.5 in (8.9 cm) long.
- After Rnd 25: the body is about 9.5 in (24.1 cm) tall.
If your piece is too big, go down a hook size, or shorten the mesh chains to ch 4. If it’s too small, go up a hook size. Change the hook before you change any stitch counts, because the slot and the top shaping depend on the 60-stitch / 15-loop circumference.
Pattern
Base
Ch 15.
Rnd 1: Sc in 2nd ch from hook, sc in next 12 ch, 3 sc in last ch. Rotate and work along the underside of the chain: sc in next 12 ch, 2 sc in the last ch (the same ch as the first sc). Do not join; work in a spiral and move a marker up each round. (30 sts)
Rnd 2: Inc, sc 12, inc 3 times, sc 12, inc 2 times. (36 sts)
Rnd 3: Sc 1, inc, sc 12, (sc 1, inc) 3 times, sc 12, (sc 1, inc) 2 times. (42 sts)
Rnd 4: Sc 2, inc, sc 12, (sc 2, inc) 3 times, sc 12, (sc 2, inc) 2 times. (48 sts)
Rnd 5: Sc 3, inc, sc 12, (sc 3, inc) 3 times, sc 12, (sc 3, inc) 2 times. (54 sts)
Rnd 6: Sc 4, inc, sc 12, (sc 4, inc) 3 times, sc 12, (sc 4, inc) 2 times. (60 sts)
The base now has two straight sides of 12 sts each and two curved ends of 18 sts each: 12 + 18 + 12 + 18 = 60. Checkpoint 1: 4 x 1.75 in (10.2 x 4.4 cm).
Solid Wall
Rnd 7: Sc in BLO of each st around. (60 sts) This makes the crisp fold between the base and the wall.
Rnds 8–9: Sc in each st around. (60 sts) Sl st in the next st to finish the spiral.
Mesh Body
Rnd 10 (mesh set-up): Ch 1, sc in the same st. Ch 5, sk 3 sts, sc in next st. Repeat from * 13 more times, then work a closing loop. (15 sc, 15 loops)
Here is the check: the 15 sc land on sts 1, 5, 9 … 57, which gives 14 ch-5 loops plus 1 closing loop over sts 58–60.
Rnds 11–14: Ch 1, sc around the post of the dc. Ch 5, sc in next loop. Repeat from * 13 more times, then work a closing loop. (15 loops each round)
Checkpoint 2: the tube is 10 in (25.4 cm) around and the mesh is 2.5 in (6.4 cm) tall.
Slot Rows
Mesh rounds shift slightly every round, so position the slot by eye.
Flatten the tube so that the base’s straight sides are the front and back. Find the Rnd 14 loop closest to the vertical center of the front and mark it. That loop stays unworked.
If your hook isn’t already in the loop just after the marked loop, sl st loosely along the chains until you reach the center of that loop. These sl sts don’t change any counts.
Row 1 (RS): Ch 1, sc in current loop. Ch 5, sc in next loop. Repeat from * 12 more times. (14 sc, 13 loops) The marked loop is left empty. Turn.
Row 2 (WS): Ch 5 (counts as dc + ch 2), sc in first loop. Ch 5, sc in next loop. Repeat from * 11 more times. Ch 2, dc in last sc. (13 sc, 12 loops + 2 half loops) Turn.
Row 3 (RS): Ch 1, sc in the first dc. Ch 5, sc in next loop. Repeat from * 11 more times. Ch 5, sc in the 3rd ch of the tch. (14 sc, 13 loops) Turn.
Rows 4–7: Repeat Rows 2–3 twice. Do not turn after Row 7.
Checkpoint 3: the gap is about 1.3 x 3.5 in (3.3 x 8.9 cm).
Closing the Tube
Rnd 15 (bridge): Ch 9 and sl st in the first sc of Row 7, across the gap. Sl st in the next 3 ch to reach the center of the first loop. Ch 1, sc in the same loop. Ch 5, sc in next loop. Repeat from * 11 more times. (13 sc)
Now cross the bridge. Ch 5, sc in the 3rd ch of the ch-9 bridge. Ch 5, sk 3 ch, sc in the 7th ch. Work a closing loop. (15 sc, 15 loops)
The count works like this: 13 sc sit on Row 7’s 13 loops, and 2 sc sit on the bridge, which restores 15 joints and 15 loops.
Rnds 16–17: Repeat Rnd 11. (15 loops)
Rnd 18: Ch 1, sc around the post of the dc. Ch 5, sc in next loop. Repeat from * 13 more times. Ch 5 and sl st in the first sc. (15 sc, 15 loops)
Top Cap
Rnd 19 (conversion): Ch 1, sc in the same st as the join, 3 sc in next loop. Sc in next sc, 3 sc in next loop. Repeat from * 13 more times. Sl st in the first sc.
This gives 15 sc worked into existing sc + 45 sc worked into loops = 60 sts.
Rnd 20: Ch 1, sc in each st around. (60 sts) Do not join.
Flatten the piece with the slot centered on the front. Mark the 12 sts centered above the slot, and the 12 sts centered on the back. The 18 sts at each side fold are the curves. Keep working sc until you reach the start of the front 12 sts; those few extra sts only move the round start. Work in a spiral from here.
Rnd 21: Sc 12, (sc 4, sc2tog) 3 times, sc 12, (sc 4, sc2tog) 3 times. (54 sts)
Rnd 22: Sc 12, (sc 3, sc2tog) 3 times, sc 12, (sc 3, sc2tog) 3 times. (48 sts)
Rnd 23: Sc 12, (sc 2, sc2tog) 3 times, sc 12, (sc 2, sc2tog) 3 times. (42 sts)
Rnd 24: Sc 12, (sc 1, sc2tog) 3 times, sc 12, (sc 1, sc2tog) 3 times. (36 sts)
Rnd 25: Sc 12, sc2tog 3 times, sc 12, sc2tog 3 times. (30 sts)
These rounds mirror the base. Checkpoint 4: the body is about 9.5 in (24.1 cm) tall.
If you want, put a soft pack of folded tissues inside now. It should be no larger than 3.75 x 1.5 x 8.5 in (9.5 x 3.8 x 21.6 cm).
Closing row: Flatten the top so that 15 front sts line up with 15 back sts. Ch 1, then work through both layers: sc in each pair across. (15 sc)
Strap
Row 1: Turn, sl st in the first 5 sts, ch 1, sc in the next 5 sts. (5 sc) The last 5 sts stay unworked, so the strap is centered.
Rows 2–42: Ch 1, turn, sc 5. (5 sc)
The strap is about 6 in (15.2 cm) long and 0.8 in (2.0 cm) wide. Fold it toward the back and whipstitch Row 42 to the back of Row 1. This makes a loop about 3 in (7.6 cm) tall. Fasten off and weave in the ends.
Border
The border is the raised rim around the slot plus a sl st edge along the strap.
Rim gauge: 3 sc per mesh row end. Each row end is 0.5 in (1.3 cm), so that works out to 6 sc per 1 in (2.5 cm), which matches the solid gauge.
Rim Rnd 1: With the RS facing, join at the bottom of the gap.
- Bottom: 8 sc in the unworked Rnd 14 loop.
- Side: 3 sc in each of the 7 row ends, for 21 sc.
- Top: 1 sc in each of the 9 bridge chains, worked into the underside of the chain, for 9 sc.
- Second side: 21 sc.
Sl st in the first sc. (8 + 21 + 9 + 21 = 59 sts)
Rim Rnd 2: Ch 1. Sc in each st around, but work sc2tog twice across the center of the bottom and twice across the center of the top. Sl st to join. (59 − 4 = 55 sts) Fasten off.
Why the math works: The sides are 21 sts over 3.5 in (8.9 cm), which is exactly 6 sts per inch, so the rim lies flat. Over the two rounds, the rim grows about 0.3 in (0.8 cm) inward on every edge. That turns the 1.3 x 3.5 in (3.3 x 8.9 cm) gap into a 0.75 x 3 in (1.9 x 7.6 cm) opening. The four decreases at each end keep the curved ends from flaring.
Strap edge: Join at the base of the strap. Sl st in each row end up one long side (42 sl sts), through the fold, and down the other side (42 sl sts). This firms the edges and stops them from rolling. Keep the sl sts loose enough that the strap doesn’t shorten.
Final Blocking
- Take out the tissues and mist the holder until it’s damp, not wet.
- Slide a rolled towel or a 4 x 1.75 in (10.2 x 4.4 cm) piece of foam inside the tube.
- Ease each diamond into an even shape with your fingers. Pull the mesh lengthwise until the body measures 9.5 in (24.1 cm).
- Pin the slot rim straight and vertical at 3 in (7.6 cm) long.
- Lay the strap flat and pin it to 0.8 in (2.0 cm) wide.
- Let it dry completely, then put the tissues back in.
Final Quality-Control Checklist
- [ ] The base measures 4 x 1.75 in (10.2 x 4.4 cm) and lies flat.
- [ ] Every mesh round has 15 loops.
- [ ] The slot is centered on the front and vertical.
- [ ] Rim Rnd 2 has 55 sts and lies smooth.
- [ ] The top cap is closed with 15 sc and has no gaps at the corners.
- [ ] The strap is 5 sts wide and the loop is about 3 in (7.6 cm) tall.
- [ ] The body is 9.5 in (24.1 cm) tall and 10 in (25.4 cm) around.
- [ ] All ends are woven in securely, inside the solid sections.
Troubleshooting
Base cups instead of lying flat: Your increases are too tight. Go up half a hook size for Rnds 1–6.
Base ruffles: You’ve probably miscounted. Check for 60 sts after Rnd 6.
Mesh twists around the tube: That’s normal drift. Reposition by eye before the slot rows, as described above.
Slot is off-center: Pull back to Rnd 14 and mark the loop again.
Rim waves: You worked more than 3 sc per row end. Rework the sides with exactly 21 sc.
Slot is too tight for tissues: Leave out the decreases in Rim Rnd 2 and work 59 sc.
Strap stretches: Work it with a hook one size smaller.
Corners gap at the top closing row: Use a tail to sew them shut.
Care
Hand wash in cool water with mild soap, press out the water in a towel, and dry flat over a towel roll. Don’t tumble dry, or the net will lose its shape.

Final Notes
The whole design follows one measurement chain. A 6 sc per inch gauge gives a 60-stitch, 10 in (25.4 cm) base perimeter. That becomes 15 mesh loops, and 7 flat rows open a 3.5 in (8.9 cm) gap. A two-round rim narrows the gap to a 0.75 x 3 in (1.9 x 7.6 cm) slot. The top mirrors the base back down to 30 sts, closes with 15 sc, and leads into a 5-stitch strap. If you check each stage against its checkpoint, the finished holder will be 4 x 9.5 in (10.2 x 24.1 cm) and ready to hang from your headrest.
Happy crocheting!