

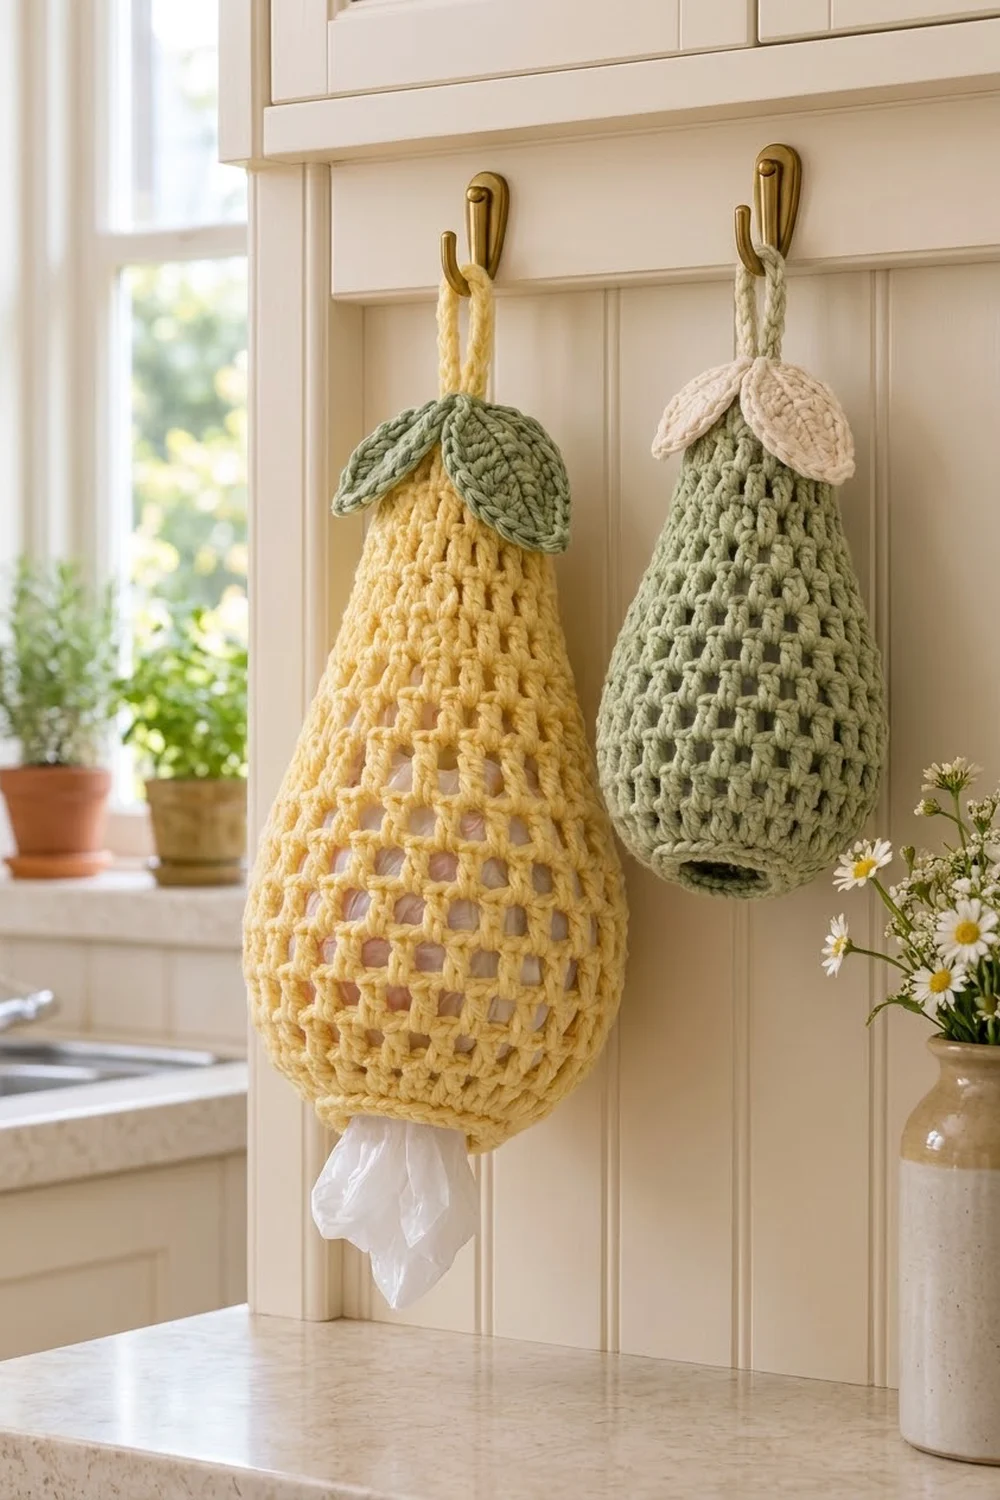
This pear-shaped bag holder turns your pile of plastic grocery bags into something you’ll actually want on the wall. It has a solid top cap, an open square mesh body that swells into a round pear bottom, and a firm rim around the bottom opening so you can pull out one bag at a time.
The sample is butter yellow with two sage green leaves and a covered hanging loop. It’s a soft, farmhouse-kitchen look that also works in sage with cream leaves, or in any fruit color you like. The pattern uses US crochet terms throughout.
The finished holder is about 14 in (35.6 cm) tall and 8 in (20.3 cm) wide at its widest point when laid flat, not counting the 3 in (7.6 cm) loop. The bottom opening is about 2.5 in (6.4 cm) across.
You work the body top-down in joined rounds without turning. You start with a magic ring, make a two-round double crochet cap, switch to chain-1 mesh, increase to shape the pear, decrease toward the bottom, and finish with three rounds of single crochet. Then you make two leaves and a loop and sew them on.
Finished Size and Construction
- Finished size: 14 in (35.6 cm) tall x 8 in (20.3 cm) wide, measured flat
- Total height with loop: 17 in (43.2 cm)
- Skill level: Easy / advanced beginner
- Terminology: US crochet terms
- Yarn weight: Bulky (#5)
- Hook: 6.0 mm (US J-10)
- Number of pieces: 1 body, 2 leaves, 1 loop (worked onto the body)
- Layout: One single 3D piece; nothing is joined to other motifs
- Neck size: 4 in (10.2 cm) wide flat, 8 in (20.3 cm) around
- Widest point: 8 in (20.3 cm) wide flat, 16 in (40.6 cm) around
- Size before rim: 13.25 in (33.7 cm) tall
- Rim depth: 0.75 in (1.9 cm)
Materials
Pick a smooth bulky cotton or cotton blend so the mesh holes stay crisp and the bottom rim holds its shape. Acrylic will work, but it stretches more under the weight of the bags. The amounts below assume a yarn of about 150 m per 100 g.
- Butter yellow (main color, MC): 130 g / 195 m
- Sage green (leaves, CC): 15 g / 23 m
These amounts include a margin of about 15% for your gauge swatch and small differences in tension.
Tools:
– 6.0 mm (US J-10) crochet hook
– Stitch marker
– Tapestry needle
– Scissors
– Measuring tape
– Rust-proof pins and a spray bottle for blocking
Abbreviations (US Terms)
- ch – chain
- sl st – slip stitch
- sc – single crochet
- hdc – half double crochet
- dc – double crochet
- sp – space
- st(s) – stitch(es)
- beg – beginning
- MC / CC – main color / contrast color
Special stitches:
- Mesh unit: 1 dc followed by ch 1. Each unit counts as 2 sts (the dc and the ch). “Work a unit in the next dc” means dc in the next dc, ch 1, skipping the ch-1 sp below.
- Beg unit: Ch 4 at the start of a mesh round. It counts as the first dc + ch 1 and sits over the joining st.
- Mesh increase (minc): (dc, ch 1, dc, ch 1) all in the next dc. This turns 1 unit into 2.
- Mesh decrease (mdec): Yo, insert hook in the next dc, pull up a loop, yo, pull through 2 loops; skip the ch-1 sp; yo, insert hook in the following dc, pull up a loop, yo, pull through 2 loops; yo, pull through all 3 loops; ch 1. This turns 2 units into 1.
Gauge and Checkpoints
Gauge: 6 mesh units (12 sts) and 5 mesh rounds = 4 in (10.2 cm). So one unit is about 0.67 in (1.7 cm) wide, and one mesh round is 0.8 in (2.0 cm) tall.
Rim gauge: 3 sc = 1 in (2.5 cm) around; 3 sc rounds = 0.75 in (1.9 cm).
Make the first 5 rounds as your gauge test. That’s the cap and the neck, so a correct gauge here will carry through the rest of the body.
Checkpoints:
– After Round 2: the cap is a flat circle 2.5 in (6.4 cm) across.
– After Round 5: the neck is 4 in (10.2 cm) wide flat, and the mesh section (Rounds 3–5) is 2.4 in (6.1 cm) tall.
– After Round 9: the body is 8 in (20.3 cm) wide flat, and the mesh section is 5.6 in (14.2 cm) tall.
– After Round 14: the mesh section is 9.6 in (24.4 cm) tall.
– After Round 17: the mesh section is 12 in (30.5 cm) tall. The total height including the cap is 13.25 in (33.7 cm).
– After Round 20: the total height is 14 in (35.6 cm).
If your piece is too big, go down 0.5 mm in hook size. If it’s too small, go up 0.5 mm. If only the height is off, check how tall your dc stitches are. Pull each dc up to its full height rather than snugging it down.
Body
Use MC. Work in joined rounds and don’t turn. Put the marker in the beg ch of each round.
Top Cap
Round 1: Make a magic ring. Ch 3 (counts as dc), 11 dc in ring. Pull the ring tight. Sl st in the top of the beg ch-3. (12 dc)
Round 2 (growth): Ch 3 (counts as dc), dc in the same st, 2 dc in each st around. Sl st in the top of the beg ch-3. (24 dc)
Checkpoint: the cap is 2.5 in (6.4 cm) across.
Neck
Round 3 (conversion): Ch 4 (beg unit), skip the next dc, dc in the next dc, ch 1, skip the next dc 11 times. Sl st in the 3rd ch of the beg ch-4.
(12 dc + 12 ch-1 = 24 sts, or 12 units)
Each new dc sits in every other dc of Round 2. The ch-1 skips over one dc, which opens the first row of square holes. The stitch count stays at 24.
Rounds 4–5: Beg unit, work a unit in each dc around (11 units), sl st in the 3rd ch of the beg ch-4. (12 units / 24 sts)
Each dc sits on top of the dc below, so the holes line up in straight columns.
Shoulder and Belly
Round 6 (growth): Beg unit, unit in the next dc, minc in the next dc, unit in each of the next 2 dc, minc in the next dc 3 times. Sl st to join. (16 units / 32 sts)
The body is now about 5.3 in (13.5 cm) wide flat.
Round 7: Beg unit, unit in each dc around. Sl st to join. (16 units / 32 sts)
Round 8 (growth): Beg unit, unit in each of the next 2 dc, minc in the next dc, unit in each of the next 3 dc, minc in the next dc 3 times. Sl st to join. (20 units / 40 sts)
The body is now about 6.7 in (17.0 cm) wide flat.
Round 9 (growth): Beg unit, unit in each of the next 3 dc, minc in the next dc, unit in each of the next 4 dc, minc in the next dc 3 times. Sl st to join. (24 units / 48 sts)
Checkpoint: 8 in (20.3 cm) wide flat, 16 in (40.6 cm) around.
Rounds 10–14: Beg unit, unit in each dc around. Sl st to join. (24 units / 48 sts)
These five straight rounds give the pear its full, rounded bottom.
Lower Taper
Round 15: Beg unit, unit in each of the next 3 dc, mdec, unit in each of the next 4 dc, mdec 3 times. Sl st to join. (20 units / 40 sts)
Round 16: Beg unit, unit in each of the next 2 dc, mdec, unit in each of the next 3 dc, mdec 3 times. Sl st to join. (16 units / 32 sts)
Round 17: Beg unit, unit in the next dc, mdec, unit in each of the next 2 dc, mdec 3 times. Sl st to join. (12 units / 24 sts)
The decreases fall in the same four places as the increases did, so the pear stays even on all sides.
Bottom Opening Rim
The rim does the job of a border. It firms up the opening and keeps bags from spilling out.
Rim gauge: 3 sc per 1 in (2.5 cm). Round 17 is 24 sts, or 8 in (20.3 cm) around, so 24 sc fit exactly with no ruffling or cupping.
Round 18 (conversion): Ch 1, sc in the same st, sc in the next ch-1 sp, sc in the next dc, sc in the next ch-1 sp 11 times. Sl st in the first sc.
(12 sc in dc + 12 sc in ch-1 sp = 24 sc)
When you lay the holder flat, that’s 12 sc across the front and 12 across the back.
Round 19: Ch 1, sc in each st around. Sl st in the first sc. (24 sc)
Round 20: Ch 1, sc in each st around, working a little more firmly. Sl st in the first sc. (24 sc)
Fasten off and weave in the end.
Why the math works: The opening has the same 24 sts as the neck. Each mesh unit is 2 sts and gives 2 sc, so the rim is 8 in (20.3 cm) around and about 2.5 in (6.4 cm) across. That’s wide enough for your fingers and narrow enough to hold the bags in. The rim adds 0.75 in (1.9 cm), which brings the body from 13.25 in (33.7 cm) to 14 in (35.6 cm).
Hanging Loop
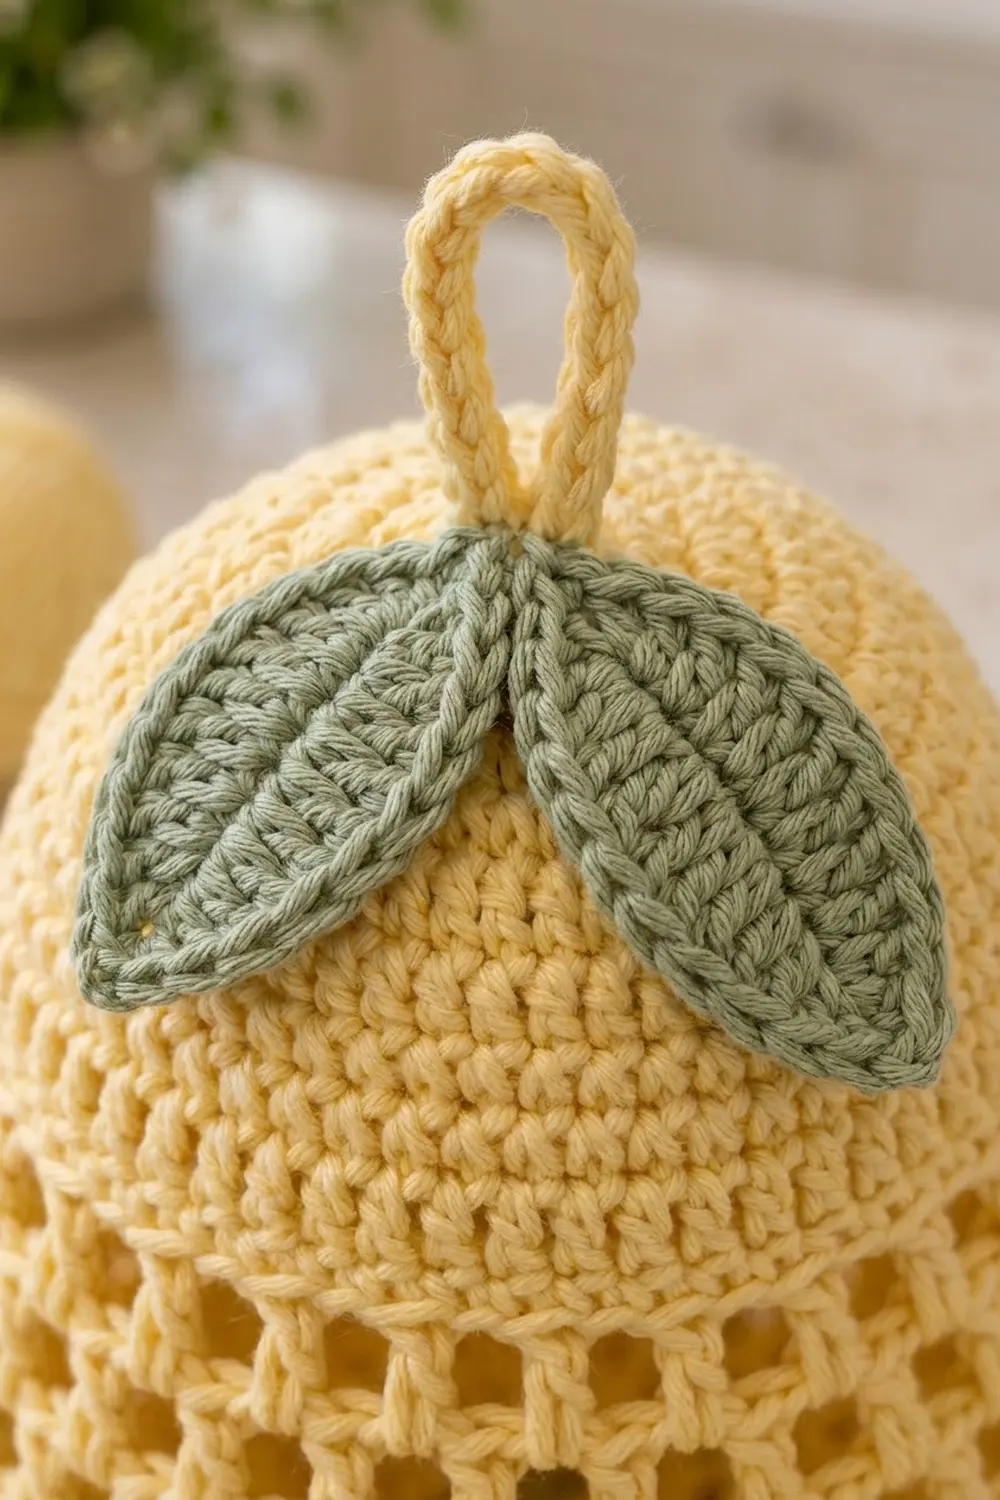
Join MC with a sl st at the center of the magic ring on the outside of the cap. Ch 18, then sl st in the same spot to make a loop. Work 20 sc into the ch-18 loop, covering it completely. Sl st in the starting point and fasten off. Thread the tail through the cap to the inside and knot it securely.
The finished loop is 3 in (7.6 cm) long. Covering it with sc makes it stiff enough to hang without twisting.
Leaves (Make 2)
Use CC.
Ch 11.
Round 1: Working along one side of the chain: sc in the 2nd ch from the hook, hdc in the next ch, dc in each of the next 5 ch, hdc in the next ch, sc in the next ch (9 sts). Work 3 sc in the last ch for the tip. Now work along the other side of the chain: sc in the next ch, hdc in the next ch, dc in each of the next 5 ch, hdc in the next ch, sc in the next ch (9 sts). Sl st in the first sc. (21 sts)
Round 2: Sl st in each st around. In the center sc of the 3-sc tip, work (sl st, ch 2, sl st) instead. When you reach the stem end, ch 2 and sl st in the 2nd ch from the hook for the second point. Sl st in the first sl st. (21 sl sts + 2 points)
Vein: Leave a long tail. Holding the yarn behind the leaf, surface sl st along the foundation chain from the stem to the tip.
Each leaf is 3 in (7.6 cm) long and 1.5 in (3.8 cm) wide.
Attaching: Pin the two stem ends right next to the base of the loop on the front of the cap. Angle the leaves outward and down in a V, laid flat over the cap. Whipstitch the edge of each leaf to Rounds 1–2, stopping 1 in (2.5 cm) from the tip so the points lift slightly.
Final Blocking
- Weave in all ends along the dc columns, where they won’t show through the holes.
- Stuff the body firmly with plastic bags or a rolled towel so it holds its pear shape.
- Mist it with water until it’s damp, but not soaked.
- Gently pull the mesh so the holes are square and the columns run straight from the neck to the rim.
- Check that it’s 8 in (20.3 cm) wide at Rounds 10–14 and 4 in (10.2 cm) wide at the neck.
- Pin the leaves flat on a towel and mist them. Smooth the vein straight.
- Leave everything to dry completely, then take out the stuffing.
Final Quality-Control Checklist
- The cap lies flat and is 2.5 in (6.4 cm) across.
- The neck has 12 columns; the widest section has 24 columns.
- The increases and decreases sit in 4 evenly spaced places.
- The body is 14 in (35.6 cm) tall and 8 in (20.3 cm) wide flat.
- The rim has 24 sc and the opening is about 2.5 in (6.4 cm) across.
- The loop is 3 in (7.6 cm) long and anchored through the cap.
- Both leaves are 3 in (7.6 cm) long, with clear points and a center vein.
- All ends are woven in securely.
Troubleshooting
The holes are slanting instead of stacking. You’re working into the ch-1 sp instead of the dc, or you’re joining in the wrong ch. Always join in the 3rd ch of the beg ch-4.
The cap is cupping. Your dc is too tight. Loosen it, or work Round 1 with a hook 0.5 mm larger.
The cap is ruffling. Check that you have exactly 12 dc in Round 1 and 24 in Round 2.
The opening is too wide. Work Round 20 with a hook 1 mm smaller, or add a round of sl st.
The pear looks lopsided. Check that the increase and decrease rounds start right after the beg unit, so all 4 shaping points line up.
The leaves are curling. Block them flat, and make sure the 3 sc at the tip all went into the same ch.
Care
Hand wash in cool water and lay flat to dry, stuffed lightly to keep the shape. Don’t tumble dry, because the mesh can stretch out of shape.
Final Notes
Here’s the full measurement chain. The cap is 2.5 in (6.4 cm) across. The neck is 12 units, or 4 in (10.2 cm) flat. The belly is 24 units, or 8 in (20.3 cm) flat. The body tapers back to 12 units. The 24 sc rim brings the holder to 14 in (35.6 cm) tall, with a 2.5 in (6.4 cm) opening. If each checkpoint matches, the finished pear will too.
To load it, push the bags up through the bottom opening, then pull them out one at a time from the same spot. For the sage version, swap the colors: make the body in sage green and the leaves in cream.
Happy crocheting!