

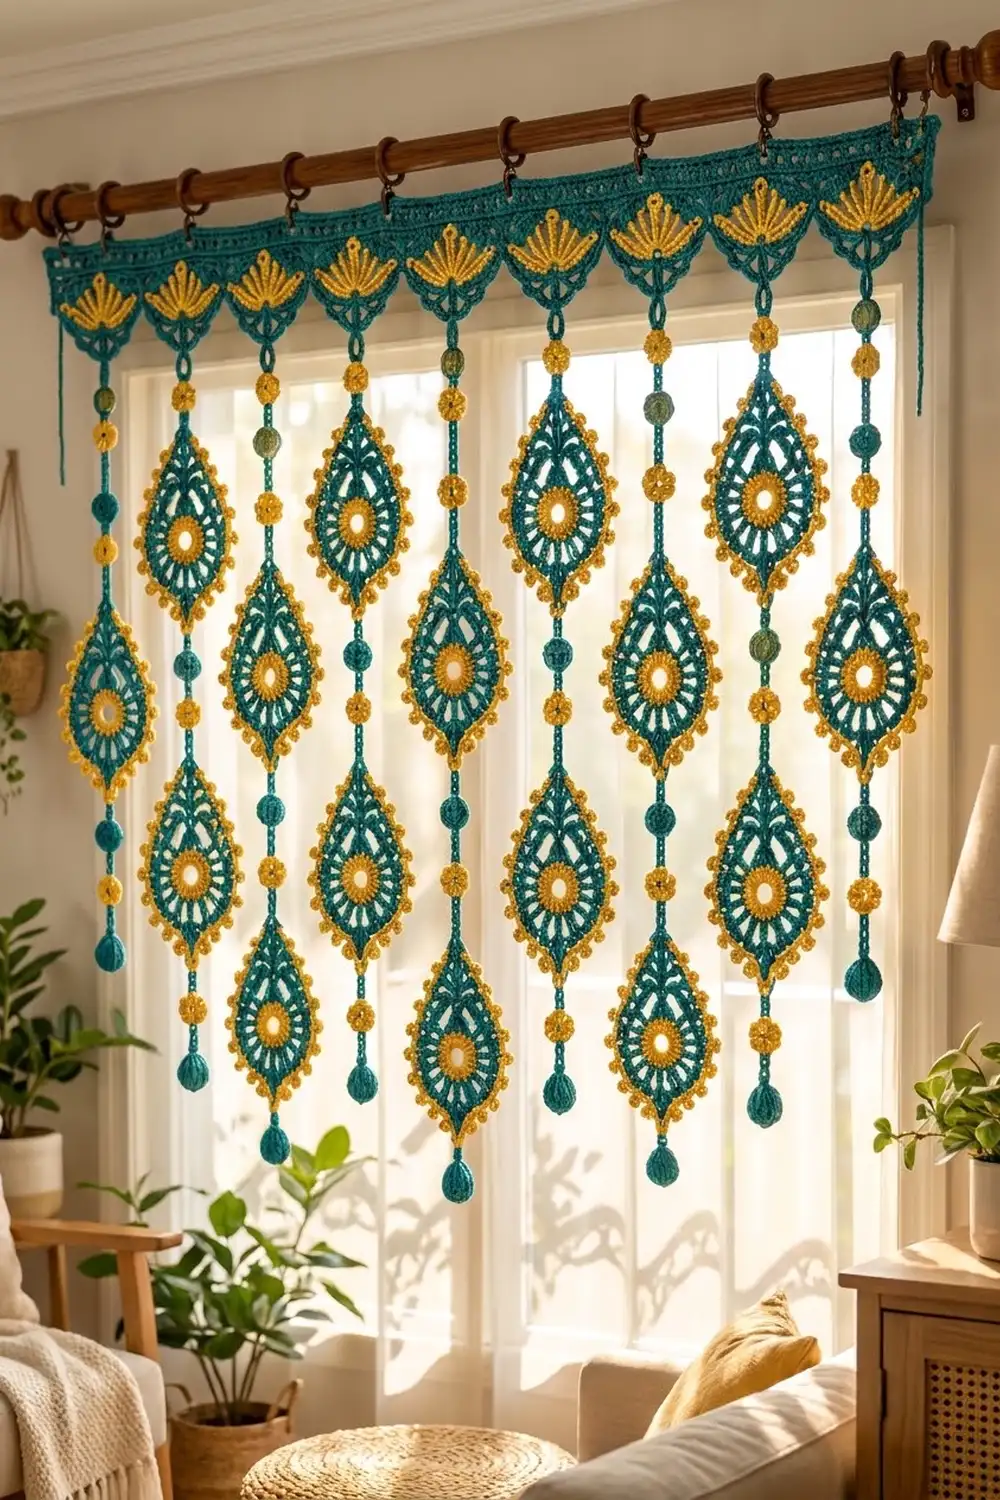
This valance hangs nine lacy strands from a scalloped header. Each strand holds three teardrop motifs with yellow centers and picot edges. Small yellow flowers and teal beads are spaced along the cords, and each strand ends in a teal drop. The strands are staggered, so the motifs form a diamond pattern across the glass.
There are only two colors: deep teal and golden yellow. Teal is used for the header, the motif spokes, the cords, and the beads. Yellow is used for the header fans, the motif center rings, the motif edging, and the flowers. The style is boho with a peacock-feather feel.
All instructions use US crochet terms. The finished valance is 27¼ in (69.2 cm) wide. The long strands reach 26¼ in (66.7 cm) and the short strands reach 23¾ in (60.3 cm), both measured including the header.
You make one header band, 27 teardrop motifs, slip-stitch cords, beads, and flowers. Then you sew everything into strands and finish the header with a border and curtain rings.
Finished Size and Construction
- Finished size: 27¼ in (69.2 cm) wide × 26¼ in (66.7 cm) at the longest strand
- Skill level: Intermediate
- Terminology: US
- Yarn weight: Fingering (#1) mercerized cotton
- Hook: 2.5 mm
- Number of pieces: 1 header, 27 motifs, 36 cords, 31 beads, 9 drops, 58 flowers
- Layout: 9 strands, one from each scallop point, alternating Strand A (short) and Strand B (long)
- Motif size: 3 × 4½ in (7.6 × 11.4 cm)
- Header before border: 27 in (68.6 cm) wide × 2 in (5.1 cm) deep at the points
- Border depth: ⅛ in (0.3 cm) on the sides, ¼ in (0.6 cm) on the top
Materials
Use a smooth mercerized fingering cotton of about 170 m per 50 g. It gives crisp stitch definition and the lace hangs without stretching.
- Teal: 150 g / 510 m
- Golden yellow: 100 g / 340 m
Both quantities include a margin of about 20%.
Tools:
– 2.5 mm hook
– Tapestry needle
– 10 curtain rings, 1¼ in (3.2 cm)
– Stitch markers
– Fiberfill or yarn scraps for stuffing
– Rustproof pins, blocking mat, spray bottle
Abbreviations (US Terms)
- ch – chain
- sl st – slip stitch
- sc – single crochet
- hdc – half double crochet
- dc – double crochet
- tr – treble crochet
- BLO – back loop only
- MR – magic ring
- sc2tog – single crochet 2 together
- sp(s) – space(s)
- st(s) – stitch(es)
- RS – right side
Special stitches:
- Picot: Ch 3, sl st in the 3rd ch from hook.
- Fan Cluster (FC): Worked over 13 sts. In each of the 1st, 3rd, 5th, 7th, 9th, 11th, and 13th sts: yo twice, insert hook, pull up a loop, [yo, pull through 2] twice. You now have 8 loops on the hook. Yo and pull through all 8. The result is 7 rays joined at one point.
- Reverse sc: Sc worked from left to right.
Gauge and Checkpoints
Gauge: 28 sc × 32 rows = 4 in (10.2 cm). At 7 sts per inch, 189 sts = 27 in (68.6 cm).
Make and block one motif before you make the rest. Check it at each stage:
- After Rnd 1: yellow ring ¾ in (1.9 cm) across
- After Rnd 3: spoke circle 2 in (5.1 cm) across
- After Rnd 5: 2½ × 4 in (6.4 × 10.2 cm)
- After Rnd 6, blocked: 3 × 4½ in (7.6 × 11.4 cm)
If the motif is too big, go down 0.25 mm. If it is too small, go up 0.25 mm. Keep the long chain loops firm. Do not change the chain counts.
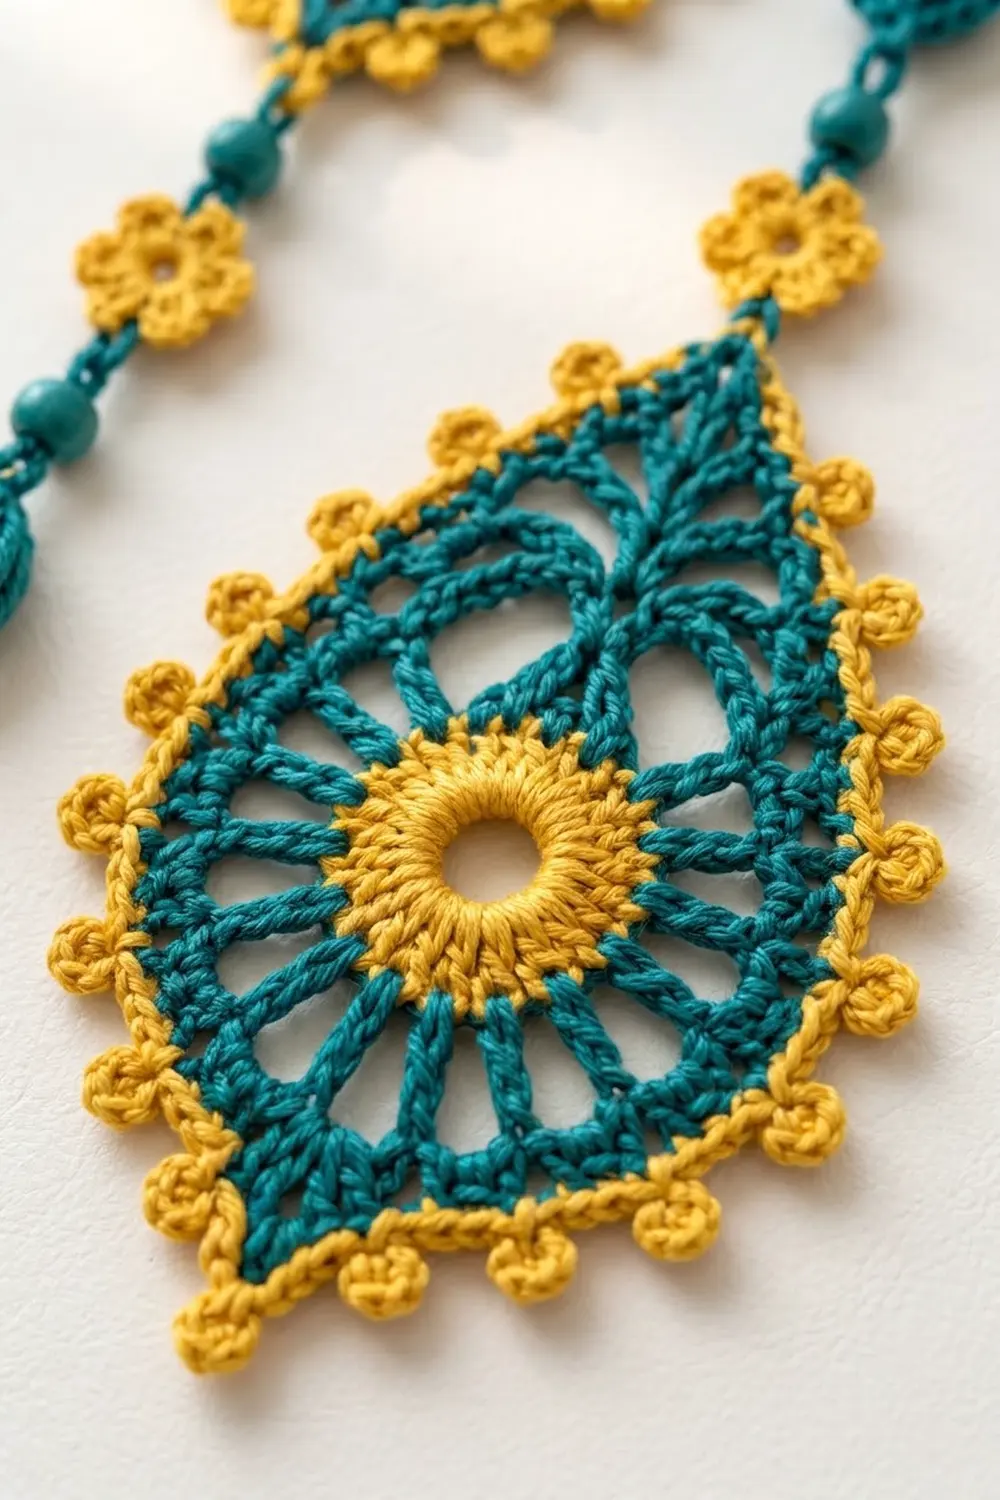
Teardrop Motif (Make 27)
Rnd 1 (Yellow): Ch 4 and sl st in the first ch to form a ring. Ch 3 (counts as dc), then work 15 dc in the ring. Join to the top of the ch-3. (16 dc) The center stays open. Fasten off.
Rnd 2 (Teal): Join teal in the BLO of any dc. Ch 1, then sc in the BLO of the same st and of each st around. Join. (16 sc) The unused front loops leave a yellow ridge.
Rnd 3: Ch 6 (counts as tr + ch 2). [Tr in next sc, ch 2] 15 times. Join to the 4th ch of the ch-6. (16 tr, 16 ch-2 sps) Mark the joining spoke as Spoke 1. This is the top center. The other spokes are 2–16 in order.
Rnd 4 (shaping loops): Ch 1, sc in Spoke 1. Then make the loops below, passing over the ch-2 sps:
- Loops 1–2: [Ch 7, sc in next tr] twice.
- Loops 3–4: [Ch 5, sc in next tr] twice.
- Loops 5–12: [Ch 3, sc in next tr] 8 times.
- Loops 13–14: [Ch 5, sc in next tr] twice.
- Loop 15: Ch 7, sc in Spoke 16.
- Loop 16: Ch 7, sl st in the first sc.
(16 sc; 16 loops: 4 ch-7, 4 ch-5, 8 ch-3) The long top loops stretch the circle into a teardrop and create the open V-shaped lace below the tip.
Rnd 5: Start the tip in the Spoke 1 sc: ch 4 (counts as tr), ch 5, tr in the same sc. Then fill each loop, skipping the sc’s between loops:
- Loop 1: 3 tr, 3 dc, hdc
- Loop 2: 3 hdc, 4 sc
- Loops 3–4: 5 sc in each
- Loops 5–12: 4 sc in each
- Loops 13–14: 5 sc in each
- Loop 15: 4 sc, 3 hdc
- Loop 16: hdc, 3 dc, 3 tr
Join to the top of the ch-4. (82 sts + 1 ch-5 tip sp)
Check the count: 2 tip tr + 7 + 7 + 10 + 32 + 10 + 7 + 7 = 82. Because the stitches get shorter moving away from the tip, the point stays sharp. Fasten off.
Rnd 6 (Yellow edging): Join yellow in the tip ch-5 sp.
- Ch 1, then (2 sc, ch 4, 2 sc) in the tip sp. The ch-4 is the hanging loop.
- Right half: [Sc in next 3 sts, (sc, picot) in next st] 10 times, then sc in next st. (41 sts)
- Bottom loop: Ch 4, sl st in the 4th ch from hook. This loop sits directly below Spoke 9.
- Left half: Sc in next st, then [(sc, picot) in next st, sc in next 3 sts] 10 times. (41 sts)
- Join to the first sc.
(86 sc, 20 picots, 1 hanging loop, 1 bottom loop) The two halves mirror each other. Fasten off and block to 3 × 4½ in (7.6 × 11.4 cm).
Header Band (Make 1)
Foundation (Teal): Ch 190.
Row 1: Sc in the 2nd ch from hook and in each ch across. (189 sc) Turn.
Row 2: Ch 3 (counts as dc), dc in each st across. (189 dc) Turn.
Row 3: Ch 1, sc in each st across. (189 sc) Turn.
Rows 4–5: Repeat Rows 2–3. Fasten off. The band should measure 27 × 1 in (68.6 × 2.5 cm).
Row S1 (Yellow): With RS facing, join yellow in the first st. Ch 1, then work sc in next 4 sts, ch 4, FC over next 13 sts, ch 4, sc in next 4 sts 9 times. (72 sc, 9 FC, 18 ch-4 sps) Each repeat uses 21 sts, and 9 × 21 = 189. The fan rays open upward toward the band. Fasten off.
Row S2 (Teal): With RS facing, join teal in the first sc. Ch 1, then work sc in next 4 sc, 5 sc in ch-4 sp, (sc, ch 5, sc) in top of FC, 5 sc in next ch-4 sp, sc in next 4 sc 9 times. (180 sc, 9 ch-5 loops) That is 10 sc on each side of every loop. Turn.
Row S3 (pointed scallops): Ch 1, then work sl st in next 2 sc, sc in next 2, hdc in next 2, dc in next 2, tr in next 2, (2 tr, ch 3, 2 tr) in ch-5 loop, tr in next 2, dc in next 2, hdc in next 2, sc in next 2, sl st in next 2 9 times. (216 sts, 9 ch-3 point sps)
Each side uses its 10 sc and each point adds 4 tr, for 24 sts per repeat. Fasten off. The header is 2 in (5.1 cm) deep at the points and 1¼ in (3.2 cm) at the sides.
Cords, Beads, and Flowers
Cord (Teal): Ch the stated number plus 1. Sl st in the back bump of the 2nd ch from hook and of each ch across. Leave 6 in (15.2 cm) tails at both ends. Cords measure 8 sl sts per inch.
- Top A: 12 sl sts, 1½ in (3.8 cm)
- Top B: 32 sl sts, 4 in (10.2 cm)
- Connector: 20 sl sts, 2½ in (6.4 cm)
- End: 8 sl sts, 1 in (2.5 cm)
Bead (Teal):
- Rnd 1: 6 sc in MR. (6)
- Rnd 2: 2 sc in each st. (12)
- Rnd 3: Sc in each st. (12)
- Rnd 4: Sc2tog 6 times. (6)
Stuff and close. The bead is ½ in (1.3 cm) across.
Drop (Teal):
- Rnd 1: 4 sc in MR. (4)
- Rnd 2: 2 sc in each st. (8)
- Rnd 3: [Sc in next st, 2 sc in next st] 4 times. (12)
- Rnd 4: Sc in each st. (12)
- Rnd 5: Sc2tog 6 times. (6)
Stuff and close. The drop is ¾ in (1.9 cm) long.
Flower (Yellow):
- Rnd 1: Ch 1, 5 sc in MR, join. (5)
- Rnd 2: (Sl st, ch 2, 2 dc, ch 2, sl st) in each sc. (5 petals)
The flower is about 0.6 in (1.5 cm) across.
Make All Pieces
Teal:
– 1 header (Rows 1–5, S2, S3)
– 27 motifs (Rnds 2–5)
– 5 Top A cords
– 4 Top B cords
– 18 connectors
– 9 end cords
– 31 beads
– 9 drops
Yellow:
– Header Row S1
– 27 motifs (Rnds 1 and 6)
– 58 flowers
Layout grid (top to bottom; M = motif, F = flower, B = bead):
Strand:   1   2   3   4   5   6   7   8   9
Type:     A   B   A   B   A   B   A   B   A

Strand A: Top A (F, B) – M – Connector (F, B, F) – M –
          Connector (F, B, F) – M – End (F) – Drop
Strand B: Top B (F, B, F, B) – M – Connector (F, B, F) – M –
          Connector (F, B, F) – M – End (F) – Drop
Count check:
– Motifs: 9 strands × 3 = 27
– Flowers: 5 × 6 + 4 × 7 = 58
– Beads: 5 × 3 + 4 × 4 = 31
Joining
Each join is sewn with a cord tail, one point to one point.
- Header to strand: Sew the top of strand n into the ch-3 point sp of scallop n. There are 9 points for 9 strands, and no stitches are added.
- Cord to motif top: Pass the cord tail through the motif’s ch-4 hanging loop. Fold ¼ in (0.6 cm) of cord back and whipstitch it down.
- Motif bottom to next cord: Attach the next connector or end cord to the bottom loop under Spoke 9 the same way.
- Drop: Sew the MR end of the drop to the bottom of the end cord.
- Beads and flowers: Center each one on the cord and stitch through its core. Measure positions from the top of each cord:
- Top A: F at ½ in (1.3 cm); B at 1 in (2.5 cm)
- Top B: F at 1 in (2.5 cm); B at 1¾ in (4.4 cm); F at 2½ in (6.4 cm); B at 3¼ in (8.3 cm)
- Connector: F at ¾ in (1.9 cm); B at 1¼ in (3.2 cm); F at 1¾ in (4.4 cm)
- End: F at ½ in (1.3 cm)
Tension: Make the whipstitches snug but not puckered. Keep cords untwisted and every motif RS forward.
Size checkpoint: Measure each strand from the scallop point to the bottom of the drop.
- Strand A: 1½ + 3 × 4½ + 2 × 2½ + 1 + ¾ = 21¾ in (55.2 cm).
- Strand B: Its 4 in top cord adds 2½ in, for 24¼ in (61.6 cm).
Border
The border goes along the header’s top and sides only. It uses the same gauge of 7 sc per inch.
Rnd 1 (Teal): With RS facing, join at the bottom of the right side edge.
- Right side: 1 sc in each end of Rows 1, 3, 5, S1, S2, and S3 (6 sc), plus 2 sc in each end of Rows 2 and 4 (4 sc). (10 sc)
- Corner: Ch 1. This corner sp does not count as a stitch.
- Top: Sc in each remaining loop of the foundation ch. (189 sc)
- Corner: Ch 1.
- Left side: Work as for the right side. (10 sc)
Fasten off.
Row 2 (top only): With RS facing, join in the top-left corner sp. Ch 1, then reverse sc in each of the 189 top sts. Sl st in the top-right corner sp. Fasten off.
Why the math works: The top has 189 sts, which is 9 repeats of 21. The header is one piece, so there are no seam stitches, and the corner sps are outside all side counts. Sew the rings at st 1, at st 189, and at the 8 points between repeats (between sts 21/22, 42/43, and so on). That gives 10 rings, 3 in (7.6 cm) apart, and each strand hangs halfway between two rings.
Final Blocking
- Pin the header RS up to 27¼ × 2 in (69.2 × 5.1 cm). Pin out every point and fan.
- Mist the header until damp and let it dry completely.
- Lay each strand flat at its target length. Pin each motif to 3 × 4½ in (7.6 × 11.4 cm) and pin every picot open.
- Mist the cords and straighten any twists.
- When everything is dry, put the rings on the rod and let the valance hang for a day before you trim the tails.
Final Quality-Control Checklist
- 27 motifs, each 3 × 4½ in (7.6 × 11.4 cm) with 20 picots and a bottom loop
- Header 27¼ in (69.2 cm) wide with 9 fans and 9 points
- Strands alternate A/B, starting and ending with A
- Strand A is 21¾ in (55.2 cm); Strand B is 24¼ in (61.6 cm)
- 58 flowers, 31 beads, and 9 drops, all centered on the cords
- Cords untwisted and every motif RS forward
- 10 rings, 3 in (7.6 cm) apart
Troubleshooting
- Motif is too round: The ch-7 loops are too tight. Chain more loosely.
- Tip curls: Check that the tip has 2 tr with a ch-5 between them, then block firmly.
- Picots are uneven: Each half must have exactly 41 sts.
- Header ripples: Close each FC more firmly.
- Strands are uneven: Measure the cords before you sew them.
- Beads tilt: Stitch through the center of each bead twice.
Care
Hand wash in cool water with mild soap. Roll the valance in a towel to remove water, then dry it flat and reshape the motifs while they are damp.
Final Notes
Each measurement depends on the one before it. At 7 sts per inch:
- Motif: 2 in (5.1 cm) at Rnd 3, 2½ × 4 in (6.4 × 10.2 cm) at Rnd 5, and 3 × 4½ in (7.6 × 11.4 cm) after edging.
- Header: 189 sts make 27 in (68.6 cm), and the border brings it to 27¼ in (69.2 cm).
- Strands: 21¾ in (55.2 cm) and 24¼ in (61.6 cm), so the valance falls to 26¼ in (66.7 cm) at its longest.
Check your measurements at every stage and the valance will hang evenly.
Happy crocheting!