

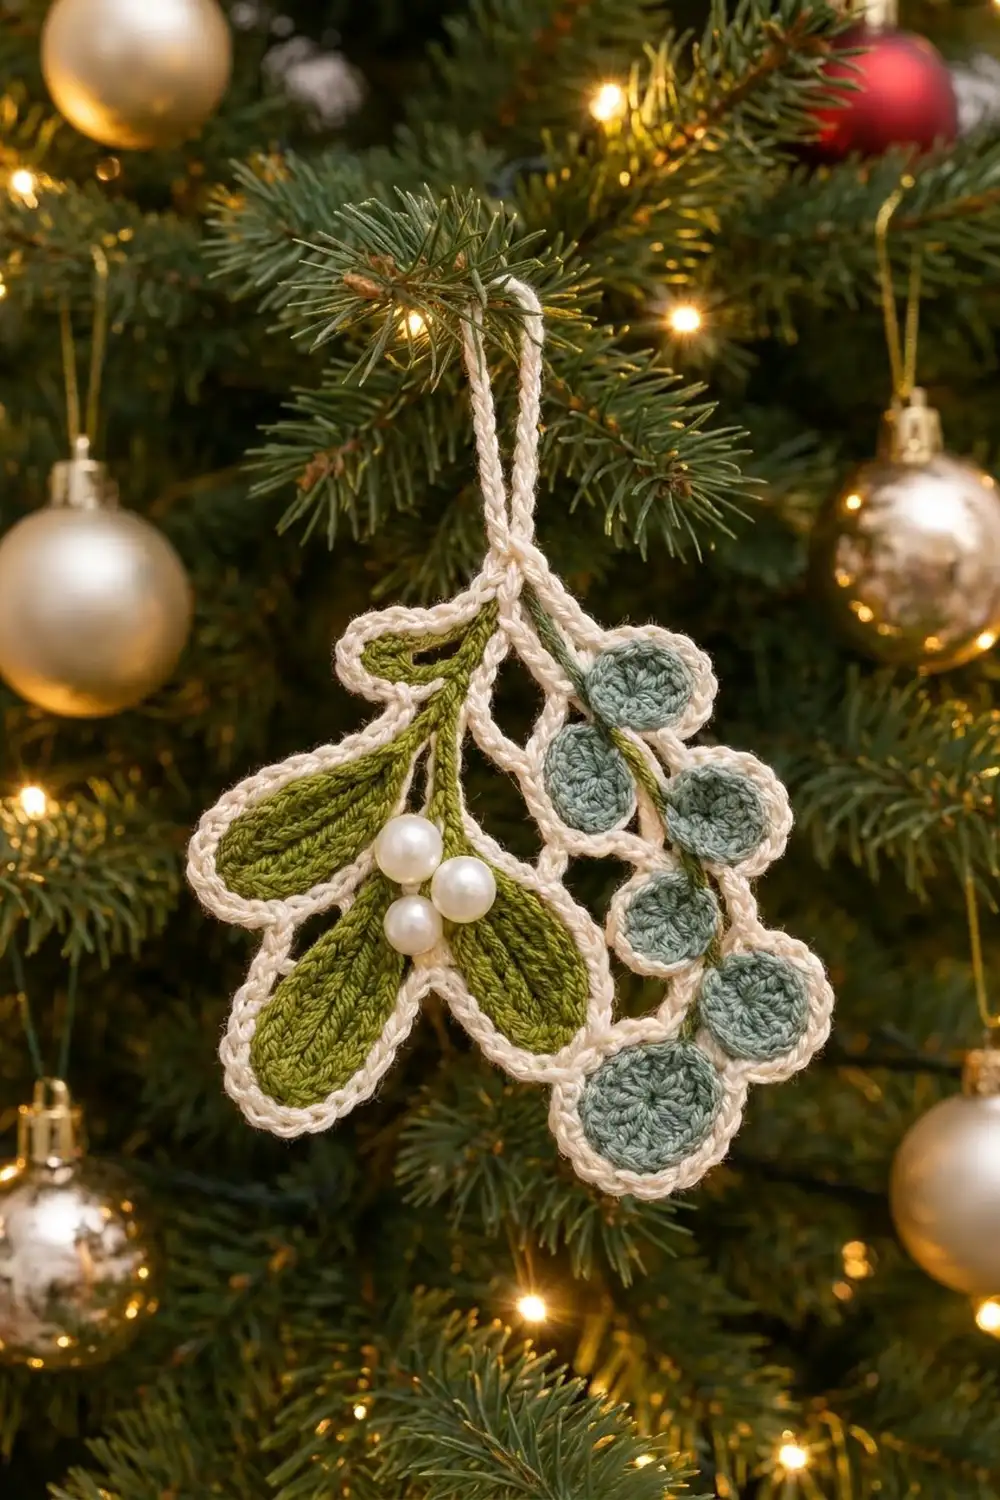
This little mistletoe sprig is a flat hanging ornament with three olive green leaves, six sage blue-green berry discs and three white pearl beads where the leaves meet. Every leaf and berry has a rope-like cream outline. A cream chain web fills the open space above the sprig and rises into a hanging loop.
The colors are soft and vintage: olive leaves, dusty sage berries, ivory outlines and glossy pearls. It looks good on a tree, tied onto a gift or hung in a window.
This pattern uses US crochet terms. The finished ornament measures about 4.5 in wide x 5 in tall (11.4 x 12.7 cm), not counting the hanging loop. The loop adds 1.5 in (3.8 cm), so the total hanging length is 6.5 in (16.5 cm).
Construction is simple. First you crochet the leaves and berry discs separately, make short slip-stitch stems and sew everything into a sprig. Then you work a cream crab-stitch outline around each leaf and disc. The cream chain web and hanging loop come last and hold the whole ornament together.
Finished Size and Construction
- Finished size: 4.5 x 5 in (11.4 x 12.7 cm), plus a 1.5 in (3.8 cm) loop
- Skill level: Advanced beginner to intermediate
- Terminology: US crochet terms
- Yarn weight: DK / light worsted (#3), cotton or cotton blend
- Hook: 3.25 mm (US D/3)
- Number of pieces: One finished ornament (a single motif), built from 3 leaves, 6 berry discs and 4 stems
- Layout: Leaves fan down to the left, berries hang down to the right and the web sits above them
- Leaf size: 2.25 x 0.9 in (5.7 x 2.3 cm) before the outline, 2.5 x 1.1 in (6.4 x 2.8 cm) after it
- Berry size: large 1 in (2.5 cm), small 0.75 in (1.9 cm) before the outline
- Size before border: about 4.25 x 3.75 in (10.8 x 9.5 cm) for the assembled sprig
- Border depth: the crab-stitch outline adds about 0.1 in (0.3 cm) on every edge, and the web adds about 1.25 in (3.2 cm) on top
Materials
Use a smooth, mercerized cotton or cotton blend in DK weight. Cotton shows each stitch clearly and makes a firm, flat ornament that keeps its shape. Avoid fuzzy yarns because they blur the crab-stitch outline.
- Olive green: 5 g / 12 m (13 yd) for leaves and stems
- Sage blue-green: 3 g / 7 m (8 yd) for berry discs
- Cream / ivory: 5 g / 12 m (13 yd) for outlines, web and loop
These amounts include about 20 percent extra for swatching and weaving in ends. One small ball of each color will make several ornaments.
Tools:
- 3.25 mm (US D/3) crochet hook
- 3 white pearl beads, 8 mm (0.3 in / 0.8 cm)
- White sewing thread and a fine sewing needle
- Tapestry needle
- Locking stitch markers (at least 6)
- Scissors
- Pins, a blocking mat and a spray bottle
Abbreviations (US Terms)
- ch: chain
- sl st: slip stitch
- sc: single crochet
- hdc: half double crochet
- dc: double crochet
- MR: magic ring
- st(s): stitch(es)
- rev sc: reverse single crochet (crab stitch)
- ( ): repeat the steps in parentheses as many times as stated
Special stitch: rev sc (crab stitch). Right-handed crocheters work from left to right. Insert the hook into the next stitch to the right, yarn over and pull up a loop. Yarn over again and pull through both loops. Each rev sc makes a twisted, rope-like bump. This is the cream outline around every leaf and berry.
Gauge and Checkpoints
Make one large berry disc first and use it as your gauge swatch.
- Large disc after Round 3: 1 in (2.5 cm) across
- Small disc after Round 2: 0.75 in (1.9 cm) across
- Leaf after Round 2: 2.25 in (5.7 cm) long and 0.9 in (2.3 cm) wide
- Leaf stem: 1.4 in (3.6 cm) long
- Berry stem: 3.5 in (8.9 cm) long
If your disc is larger than 1 in (2.5 cm), go down to a 3.0 mm hook. If it is smaller, go up to a 3.5 mm hook. Also check that the disc lies flat. A disc that cups means your tension is too tight, and one that ruffles means it is too loose.
Small differences add up on an ornament this size. A disc that is 0.1 in (0.3 cm) too wide makes the berry branch about 0.5 in (1.3 cm) too long.
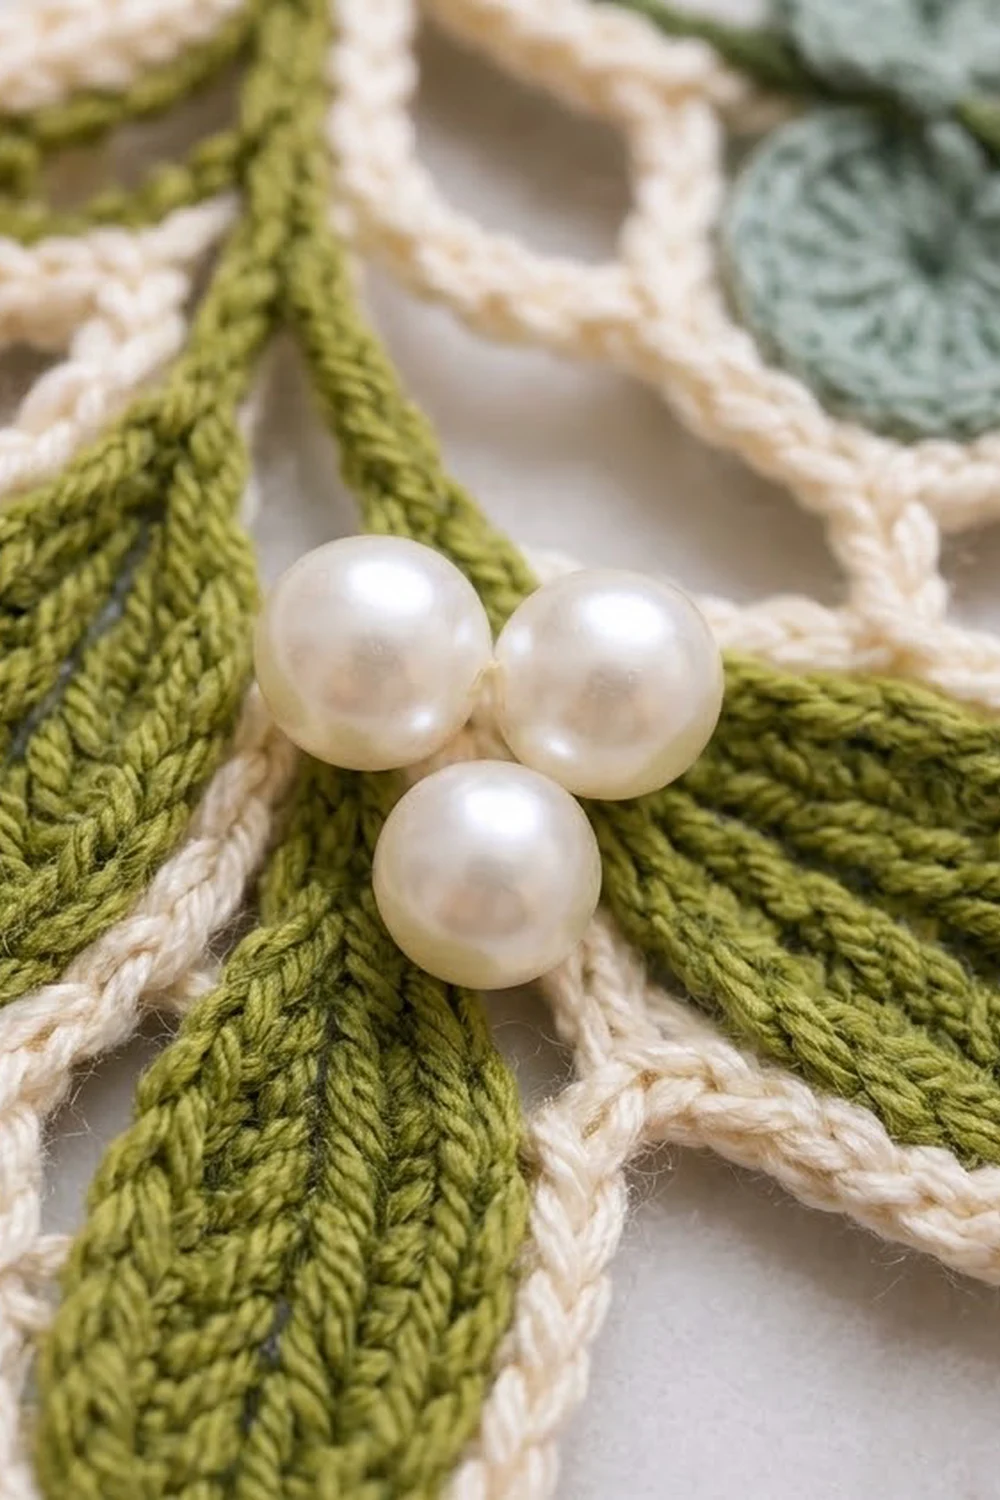
Leaves (Make 3, Olive)
Each leaf is worked around both sides of a foundation chain. The narrow end attaches to the stem, and the wide, rounded end hangs down.
Ch 12.
Round 1: Sc in 2nd ch from hook, sc in next ch, hdc in next 2 ch, dc in next 6 ch, 6 dc in last ch for the rounded tip. Turn the piece and work along the other side of the foundation chain: dc in next 6 ch, hdc in next 2 ch, sc in next 2 ch. Sl st to first sc. (26 sts)
That is 10 sts on the first side, 6 sts in the tip and 10 sts on the second side. Where the dc stitches from both sides meet along the foundation chain, they form a natural center vein.
Round 2: Ch 1, sc in first 10 sts, 2 sc in each of the next 6 sts (the tip), sc in last 10 sts. Sl st to first sc. (32 sts: 26 worked once + 6 extra)
Fasten off, leaving a 6 in (15.2 cm) tail for sewing.
Optional vein: With olive, work 8 surface sl sts up the center line, starting at the narrow end. This makes the vein ridge stand out more.
Checkpoint: 2.25 x 0.9 in (5.7 x 2.3 cm). Make all three leaves the same size. They should only look different because of how you angle them later.
Berry Discs (Make 6, Sage)
You need 2 large discs and 4 small discs. The large discs go at the bottom of the berry branch.
Small disc (make 4):
Round 1: 8 sc in MR. Sl st to first sc. (8 sts)
Round 2: Ch 1, 2 sc in each st around. Sl st to first sc. (16 sts)
Fasten off, leaving a 6 in (15.2 cm) tail. Checkpoint: 0.75 in (1.9 cm).
Large disc (make 2):
Work Rounds 1 and 2 as for the small disc.
Round 3: Ch 1, (sc in next st, 2 sc in next st) 8 times. Sl st to first sc. (24 sts: 16 worked once + 8 extra)
Fasten off, leaving a 6 in (15.2 cm) tail. Checkpoint: 1 in (2.5 cm).
Pull the MR tight but leave a tiny hole in the center. This makes the small dimple in each berry.
Stems (Olive)
Leaf stems (make 3): Ch 9. Sl st in the back bump of the 2nd ch from hook and in each ch across. (8 sl sts) Each stem is 1.4 in (3.6 cm) long.
Berry stem (make 1): Ch 21. Sl st in the back bump of the 2nd ch from hook and in each ch across. (20 sl sts) The stem is 3.5 in (8.9 cm) long.
Leave a 6 in (15.2 cm) tail at both ends.
Assembling the Sprig
Lay all the parts right side up on your blocking mat.
- Top point: Gather the top ends of all 4 stems into one point and sew them together with an olive tail. This is the top point of the sprig.
- Leaves: Sew the narrow end of one leaf to the free end of each leaf stem. Fan the leaves out: Leaf A points down and to the left, Leaf B points down at an angle and Leaf C points almost straight down. Neighboring leaves should touch at their widest points.
- Berries: Lay the berry stem so it runs down to the right. Sew discs along it, alternating left and right, in this order from top to bottom: small, small, small, small, large, large. The two large discs stay at the bottom.
- Tack points: Wherever two leaves or two discs touch, join them with 2 small stitches in the matching color.
- Pearls: With white thread, sew the 3 pearls in a small triangle where the bases of Leaves A and B meet, just below the stems.
Checkpoint: The sprig measures about 4.25 x 3.75 in (10.8 x 9.5 cm).
Border: Cream Outline, Web and Loop
The border has three parts. Round 1 is the cream outline, Round 2 makes the spokes and loop, and Round 3 adds the crossbars of the web.
Border gauge: Work 1 rev sc in each existing st. The outline adds 0.1 in (0.3 cm) on every edge without changing the stitch count.
Border Round 1 (cream rev sc outline): Work around each leaf and disc while it stays in place. Join cream with a sl st in any st of the last round. Ch 1, rev sc in each st around, then sl st to first rev sc. Fasten off and weave in the ends.
- Each leaf: 32 rev sc (10 + 12 + 10, the same as Round 2)
- Each large disc: 24 rev sc
- Each small disc: 16 rev sc
At tack points, work the rev sc through both pieces. The two outlines then merge into one cream line, like the lines between the leaves in the photo.
Total outline sts: 3 x 32 + 2 x 24 + 4 x 16 = 96 + 48 + 64 = 208 rev sc.
Checkpoints: leaves 2.5 x 1.1 in (6.4 x 2.8 cm), large discs 1.25 in (3.2 cm), small discs 1 in (2.5 cm).
Border Round 2 (spokes and loop): Join cream at the top point.
- Hanging loop: Ch 16, then sl st in the top point. The loop is 1.5 in (3.8 cm) tall.
- Spokes: Make 5 spokes. For each one, ch 7, sl st in the outline of the piece it goes to, then sl st back in each of the 7 ch to the top point. (7 ch + 7 sl sts per spoke)
- Spoke 1: outer top edge of Leaf A
- Spoke 2: top edge of Leaf B
- Spoke 3: top edge of Leaf C
- Spoke 4: outer edge of the 1st small disc
- Spoke 5: outer edge of the 2nd small disc
Working sl sts back along each chain doubles it. That gives you the thick, cord-like web lines in the photo.
Border Round 3 (crossbars): Join cream with a sl st in the 4th sl st of Spoke 1, counting from the top point. (Ch 5, sl st in the 4th sl st of the next spoke) 4 times. Fasten off. (4 crossbars, 20 ch)
The crossbars turn the spokes into a web of open cells above the sprig.
Why the math works: The rev sc outline uses 1 st in each st, so it adds no extra fabric and every piece stays flat. The 7-ch spokes match the distance from the top point to the pieces. The 5-ch crossbars, placed at the 4th st, match the distance between neighboring spokes at that spot, so the web lies flat without pulling.
Checkpoint: 4.5 x 5 in (11.4 x 12.7 cm), plus the 1.5 in (3.8 cm) loop.
Final Blocking
- Weave in all ends on the back and trim them to 0.25 in (0.6 cm).
- Spray the ornament lightly until it is damp but not wet.
- Pin it to the mat at 4.5 x 5 in (11.4 x 12.7 cm).
- Pin each leaf tip and each large disc to hold its shape.
- Pin the spokes straight and shape the loop into a neat teardrop.
- Let it dry completely, which takes about 6 to 8 hours.
- For extra stiffness, brush on a light coat of fabric stiffener, keeping it off the pearls.
Final Quality-Control Checklist
- Round 2 of each leaf has 32 sts, and each leaf has a full 32 rev sc outline
- Large discs have 24 sts and small discs have 16 sts
- All 4 stems meet at one firm top point
- The two large discs sit at the bottom of the berry branch
- The 3 pearls are sewn on firmly and don’t wobble
- The cream outline goes all the way around every piece without gaps
- The web has 5 spokes and 4 crossbars
- The finished ornament is 4.5 x 5 in (11.4 x 12.7 cm)
- The loop is 1.5 in (3.8 cm) tall and centered
- No ends show on the front
Troubleshooting
Leaves curl lengthwise. Your foundation chain is too tight. Make the chain with a larger hook, then switch back for Round 1.
Discs cup. Check that Round 2 has 16 sts and Round 3 has 24. If the counts are right, loosen your tension.
Discs ruffle. You probably added extra stitches. Count again and redo the round.
Crab stitch looks flat. Tilt your hook slightly downward as you pull through, and keep the loops loose enough for the twist to show.
Web lines sag. Pull each chain snug as you sl st back, then block with the spokes pinned straight.
Ornament hangs crooked. Make sure the top point is centered over the sprig. Sew the stems again if needed.
Pearls flop forward. Sew each pearl twice and take the thread through the leaf outline on the back to anchor it.
Care
Hand wash in cool water with mild soap and lay flat to dry. Don’t wring it, and store it flat so the leaves and loop keep their shape.
Final Notes
Here are the measurements in order. Your gauge is the large disc, which should be 1 in (2.5 cm) after Round 3. Each leaf is 2.25 x 0.9 in (5.7 x 2.3 cm) after Round 2. The assembled sprig is about 4.25 x 3.75 in (10.8 x 9.5 cm). The cream outline brings the leaves to 2.5 x 1.1 in (6.4 x 2.8 cm) and the large discs to 1.25 in (3.2 cm). With the web and loop, the finished ornament is 4.5 x 5 in (11.4 x 12.7 cm) plus a 1.5 in (3.8 cm) loop.
Check each measurement as you go, and your mistletoe will come out neat, flat and ready to hang.
Happy crocheting!