

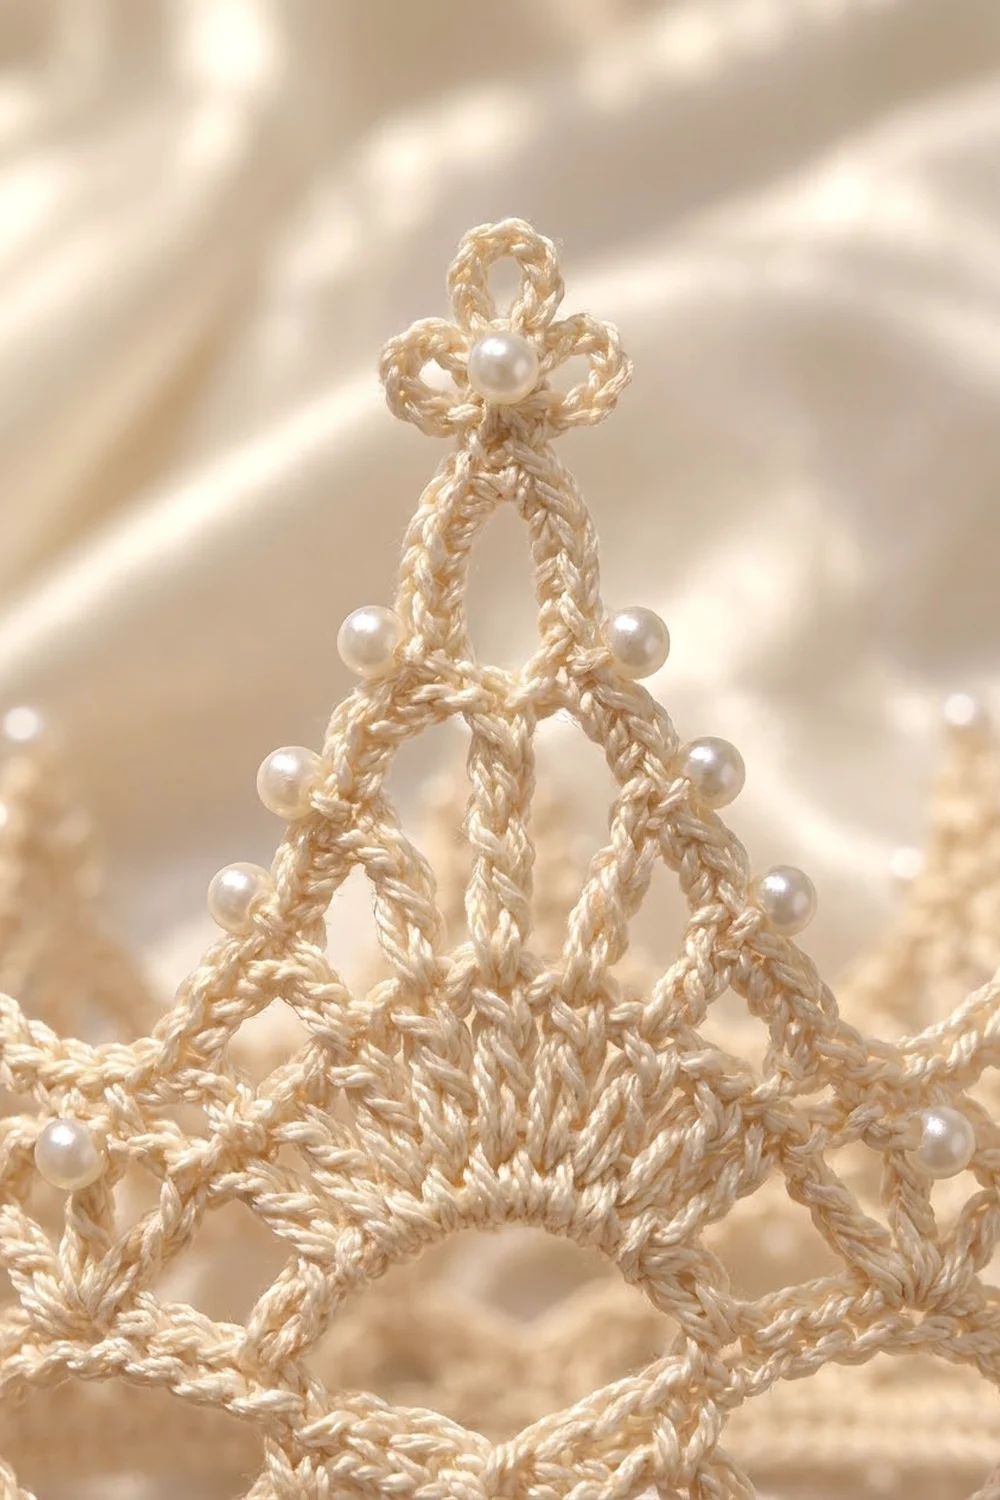
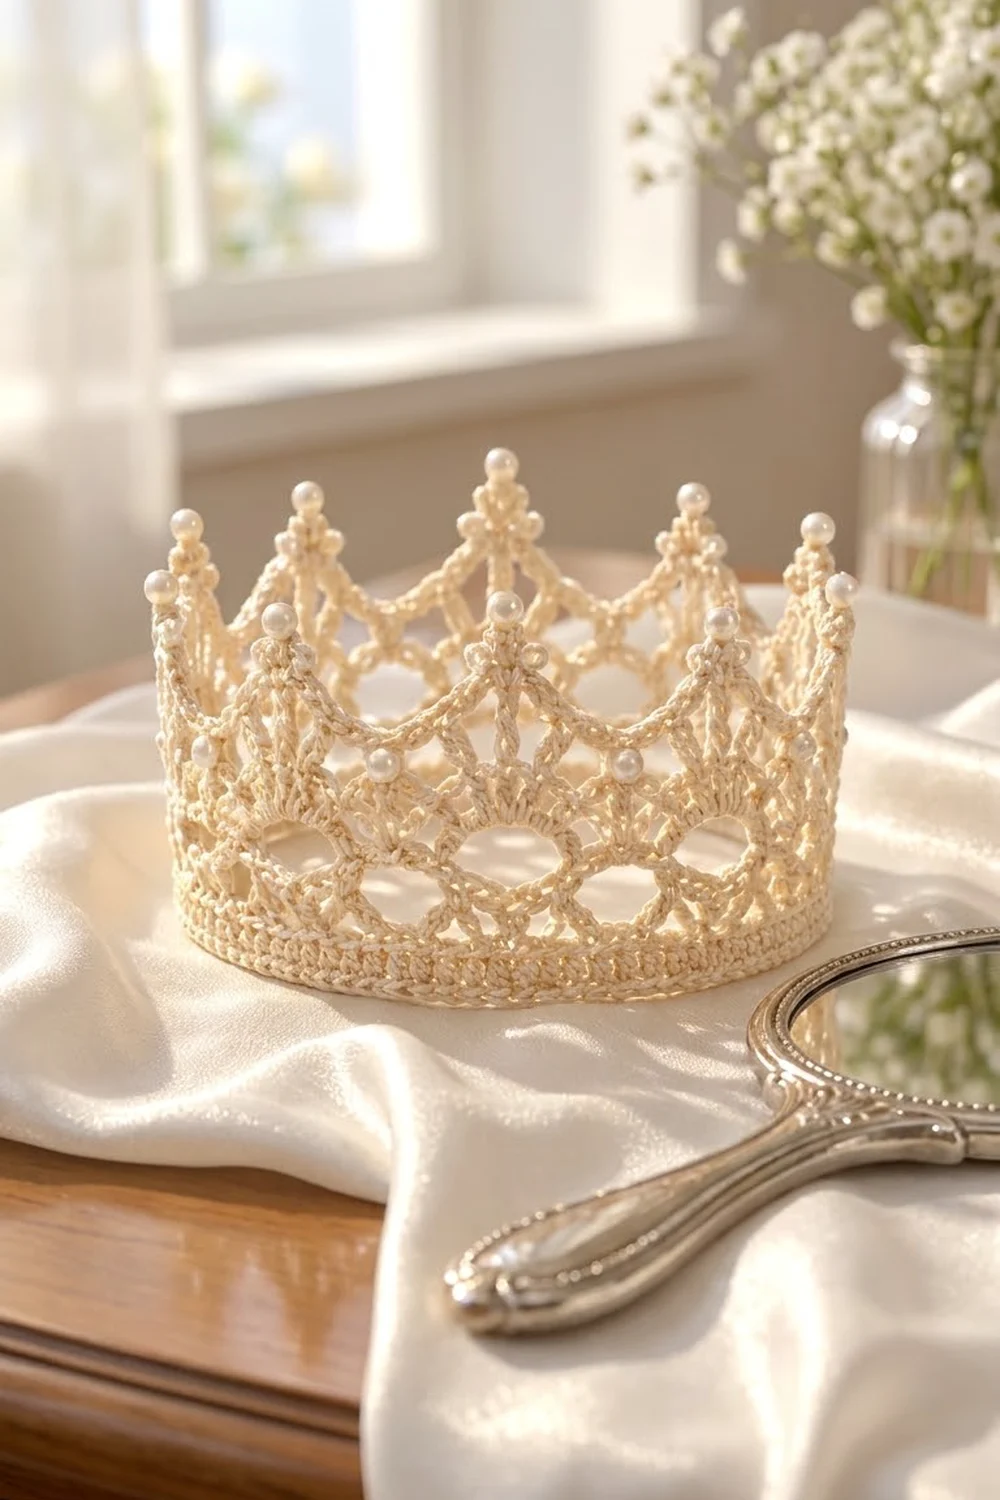
This little crown is made of light, airy lace. A firm single-crochet band holds the shape. Above it, open chain lattice and sunburst fans rise into six pearl-tipped peaks. It works as a keepsake, a photo prop, a birthday crown for a small child or a decoration for a dressing table.
The sample uses one color: a soft cream cotton thread with small white pearl beads. The style is vintage and romantic, a bit like heirloom doilies but in three dimensions. All instructions use US crochet terms.
The finished crown is 12 in (30.5 cm) around, about 3.8 in (9.7 cm) across and 4 in (10.2 cm) tall at the peaks.
It is made in one piece, in joined rounds, from a foundation ring. You work the band, lattice, fans and scallops in the round. Then you shape each peak separately in short rows, add a bottom edging, stiffen the crown and sew on the pearls.
Finished Size and Construction
- Finished size: 12 in (30.5 cm) circumference × 4 in (10.2 cm) tall
- Skill level: Intermediate
- Terminology: US
- Yarn weight: Size 3 cotton crochet thread (fingering-weight range)
- Hook: 2.25 mm (US B-1)
- Number of pieces: 1
- Layout: One ring with 6 repeats of 14 stitches (6 fans, 6 tall peaks and 6 small points)
- Piece size before the edging: 12 in (30.5 cm) around × 3.75 in (9.5 cm) tall
- Edging (border) depth: 0.25 in (0.6 cm), added at the bottom edge
Materials
Thread: Use a mercerized cotton thread in size 3. Mercerized cotton holds stiffener well and gives clear stitch definition. Avoid fuzzy or acrylic-blend threads, because the peaks will droop.
- Cream (main color): about 25 g / 105 m used. Have 35 g / 150 m on hand.
Tools and notions:
- 2.25 mm (US B-1) crochet hook
- 30 white pearl beads, 4 mm (buy 36 to allow for spares)
- Beading needle and white or cream sewing thread
- Tapestry needle
- Fabric stiffener or strong starch
- A cylinder about 12 in (30.5 cm) around (a jar or container wrapped in plastic wrap)
- Rustproof pins and stitch markers
The quantities above include a margin of about 40% for the thread and 6 extra pearls.
Abbreviations (US Terms)
- ch – chain
- sl st – slip stitch
- sc – single crochet
- dc – double crochet
- sk – skip
- sp – space
- st(s) – stitch(es)
- rep – repeat
- beg – beginning
Special stitches:
- Picot: Ch 3, then sl st in the 3rd ch from the hook.
- Small point: In the stitch indicated, work (dc, picot, dc).
- Trefoil tip: Ch 4, sl st in the 4th ch from the hook. Then work (ch 4, sl st in the same st) 2 times. This makes three small rings.
Gauge and Checkpoints
Gauge: 7 sc and 7 sc rounds = 1 in (2.5 cm).
Before you start, work a test swatch. Chain 15, then work 14 sc per row for 7 rows. The swatch should measure 2 in (5.1 cm) wide and 1 in (2.5 cm) tall. If it does, your hook and tension match the pattern.
Checkpoints (height measured from the foundation chain):
- After Rnd 3: 12 in (30.5 cm) around, 0.4 in (1.0 cm) tall
- After Rnd 5: 1.15 in (2.9 cm) tall
- After Rnd 7: 1.9 in (4.8 cm) tall
- After Rnd 9: 2.4 in (6.1 cm) tall
- After the peaks: 3.75 in (9.5 cm) tall
- After the edging: 4 in (10.2 cm) tall
If your work is too big: Go down 0.25 mm in hook size, or chain more tightly. If it is too small: Go up 0.25 mm in hook size. A crown that is 0.5 in (1.3 cm) off in circumference still stands well, but the peaks will sit closer together or further apart.
Pattern
Foundation and Band
Foundation: Ch 84. Join with a sl st to the first ch to form a ring. Make sure the chain is not twisted.
Rnd 1: Ch 1, sc in each ch around. Join with a sl st to the first sc. (84 sc)
Rnd 2: Ch 1, sc in each sc around. Join. (84 sc)
Rnd 3: Repeat Rnd 2. (84 sc)
Checkpoint: The band measures 12 in (30.5 cm) around and 0.4 in (1.0 cm) tall. Place a marker after every 14th sc to mark the 6 repeats.
Lattice
Rnd 4 (large ovals): Ch 1, sc in the first sc. Then work (ch 7, sk 6 sc, sc in the next sc) 11 times. Ch 7, sk the last 6 sc and join with a sl st to the first sc. (12 sc and 12 ch-7 loops; 12 × 7 = 84 sts covered)
Rnd 5 (offset loops): Sl st in the next 3 ch to reach the center of the first loop. Ch 1, sc in the same loop. Then work (ch 7, sc in the next ch-7 loop) 11 times. Ch 7, join to the first sc. (12 sc and 12 ch-7 loops)
These offset loops cross the Rnd 4 ovals to make the diamond lattice.
Checkpoint: 1.15 in (2.9 cm) tall.
Sunburst Fans
Rnd 6 (fan base): Sl st into the next ch-7 loop. Ch 3 (counts as dc), then work 8 dc in the same loop. Ch 3, sc in the next loop, ch 3. Then work 9 dc in the next loop, ch 3, sc in the next loop, ch 3. Repeat from * 4 more times. Join to the top of the beg ch-3. (6 fans of 9 dc = 54 dc, 6 sc, 12 ch-3 sps)
Each fan should sit above a marked 14-st repeat.
Rnd 7 (open rays): Ch 4 (counts as dc + ch 1). Work (dc in the next dc, ch 1) 7 times, then dc in the next dc. Ch 4, sc in the next sc, ch 4. Then work (dc in the next dc, ch 1) 8 times, dc in the next dc, ch 4, sc in the next sc, ch 4. Repeat from * 4 more times. Join to the 3rd ch of the beg ch-4. (6 fans, each with 9 dc and 8 ch-1 sps; 6 sc; 12 ch-4 sps)
Checkpoint: 1.9 in (4.8 cm) tall. The fans should fan out flat without cupping.
Scallops and Small Points
Rnd 8: Sl st in the first ch-1 sp, then ch 1. Then work sc in the ch-1 sp, (ch 3, sc in the next ch-1 sp) 7 times, ch 3, work a small point in the next sc, ch 3. Repeat from * 5 more times. Join to the first sc. (Per repeat: 8 sc, 7 ch-3 fan loops, 2 ch-3 connecting sps, 1 small point. Total: 48 sc, 42 fan loops, 12 connecting sps, 6 small points)
Rnd 9: Sl st into the first ch-3 fan loop, then ch 1. Then work sc in the fan loop, (ch 4, sc in the next fan loop) 6 times, ch 4, sc in the picot of the small point, ch 4. Repeat from * 5 more times. Join to the first sc and fasten off. (Per repeat: 8 sc, 6 ch-4 fan loops, 2 ch-4 connecting loops. Total: 48 sc, 36 fan loops, 12 connecting loops)
The ch-4 loops that pass through each small point make the scallop line that sits between the tall peaks.
Checkpoint: 2.4 in (6.1 cm) tall.
Peaks (make 6, worked in rows)
Work each peak over the 6 ch-4 fan loops of one repeat. Turn at the end of every row.
Row 1: Attach the thread with a sl st in the first fan loop of the repeat. Ch 1, sc in the same loop. Then work (ch 4, sc in the next fan loop) 5 times. Turn. (6 sc, 5 loops)
Row 2: Sl st in the first 2 ch to reach the center of the first loop. Ch 1, sc in the same loop. Then work (ch 4, sc in the next loop) 4 times. Turn. (5 sc, 4 loops)
Row 3: Work as Row 2, but repeat the (ch 4, sc) 3 times. (4 sc, 3 loops)
Row 4: Work as Row 2, but repeat the (ch 4, sc) 2 times. (3 sc, 2 loops)
Row 5: Work as Row 2, but work the (ch 4, sc) 1 time. (2 sc, 1 loop)
Row 6 (tip): Sl st in the first 2 ch to reach the center of the last loop. Ch 1, sc in the loop, work a trefoil tip, then sc in the same loop. Fasten off.
Repeat Rows 1–6 over the remaining 5 fans. Each peak loses one loop per row, which gives it a clean, even taper.
Checkpoint: The crown measures 3.75 in (9.5 cm) to the trefoil tips. Each peak is 2 in (5.1 cm) wide at its base, matching its 14-st repeat.
Border (Bottom Edging)
Border gauge: Same as the band, 7 sts = 1 in (2.5 cm). The two edging rounds add 0.25 in (0.6 cm) of height.
Turn the crown upside down. Join the thread in any free loop of the foundation chain.
Edging Rnd 1: Ch 1, sc in each free loop of the foundation chain around. Join. (84 sc)
Edging Rnd 2: Sl st in the back loop of each sc around. Join and fasten off. (84 sl sts)
Why the math works: The foundation has 84 chains, so there are exactly 84 free loops. Working one stitch into each loop keeps the count at 84, the same as Rnds 1–3. Because nothing is added or skipped, the bottom edge stays exactly 12 in (30.5 cm) around and will not flare or pucker. The back-loop slip stitches make the firm ridged edge that helps the crown stand.
Checkpoint: 4 in (10.2 cm) total height.
Final Blocking
- Weave in all ends and hide the tails along the chain loops.
- Dilute the stiffener as the label directs. Use it full strength if you want very upright peaks.
- Soak the crown completely, then squeeze out the excess. Do not wring it.
- Slide the crown over the plastic-wrapped cylinder, which should be 12 in (30.5 cm) around.
- Even out the band so the bottom edge sits level.
- Open each oval and fan with your fingers, and spread the fan rays evenly.
- Pull each peak straight up and pin the trefoil tip so it is upright. Check that all 6 tips are the same height: 4 in (10.2 cm) from the bottom edge.
- Let it dry fully, usually 24 hours, then remove it from the cylinder.
- Sew on the pearls with the beading needle:
- 6 on the trefoil centers
- 6 on the small-point picots
- 12 at the outer ends of Row 3 of each peak (2 per peak)
- 6 at the center (4th) loop of Rnd 8 above each fan
Final Quality-Control Checklist
- The band and edging each have 84 stitches, and the circumference is 12 in (30.5 cm).
- There are 12 ovals in Rnd 4 and 12 offset loops in Rnd 5.
- There are 6 fans, each with 9 dc.
- There are 6 small points, each joined into the Rnd 9 scallop.
- There are 6 peaks, each tapering 5-4-3-2-1 loops to a trefoil.
- All peaks are 4 in (10.2 cm) tall and evenly spaced 2 in (5.1 cm) apart at the base.
- All 30 pearls are secure, with no loose sewing thread.
- The crown stands upright without support.
Troubleshooting
- The ring twisted: Check before Rnd 1. If it twisted, undo the join and rejoin.
- The fans cup or ruffle: If they cup, your dc are too tight; loosen up or add a little height to each stitch. If they ruffle, your chain-1 spaces are too long.
- The peaks lean sideways: Make sure Row 1 starts in the first fan loop of the repeat, not in a connecting loop.
- The peaks droop after blocking: Re-stiffen at full strength and dry upright.
- The bottom edge flares: You added stitches in Edging Rnd 1. Count back to 84.
- The crown is too loose to stand: Work the band and edging with a hook 0.25 mm smaller.
Care
Spot clean only, using a damp cloth. Washing removes the stiffener. If the crown needs a full wash, re-stiffen it on the cylinder afterward, and keep it away from humidity to hold its shape.
Final Notes
The measurement chain runs like this:
- Gauge: 7 sc = 1 in (2.5 cm)
- 84 stitches give a 12 in (30.5 cm) circumference
- The band reaches 0.4 in (1.0 cm)
- The lattice reaches 1.15 in (2.9 cm)
- The fans reach 1.9 in (4.8 cm)
- The scallops reach 2.4 in (6.1 cm)
- The peaks reach 3.75 in (9.5 cm)
- The edging brings it to 4 in (10.2 cm)
Check at each stage, and the crown will come out true and even.
Happy crocheting!