

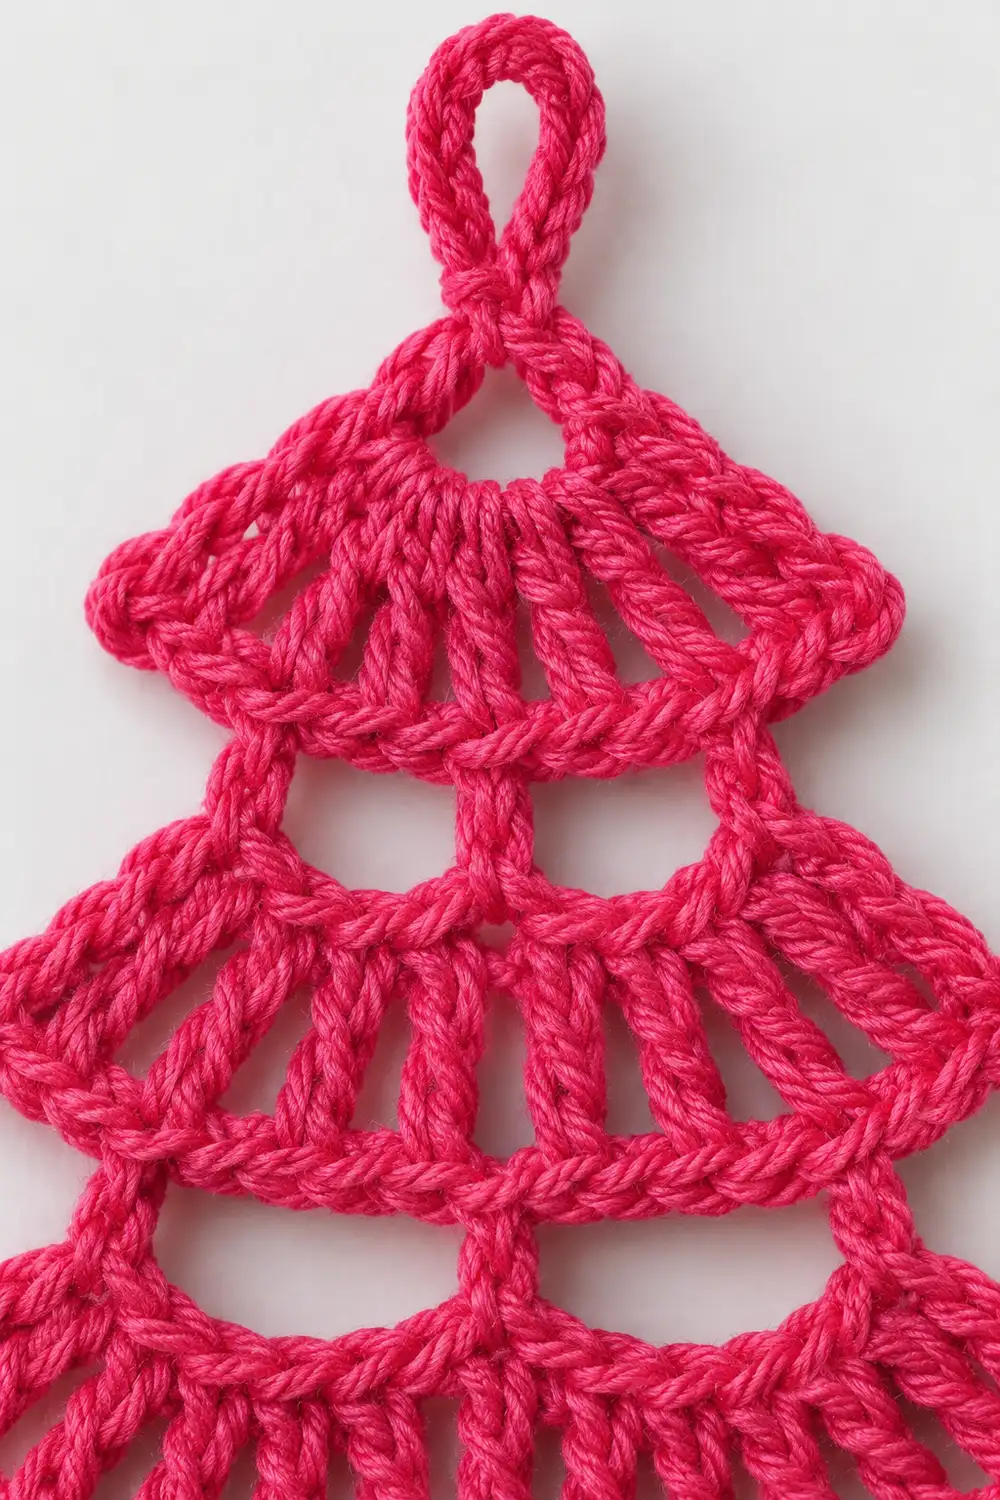
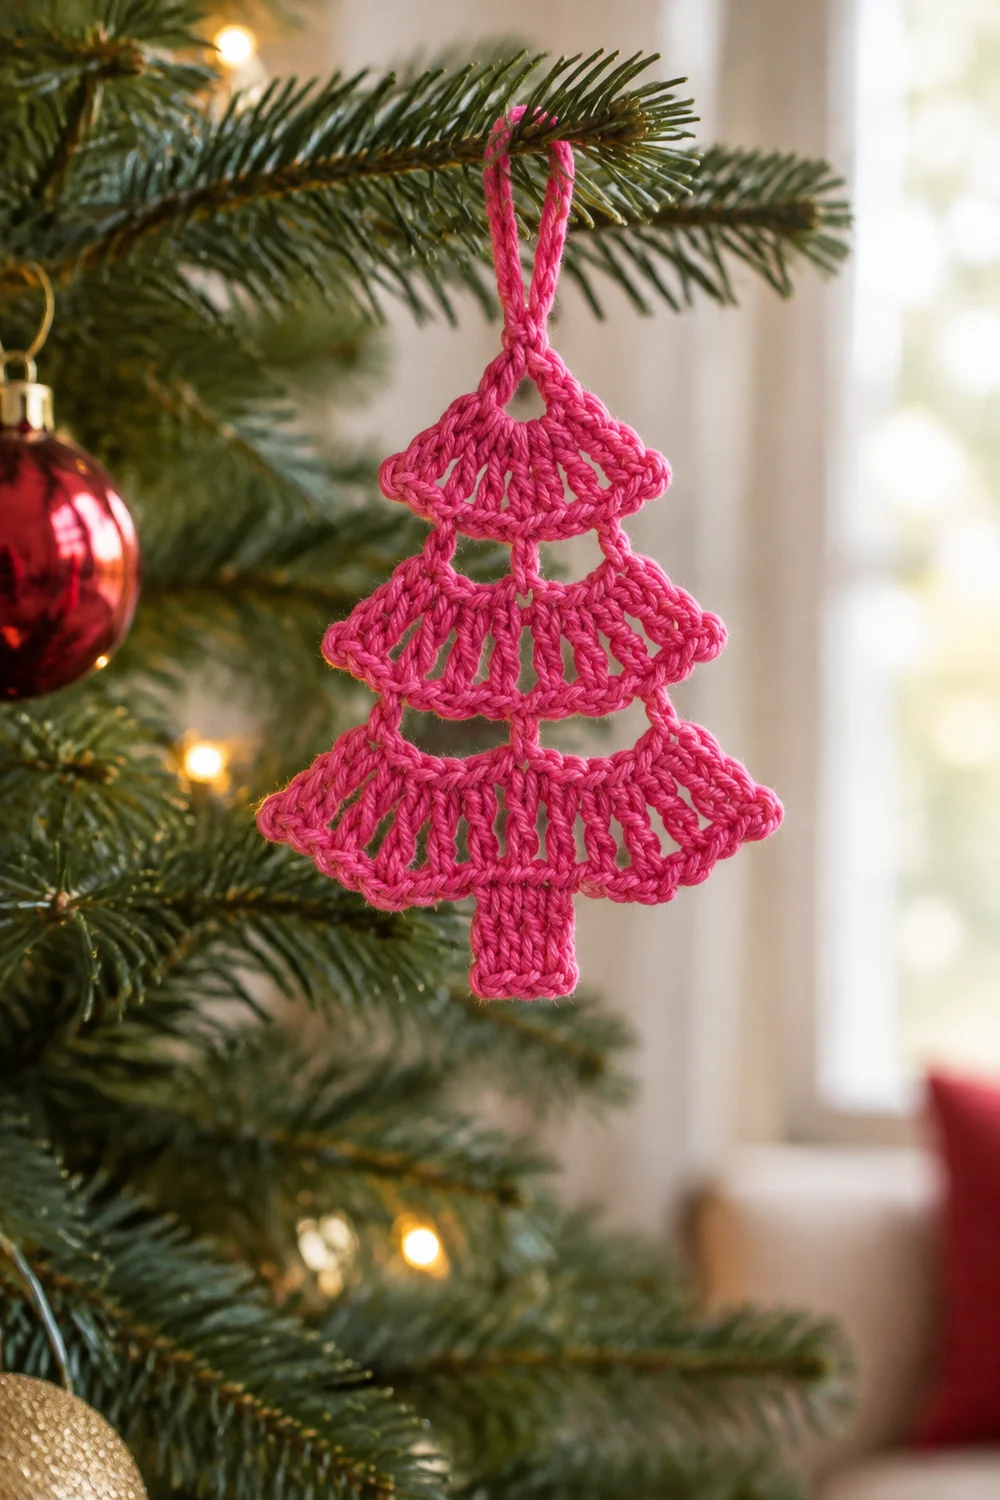
This Christmas tree ornament has three cone-shaped tiers stacked one above the other. Each tier is an open fan of tall stitches that ends in a scalloped shell edge. Small gaps separate the tiers, which gives the tree a light, layered silhouette. A solid little trunk sits at the bottom, and a chain loop at the top is ready for hanging.
The sample is worked in a single bright hot pink. The lacy fans radiate from a point at the top of each tier, so the piece reads clearly as a tree. It looks good on a branch, on a gift tag, or taped flat in a window.
The pattern uses US crochet terms. The finished ornament measures about 4 in (10.2 cm) wide at the bottom tier. It is 7.25 in (18.4 cm) tall from the top of the first tier to the bottom of the trunk, or 8.5 in (21.6 cm) including the hanging loop.
The ornament is worked as one piece from the top down. You start with a small ring and the hanging loop, then work Tier 1 in short rows that fan out to a cone. Next you join the yarn at the center of that tier’s scalloped edge, chain a short spine, and start the next tier from a new ring. The trunk is worked straight off the center of the bottom tier. There is no sewing.
Finished Size and Construction
- Finished size: 4 in (10.2 cm) wide × 7.25 in (18.4 cm) tall, or 8.5 in (21.6 cm) with the loop
- Skill level: Easy-intermediate
- Terminology: US crochet terms
- Yarn weight: DK (#3)
- Hook: 4.0 mm (G-6)
- Number of pieces: 1. The ornament is worked in one piece, and you rejoin the yarn 3 times.
- Layout: Loop at the top, then Tiers 1, 2, and 3 stacked vertically on a center chain spine, then the trunk at the bottom
- Tier sizes (finished): Tier 1 is 1.25 in (3.2 cm) tall × 2.25 in (5.7 cm) wide. Tier 2 is 1.75 in (4.4 cm) × 3 in (7.6 cm). Tier 3 is 2.25 in (5.7 cm) × 4 in (10.2 cm).
- Tier sizes before the scalloped edge: Tier 1 is 0.75 in (1.9 cm) × 1.5 in (3.8 cm). Tier 2 is 1.25 in (3.2 cm) × 2.25 in (5.7 cm). Tier 3 is 1.75 in (4.4 cm) × 3 in (7.6 cm).
- Edge depth: The shell edge adds about 0.5 in (1.3 cm) to each tier.
- Trunk: about 0.9 in (2.3 cm) wide × 1 in (2.5 cm) tall
Materials
Yarn: Use a smooth DK yarn with good stitch definition. Cotton or a cotton blend holds the scallops crisply and blocks flat. Acrylic also works, but it may need a light starch to keep the cone shape. Avoid fuzzy or very splitty yarns, because they hide the lacy fans.
- Hot Pink: 10 g, about 25 m (27 yd)
That quantity includes a margin of roughly 25% for your gauge swatch and weaving in ends. The ornament itself uses about 8 g (20 m).
Tools:
– 4.0 mm (G-6) crochet hook
– Tapestry needle
– Scissors
– 2 stitch markers
– Blocking mat and rust-proof pins
– Spray bottle
– Optional: fabric stiffener or spray starch
Abbreviations (US Terms)
- ch – chain
- sl st – slip stitch
- sc – single crochet
- dc – double crochet
- st(s) – stitch(es)
- sk – skip
- rep – repeat
- RS / WS – right side / wrong side
Special stitch – Shell: Work 5 dc in the same st.
Turning chain: The ch 3 at the start of a dc row counts as the first dc. It sits in the first st of the row. The top of a turning chain counts as a stitch on the next row.
Gauge and Checkpoints
Gauge: 18 dc and 10 dc rows = 4 in (10.2 cm), worked flat with a 4.0 mm hook. That works out to 4.5 dc and 2.5 rows per 1 in (2.5 cm).
You don’t need a separate swatch. Tier 1 is your test piece, so work it first and measure it before you continue.
Checkpoints:
1. Tier 1 after Row 2: You should have 9 dc. The outer curve measures about 2 in (5.1 cm) along the stitches, and the height from the top of the ring is about 0.75 in (1.9 cm).
2. Tier 1 finished: about 1.25 in (3.2 cm) tall × 2.25 in (5.7 cm) wide, measured across the outer shell tips
3. Tier 2 finished: about 1.75 in (4.4 cm) × 3 in (7.6 cm)
4. Tier 3 finished: about 2.25 in (5.7 cm) × 4 in (10.2 cm)
5. Whole tree: about 4 in (10.2 cm) × 7.25 in (18.4 cm), not counting the loop
If Tier 1 is too big (more than 2.5 in / 6.4 cm wide), switch to a 3.5 mm hook.
If Tier 1 is too small (under 2 in / 5.1 cm wide), switch to a 4.5 mm hook.
Changing size slightly won’t break anything, because the stitch counts work at any gauge. However, the three tiers must match each other, so keep your tension steady throughout.
Tier 1 (Top Tier)
Apex ring: Ch 4, sl st in the first ch to form a ring.
Hanging loop: Ch 15, sl st into the ring. The loop is about 1.25 in (3.2 cm) tall.
Row 1 (RS): Ch 3, then work 4 dc into the ring on the side opposite the loop. Turn. (5 dc)
Row 2 (WS): Ch 3, then work 2 dc in each of the next 4 sts. Turn. (9 dc)
Stop here and check Checkpoint 1.
Row 3 (RS, edge): Work the Shell Edge Row with 2 shells, as given in the Border section. (13 sts: 3 sc, 10 dc)
Fasten off.
Tier 2 (Middle Tier)
Spine and ring: With the RS facing, join the yarn with a sl st in the center sc of the Tier 1 edge. This is the 2nd of its 3 sc.
Ch 7, then sl st in the 4th ch from the hook to form the apex ring. The first 3 ch form the spine, which is about 0.5 in (1.3 cm) long.
Row 1: Ch 3, then work 4 dc into the ring on the side away from the spine. Turn. (5 dc)
Row 2: Ch 3, then work 2 dc in each of the next 4 sts. Turn. (9 dc)
Row 3: Ch 3, then 2 dc in next st, dc in next st. Rep from * 3 more times (4 times total). Turn. (13 dc)
Row 4 (edge): Work the Shell Edge Row with 3 shells. (19 sts: 4 sc, 15 dc)
Fasten off.
Tier 3 (Bottom Tier)
Spine and ring: Find the center st of the Tier 2 edge, which is the 3rd dc of the middle (2nd) shell. With the RS facing, join with a sl st there.
Ch 7, then sl st in the 4th ch from the hook to form the ring. The 3-ch spine is about 0.5 in (1.3 cm) long.
Rows 1–3: Work these exactly as Tier 2 Rows 1–3. (5 dc, then 9 dc, then 13 dc)
Row 4: Ch 3, then 2 dc in next st, dc in each of next 2 sts. Rep from * 3 more times. Turn. (17 dc)
Row 5 (edge): Work the Shell Edge Row with 4 shells. (25 sts: 5 sc, 20 dc)
Fasten off.
Trunk
The trunk is worked straight down from the center of Tier 3.
With the RS facing, join the yarn with a sl st in the center sc of the Tier 3 edge. This is the 3rd of its 5 sc.
Row 1: Ch 3, then work 3 dc in the same sc. Turn. (4 dc)
Rows 2–3: Ch 3, then dc in each of the next 3 sts. Turn. (4 dc per row)
Fasten off. Row 1 tucks partly into the valley between two shells, so the trunk shows about 1 in (2.5 cm) below the scallops. It is about 0.9 in (2.3 cm) wide.
Weave in all 8 ends along the backs of the dc rows. Keep them out of the spine chains, or the spines will thicken unevenly.
Border: Scalloped Shell Edge
The scalloped edge is the border of this ornament. It runs along the outer curve of each tier only. The sloped top sides of each cone are the turning-chain edges of the dc rows, and they get no border.
Shell Edge Row (worked across a row of 4k + 1 sts, making k shells):
Ch 1, sc in the first st, then sk 1 st, Shell in next st, sk 1 st, sc in next st. Rep from * until you have k shells. The final sc lands in the top of the turning chain.
Exact counts per tier:
| Tier | Base row sts | Shells (k) | sc | Edge total |
|---|---|---|---|---|
| 1 | 9 | 2 | 3 | 13 |
| 2 | 13 | 3 | 4 | 19 |
| 3 | 17 | 4 | 5 | 25 |
Why the math works:
– Each repeat uses exactly 4 base sts: one skipped, one Shell, one skipped, and one sc. The opening sc uses 1 more st, so the base row must hold 4k + 1 sts.
– Every dc row in this pattern adds exactly 4 sts, starting from 5. That gives 5, 9, 13, 17, which are all 4k + 1 numbers, so the edge always fits with no fudging.
– The edge total is 5k dc + (k + 1) sc = 6k + 1. That gives 13, 19, and 25.
Where the joins land:
– The center of each base row is st 2k + 1.
– The sc fall on sts 1, 5, 9, and so on.
– When k is even (Tiers 1 and 3), the center is an sc. That is why the Tier 2 spine and the trunk start from a center sc.
– When k is odd (Tier 2), the center is the middle dc of the middle shell. That is why the Tier 3 spine starts there.
– In every case, each piece hangs exactly on the centerline.
Border gauge:
– Each repeat spans 4 base sts, or about 0.9 in (2.3 cm) at 4.5 dc per 1 in (2.5 cm).
– Each Shell fans to about 0.5 in (1.3 cm) deep.
– The shells flare slightly past the base row, which is why each tier gains about 0.75–1 in (1.9–2.5 cm) of width from its edge.
Final Blocking
- Soak the ornament in cool water for 10 minutes, then press out the water in a towel. Do not wring it.
- Lay it RS up on the blocking mat. Pin the top of the hanging loop, then pin the apex ring of each tier on a straight vertical line.
- Pull each spine just straight, so it is about 0.5 in (1.3 cm) long. Don’t stretch it.
- Open each tier into a cone. Pin the outer shell tip on each side first, matching the checkpoint widths: 2.25 in (5.7 cm), 3 in (7.6 cm), and 4 in (10.2 cm).
- Pin the center of every shell so the scallops curve evenly and the valley sc sit slightly higher.
- Square the trunk to 0.9 in (2.3 cm) × 1 in (2.5 cm) with 4 pins.
- Optional: mist the ornament with starch or brush on a thin coat of fabric stiffener for a firm, flat hang.
- Let it dry completely, at least 12 hours, before unpinning.
Final Quality-Control Checklist
- Tier 1 has 2 shells, Tier 2 has 3, and Tier 3 has 4.
- Each spine and the trunk sits exactly at the center of the tier above it.
- The fan rows radiate from each ring with no twisted turning chains.
- There are visible gaps on both sides of each spine.
- The trunk is 4 sts wide and 3 rows tall.
- The total height is about 7.25 in (18.4 cm) without the loop.
- The widest point is about 4 in (10.2 cm).
- All 8 ends are woven in and trimmed, and none show from the RS.
- The hanging loop is centered and not twisted.
Troubleshooting
Tier ruffles or cups: Your dc rows are tighter than your fans. Loosen your tension slightly, or try going up 0.5 mm.
Shells don’t fit the row: Recount the base row. It must be 9, 13, or 17. The usual culprit is a missed turning chain, so remember that the ch 3 counts as a st.
Spine or trunk is off-center: Remove it and rejoin in the correct center st. Count from both ends to be sure.
Spine stretches too long: Chain more firmly. If it still stretches, sl st back up the 3 ch to reinforce it.
Tree hangs crooked: Re-block it with all the apex rings pinned on one ruler-straight line.
Trunk flares at the top: Pin it square while it dries. Starch helps keep it that way.
Care
Hand wash in cool water and lay flat to dry, reshaping the scallops while damp. If the ornament is starched, re-starch it after washing.
Final Notes
Everything follows one measurement chain:
– Tier 1 confirms your gauge of 4.5 dc and 2.5 rows per 1 in (2.5 cm).
– Each dc row adds 4 sts, so every base row lands on 4k + 1 and the shell edge always fits.
– The shell edges bring the tiers to 2.25 in (5.7 cm), 3 in (7.6 cm), and 4 in (10.2 cm) wide.
– The 0.5 in (1.3 cm) spines and the 1 in (2.5 cm) trunk complete a tree about 7.25 in (18.4 cm) tall, or 8.5 in (21.6 cm) with the loop.
If your first tier matches its checkpoint, the rest will follow.
Optional: for a matching set, make extra ornaments in other colors using the same counts.
Happy crocheting!