

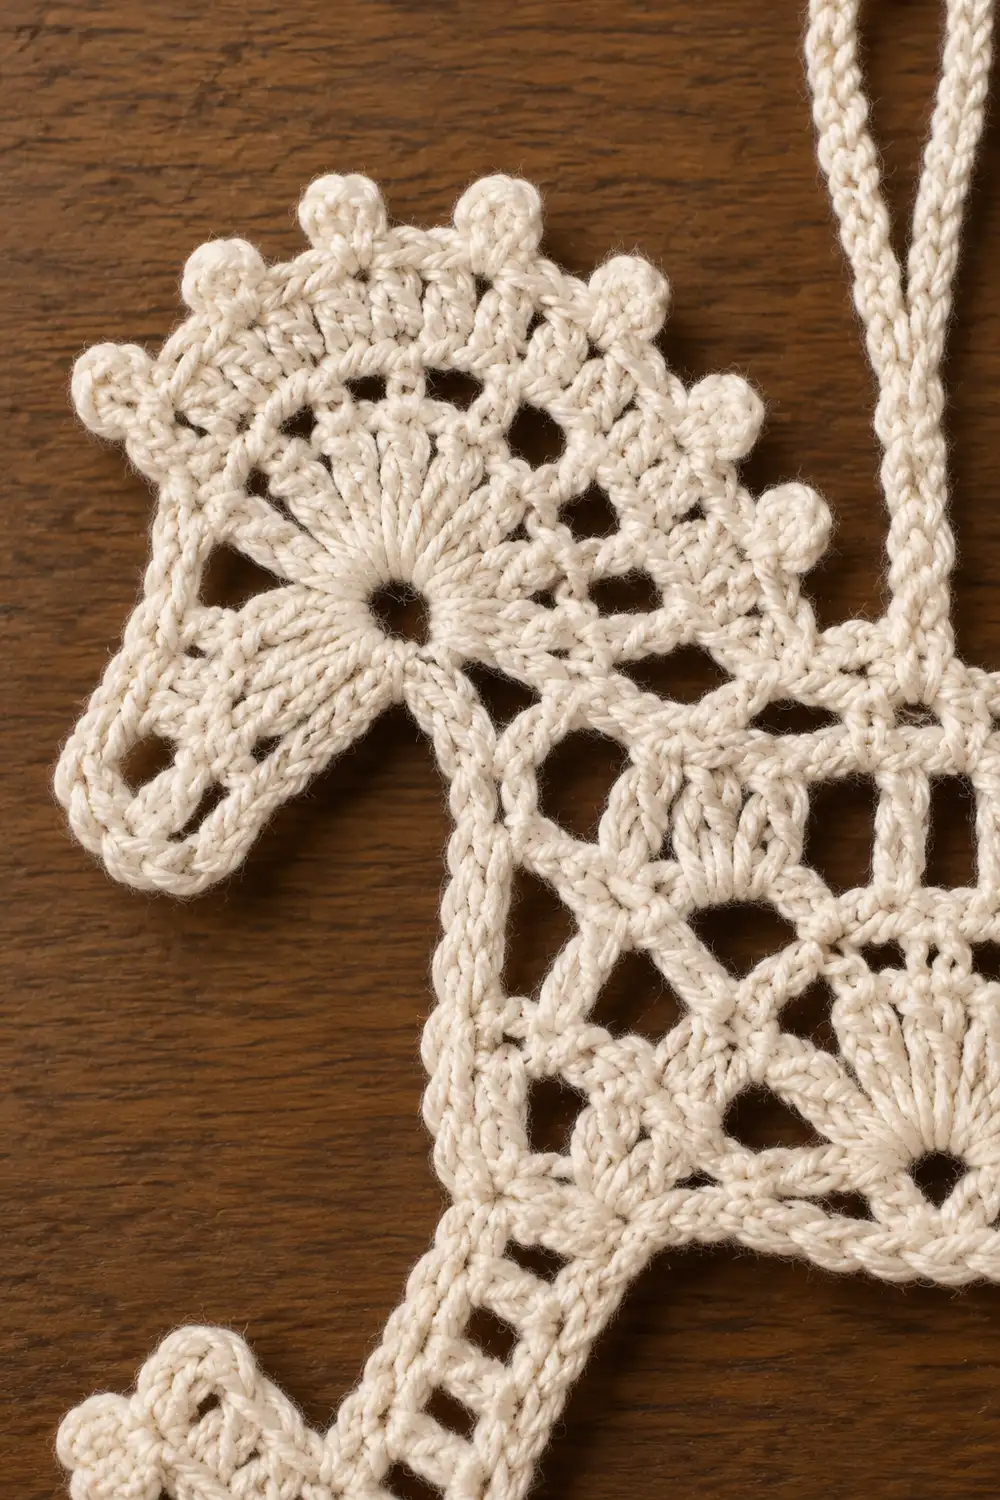
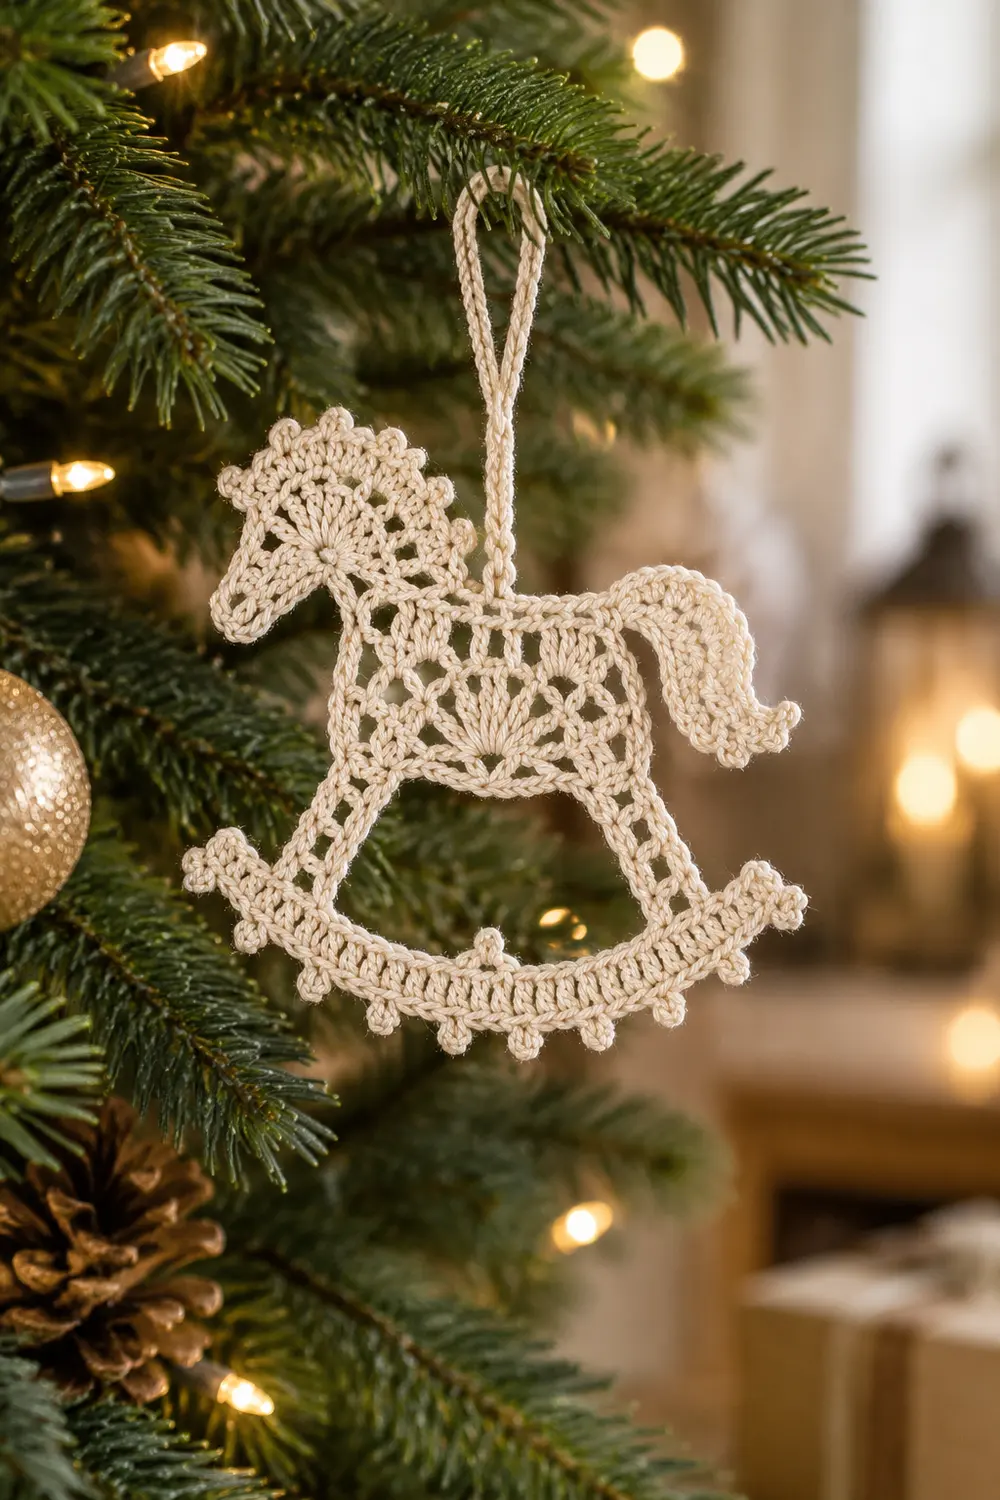
This rocking horse ornament is a small piece of thread lace. The horse is shown in profile with an arched neck and a mane of fan stitches. The body is openwork, built from a shell and a spreading lacy fan. The tail is an open lace strip, and the horse stands on a curved rocker trimmed with small picot bumps.
The ornament is worked entirely in cream or off-white cotton thread. The single color lets the stitch texture show: the fans, the shell, the mesh, and the bell-shaped dangles at the ends of the four legs. A looped chain handle at the top of the mane is used for hanging.
The pattern uses US crochet terms. The finished ornament measures 3 in (7.6 cm) wide and 3.5 in (8.9 cm) tall, not counting the hanging loop. The loop adds about 1 in (2.5 cm).
The ornament is one piece, worked in sections with no sewing. You start with the lace body and add the neck and head to it. Then come the mane fans, the hanging loop, the tail, and the four legs. The rocker is crocheted directly onto the two outer bells, and the picot trim finishes its bottom edge.
Finished Size and Construction
- Finished size: 3 in (7.6 cm) wide × 3.5 in (8.9 cm) tall, plus a 1 in (2.5 cm) loop
- Skill level: Intermediate
- Terminology: US crochet terms
- Yarn weight: Lace (0), size 10 cotton crochet thread
- Hook: 1.5 mm steel hook
- Number of pieces: 1, worked in connected sections
- Layout: Single motif, no assembly
- Piece size: Same as the finished size
- Size before border: 3 in (7.6 cm) wide × 3.2 in (8.1 cm) tall
- Border depth: 0.3 in (0.8 cm) picot trim along the rocker’s bottom edge only
Materials
Use mercerized size 10 cotton thread. It holds crisp stitch definition and takes stiffener well. Avoid fuzzy or acrylic threads, because the fans will blur.
- Cream/off-white: 5 g (about 26 m)
The ornament uses about 3 g (15 m). The quantity above includes a margin for your gauge swatch and for any rows you rip back.
Tools:
- 1.5 mm steel hook, plus 1.25 mm and 1.75 mm hooks for gauge adjustment
- Fine tapestry needle
- 4 locking stitch markers
- Scissors
- Ruler
- Blocking mat and rustproof pins
- Spray starch or fabric stiffener
Abbreviations (US Terms)
- ch – chain
- sl st – slip stitch
- sc – single crochet
- dc – double crochet
- sc2tog – single crochet 2 together
- st(s) – stitch(es)
- sp – space
- sk – skip
- RS – right side
Special stitches
- Shell/fan: 5 dc in the same st.
- Picot: Ch 3, then sl st in the 3rd ch from the hook.
Gauge and Checkpoints
Gauge: 10 sc and 10 sc rows = 1 in (2.5 cm). One dc row is about 0.3 in (0.8 cm) tall.
To check your gauge, make a swatch. Ch 11, then work 10 rows of 10 sc. It should measure 1 in (2.5 cm) square.
Because the ornament is a single piece, treat the body as your test section. Work Body Rows 1–4 and measure before you continue.
Checkpoints:
- Body Row 1: 15 sc = 1.5 in (3.8 cm)
- Body Row 4: 21 sc = 2.1 in (5.3 cm); body is 0.8 in (2.0 cm) tall
- Neck Rows 1–4: 0.4 in (1.0 cm) tall
- Neck, head, and mane together: 1.2 in (3.0 cm) above the body
- Tail: about 1.25 in (3.2 cm) long
- Legs: outer legs 0.7 in (1.8 cm); inner legs 0.6 in (1.5 cm)
- Rocker Row 1: 28 sc = 2.8 in (7.1 cm)
- Rocker finished: 0.5 in (1.3 cm) tall; bottom edge 3.2 in (8.1 cm) measured along the curve
If your piece is too big, switch to the 1.25 mm hook. If it is too small, switch to the 1.75 mm hook. Remake the body and measure again.
Body (Shell and Fan Lace)
Row 1 (belly): Ch 16. Sc in the 2nd ch from the hook and in each ch across. Turn. (15 sc)
Row 2 (shell row): Ch 4 (counts as dc + ch 1). Sk 1 st, dc in st 3. Ch 1, sk st 4, dc in st 5. Ch 2, sk sts 6–7, work a shell in st 8. Ch 2, sk sts 9–10, dc in st 11. Ch 1, sk st 12, dc in st 13. Ch 1, sk st 14, dc in st 15. Turn.
(6 mesh dc, 4 ch-1 sps, 2 ch-2 sps, 1 shell of 5 dc)
Row 3 (fan row):
- Ch 4 (counts as dc + ch 1). Dc in the next dc, ch 1, dc in the next dc.
- Ch 1, sk the ch-2 sp. Dc in the first shell dc, then [ch 1, dc in the next shell dc] 4 times.
- Ch 1, sk the ch-2 sp. [Dc in the next dc, ch 1] 2 times, then dc in the 3rd ch of the turning ch. Turn.
(11 dc, 10 ch-1 sps)
The shell now opens into a spoked fan.
Row 4 (back edge, conversion row): Ch 1. Sc in each dc and in each ch-1 sp across. Do not fasten off yet. (11 + 10 = 21 sc)
Fasten off and weave in the ends.
Orientation: Mark one face as the RS. With the RS facing and Row 1 at the bottom, the left end is the chest.
- Number the Row 4 sts 1–21 from left to right.
- Number the belly’s 15 foundation loops 1–15 from left to right.
Neck and Head
The neck leans forward by 1 st per row. Each row adds 1 st at the front and removes 1 st at the back, so the count stays at 6 and the neck arches.
Row 1: With the RS facing, join the thread in Row 4 st 6. Ch 1, sc in st 6 and each st to st 1. Turn. (6 sc)
Row 2 (front to back): Ch 1, 2 sc in the first st, sc in the next 3 sts, sc2tog. Turn. (6 sc)
Row 3 (back to front): Ch 1, sc2tog, sc in the next 3 sts, 2 sc in the last st. Turn. (6 sc)
Row 4: Repeat Row 2. (6 sc)
Check that the neck is 0.4 in (1.0 cm) tall.
Row 5 (head): Ch 1, sc in each st across, then ch 4 for the muzzle. Turn. (6 sc + 4 ch)
Row 6: Sc in the 2nd ch from the hook and in the next 2 ch, then sc in the next 6 sts. Turn. (3 + 6 = 9 sc)
Row 7: Ch 1, sc in the first 7 sts, sc2tog. Turn. (8 sc)
Row 8: Ch 1, sc2tog, sc in the next 4 sts, sc2tog. (6 sc)
Fasten off.
Mane
Base row: With the RS facing, join the thread at the back edge of Neck Row 1. Work up the back edge:
- 1 sc in each row-end of Rows 1–7 (7 sc)
- 1 sc in each of the 6 sts of Row 8, working back to front (6 sc)
Turn. (13 sc)
Fan row: Ch 1, sc in the first st. [Sk 1 st, fan in the next st, sk 1 st, sc in the next st] 3 times.
(3 fans: 15 dc + 4 sc; 1 + 3 × 4 = 13 sts used)
Fasten off. The middle fan sits at the top of the mane.
Hanging Loop
Join the thread in the 3rd dc of the middle mane fan. Ch 20, then sl st in the same st. The loop should stand about 1 in (2.5 cm) tall. Fasten off.
Tail (Open Lacework)
Row 1:
- Join the thread in Row 4 st 21. Ch 14.
- Sc in the 2nd ch from the hook. [Ch 3, sk 1 ch, sc in the next ch] 6 times. The last sc lands in the ch closest to the body.
- Sl st in st 21. Turn.
(7 sc, 6 ch-3 loops)
Row 2: [Ch 4, sc in the next ch-3 loop] 6 times, then ch 4 and sc in the tip sc. Turn. (7 ch-4 loops)
Row 3: In each ch-4 loop, work (2 sc, ch 2, 2 sc). Sl st in st 21. (28 sc, 7 ch-2 points)
Fasten off. The tail should be about 1.25 in (3.2 cm) long.
Legs with Bell Dangles
Work all four legs into the belly’s foundation loops, with the RS facing. Each leg ends in a dc bell that flares out from the leg.
Outer front leg (belly sts 1–3):
- Row 1: Join the thread, ch 1, sc in sts 1–3. (3 sc)
- Rows 2–4: Ch 1, turn, sc in each st. (3 sc)
- Row 5 (bell): Ch 3 (counts as dc), turn. Dc in the same st, then 2 dc in each of the next 2 sts. (6 dc)
Fasten off.
Outer back leg (belly sts 13–15): Work as for the outer front leg. (6-dc bell)
Inner front leg (belly sts 5–6):
- Row 1: Join the thread, ch 1, sc in sts 5–6. (2 sc)
- Rows 2–3: Ch 1, turn, sc in each st. (2 sc)
- Row 4 (bell): Ch 3 (counts as dc), turn. Dc in the same st, then 2 dc in the next st. (4 dc)
Fasten off.
Inner back leg (belly sts 10–11): Work as for the inner front leg. (4-dc bell)
The outer legs measure 0.7 in (1.8 cm). They are anchored to the rocker in the next section.
The inner legs measure 0.6 in (1.5 cm). Their bells hang free, 0.1 in (0.3 cm) above the rocker.
Rocker
Row 1 (top edge, joining row): Ch 29. Sc in the 2nd ch from the hook and in each ch across. (28 sc)
The bells are joined to the rocker as you work this row:
- Bell placement is symmetrical, so you can count from either end.
- At rocker sts 5–10 and sts 19–24, insert the hook through the top of a bell dc and then through the ch. Complete the sc through both.
- Use one bell dc per sc, so the 6 bell dc match 6 rocker sts.
- Keep the horse RS up as you work.
Row 2 (curve row, growth row): Ch 3 (counts as dc), turn. Dc in each st across, working 2 dc in sts 6, 12, 17, and 23. (32 dc)
The increase positions form mirror pairs: 6 + 23 = 29 and 12 + 17 = 29. This keeps the curve even.
Row 3 (bottom edge, conversion row): Ch 1, turn. Sc in each dc across. (32 × 1 + 0 extra = 32 sc)
The bottom edge is now 4 sts longer than the top edge, so the rocker curves upward at both tips.
Check that the rocker is 0.5 in (1.3 cm) tall and 3.2 in (8.1 cm) along its bottom curve.
Border: Picot Trim
Border gauge: The trim is worked at the same gauge as the rest of the ornament, 10 sc per 1 in (2.5 cm). It is worked only along the bottom edge.
Trim row: Continue from Rocker Row 3. Ch 1, turn. Sc in the first 2 sts. [Picot, sc in the next 4 sts] 7 times, then picot and sc in the last 2 sts.
- Bottom edge: 32 sc + 8 picots
- Top edge and tips: no stitches added
Fasten off.
Why the math works:
- 2 + (7 × 4) + 2 = 32, so every Row 3 st gets exactly one sc.
- Each end has 2 sc before its first or last picot, so the trim is symmetrical.
- The picots sit 0.4 in (1.0 cm) apart.
- The picots are worked off the sc and do not use extra base sts, so the rocker does not lengthen.
- The trim adds 0.3 in (0.8 cm) of depth, bringing the height from 3.2 in (8.1 cm) to 3.5 in (8.9 cm).
Final Blocking
- Weave in all ends along solid sc edges, not through the lace.
- Soak the ornament in cool water and press out the excess in a towel.
- Lay it RS up and pin the rocker into a smooth arc.
- Pin the outer legs straight down to the rocker. Angle the inner legs slightly toward the center so their bells don’t overlap.
- Pin each mane fan open, then open the body fan’s spokes evenly.
- Shape the tail into a gentle S curve.
- Check the dimensions: 3 in (7.6 cm) from the muzzle to the back rocker tip, and 3.5 in (8.9 cm) tall.
- Apply starch or stiffener and let it dry completely before unpinning.
Final Quality-Control Checklist
- Body Row 4 has 21 sc, and the fan has 5 spokes.
- The neck has kept 6 sts on every row and arches forward.
- The mane has 3 even fans, with the loop on the middle fan.
- The tail has 7 lace points.
- All four legs are sc and end in bells: 6 dc for the outer legs, 4 dc for the inner legs.
- The outer bells are caught into rocker sts 5–10 and 19–24.
- The rocker rows have 28, 32, and 32 sts, and the trim has 8 picots.
- The final size is 3 in × 3.5 in (7.6 × 8.9 cm).
Troubleshooting
- Rocker too flat: Work Row 2 more loosely, or add a 5th increase at the center st.
- Rocker too curved: Your Row 1 is tight. Redo it with a 1.75 mm hook.
- Body cupping: The ch-1 sps are too short. Loosen the chains slightly.
- Mane fans ruffling: Work the base row with a smaller hook.
- Inner bells catching on each other: Re-block them angled inward and stiffen.
- Hanging tilt: A slight forward lean is normal for a mane loop and reads as rocking. Block the tail fuller to balance it.
Care
Spot clean or hand wash in cool water. Re-block and re-stiffen after washing, and store the ornament flat between tissue.
Final Notes
The measurement chain:
- The 15-sc belly opens into a 21-sc back that is 2.1 in (5.3 cm) wide.
- The neck, head, and mane rise 1.2 in (3.0 cm) above the 0.8 in (2.0 cm) body.
- The legs drop 0.7 in (1.8 cm) to the 28-sc rocker.
- The rocker curves to a 32-sc bottom edge.
- The picot trim brings the ornament to 3.5 in (8.9 cm) tall and 3 in (7.6 cm) wide.
Check your gauge on the body, then each later section should fall into place. Happy crocheting!