

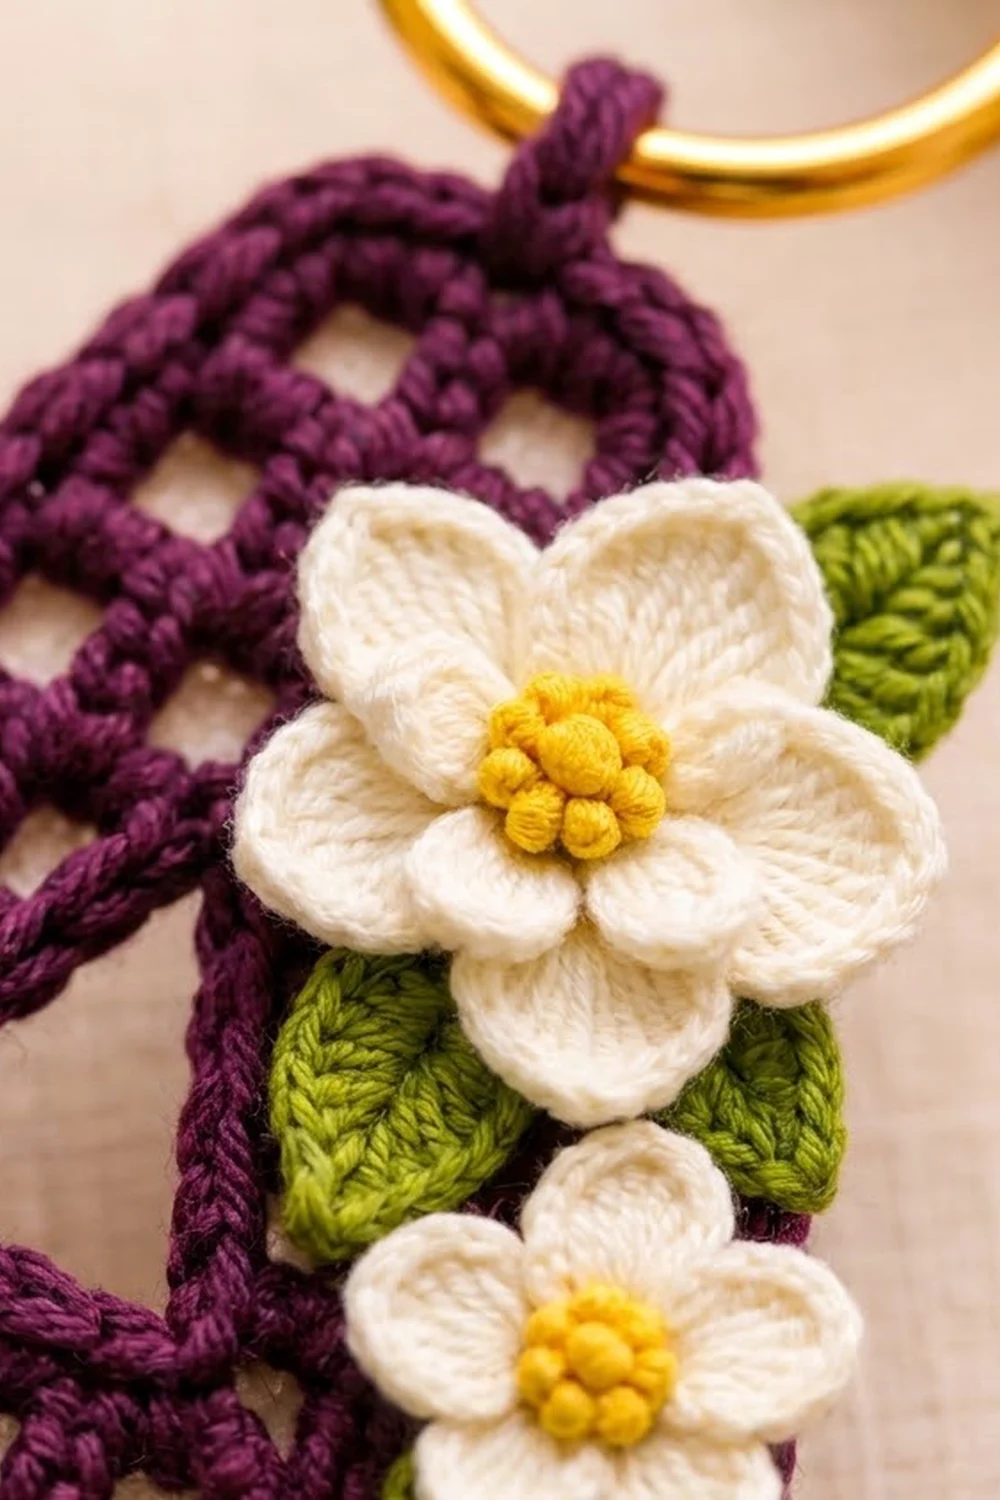
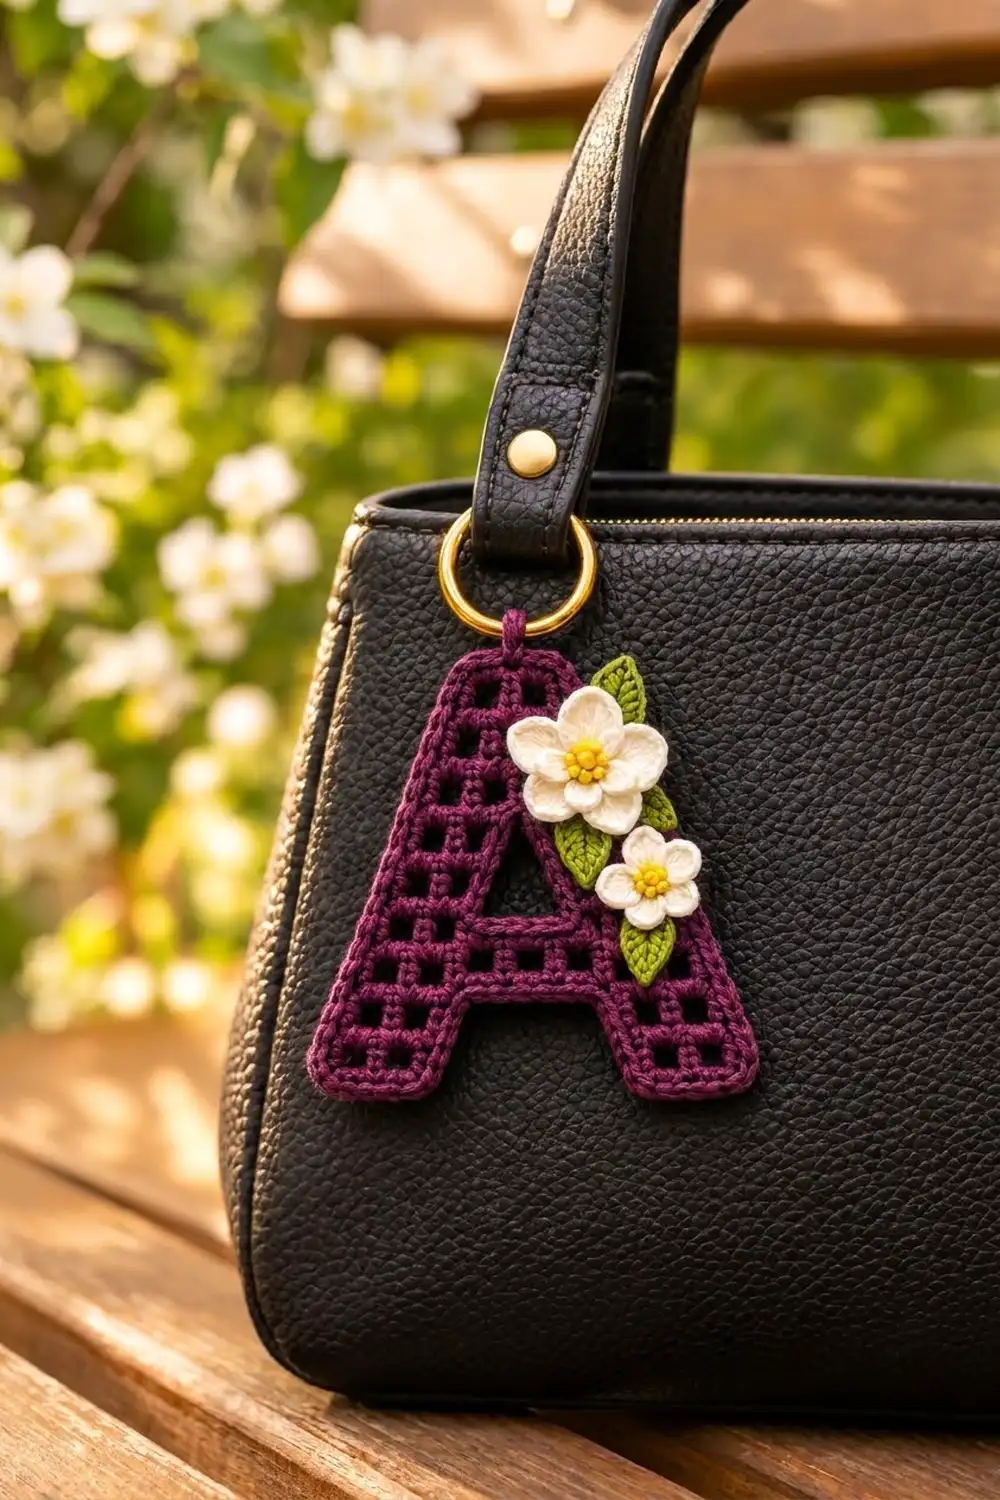
This keychain is a capital letter A worked in open filet mesh. The deep plum grid gives a light, lacy look while keeping the letter shape sharp. A neat single-crochet outline frames the letter, and a small cluster of cream blossoms with yellow centers and fresh green leaves adds a soft, botanical touch.
The letter hangs from a folded tab on a gold ring, so it clips easily onto a bag, keys, or a zipper pull. It makes a quick personalized gift. Once you understand how the A is built, the same method works for other letters.
This pattern uses US crochet terms. The finished letter measures about 4 in (10.2 cm) wide x 4 in (10.2 cm) tall, not counting the tab and ring.
Construction overview: You work the letter bottom-up in rows of filet mesh. Each leg starts as a separate small rectangle. A chain “bridge” joins the legs into the crossbar. The piece splits again around the upper opening and then rejoins to form the peak. Stepped decreases on the outer edges create the slope. Finally you work a single-crochet outline, add the tab and ring, and sew on the flowers and leaves.
Finished Size and Construction
- Finished size: 4 in (10.2 cm) wide x 4 in (10.2 cm) tall, plus the tab and ring
- Skill level: Intermediate (filet shaping and chain bridges)
- Terminology: US
- Yarn weight: #2 fine (sport) cotton
- Hook: 3.25 mm (US D-3)
- Number of pieces: 1 letter, plus 2 flowers and 3 leaves sewn on as appliqués
- Layout: one single motif (nothing to join)
- Mesh size: 1 mesh = 0.33 in (0.8 cm) square
- Size before border: 3.67 in (9.3 cm) wide x 3.67 in (9.3 cm) tall (11 meshes x 11 rows)
- Border depth: 0.17 in (0.4 cm) on every edge
Materials
Use a smooth, mercerized sport-weight cotton, about 100 m per 50 g. Cotton shows the square holes crisply and holds its shape on a keychain that gets handled a lot. Avoid fuzzy yarns, which fill in the holes.
- Plum (MC): 12 g / 24 m
- Cream (petals): 3 g / 6 m
- Yellow (centers): 1 g / 2 m
- Green (leaves): 2 g / 4 m
Tools:
– 3.25 mm (US D-3) hook
– 1.25 in (3.2 cm) gold O-ring or split key ring
– Tapestry needle
– Rustproof pins and a blocking mat
– Spray bottle
– Scissors
All quantities include a margin of about 20% for a gauge swatch and weaving in ends.
Abbreviations (US Terms)
- ch – chain
- sl st – slip stitch
- sc – single crochet
- hdc – half double crochet
- dc – double crochet
- sc2tog – single crochet 2 together
- sk – skip
- sp – space
- MR – magic ring
- beg – beginning
- rep – repeat
Special stitch – Mesh: one mesh is (ch 1, sk 1, dc in next st). Each mesh is 2 stitches wide. A row of n meshes therefore has (2 x n) + 1 stitches: the dc “posts” plus the ch-1 spaces.
Mesh decrease (start of row): turn, sl st in the first ch-1 sp and in the next dc, then ch 4. Mesh decrease (end of row): stop before the last mesh and leave it unworked.
Gauge and Checkpoints
Gauge: 6 meshes x 6 rows = 2 in (5.1 cm) square.
Make a test leg (Rows 1–3 below) before committing. It should measure 1 in (2.5 cm) wide x 1 in (2.5 cm) tall. Check again at these points:
- After Row 3 (each leg): 1 in (2.5 cm) x 1 in (2.5 cm)
- After Row 6: crossbar width 3 in (7.6 cm); full bottom spread 3.67 in (9.3 cm); height 2 in (5.1 cm)
- After Row 11: 3.67 in (9.3 cm) tall
- After the border: 4 in (10.2 cm) x 4 in (10.2 cm)
If your test leg is more than 0.25 in (0.6 cm) too big, go down one hook size. If it is too small, go up one. If the width is right but the rows are too short, pull up a slightly taller loop on each dc.
Letter A Pattern
Throughout, the stated count after each row is the complete count for that row only.
Legs (make 2)
With plum, ch 10.
Row 1: Dc in 6th ch from hook (the 5 skipped ch count as dc, ch 1, and 1 skipped base ch). [Ch 1, sk next ch, dc in next ch] twice. (3 meshes, 7 sts.)
Rows 2–3: Ch 4 (counts as dc + ch 1), turn. Dc in next dc, ch 1, dc in next dc, ch 1. Finish with dc in the 4th ch of the beg ch-5 in Row 2, or in the 3rd ch of the turning ch-4 in Row 3. (3 meshes, 7 sts.)
Fasten off the first leg. Do not fasten off the second leg.
Lay both legs flat with the same side facing up, the second leg on the right and its working loop at the far right edge. Leave a gap of about 1.67 in (4.2 cm) between them, which equals 5 meshes.
Crossbar
Row 4 (joining row): Turn the right leg. Work a mesh decrease (sl st in ch-1 sp and next dc, ch 4). Dc in next dc, ch 1, dc in last dc (the inner edge). Ch 9 for the bridge. Dc in the inner-edge stitch at the top of the left leg, ch 1, dc in next dc, ch 1, dc in next dc. Leave the outer mesh unworked.
Count: right leg 5 sts + bridge 9 ch + left leg 5 sts = 19 sts, equal to 9 meshes.
The bridge is 9 ch because a 5-mesh span holds 4 interior posts and 5 ch-1 spaces.
Row 5: Ch 4, turn. Dc in next dc, ch 1, dc in next dc. Across the bridge: [ch 1, sk 1 ch, dc in next ch] 4 times, then ch 1, sk last ch, dc in next dc. Ch 1, dc in next dc, ch 1, dc in 3rd ch of turning ch. (9 meshes, 19 sts.)
Row 6: Ch 4, turn. Dc in next dc, [ch 1, dc in next dc] across, finishing in the 3rd ch of the turning ch. (9 meshes, 19 sts.)
Sides of the Upper Opening
Row 7, left side: Ch 4, turn. Dc in next dc, [ch 1, dc in next dc] twice. (3 meshes, 7 sts.) The next 3 meshes stay unworked to form the opening.
Row 8, left side: Ch 4, turn. Dc in next dc, ch 1, dc in next dc. Leave the outer mesh unworked. (2 meshes, 5 sts.) Fasten off.
Row 7, right side: Join plum with a sl st in the 3rd ch of the beg ch-4 at the right outer edge of Row 6. Ch 4 (counts as dc + ch 1), dc in next dc, [ch 1, dc in next dc] twice. (3 meshes, 7 sts.)
Row 8, right side: Ch 4, turn. Dc in next dc, ch 1, dc in next dc. Leave the outer mesh unworked. (2 meshes, 5 sts.) Do not fasten off.
Peak
Row 9 (joining row): Ch 4, turn. Dc in next dc, ch 1, dc in 3rd ch of turning ch. Ch 5 for the bridge. Dc in 3rd ch of the turning ch at the inner edge of the left side, ch 1, dc in next dc, ch 1, dc in last dc.
Count: 5 + 5 + 5 = 15 sts, equal to 7 meshes.
Row 10: Mesh decrease. Dc in next dc. [Ch 1, sk 1 ch, dc in next ch] twice. Ch 1, sk last ch, dc in next dc. Ch 1, dc in next dc. Leave the last mesh unworked. (5 meshes, 11 sts.)
Row 11: Mesh decrease. Dc in next dc, [ch 1, dc in next dc] twice. Leave the last mesh unworked. (3 meshes, 7 sts.) Fasten off.
Outer edge check: Each outer edge steps in by one mesh after Rows 3, 7, 9, and 10. This gives each side a slope of 3 + 4 + 2 + 1 + 1 = 11 rows.
Border
Border gauge: 6 sc = 1 in (2.5 cm), matching the mesh exactly.
Rules:
– Along top and bottom edges, work 2 sc in each mesh space.
– Along row ends, work 2 sc around each dc post.
– At every outward-pointing (convex) corner, work 1 extra sc.
– At inward (concave) corners, work no extra stitches.
Round 1 (outer outline): Join plum at the bottom-left outer corner. Work around as follows:
- Bottom section: corner 1, left leg bottom 6, corner 1, left leg inner edge 8, underside of bridge 10, right leg inner edge 8, corner 1, right leg bottom 6, corner 1. (42 sc.)
- Right sloped edge: 6, corner 1, step 2, 8, corner 1, step 2, 4, corner 1, step 2, 2, corner 1, step 2, 2. (34 sc.)
- Top: corner 1, 6, corner 1. (8 sc.)
- Left sloped edge: mirror of the right edge. (34 sc.)
Join with a sl st to the first sc. Total: 118 sc.
Round 2 (opening outline): Join plum at a bottom corner of the opening. Work as follows:
- Bottom: 6 sc
- Side: 6 sc (3 rows)
- Top: 6 sc
- Other side: 6 sc
At both upper corners, work the last sc of the side and the first sc of the top as sc2tog. Join. Total: 24 – 2 = 22 sc. The two sc2tog draw the top corners in so the opening narrows into a soft triangle.
Why the math works: Each mesh is exactly 2 stitches wide, and each dc row is the same height as one mesh, so 2 sc per unit lies flat on every edge. There are 14 convex corners, each with 1 extra sc, so the outline turns without cupping: 44 sc on top and bottom edges + 60 sc on row ends + 14 corner sc = 118.
Tab and Ring
Tab: Skip the first sc after the top-left corner. Join plum in the next sc. Sc in 4 sc across the center of the top edge.
Rows 1–6: Ch 1, turn, sc in each sc across. (4 sc.) The tab measures 0.67 in (1.7 cm) wide x 0.75 in (1.9 cm) long.
Fold the tab through the ring to the back and whipstitch the last row to the base of Row 1.
Flowers and Leaves
Large Flower (make 1)
Rnd 1: With yellow, work 10 sc in a MR. Join. (10 sc.) Fasten off yellow.
Rnd 2: Join cream. [Ch 3, sk 1 sc, sl st in next sc] 5 times. (5 ch-3 loops.)
Rnd 3: In each ch-3 loop, work (sc, hdc, 3 dc, hdc, sc). (5 petals, 35 sts.) Fasten off.
The large flower measures about 1.25 in (3.2 cm) across.
Small Flower (make 1)
Rnd 1: With yellow, work 5 sc in a MR. Join. (5 sc.) Fasten off.
Rnd 2: Join cream. In each sc, work (sl st, ch 2, 2 dc, ch 2, sl st). (5 petals.)
The small flower measures about 0.9 in (2.3 cm) across.
For both flowers, add 3–4 yellow French knots to the center for the bobbly look.
Leaves (make 3)
With green, ch 7. Starting in the 2nd ch from hook, work: sl st, sc, hdc, dc, hdc. Work 3 sc in the last ch. Then work along the other side of the chain: hdc, dc, hdc, sc, sl st. (13 sts.)
Each leaf measures about 1 in (2.5 cm) long.
Placement
- Sew the large flower over the upper right leg, just below the peak.
- Sew the small flower lower down the same leg, beside the crossbar.
- Tuck one leaf behind the upper right of the large flower.
- Tuck one leaf between the two flowers, pointing left.
- Tuck one leaf below the small flower.
Stitch through the back loops only so no stitches show on the front.
Final Blocking
- Weave in all ends before blocking, except the tails you still need for sewing.
- Mist the letter until it is evenly damp, but not soaked.
- Pin the four outer bottom corners to 4 in (10.2 cm) wide.
- Pin the peak so the total height is 4 in (10.2 cm).
- Square up each mesh with your fingertips.
- Pin the upper corners of the opening inward to sharpen the triangle.
- Let it dry completely, then sew on the appliqués if you haven’t already.
Final Quality-Control Checklist
- Every mesh is open and square, and none has been skipped.
- Row counts match the pattern: 7, 7, 7, 19, 19, 19, 7/7, 5/5, 15, 11, 7.
- The outer border has 118 sc and lies flat.
- The opening outline has 22 sc.
- The tab is centered and sewn securely around the ring.
- The flowers and leaves are tight, with no loose loops.
- The finished letter measures 4 in (10.2 cm) x 4 in (10.2 cm).
Troubleshooting
- Meshes are rectangles, not squares: Your dc is too short or too tall. Adjust the loop height or change the hook size.
- Bridge sags: You chained too loosely. Work the bridge chains with a smaller hook.
- Border ruffles: You added extra stitches at concave corners. Remove them.
- Border cups: You missed a corner extra. Recount against the 118 total.
- Legs lean unevenly: Check that both legs were placed with the same side facing up before Row 4.
- Opening looks square: Re-pin it while damp and make sure the two sc2tog are in place.
Care
Hand wash in cool water with mild soap, press the water out in a towel, and dry flat. Remove the metal ring first if it isn’t rustproof.
Final Notes
The size depends on one measurement chain:
- Each mesh is 0.33 in (0.8 cm).
- A 3-mesh leg is 1 in (2.5 cm).
- Eleven meshes and 11 rows make 3.67 in (9.3 cm).
- The 0.17 in (0.4 cm) border brings the letter to 4 in (10.2 cm) square.
Keep your mesh true and every later step falls into place.
Happy crocheting!