

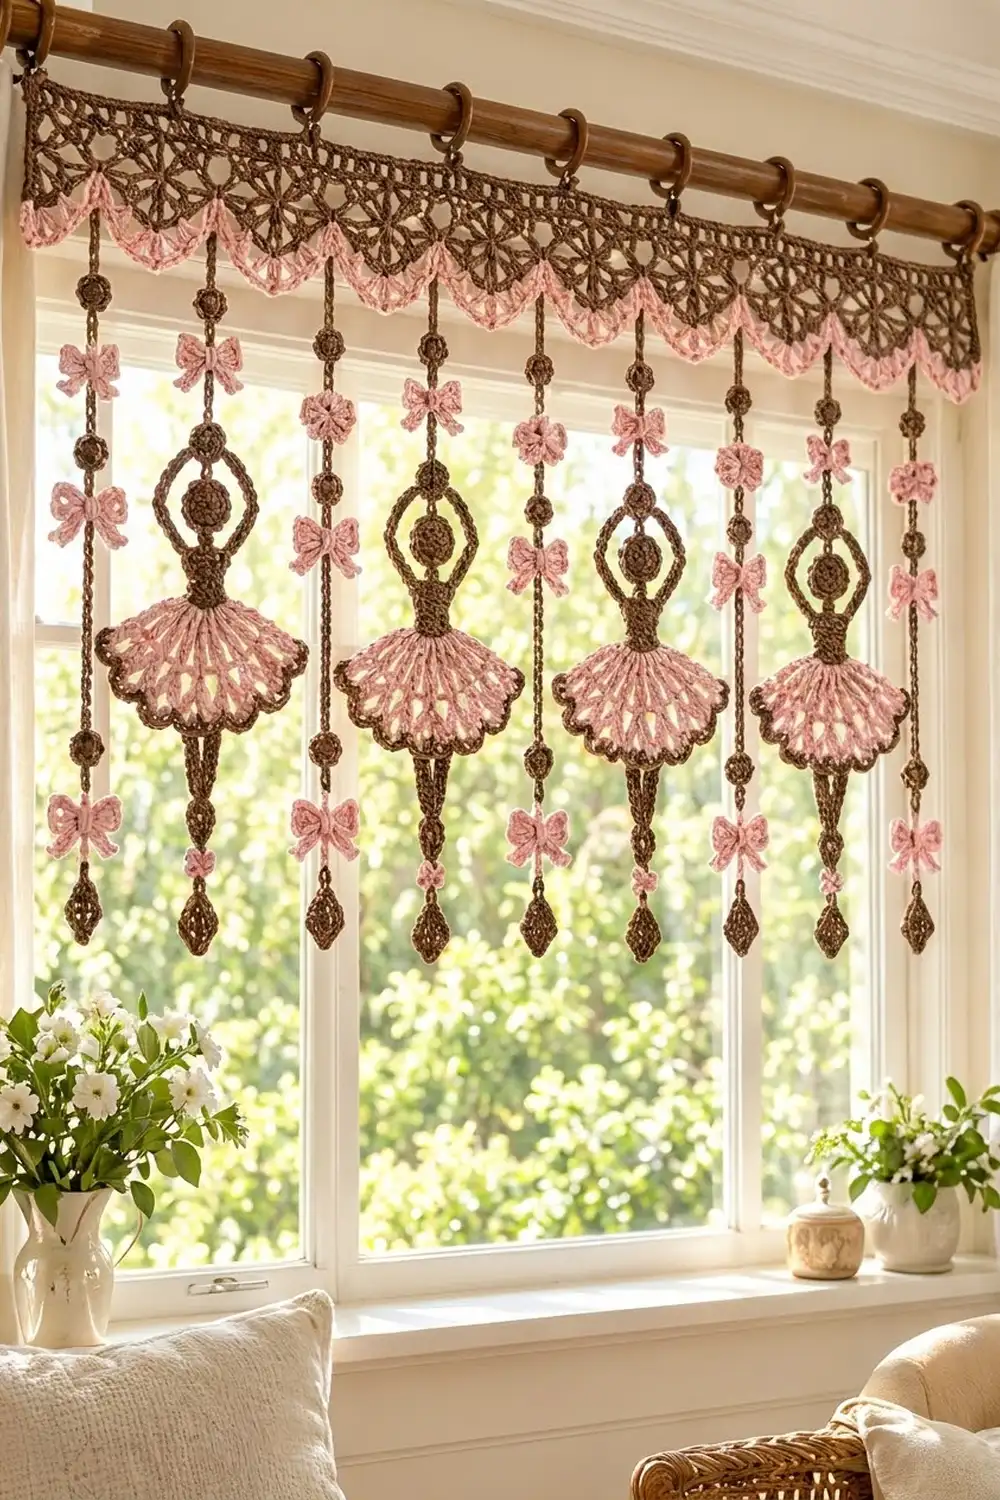
This valance turns a plain window into a small stage. A brown lace header hangs from clip rings, and nine strands drop below it: four dancing ballerinas in pink lace tutus, and five strands of pink bows and round brown beads.
The colors are a warm chocolate brown and a soft blush pink. Brown gives the lace and the figures a clear outline, and pink softens the tutus, bows and scallops. The look is sweet and vintage, and it works well in a nursery, a dance-lover’s bedroom, or a cozy reading nook.
The pattern uses US crochet terms. The finished valance measures 29 in (73.7 cm) wide. The header is 3 in (7.6 cm) deep, and the strands hang 12 in (30.5 cm) below it, so the total drop is 15 in (38.1 cm).
Construction is simple and modular. First you work the header in flat rows, ending with a two-row scallop border. Then you make the small parts (ballerinas, bows, beads and drops), build nine cords, sew everything together and hang the cords from the scallop valleys.
Finished Size and Construction
- Finished size: 29 in x 15 in (73.7 cm x 38.1 cm)
- Skill level: Intermediate
- Terminology: US
- Yarn weight: DK / light (#3), cotton or cotton blend
- Hook: 3.5 mm (E-4)
- Number of pieces: 1 header, 4 ballerinas, 19 bows, 19 beads, 5 drops, 9 cords
- Layout: 9 strands, alternating bead strand / ballerina strand, with a bead strand at each end
- Strand length: 12 in (30.5 cm)
- Ballerina size: about 3.5 in (8.9 cm) wide x 7 in (17.8 cm) tall
- Header depth before border: 2.25 in (5.7 cm)
- Border depth: 0.75 in (1.9 cm)
Materials
Use a smooth, mercerized cotton DK. It shows the lace clearly and won’t fuzz in sunlight. Avoid splitty yarns, because the small parts need crisp stitches.
- Brown: 150 g (about 345 m)
- Pink: 75 g (about 173 m)
Quantities include a margin of roughly 15 percent for swatching and sewing.
Tools:
– 3.5 mm (E-4) hook
– Tapestry needle
– Scissors
– Stitch markers
– Rust-proof pins
– Blocking mat
– 10 curtain clip rings
– Small amount of scrap brown yarn for filling the beads
Abbreviations (US Terms)
- ch: chain
- sl st: slip stitch
- sc: single crochet
- hdc: half double crochet
- dc: double crochet
- sc2tog: single crochet 2 together
- sc3tog: single crochet 3 together
- sp: space
- st(s): stitch(es)
- MR: magic ring
- RS / WS: right side / wrong side
Special stitches:
– V-st: (dc, ch 1, dc) in the same stitch or space.
– Shell: (2 dc, ch 2, 2 dc) in the same space.
– Starburst: (dc, ch 1, dc, ch 1, dc) in the same stitch.
Gauge and Checkpoints
Gauge: 20 sc and 22 rows = 4 in (10.2 cm). Chains: 5 ch = 1 in (2.5 cm).
Make one complete ballerina before starting the header. It uses every stitch in the pattern and shows you right away whether your tension matches.
Ballerina checkpoints:
– Head: 1 in (2.5 cm) across
– Bodice: 0.8 in (2.0 cm) wide x 1.1 in (2.8 cm) tall
– Tutu: 3.5 in (8.9 cm) wide at the hem and 2 in (5.1 cm) tall
– Legs strip: 0.6 in (1.5 cm) wide x 4 in (10.2 cm) long
Header checkpoints:
– Row 1: 29 in (73.7 cm)
– After Row 7: 2.25 in (5.7 cm) deep
– After Row 9: 3 in (7.6 cm) deep
If your pieces measure too big, go down a half size to a 3.25 mm hook. If they measure too small, go up to a 3.75 mm hook. Remeasure after changing hooks. A ballerina that’s 0.25 in too wide will look fine, but a header that’s 2 in too wide will throw off the strand spacing.
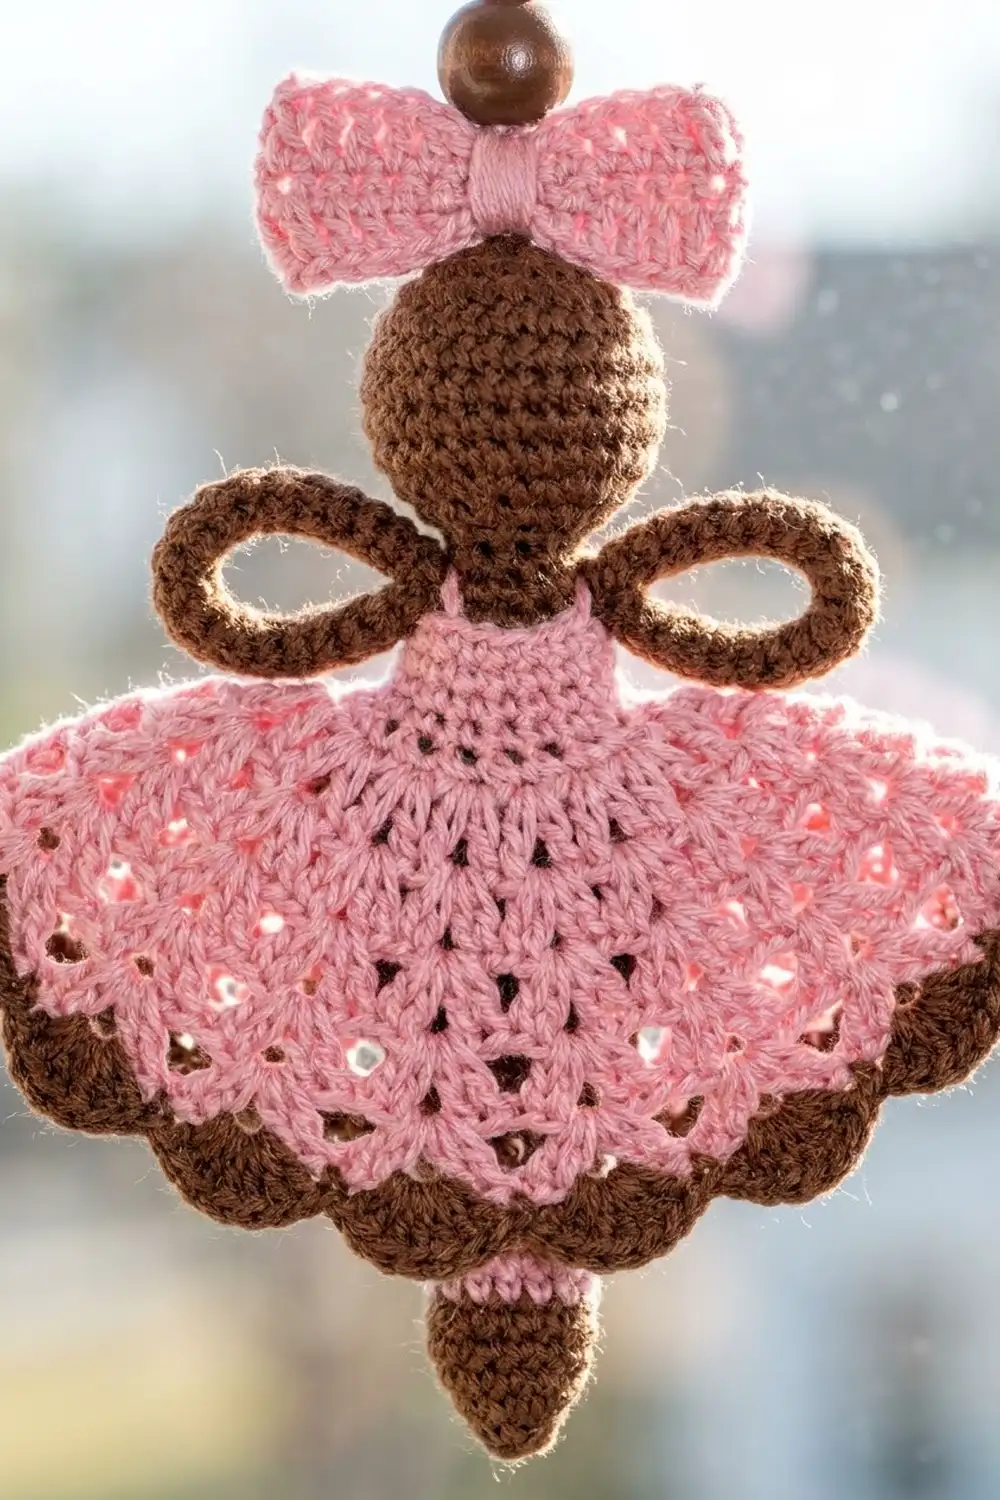
Ballerina (Make 4)
Head (brown)
Rnd 1: In MR, work 8 sc; join with a sl st. (8 sc)
Rnd 2: Ch 1, 2 sc in each st around; join. (16 sc)
Fasten off and leave an 8 in (20.3 cm) tail. The head should measure 1 in (2.5 cm).
Bodice (brown)
Row 1: Ch 5, sc in 2nd ch from hook and in each remaining ch. (4 sc)
Rows 2–6: Ch 1, turn, sc in each st across. (4 sc)
Don’t fasten off. Row 1 is the neckline and Row 6 is the waist. The bodice should measure 0.8 in x 1.1 in (2.0 cm x 2.8 cm).
Tutu (pink, worked into the waist)
Row 1 (RS): Join pink in the first st of Row 6. Ch 3 (counts as dc), dc in the same st, then 2 dc in each of the next 3 sts. (8 dc)
Row 2: Ch 3 (counts as dc), turn, dc in the same st. Dc in the next st, 2 dc in the next st 3 times, then 2 dc in the last st. (13 dc)
Row 3: Ch 4 (counts as dc + ch 1), turn, dc in the first st (first V-st). Skip the next st, V-st in the next st 6 times. (7 V-sts)
Row 4: Turn and sl st into the first ch-1 sp. Ch 3 (counts as dc), then (dc, ch 2, 2 dc) in the same sp. Work a shell in each of the next 6 ch-1 sps. Fasten off pink. (7 shells: 28 dc and 7 ch-2 sps)
Row 5 (brown hem, RS): Join brown in the first dc at the right edge and ch 1. Sc in the next 2 dc, 3 sc in the ch-2 sp, sc in the next 2 dc 7 times. This is a conversion row: 28 sc worked one per dc, plus 7 sps x 3 sc = 21 sc, for 49 sc. Fasten off.
The 3-sc groups at the shell tips form the scallops on the hem. Because the stitch count grows from 4 to 28 over four rows, the tutu fans out wide and ripples a little. The tutu should measure 3.5 in (8.9 cm) wide x 2 in (5.1 cm) tall.
Legs (brown)
Row 1: Ch 4, sc in 2nd ch from hook and in the next 2 ch. (3 sc)
Rows 2–18: Ch 1, turn, sc in each st. (3 sc)
Row 19: Ch 1, turn, 2 sc in the first st, sc in the next st, 2 sc in the last st. (5 sc)
Row 20: Ch 1, turn, sc in each st. (5 sc)
Row 21: Ch 1, turn, sc2tog, sc in the next st, sc2tog. (3 sc)
Row 22: Ch 1, turn, sc3tog. (1 sc)
Fasten off. Rows 19–22 form the diamond toe. The strip should measure 4 in (10.2 cm) long.
Arm Loop (brown)
Rnd 1: Ch 36 and join with a sl st to form a ring. Ch 1, sc in each ch around; join. (36 sc)
Fasten off. The circumference should be 7.2 in (18.3 cm).
Assemble the Ballerina
- Sew the bottom edge of the head to Row 1 of the bodice, centered.
- Flatten the arm loop into a tall oval. Sew its lower edge across both shoulder corners of Row 1 so the oval surrounds the head and rises 2.25 in (5.7 cm) above the shoulders.
- On the WS, sew the top 2.25 in (5.7 cm) of the legs strip behind the waist and tutu. That leaves 1.75 in (4.4 cm) hanging below the hem.
Small Parts
Bow (pink, make 19)
Rnd 1: Ch 16 and join to form a ring. Ch 1, 16 sc around; join. (16 sc)
Flatten the ring with the join at the center back. Wrap the center tightly 10 times with pink. Then make 2 tails: ch 7 from the center for each tail, and fasten off each tail.
The bow should measure 1.6 in (4.1 cm) wide, with tails 1.4 in (3.6 cm) long.
Bead (brown, make 19)
Rnd 1: In MR, work 6 sc. (6 sc)
Rnd 2: 2 sc in each st around. (12 sc)
Rnd 3: Sc in each st around. (12 sc)
Rnd 4: Sc2tog 6 times. (6 sc)
Fill the bead firmly with brown scraps. Close the hole and keep the tail for sewing. The bead should measure 0.75 in (1.9 cm) across.
Diamond Drop (brown, make 5)
Row 1: Ch 2, sc in 2nd ch from hook. (1 sc)
Row 2: Ch 1, turn, 3 sc in the st. (3 sc)
Row 3: Ch 1, turn, 2 sc in the first st, sc in the next st, 2 sc in the last st. (5 sc)
Row 4: Ch 1, turn, sc in each st. (5 sc)
Row 5: Ch 1, turn, sc2tog, sc in the next st, sc2tog. (3 sc)
Row 6: Ch 1, turn, sc3tog. (1 sc)
Fasten off. The drop should measure 1 in (2.5 cm) wide x 1.1 in (2.8 cm) tall.
Cords (brown)
Ch the number of chains listed below, then sl st in the back bump of each ch to firm up the cord. Leave a 10 in (25.4 cm) tail at the top for joining.
- Long cord (make 5): Ch 55, which gives 11 in (27.9 cm).
- Short cord (make 4): Ch 25, which gives 5 in (12.7 cm).
Make All Pieces
| Part | Color | Quantity |
|---|---|---|
| Ballerinas | Brown + pink | 4 |
| Bows | Pink | 19 (3 per bead strand, 1 per ballerina strand) |
| Beads | Brown | 19 (3 per bead strand, 1 per ballerina strand) |
| Diamond drops | Brown | 5 |
| Long cords | Brown | 5 |
| Short cords | Brown | 4 |
Bead strand (make 5): Measure all positions from the top of a long cord.
– Bow at 1 in (2.5 cm)
– Bead at 3 in (7.6 cm)
– Bow at 5 in (12.7 cm)
– Bead at 7 in (17.8 cm)
– Bow at 9 in (22.9 cm)
– Bead at 10.5 in (26.7 cm)
– Drop sewn to the cord end, for a total length of 12 in (30.5 cm)
Ballerina strand (make 4): On a short cord, sew a bow at 1 in (2.5 cm) and a bead at 3 in (7.6 cm). Sew the top of the arm loop to the cord end. The 5 in (12.7 cm) cord plus the 7 in (17.8 cm) ballerina gives 12 in (30.5 cm).
Layout, left to right:
B   D   B   D   B   D   B   D   B
B = bead strand    D = ballerina strand
Header
Row 1 (RS): With brown, ch 146. Sc in 2nd ch from hook and in each remaining ch. (145 sc)
Row 2: Ch 1, turn, sc in each st. (145 sc)
Row 3: Ch 1, turn, sc in the first st. Skip 2 sts, starburst in the next st, skip 2 sts, sc in the next st 24 times. (24 starbursts, 25 sc)
Row 4: Ch 5 (counts as dc + ch 2), turn. Sc in the center dc of the next starburst, ch 2, dc in the next sc. Ch 2, sc in the center dc of the next starburst, ch 2, dc in the next sc 23 times. (25 dc, 24 sc, 48 ch-2 sps)
Row 5: Ch 1, turn, sc in the first dc. Skip the ch-2 sp, starburst in the next sc, skip the ch-2 sp, sc in the next dc 24 times. (24 starbursts, 25 sc)
Row 6: Repeat Row 4. (25 dc, 24 sc, 48 ch-2 sps)
Row 7: Ch 1, turn, sc in the first dc. 2 sc in the next ch-2 sp, sc in the next sc, 2 sc in the next ch-2 sp, sc in the next dc 24 times. That’s 1 + (24 x 6), for 145 sc.
The header should measure 29 in (73.7 cm) wide x 2.25 in (5.7 cm) deep. Each 6-stitch repeat takes up 1.2 in (3.0 cm), so the stitch count returns to exactly 145.
Joining
Method: Sew each strand to a scallop valley with its cord tail, using a whipstitch through both loops of a single Row 9 sc.
Stitch logic: Row 9 has 25 valley sc, at sts 1, 9, 17 and so on, every 8th stitch through st 193. Hang a strand from every 3rd valley: sts 1, 25, 49, 73, 97, 121, 145, 169 and 193. That gives 9 strands, 24 sts or 3 scallops apart, which is 3.6 in (9.1 cm) on center. The end strands sit exactly at the header corners.
Tension: Pass the tail through the valley twice, then knot it on the WS and weave it into the cord. Pull just firmly enough that the cord top sits flush with the valley without puckering the scallops on either side.
Checkpoint: Lay the joined valance flat. Every strand should measure 12 in (30.5 cm) from valley to tip, with no strand differing by more than 0.25 in. Strands at sts 1 and 193 should be 28.8 in apart, which is 8 gaps x 3.6 in, or 73.2 cm (8 x 9.144 cm).
Border
Border gauge: Each scallop is 6 sts, or 1.2 in (3.0 cm). The border adds 0.75 in (1.9 cm) of depth.
Row 8 (brown, WS): Ch 1, turn, sc in the first st. Skip 2 sts, 5 dc in the next st, skip 2 sts, sc in the next st 24 times. (24 scallops: 120 dc + 25 sc = 145 sts)
Row 9 (pink, RS): Join pink in the first sc and ch 1. Sc in the same sc. Sc in the next 2 dc, 3 sc in the center dc, sc in the next 2 dc, sc in the next sc 24 times. This is a trim row: 145 sc worked one per stitch, plus 24 x 2 extra at the tips, for 193 sc. Fasten off.
Why the math works: The header is a single piece, so the border starts on exactly Row 7’s 145 sts, with no seam stitches to add. Since 145 = (6 x 24) + 1, the 24 scallops fit evenly and both ends finish on a sc. Row 9 adds stitches only at the 24 tips, so the width stays at 29 in (73.7 cm) and only the points get sharper.
Final Blocking
- Weave in all the remaining tails.
- Soak the valance in cool water for 10 minutes and press out the water in a towel. Don’t wring it.
- Pin the header flat to 29 in x 3 in (73.7 cm x 7.6 cm). Pin each scallop tip.
- Open each starburst and pin the tutu hems into smooth, even arcs 3.5 in (8.9 cm) wide.
- Lay the strands straight at 12 in (30.5 cm) and fluff the bow loops.
- Let everything dry fully, then attach 10 clip rings evenly along Row 1, about 3.2 in (8.1 cm) apart.
Final Quality-Control Checklist
- The header measures 29 in (73.7 cm) wide and 3 in (7.6 cm) deep.
- All 24 scallops have pink tips with 3 sc each.
- There are 9 strands, alternating B-D-B-D-B-D-B-D-B.
- Every strand is 12 in (30.5 cm) long.
- Each tutu has 7 shells and a 49-sc brown hem.
- The heads are centered and the arm loops are symmetrical.
- The legs hang 1.75 in (4.4 cm) below each hem.
- The beads are firm and every tail is secured.
Troubleshooting
- The header curls: Your sc rows are tight. Block firmly, or work Rows 1–2 and Row 7 with a 3.75 mm hook.
- The tutu cups instead of fanning: Check that Row 2 has 13 dc and that Row 4 shells go into the V-st spaces.
- The scallops lean: You’ve skipped the wrong number of sts. Recount so there are exactly 2 skipped sts on each side of every 5-dc group.
- The strands twist: Steam-block the cords while they hang, or work the sl st return row more loosely.
- The beads look lumpy: Add more filling before closing Rnd 4.
Care
Hand wash in cool water with mild soap, then lay flat and re-pin to dry. Keep the valance out of harsh, direct afternoon sun for long periods to protect the pink from fading.
Final Notes
The whole valance depends on a short measurement chain. Gauge of 20 sc = 4 in (10.2 cm) gives a 145-st header of 29 in (73.7 cm). Twenty-four 1.2 in (3.0 cm) scallops fit that width exactly, and every third valley holds a strand, 3.6 in (9.1 cm) apart. Each strand is either an 11 in cord plus a 1 in drop, or a 5 in cord plus a 7 in ballerina, and both come to 12 in (30.5 cm). Check one ballerina against its checkpoints, and the rest of the project will fall into place.
Happy crocheting!