

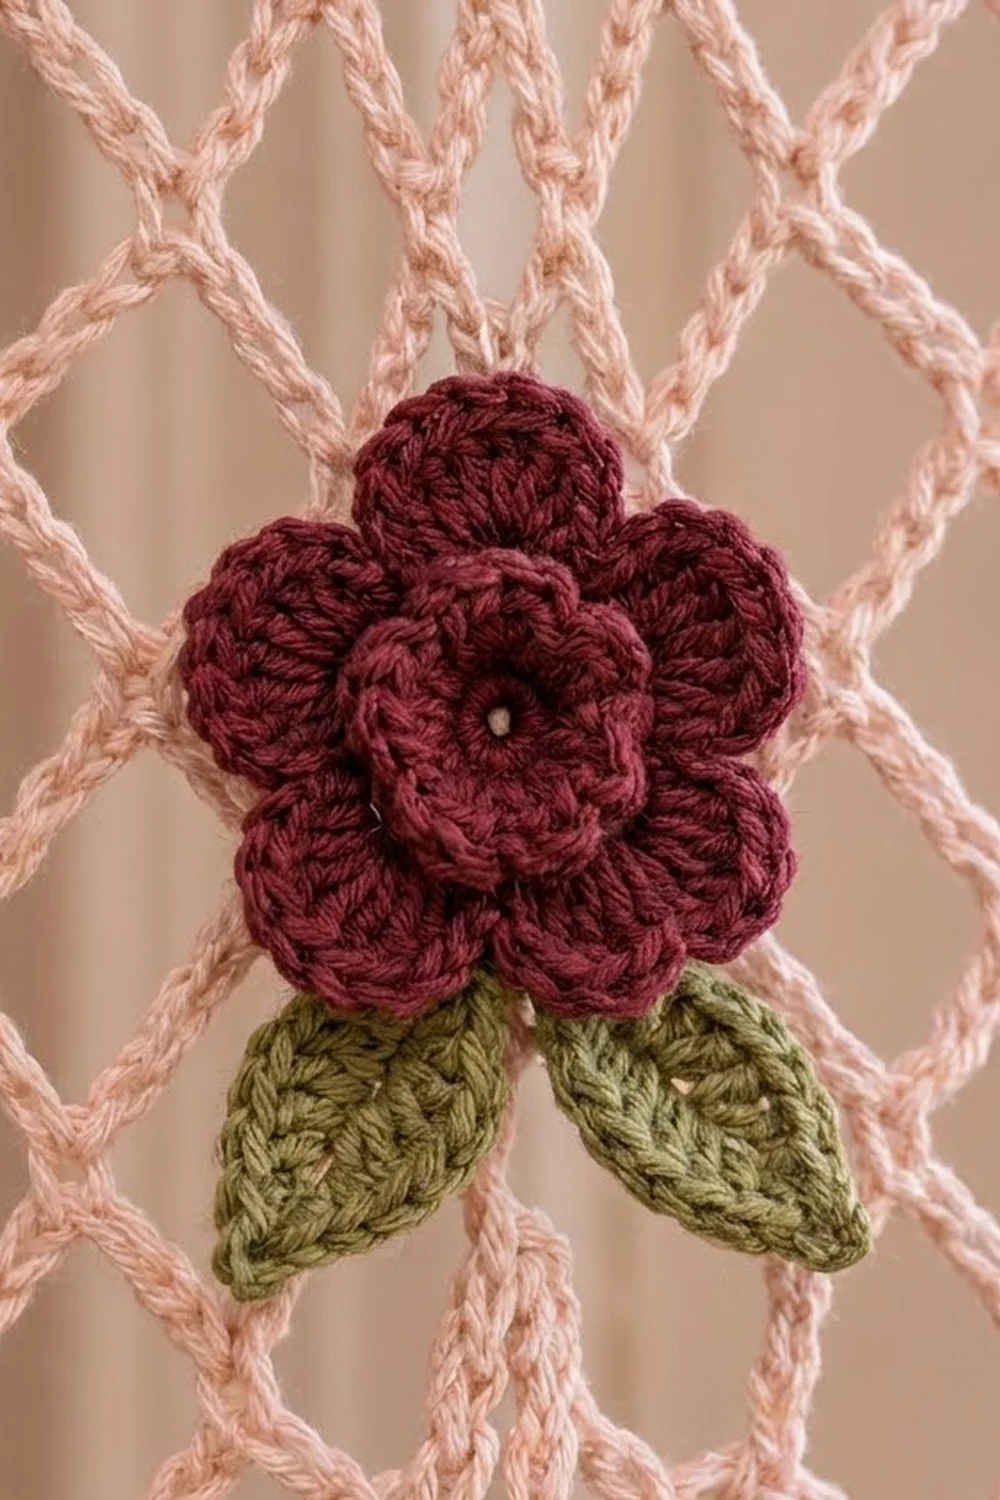
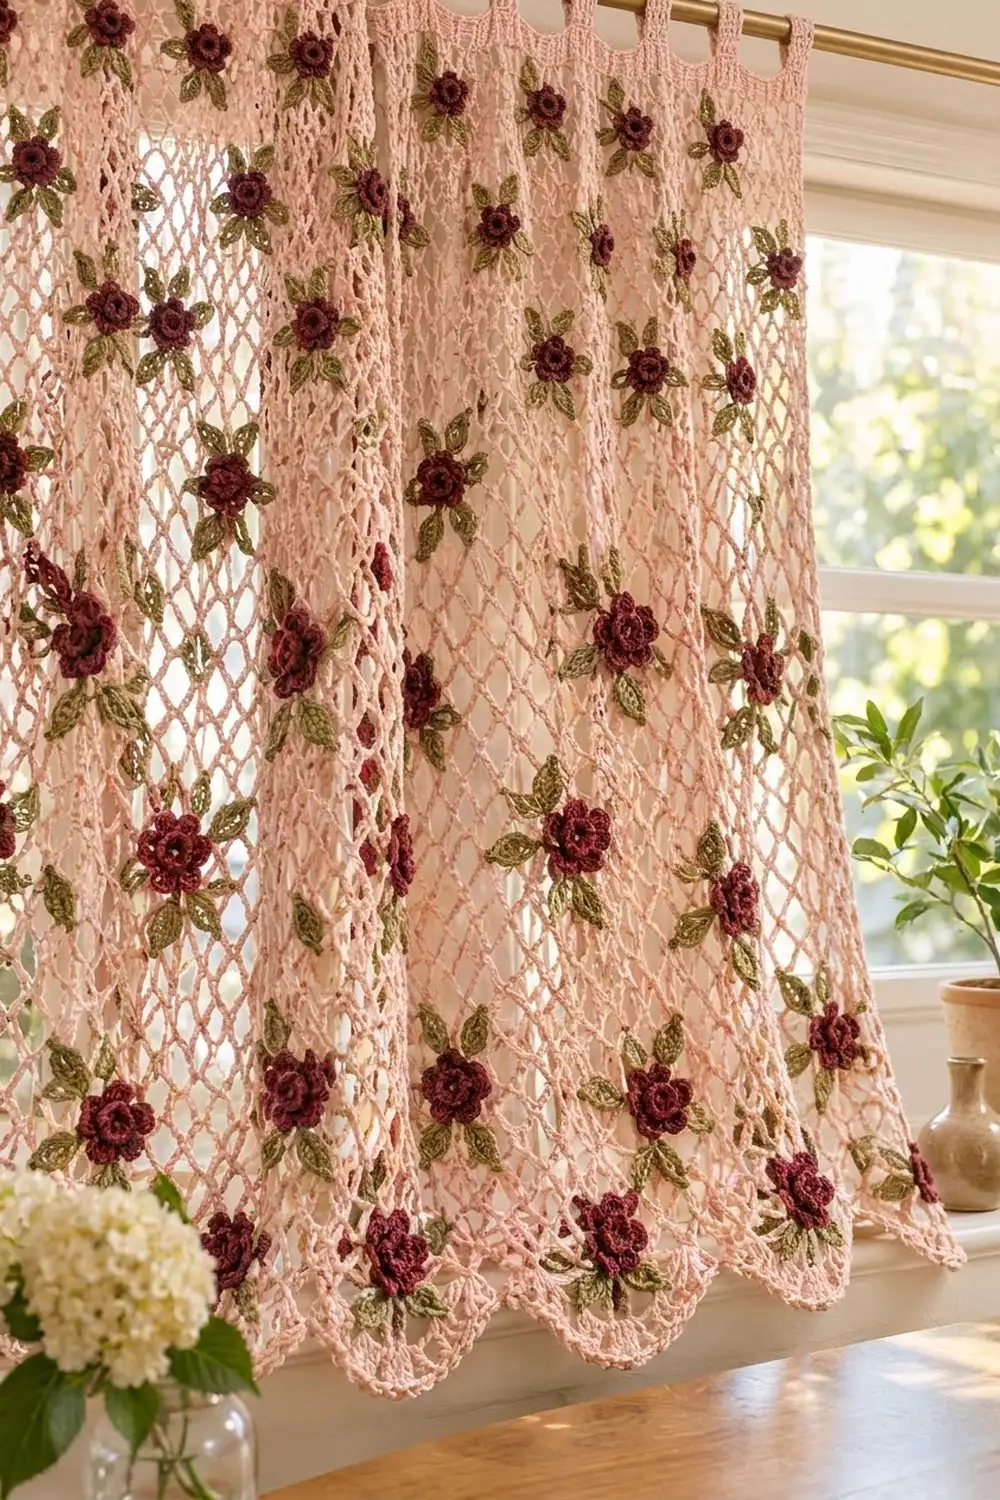
The Rose Lattice Curtain is an airy tab-top panel. A blush-pink diamond mesh is scattered with small burgundy roses, and each rose has a pair of olive-green leaves. Light passes through the lattice, and the roses give the panel a soft cottage-garden look.
The palette is three colors: pale pink for the panel, deep burgundy for the roses, and olive green for the leaves. The hem ends in shallow scallops edged with tiny chain loops, so the bottom edge looks finished and moves gently in a breeze.
This pattern uses US crochet terms. One finished panel measures 42 in (106.7 cm) wide and 80 in (203.2 cm) long from the top of the header to the scallop points. The tabs add 3 in (7.6 cm) of loop above the header, so the panel hangs about 83 in (210.8 cm) below the top of the rod.
You work the panel in one piece from the top down: first a solid header, then the diamond mesh, then the scalloped hem. Side edging and tabs come next. Last, you crochet the roses and leaves separately and sew them on in a staggered grid. For a pair like the one in the photo, make two panels.
Finished Size and Construction
- Finished size: 42 in × 80 in (106.7 cm × 203.2 cm), plus 3 in (7.6 cm) tab loops
- Skill level: Intermediate
- Terminology: US
- Yarn weight: Worsted (#4) cotton
- Hook: 5 mm (H-8)
- Number of pieces: 1 mesh panel, plus 104 roses and 208 leaves sewn on as appliqués
- Layout: 16 rose rows in a half-drop grid, alternating 7 and 6 roses per row
- Rose size: 2.5 in (6.4 cm) across. Leaf size: 1.75 in (4.4 cm) long
- Size before border: 42 in × 77.75 in (106.7 cm × 197.5 cm)
- Border depth: 2.25 in (5.7 cm) at the scallop points, 1.25 in (3.2 cm) at the dips
Materials
Use a smooth, mercerized or combed worsted-weight cotton of about 186 yd (170 m) per 100 g. Cotton holds the open mesh crisply and the roses keep their shape. Acrylic is lighter, but the mesh will drape more loosely.
- Pale pink (panel): 1,000 g / 1,700 m
- Burgundy (roses): 400 g / 680 m
- Olive green (leaves): 250 g / 425 m
All quantities include a margin of roughly 10–15%. For a pair, double everything.
Tools:
– 5 mm (H-8) hook
– Tapestry needle
– Stitch markers (about 20)
– Locking pins or rustproof T-pins
– Measuring tape
– Scissors
– Blocking mats or a clean sheet on a large flat surface
Abbreviations (US Terms)
- ch: chain
- sl st: slip stitch
- sc: single crochet
- hdc: half double crochet
- dc: double crochet
- tr: treble crochet
- sp: space
- st(s): stitch(es)
- RS / WS: right side / wrong side
- BPsc (back post single crochet): insert the hook from the back to the front and to the back again around the post of the stitch, yarn over, and finish as a sc.
Gauge and Checkpoints
Gauge:
– Dc: 10 dc = 3 in (7.6 cm), and 3 dc rows = 2 in (5.1 cm)
– Mesh: 4 ch-6 loops = 6 in (15.2 cm) wide, and 8 mesh rows = 6 in (15.2 cm) tall. Each diamond is 1.5 in (3.8 cm) wide and tall.
– Sc edging: 4 sc = 1 in (2.5 cm)
Test piece first. Ch 23. Work Header Rows 1–3 (21 dc per row), then Mesh Rows 1–9 with 4 loops per row. The swatch should measure 6.3 in (16.0 cm) wide, the dc band 2 in (5.1 cm) deep, and 8 mesh rows 6 in (15.2 cm). Then make one rose (2.5 in / 6.4 cm) and one leaf (1.75 in / 4.4 cm).
If your swatch is too big, go down 0.5 mm. If it is too small, go up 0.5 mm. The mesh gauge matters most because it sets the full length.
Checkpoints on the panel:
– After Header Row 3: 42.3 in (107.4 cm) wide, 2 in (5.1 cm) deep
– After Mesh Row 40: 30 in (76.2 cm) of mesh
– After Mesh Row 80: 60 in (152.4 cm) of mesh
– After Mesh Row 101: 75.75 in (192.4 cm) of mesh, 77.75 in (197.5 cm) total
Measure the panel lying flat and relaxed, not hanging.
Header
Use pale pink.
Foundation: Ch 143.
Row 1 (RS): Dc in the 4th ch from the hook (the skipped ch count as the first dc) and in each ch across. Turn. (141 dc)
Rows 2–3: Ch 3 (counts as dc), dc in each st across, working the last dc in the top of the turning ch. Turn. (141 dc)
The header measures 42.3 in × 2 in (107.4 cm × 5.1 cm).
Diamond Mesh
Row 1: Ch 1, sc in the first dc, ch 6, skip 4 dc, sc in the next dc 28 times. Turn. (28 ch-6 loops, 29 sc)
Check: 1 + (28 × 5) = 141 sts used.
Row 2 (half-loop row): Ch 4 (counts as dc + ch 1), sc in the first ch-6 loop, ch 6, sc in the next ch-6 loop 27 times, ch 2, dc in the last sc. Turn. (27 full loops, 28 sc, a half loop at each edge)
Row 3 (full-loop row): Ch 1, sc in the first dc, ch 6, sc in the next ch-6 loop 27 times, ch 6, sc in the 3rd ch of the turning ch-4. Turn. (28 ch-6 loops, 29 sc)
The short edge chains in Row 2 keep the long sides straight while the diamonds form in between.
Rows 4–101: Repeat Rows 2–3 forty-nine more times, ending with a full-loop row.
Odd rows are always full-loop rows with 28 loops. Row 101 has 28 ch-6 loops. The mesh measures 75.75 in (192.4 cm), and the panel measures 42 in × 77.75 in (106.7 cm × 197.5 cm) before the border. Do not fasten off.
Scalloped Border
Border gauge: 10 dc = 3 in (7.6 cm). Each scallop is 20 sts, or 6 in (15.2 cm), which matches 4 mesh loops.
Row 1 (conversion row): Ch 3 (counts as dc), 4 dc in the next ch-6 loop, dc in the next sc 28 times. Turn.
Count: 29 sts worked one per sc (the ch-3 counts as the first) + 112 dc worked into loops (28 × 4) = 141 sts.
Row 2 (scallop shaping): Ch 1, sc in the first st, hdc in the next 2 sts, dc in the next 3 sts, tr in the next 9 sts, dc in the next 3 sts, hdc in the next 2 sts, sc in the next st 7 times. Turn.
Each repeat uses 2 + 3 + 9 + 3 + 2 + 1 = 20 sts. Count: 1 + (7 × 20) = 141 sts, making 7 scallops.
Row 3 (loop edge): Ch 1, sc in the first sc, (ch 3, skip the next st, sc in the next st) 10 times 7 times. Fasten off. (71 sc, 70 ch-3 loops)
The last sc of each repeat lands on the sc between two scallops.
Why the math works: 141 sts at 10 dc per 3 in gives 42.3 in (107.4 cm), the same width as the header. The hem lies flat instead of ruffling. Because 141 = 7 × 20 + 1, the row splits into exactly 7 scallops with one sc to close. The tr at the center of each scallop hang lower, which makes the 2.25 in (5.7 cm) points.
Side Edging
With RS facing, join pale pink at a top corner and work down one long side:
- 2 sc in each header row-end (3 rows = 6 sc)
- 3 sc in each mesh row-end (101 rows = 303 sc)
- 2 sc in the border Row 1 dc end, then 1 sc in each of the Row 2 and Row 3 ends (4 sc)
That makes 313 sc per side. Fasten off and repeat on the other side, working from the bottom up. The 303 sc over 75.75 in is exactly 4 sc per inch, so the sides neither pull in nor wave.
Tabs
Turn the panel so the foundation chain faces up and the RS faces you. Number the 141 foundation chains from right to left.
Each tab is 8 sts wide, and the gaps between tabs are 11 sts. Tab k starts on ch 1 + 19 × (k − 1), so the tabs start on ch 1, 20, 39, 58, 77, 96, 115, and 134. Check: 8 × 8 + 7 × 11 = 141.
Row 1: Join pale pink in the first ch of the tab, ch 3 (counts as dc), dc in the next 7 ch. Turn. (8 dc)
Rows 2–9: Ch 3, dc in each st across. Turn. (8 dc)
Each tab strip is 2.4 in (6.1 cm) wide and 6 in (15.2 cm) long. Fasten off with a 12 in (30.5 cm) tail. Fold the tab to the WS and whipstitch Row 9 to the base of the tab, which leaves a 3 in (7.6 cm) loop. The gaps are 3.3 in (8.4 cm) wide. Make all 8 tabs.
Rose (Make 104)
Use burgundy.
Rnd 1: Make a magic ring, ch 1, work 10 sc in the ring, sl st to the first sc. Pull the ring snug but leave a small open center. (10 sc)
Rnd 2: Ch 1, sc in the first st, ch 3, skip 1, sc in the next st, ch 3, skip 1 4 times, sl st to the first sc. (5 sc, 5 ch-3 sps)
Rnd 3 (inner petals): In each ch-3 sp work (sc, hdc, 3 dc, hdc, sc). Sl st to the first sc. (5 petals, 35 sts)
Rnd 4: Working behind the petals, ch 1, BPsc around the first sc of Rnd 2, ch 5, BPsc around the next Rnd 2 sc 4 times, ch 5, sl st to the first BPsc. (5 ch-5 sps)
Rnd 5 (outer petals): In each ch-5 sp work (sc, hdc, 5 dc, hdc, sc). Sl st to the first sc. (5 petals, 45 sts)
Fasten off with a 12 in (30.5 cm) tail. The outer petals sit between and behind the inner petals, so you get two stacked layers around the open center. The rose measures 2.5 in (6.4 cm) across.
Leaf (Make 208)
Use olive green.
Ch 8. Sc in the 2nd ch from the hook, hdc in the next ch, dc in the next 3 ch, hdc in the next ch, then work (sc, ch 2, sc) in the last ch for the pointed tip. Working along the other side of the chain, hdc in the next ch, dc in the next 3 ch, hdc in the next ch, sc in the next ch. Sl st to the first sc.
Count: 14 sts + ch-2 tip.
Fasten off, leaving a 10 in (25.4 cm) tail. The chain spine reads as a center vein. The leaf measures 1.75 in × 0.75 in (4.4 cm × 1.9 cm).
Make All Appliqués and Layout
- Burgundy: 104 roses
- Olive green: 208 leaves (2 per rose)
Place the roses on full-loop mesh rows (odd rows), centering each rose over the ch-6 loop with the given number. Count loops from the right edge with the RS facing.
- A rows (7 roses on loops 2, 6, 10, 14, 18, 22, 26): Mesh Rows 5, 17, 29, 41, 53, 65, 77, 89
- B rows (6 roses on loops 4, 8, 12, 16, 20, 24): Mesh Rows 11, 23, 35, 47, 59, 71, 83, 95
Layout sketch (R = rose, · = empty diamond; every row shows 28 loop positions):
A: · R · · · R · · · R · · · R · · · R · · · R · · · R · ·
B: · · · R · · · R · · · R · · · R · · · R · · · R · · · ·
Across a row, the roses are 6 in (15.2 cm) apart. Each B row shifts 3 in (7.6 cm) sideways from the A row above it. Rose rows are 4.5 in (11.4 cm) apart vertically. Total: 8 × 7 + 8 × 6 = 104 roses.
Attaching the Appliqués
Lay the panel flat with the RS up. Mark every rose position first with stitch markers, working one 18 in (45.7 cm) band at a time.
Leaves: Pin two leaves under each rose position, with their bases touching at the bottom of the loop and the tips angled down-left and down-right in a V. Whipstitch each leaf along its center spine to the mesh chains it crosses.
Roses: Place the rose so its lower petals overlap the leaf bases. With the burgundy tail, sew through Rnd 2 to the mesh in 5 places, then tack the outer petal tips at 5 points. Catch only the mesh chains and keep the stitches relaxed. If you pull tight, the diamonds pucker around the rose.
Weave all ends in on the WS, through the appliqué itself.
Final Blocking
- Wet-block the panel: soak it in cool water and press the water out in a towel. Do not wring it.
- Lay it flat on mats or a sheet, RS up.
- Pin the header straight at 42 in (106.7 cm) wide.
- Pin each long side straight to 77.75 in (197.5 cm), measured from the top of the header to the end of the mesh.
- Pin each scallop point down to 2.25 in (5.7 cm) below the mesh, with the dips at 1.25 in (3.2 cm).
- Nudge the diamonds square with your fingers and fluff each rose’s petals upward.
- Let it dry fully, then hang it for 24 hours before the final measuring.
Final Quality-Control Checklist
- [ ] Header is 141 sts and 42.3 in (107.4 cm) wide
- [ ] Mesh is 101 rows, with 28 loops on every odd row
- [ ] Border Rows 1–2 are 141 sts each, with 7 even scallops
- [ ] Side edging is 313 sc per side and both sides are straight
- [ ] 8 tabs are evenly spaced and all loops are 3 in (7.6 cm)
- [ ] 104 roses with 2 layers of 5 petals each
- [ ] 208 leaves, sewn in pairs in a V
- [ ] Rose grid alternates 7 and 6 roses per row
- [ ] No puckering around the appliqués
Troubleshooting
- Panel is too long when hung: Cotton mesh stretches. Next time, work 97 mesh rows instead of 101 (72.75 in / 184.8 cm of mesh).
- Scallops ruffle: You probably worked 5 dc into some loops in Border Row 1. Recount to 141 sts.
- Sides wave: Too many sc in the edging. Keep exactly 3 per mesh row-end.
- Diamonds lean to one side: Make sure every row starts and ends with the correct half loop or full loop.
- Roses cup inward: Your BPsc in Rnd 4 is too tight. Loosen the ch-5 or use a larger hook for Rnds 4–5.
- Mesh puckers behind a rose: Remove the tacking stitches and resew them more loosely.
Care
Hand wash cool, or use a gentle machine cycle inside a large mesh bag. Lay flat to dry, then rehang while slightly damp so the scallops settle.
Final Notes
The whole curtain depends on one measurement chain. 141 header sts make 42.3 in (107.4 cm). Those same sts become 28 mesh loops of 1.5 in (3.8 cm), and 101 mesh rows add 75.75 in (192.4 cm). The border converts back to 141 sts, divides into 7 scallops of 6 in (15.2 cm), and adds 2.25 in (5.7 cm) for a finished panel of 42 in × 80 in (106.7 cm × 203.2 cm). If you check your gauge at each checkpoint, the roses and tabs will line up.
Happy crocheting!