

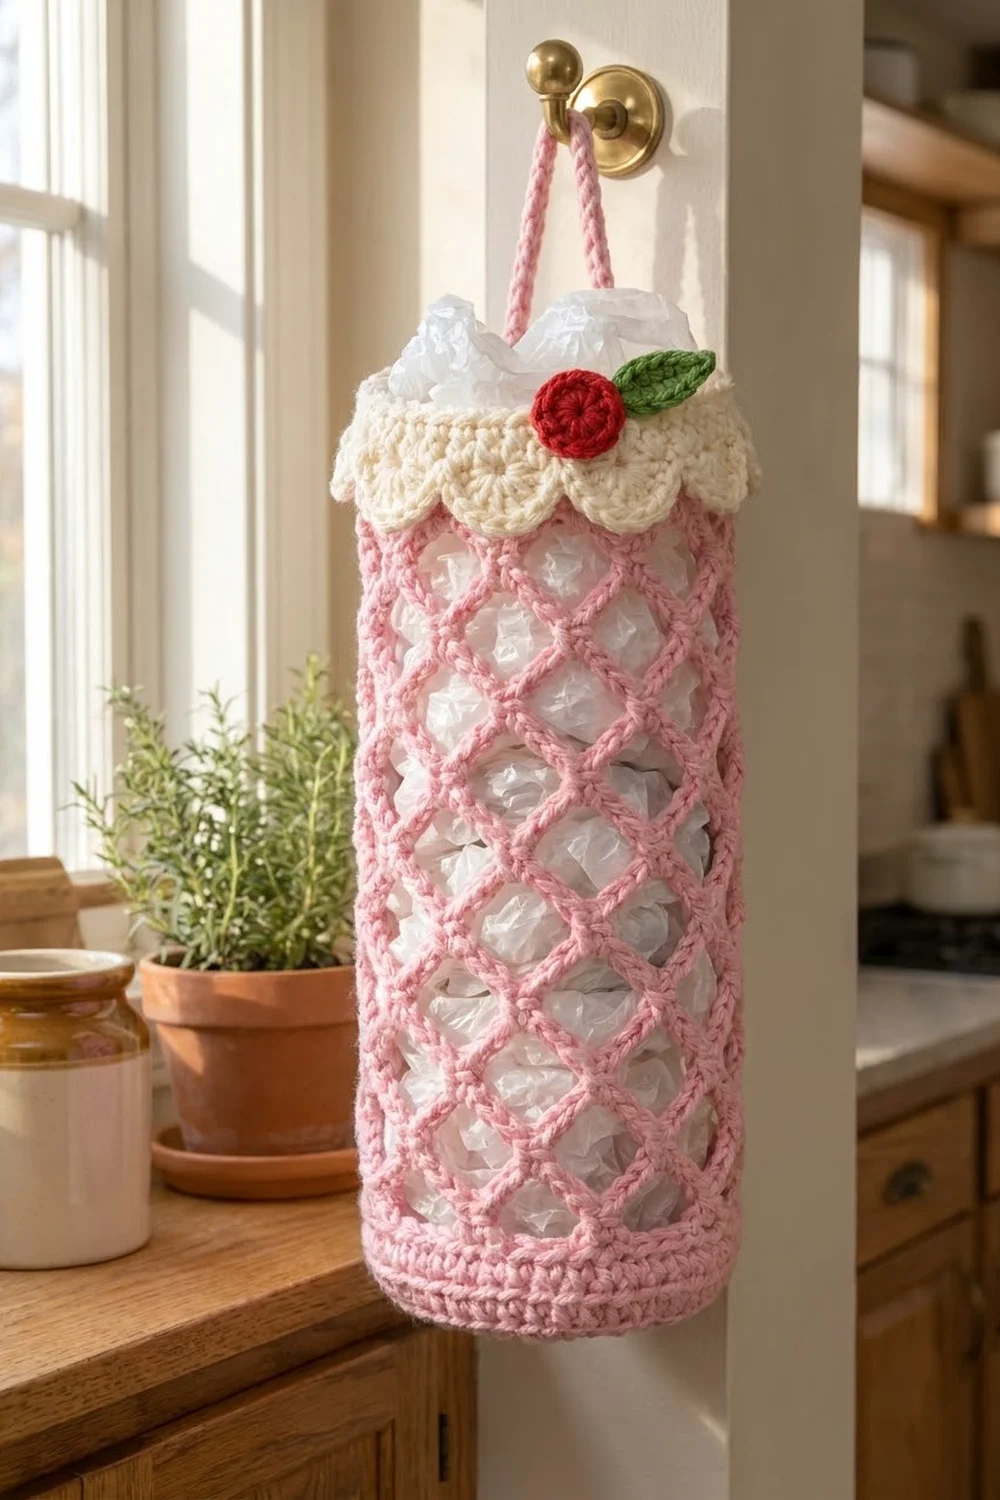
The Rosebud Lattice Bag Holder is a pretty, practical way to stop plastic bags from taking over a kitchen drawer. The body is a soft pink diamond net, so you can see the bags inside. A solid band at the bottom holds its shape and works as the dispensing hole.
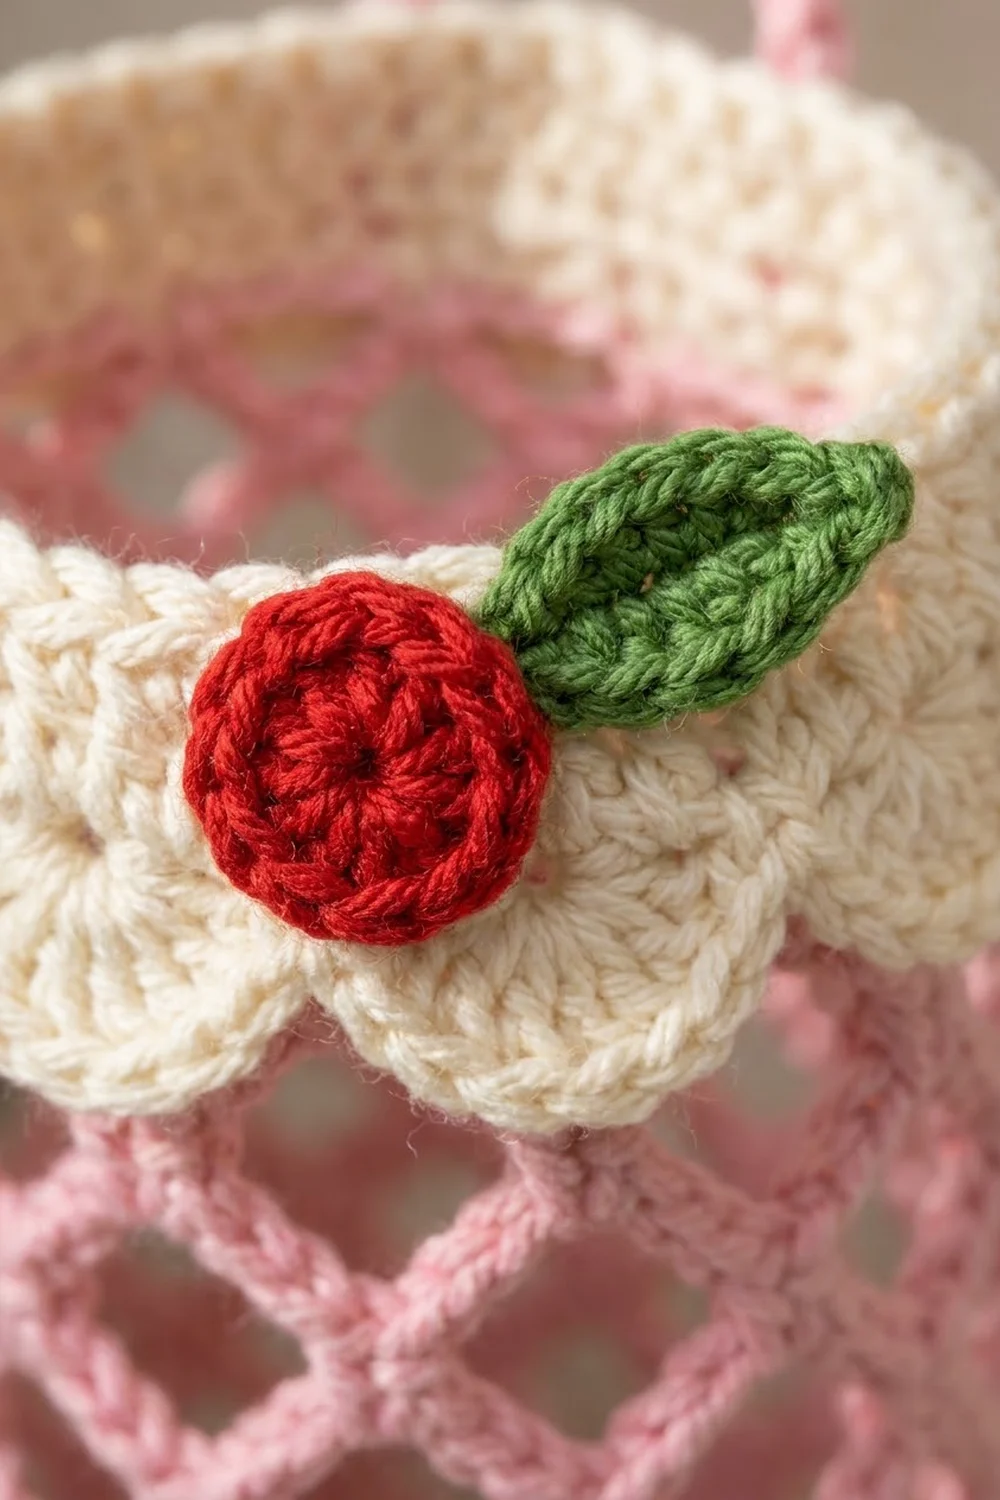
A cream band at the top has a row of shell scallops that fold down over the lattice like a little collar. A red spiral flower and a green leaf on the front add a cheerful, cottage-kitchen touch, and a pink strap at the back hangs the holder from a hook or cabinet knob.
This pattern uses US crochet terms. The finished holder is 18 in (45.7 cm) around, 9 in (22.9 cm) wide laid flat, and 14.2 in (36.1 cm) tall, not counting the hanging loop.
The holder is worked bottom-up in joined rounds as one piece: a pink sc band, then 16 rounds of chain-loop mesh, then a cream sc band. After that, you add scallops into saved front loops, then a strap and two small appliqués that you sew on. There’s no seaming and no joining of multiple pieces.
Finished Size and Construction
- Finished size: 18 in (45.7 cm) circumference; 9 in (22.9 cm) flat width; 14.2 in (36.1 cm) tall
- Skill level: Easy
- Terminology: US crochet terms
- Yarn weight: Worsted (#4), cotton or cotton blend
- Hook: 5.0 mm (H-8)
- Number of pieces: 1 main body, plus 1 strap, 1 flower, and 1 leaf sewn on
- Layout: Single tube, open at both ends
- Piece size: 72 sts around = 18 in (45.7 cm)
- Size before border: 13.1 in (33.3 cm) tall (bottom band plus mesh)
- Border depth: Cream band 1.1 in (2.8 cm); scallops hang 0.6 in (1.5 cm) over the mesh
Materials
Yarn: Use a smooth worsted-weight cotton, about 85 m (93 yd) per 50 g. Cotton keeps its shape when the holder is full and shows the lattice crisply. Acrylic also works, but it will stretch more under weight.
- Pink (main color): 60 g / 102 m
- Cream (top band and scallops): 20 g / 34 m
- Red (flower): 5 g / 9 m
- Green (leaf): 5 g / 9 m
These amounts include a safety margin of roughly 20 percent.
Tools:
- 5.0 mm (H-8) crochet hook
- Tapestry needle
- 2 locking stitch markers
- Tape measure
- Scissors
- Spray bottle and a rolled towel for blocking
Abbreviations (US Terms)
- ch – chain
- sl st – slip stitch
- sc – single crochet
- hdc – half double crochet
- dc – double crochet
- sk – skip
- st(s) – stitch(es)
- ch-5 loop – the space under a chain-5
- FLO / BLO – front loop only / back loop only
- rnd(s) – round(s)
Special stitch: Scallop. Sk 2 sts, work 5 dc in the next st, sk 2 sts, sl st in the next st. Each scallop uses 6 sts.
Gauge and Checkpoints
Sc gauge: 16 sts x 18 rnds = 4 in (10.2 cm).
Mesh gauge: 4 ch-5 loops = 4 in (10.2 cm) across when gently stretched, and 4 mesh rnds = 3 in (7.6 cm) tall.
Check your gauge with the bottom band itself. It’s the first thing you make, and you can frog it quickly if it’s off.
Checkpoints:
- After Bottom Band Rnd 5, the band measures 9 in (22.9 cm) laid flat and 1.1 in (2.8 cm) tall.
- After Mesh Rnd 4, the piece is about 4.1 in (10.4 cm) tall in total.
- After Mesh Rnd 16, the piece is 13.1 in (33.3 cm) tall.
- After Cream Rnd 5, the piece is 14.2 in (36.1 cm) tall and still 9 in (22.9 cm) flat.
If the band is too big: go down to a 4.5 mm (7) hook. If it’s too small: go up to a 5.5 mm (I-9) hook. If the band is the right width but the mesh comes out too tall, crochet the chains a little more firmly. You can also drop to 15 mesh rnds and lose 0.75 in (1.9 cm) of height.
Pattern
Bottom Band (Pink)
The bottom band is the open dispensing hole, so don’t close it.
Foundation: With pink, ch 72. Sl st to the first ch to form a ring, taking care not to twist the chain.
Rnd 1: Ch 1, sc in each ch around. Sl st to the first sc. (72 sc)
Rnds 2–5: Ch 1, sc in each st around. Sl st to the first sc. (72 sc each rnd)
Checkpoint: 9 in (22.9 cm) flat and 1.1 in (2.8 cm) tall. Don’t fasten off.
Lattice Mesh (Pink)
Mesh Rnd 1: Ch 1, sc in the same st. Ch 5, sk 3 sts, sc in the next st. Repeat from * to * 16 more times. To finish, ch 5, sk the last 3 sts, and sl st to the first sc. (18 ch-5 loops)
The math: 72 sts ÷ 4 sts per repeat = 18 loops.
Mesh Rnd 2: Sl st into each of the first 3 ch so you’re at the center of the first loop. Ch 1, sc in that loop. Ch 5, sc in the next ch-5 loop. Repeat from * to * 16 more times. To finish, ch 5 and sl st to the first sc. (18 ch-5 loops)
Each sc lands in the center of a loop from the round below, which makes the offset diamond pattern.
Mesh Rnds 3–16: Repeat Mesh Rnd 2. (18 ch-5 loops each rnd)
Place a marker in the first sc of every 4th round so you can count rounds easily. Checkpoint: 13.1 in (33.3 cm) tall. Fasten off pink.
Border: Cream Top Band and Scallop Trim
The cream band works as the border on this single-piece design. It turns the 18 loops back into 72 solid sts so the top edge matches the bottom band exactly.
Border gauge: the same as the sc gauge, 16 sts = 4 in (10.2 cm). When you lay the tube flat, each “side” (front and back) holds 36 sts = 9 in (22.9 cm).
Cream Rnd 1 (conversion rnd): Join cream with a sl st in any ch-5 loop. Ch 1, then work 4 sc in each ch-5 loop around. Sl st to the first sc. (72 sc)
This round is worked into loops, not stitch-into-stitch. The count is 0 sts worked one per existing stitch + 4 sts per loop x 18 loops = 72 sc, which is 36 sts per flat side.
Cream Rnd 2: Ch 1, sc in the BLO of each st around. Sl st to the first sc. (72 sc)
This leaves the front loops of Rnd 1 free for the scallops.
Cream Rnds 3–5: Ch 1, sc in both loops of each st around. Sl st to the first sc. (72 sc each rnd, 36 per flat side)
Fasten off and weave in the end. Checkpoint: the cream band is 1.1 in (2.8 cm) tall, and the whole piece is 14.2 in (36.1 cm) tall.
Scallop Rnd: Turn the holder upside down so the bottom band points toward you. Join cream with a sl st in any free front loop of Cream Rnd 1. Then repeat [sk 2 front loops, 5 dc in the next front loop, sk 2 front loops, sl st in the next front loop] around, ending with the last sl st in the joining st. (12 scallops; 60 dc + 12 sl st)
Why the math works: 72 sts ÷ 6 sts per scallop = 12 scallops, which is exactly 6 per flat side, with nothing left over. Because the scallops sit in front loops below the band, they hang downward over the top of the mesh by 0.6 in (1.5 cm), just like the collar in the photo.
Fasten off and weave in the ends.
Hanging Strap (Pink)
With pink, ch 41.
Row 1: Sc in the 2nd ch from the hook and in each ch across. (40 sc)
The strap measures 10 in (25.4 cm). Fasten off and leave a 12 in (30.5 cm) tail.
Fold the strap in half. Overlap both ends 1 in (2.5 cm) down the inside back of the cream band, centered between two scallops, and sew them firmly through all layers. The finished loop rises 4 in (10.2 cm) above the rim.
Flower (Red)
Rnd 1: Make a magic ring and work 6 sc into it. Don’t join; work in a spiral. (6 sc)
Rnd 2: 2 sc in each st. (12 sc)
Rnd 3: Sc in the next st, 2 sc in the next st. Repeat from * to * 6 times, then sl st to the next st. (18 sc)
Fasten off and leave a tail for sewing. The flower measures about 1.25 in (3.2 cm) across, and the spiral gives it a rolled-rose look.
Leaf (Green)
Ch 7.
Side 1: Sc in the 2nd ch from the hook, then hdc, dc, dc, hdc, and sc in the next 5 ch, so you’ve worked into all 6 remaining ch.
Tip: Ch 2. Rotate the work to crochet along the other side of the foundation chain.
Side 2: Sc, hdc, dc, dc, hdc, and sc in the 6 free loops of the chain. Sl st to the first sc. (12 sts + ch-2 tip)
Fasten off and leave a tail. The leaf is about 1.5 in (3.8 cm) long.
Assembly of Appliqués
Center the flower on the front of the cream band so its lower edge slightly overlaps the top of a scallop. Tuck the leaf against the right side of the flower with the tip pointing up and to the right. Whipstitch both pieces around their edges, keeping the stitches only in the cream band so nothing shows through the mesh.
Final Blocking
- Weave in all the remaining ends along solid sc rounds, not through the mesh.
- Roll a bath towel into a firm tube about 5.7 in (14.5 cm) across and slide the holder over it.
- Mist the whole piece evenly until it’s damp but not dripping.
- Ease the mesh lengthwise until it measures 12 in (30.5 cm) between the bands, with the diamonds even all the way around.
- Smooth the scallops flat so they hang downward over the mesh, and press the flower and leaf flat.
- Let it dry completely on the towel, which takes about 24 hours.
- Remeasure: 18 in (45.7 cm) around and 14.2 in (36.1 cm) tall.
Final Quality-Control Checklist
- [ ] Bottom band: 72 sc per round, 5 rounds, open at the bottom
- [ ] Mesh: 18 loops in every round, 16 rounds, no twisted or missed loops
- [ ] Cream band: 72 sc per round, 36 per flat side
- [ ] Exactly 12 scallops, 6 per flat side, all hanging downward
- [ ] Strap sewn securely at the back and rising 4 in (10.2 cm)
- [ ] Flower and leaf centered on the front and stitched all the way around
- [ ] All ends woven into solid rounds
- [ ] Final size: 9 in (22.9 cm) flat x 14.2 in (36.1 cm) tall
Troubleshooting
The mesh drifts in a spiral. Make sure you sl st across exactly 3 ch to reach the center of the first loop at the start of each round.
I have 17 or 19 loops. Count after every round. Usually a loop was skipped or worked twice near the join; frog back to the last correct round.
The top band ruffles. You’ve put more than 4 sc in some loops. Recount Cream Rnd 1 so it has 72 sc.
The top band pulls in. Use 4 sc per loop, not 3, and keep the sc relaxed.
The scallops point upward. They were worked into the back loops. Rework them into the free front loops of Cream Rnd 1.
Bags fall out of the bottom. Work the bottom band with a 4.5 mm (7) hook for a firmer edge, or add a 6th sc round.
The strap stretches. Sew the ends deeper, 2 in (5.1 cm) inside the band, and use cotton yarn.
Care
Hand wash in cool water, press out the excess water in a towel, and dry it flat or on a rolled towel to keep its shape. Don’t tumble dry.
Final Notes
The whole design rests on one number: 72 stitches. Your 72-st foundation becomes 18 mesh loops, those 18 loops turn back into 72 cream stitches, and the 72 cream stitches divide evenly into 12 scallops. Check the 9 in (22.9 cm) flat width at the bottom band, the 13.1 in (33.3 cm) height after the mesh, and the 14.2 in (36.1 cm) finished height, and the holder will match from bottom to top.
Happy crocheting!