

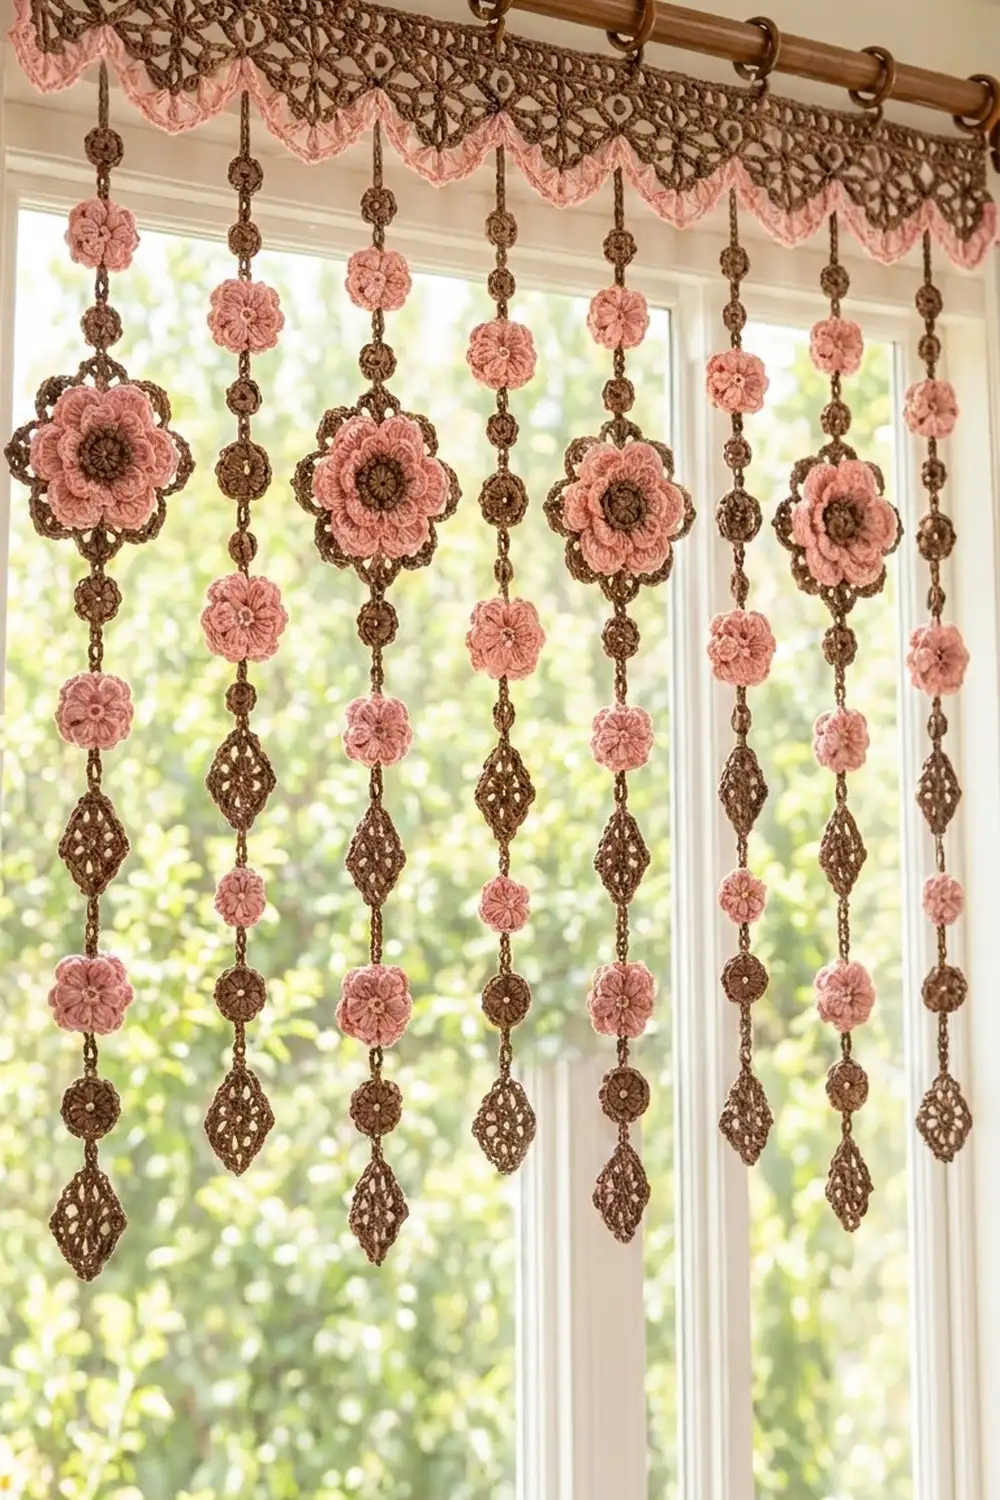
The Rosewood Bloom valance pairs a chocolate-brown lace header with dusty rose flowers. Eight beaded strands hang from a pink scalloped edge, so light comes through and the whole piece moves gently in a breeze.
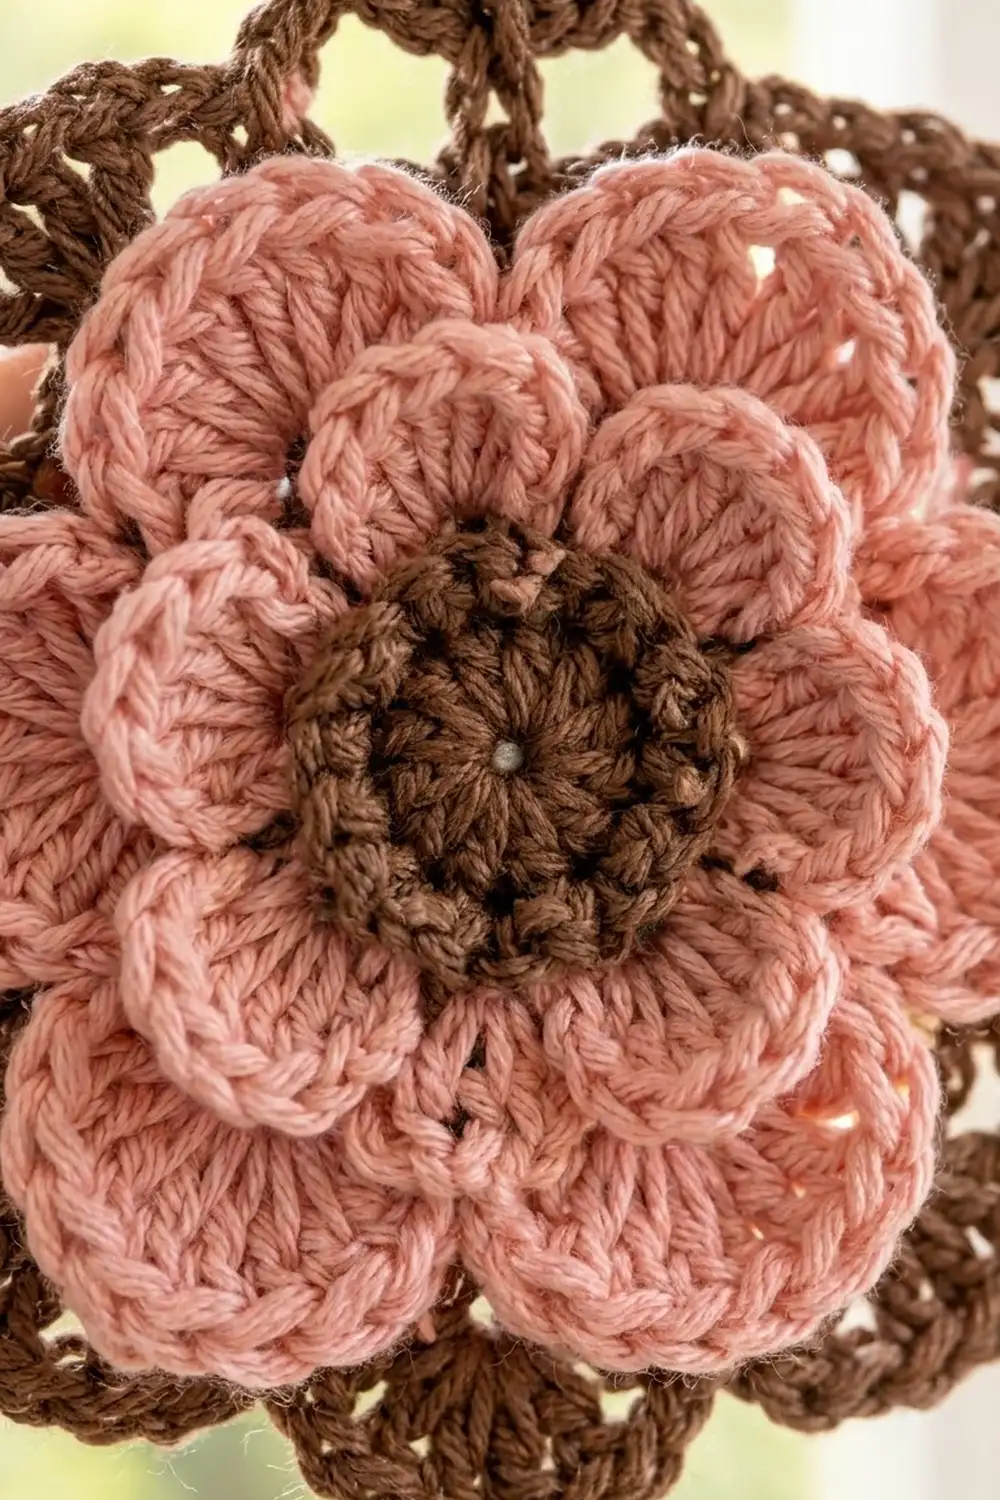
Four strands carry a large two-layer flower in a lacy brown frame. All eight strands also carry small pink blossoms and brown disks, and each one ends in a lace diamond drop. The style is cottage-meets-boho: warm and a little vintage.
This pattern uses US crochet terms. The finished valance measures 32.2 in (81.8 cm) wide and about 23 in (58.4 cm) long, including the strands.
Here is how it comes together. You crochet the header in rows from the top down, then add the pink scalloped edge. Next you make all the motifs separately. Finally, you build each strand as a brown chain cord that joins the motifs from top to bottom.
Finished Size and Construction
- Finished size: 32.2 in (81.8 cm) wide × 23 in (58.4 cm) long
- Skill level: Intermediate
- Terminology: US
- Yarn weight: DK (#3) cotton
- Hook: 3.5 mm (E/4)
- Number of pieces: 57 (1 header, 4 large flowers, 20 small flowers, 24 disks, 8 drops)
- Layout: 8 strands spaced 4 in (10.2 cm) apart; large-flower strands alternate with small-flower strands
- Header size before the edging: 32.2 in × 3.5 in (81.8 cm × 8.9 cm)
- Edging depth: 1 in (2.5 cm), so the full header is 4.5 in (11.4 cm) deep
- Strand length: 18.5 in (47.0 cm)
Materials
Choose a smooth mercerized DK cotton. It shows off the lace clearly and holds its shape against a window. The amounts below assume about 105 m per 50 g.
- Brown (Color A): 120 g / 252 m
- Pink (Color B): 80 g / 168 m
- 3.5 mm (E/4) crochet hook
- Tapestry needle
- Scissors
- Stitch markers
- 9 curtain clip rings
- Blocking mat, rust-proof pins and a spray bottle
These quantities include a margin of about 20% for gauge differences and test pieces.
Abbreviations (US Terms)
- ch – chain
- sl st – slip stitch
- sc – single crochet
- hdc – half double crochet
- dc – double crochet
- sp – space
- sc2tog – single crochet 2 together
- sc3tog – single crochet 3 together
- st(s) – stitch(es)
- rep – repeat
- RS – right side
Special stitches
- Picot: ch 3.
- Post sc: insert the hook from the back, around the post of the stitch named, and complete an sc.
Gauge and Checkpoints
Gauge: 20 dc and 10 dc rows = 4 in (10.2 cm). Chains work up at about 5 ch per 1 in (2.5 cm).
Make one large flower before anything else. It is the best test piece because it uses both colors and every stitch type in the pattern. Check it at each stage:
- After Rnd 2: 1.25 in (3.2 cm)
- After Rnd 4: 3 in (7.6 cm)
- After Rnd 6: 3.75 in (9.5 cm)
- After Rnd 9: 4.5 in (11.4 cm)
Other checkpoints:
- Small flower: 1.5 in (3.8 cm)
- Disk: 0.9 in (2.3 cm)
- Drop: 2 in (5.1 cm) wide × 2.25 in (5.7 cm) long
- Header after Row 1: 32.2 in (81.8 cm) wide
If your pieces come out too big, go down 0.25 mm in hook size. If they are too small, go up 0.25 mm. Re-test the flower before you start the header.
Header (Brown)
Ch 163.
Row 1 (top edge): Dc in 4th ch from hook and in each ch across. The skipped ch-3 counts as the first dc. Turn. (161 dc)
Row 2 (mesh): Ch 4 (counts as dc + ch 1), skip next st, dc in next st. Ch 1, skip next st, dc in next st. Rep from * across. Turn. (81 dc + 80 ch-1 sps = 161 sts)
Row 3 (net): Ch 1, sc in first dc. Ch 5, skip (ch-1 sp, dc, ch-1 sp), sc in next dc. Rep from * across. Turn. (41 sc, 40 ch-5 loops)
Row 4: Ch 5 (counts as dc + ch 2), sc in first ch-5 loop. Ch 5, sc in next loop. Rep from * across, then ch 2 and dc in last sc. Turn. (40 sc, 39 full ch-5 loops, 2 half loops)
Row 5: Ch 1, sc in first dc. Ch 5, sc in next full ch-5 loop. Rep from * 38 more times. Ch 5, sc in 3rd ch of turning ch. Turn. (41 sc, 40 ch-5 loops)
Row 6 (conversion): Ch 3 (counts as dc). 3 dc in next ch-5 loop, dc in next sc. Rep from * across. Turn. (41 sts worked 1 per sc + 120 dc added in loops = 161 dc)
Row 7 (mesh): Work as Row 2. (161 sts)
Row 8: Ch 3 (counts as dc). Dc in each ch-1 sp and each dc across. (161 dc) Do not fasten off brown; drop it.
Checkpoint: 32.2 in × 3.5 in (81.8 cm × 8.9 cm).
Large Flower (Make 4)
Rnd 1 (brown): Make a magic ring. Ch 3 (counts as dc), 11 dc in ring, sl st to top of ch-3. (12 dc)
Rnd 2 (brown): Ch 1, 2 sc in each st around, sl st to first sc. Fasten off. (24 sc)
Rnd 3 (pink): Join pink with sc in any st. Ch 3, skip 3 sts, sc in next st. Rep from * 4 more times, ch 3, skip 3 sts, sl st to first sc. (6 sc, 6 ch-3 sps)
Rnd 4 (front petals): In each ch-3 sp work (sc, hdc, 5 dc, hdc, sc). Sl st to first sc. (6 petals, 54 sts)
Rnd 5: Working behind the petals, post sc around the first Rnd-3 sc. Ch 5, post sc around next Rnd-3 sc. Rep from * 4 more times, ch 5, sl st to first sc. (6 ch-5 loops)
Rnd 6 (back petals): In each ch-5 loop work (sc, hdc, 7 dc, hdc, sc). Sl st to first sc. Fasten off. (6 petals, 66 sts)
Rnd 7 (brown): Join brown with a post sc around any Rnd-5 sc, working behind the petals. Ch 7, post sc around next Rnd-5 sc. Rep from * 4 more times, ch 7, sl st to first sc. (6 ch-7 loops)
Rnd 8 (lace frame): In each ch-7 loop work (sc, ch 3, [dc, ch 2] 3 times, dc, ch 3, sc). Sl st to first sc. (6 fans; each fan has 4 dc, 3 ch-2 sps and 2 ch-3 sps)
Rnd 9 (picot edge): In each fan, work only into the spaces: 3 sc in the ch-3 sp, (sc, picot, sc) in each of the 3 ch-2 sps, then 3 sc in the next ch-3 sp. Sl st to first sc. Fasten off. (72 sc, 18 picots)
Small Flower (Make 20, Pink)
Rnd 1: Make a magic ring. Ch 1, 10 sc in ring, sl st to first sc. (10 sc)
Rnd 2: Ch 1. Sc in next st, 5 dc in next st. Rep from * 4 more times, sl st to first sc. Fasten off. (5 petals; 5 sc + 25 dc = 30 sts)
Disk (Make 24, Brown)
Make a magic ring. Ch 2 (does not count as a st), 12 hdc in ring, sl st to first hdc. Pull the ring tight and fasten off. (12 hdc, 0.9 in / 2.3 cm)
Diamond Drop (Make 8, Brown)
- Row 1: Ch 2, 3 sc in 2nd ch from hook. Turn. (3)
- Row 2: Ch 1, 2 sc in first st, sc in next st, 2 sc in last st. Turn. (5)
- Row 3: Ch 4 (counts as dc + ch 1), dc in same st. Ch 1, skip 1, dc in next st. Ch 1, skip 1, (dc, ch 1, dc) in last st. Turn. (5 dc + 4 ch-1 sps = 9)
- Row 4: Ch 1, 2 sc in first dc, sc in each sp and st across to the last st, 2 sc in last st. Turn. (11)
- Row 5: Ch 4, skip 1, dc in next st. Ch 1, skip 1, dc in next st. Rep from * across. Turn. (6 dc + 5 sps = 11)
- Row 6: Ch 1, sc2tog, sc in each st and sp to the last 2, sc2tog. Turn. (9)
- Row 7: Ch 1, sc2tog, sc in next 5 sts, sc2tog. Turn. (7)
- Row 8: Ch 1, sc2tog, sc in next 3 sts, sc2tog. Turn. (5)
- Row 9: Ch 1, sc2tog, sc in next st, sc2tog. Turn. (3)
- Row 10: Ch 1, sc3tog. Fasten off. (1)
Make All Pieces
| Piece | Qty | Color |
|---|---|---|
| Header | 1 | Brown (pink edging) |
| Large flower | 4 | Brown + pink |
| Small flower | 20 | Pink |
| Disk | 24 | Brown |
| Diamond drop | 8 | Brown |
Strand layout (left to right):
Strand:  1   2   3   4   5   6   7   8
Type:    L   S   L   S   L   S   L   S
L strand (top to bottom): small flower, disk, large flower, disk, small flower, disk, drop.
S strand (top to bottom): small flower, disk, small flower, disk, small flower, disk, drop.
That gives 2 small flowers on each of the 4 L strands (8) and 3 on each of the 4 S strands (12), for 20 small flowers in total. Every strand has 3 disks, so 8 × 3 = 24 disks.
Joining the Strands
Work each strand as one continuous brown chain cord.
- Join brown with a sl st in the picot at the tip of a header scallop. Make the first link: ch 6 for an L strand or ch 9 for an S strand.
- Sl st through the top stitch of the motif, working from front to back. Ch a hidden cord down the back of the motif, then sl st through its bottom stitch.
- Make the next link: ch 4 on L strands or ch 6 on S strands. Then join the next motif the same way.
Which stitches to use, and how long to make the hidden cord:
- Large flower: top and bottom are the center picots of 2 opposite fans; ch 20 behind.
- Small flower: top is the center dc of a petal; bottom is the opposite sc; ch 6 behind.
- Disk: top is hdc 1 and bottom is hdc 7; ch 3 behind.
- Drop: sl st into the tip chain of Row 1, then fasten off.
Length math:
- L strand: links are 1.2 in + 6 × 0.8 in = 6.0 in. Motifs are 1.5 + 0.9 + 4.5 + 0.9 + 1.5 + 0.9 + 2.25 = 12.45 in. Total: 18.45 in.
- S strand: links are 1.8 in + 6 × 1.2 in = 9.0 in. Motifs are 3 × 1.5 + 3 × 0.9 + 2.25 = 9.45 in. Total: 18.45 in.
Both strands come out at about 18.5 in (47.0 cm), so all 8 drops line up.
Tension: Keep the link chains firm but not tight. Hidden chains should lie flat behind each motif without bunching it up.
Checkpoint: Hang the header and measure each strand. Each one should be within 0.25 in (0.6 cm) of the others.
Border: Pink Scalloped Edge
Work this edge along the bottom of the header (Row 8) only. Border gauge: each scallop covers 20 header stitches, which is 4 in (10.2 cm). 161 sts = 8 × 20 + 1, so the edge gives exactly 8 scallops, one for each strand.
Row 1 (RS): Join pink in the first st of Row 8. Ch 1, sc in same st. Ch 3, skip 3 sts, sc in next st. Rep from * across. Turn. (41 sc, 40 ch-3 sps; 5 sps per scallop)
Row 2: Ch 1. Work the scallop repeat 8 times, using 5 spaces each time:
– sc in next sp, ch 2
– 3 dc in next sp, ch 1
– (3 dc, ch 2, 3 dc) in next sp, ch 1
– 3 dc in next sp, ch 2
– sc in next sp
Sl st in the last sc. Turn. (8 scallops; 96 dc, 16 sc)
Row 3 (picot edge): Ch 1. In each scallop:
– sc in the sc
– 2 sc in the ch-2 sp
– sc in each of the next 3 dc, sc in the ch-1 sp, sc in each of the next 3 dc
– (sc, picot, sc) in the tip ch-2 sp
– sc in each of the next 3 dc, sc in the ch-1 sp, sc in each of the next 3 dc
– 2 sc in the ch-2 sp
– sc in the sc
Fasten off. (22 sc + 1 picot per scallop; 176 sc, 8 picots)
Why the math works: Row 1 uses all 161 stitches: 1 sc, then 40 repeats of 4 sts. Row 2 uses 8 × 5 = 40 spaces with none left over. Row 3 adds 22 sc to each scallop, and 8 × 22 = 176.
Checkpoint: Header plus edging = 4.5 in (11.4 cm) deep.
Final Blocking
- Weave in all ends along stitches of the same color.
- Spray the whole valance until it is evenly damp.
- Pin the header flat to 32.2 in × 4.5 in (81.8 cm × 11.4 cm), and put a pin through each picot point.
- Lay the strands straight and 4 in (10.2 cm) apart.
- Open the flower frames, pinning each picot, and fluff the petals upward.
- Pin each drop into a crisp diamond.
- Let everything dry completely before you unpin it.
Final Quality-Control Checklist
- The header is 161 sts wide with 8 even scallops.
- Each large flower is 4.5 in (11.4 cm) across and has 18 picots.
- There are 20 small flowers, 24 disks and 8 drops.
- Strands alternate L and S, starting with L on the left.
- All strands are 18.5 in (47.0 cm) long and none of them twist.
- No hidden chain shows from the front.
- All ends are secure.
Troubleshooting
- Header ruffles: Your Row 3 or Row 5 loops are too long. Try ch 4 instead, but keep the same stitch counts.
- The flower cups: Rnd 7 loops are too short. Add 1 ch per loop.
- The flower frame waves: Use a smaller hook for Rnds 8–9.
- Strands hang at uneven lengths: Recount the link chains, then re-block.
- Motifs flip forward: Shorten the hidden cord by 1 ch.
- Scallops lean: Recount Row 1. There should be exactly 40 spaces.
Care
Hand wash in cool water with mild soap. Roll the valance in a towel to remove water, then lay it flat and re-pin the scallops and flowers while it dries.
Final Notes
Each measurement in this pattern depends on the one before it:
- Gauge is 20 dc = 4 in (10.2 cm).
- That makes 161 sts = 32.2 in (81.8 cm).
- Each scallop takes 20 sts and covers 4 in (10.2 cm), which gives 8 strand points.
- Each strand is 18.5 in (47.0 cm), so the valance is 23 in (58.4 cm) long overall.
If you match the large-flower test piece, everything else will measure correctly.
Happy crocheting!