

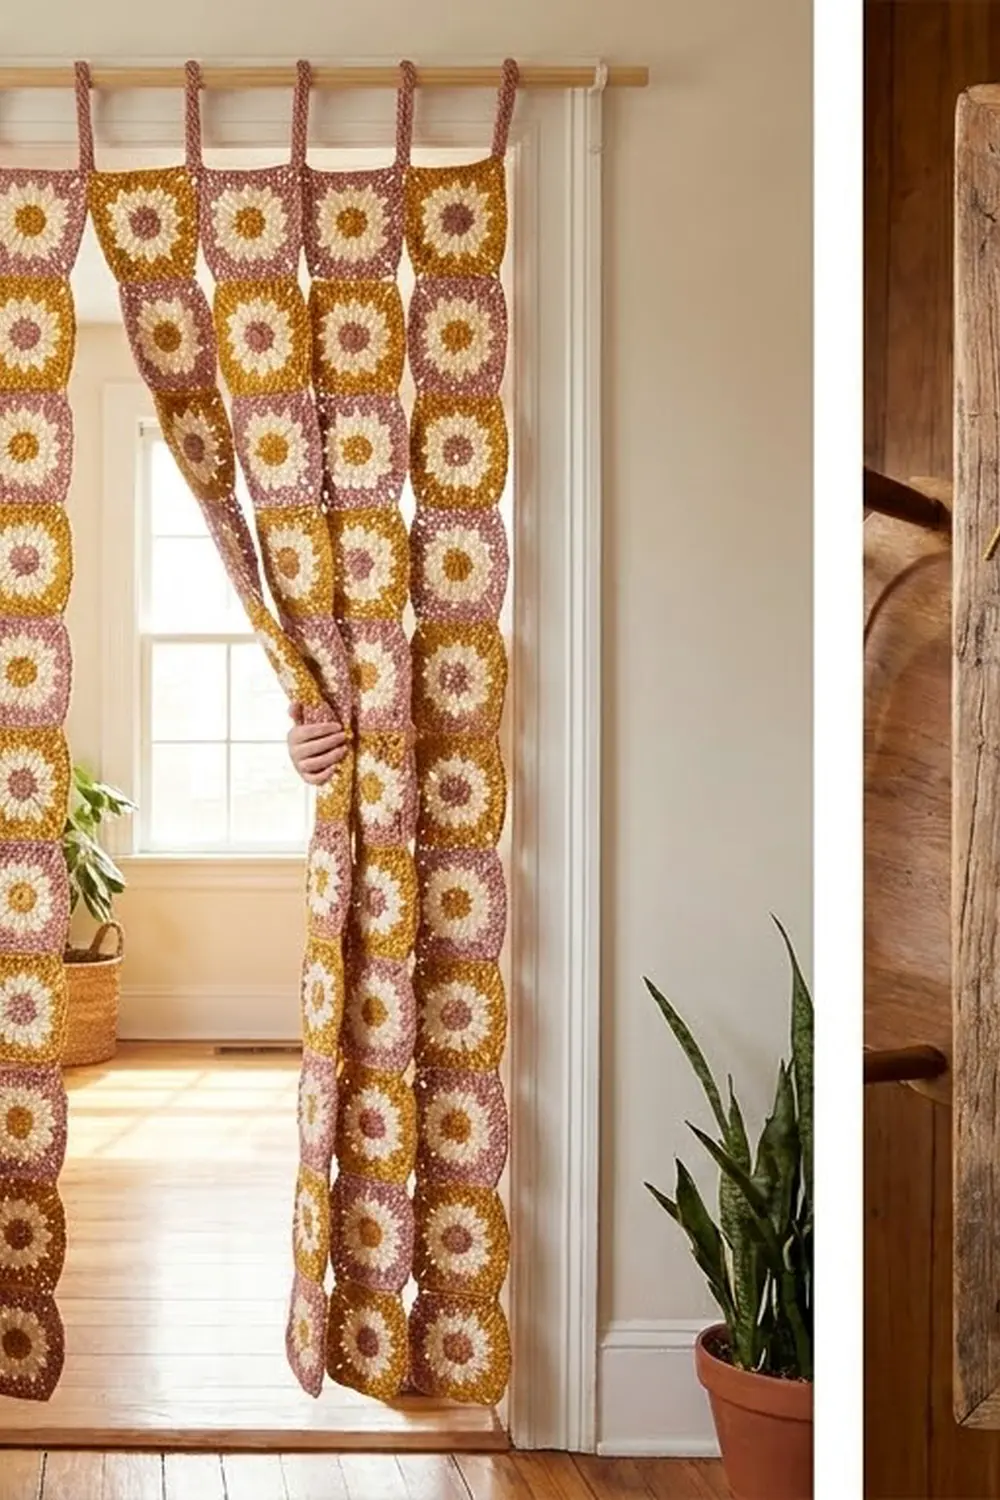
This door curtain hangs as seven loose strips of daisy granny squares. Each strip is 13 squares tall, and the strips are left unjoined so you can walk through them. You can also pull one strip aside, the way you would part a bead curtain.
Each square has a mustard-yellow center, eight plump cream petals, and a dusty-rose frame. The rose also forms the joining ridges, the strip borders, and the hanging loops. The look is soft boho with a vintage cottage feel.
This pattern uses US crochet terms. Each finished strip measures 6 in x 66 in (15.2 cm x 167.6 cm), not counting the loops. Hung edge to edge, the seven strips are 42 in (106.7 cm) wide.
You make 91 squares, join them into strips of 13, add a two-round border to each strip with loops at the top corners, then block and hang.
Finished Size and Construction
- Finished strip size: 6 in x 66 in (15.2 cm x 167.6 cm), plus 1.5 in (3.8 cm) loops
- Full curtain width: 42 in (106.7 cm) edge to edge
- Skill level: Intermediate
- Terminology: US
- Yarn weight: Worsted (#4)
- Hook: 5.0 mm (H-8)
- Number of pieces: 91 squares in 7 strips
- Layout: 7 strips, each 1 square wide x 13 squares long
- Square size: 5 in x 5 in (12.7 cm x 12.7 cm)
- Strip size before border: 5 in x 65 in (12.7 cm x 165.1 cm)
- Border depth: 0.5 in (1.3 cm) on every edge
Materials
Use a worsted cotton or cotton-blend yarn of about 200 m per 100 g. Cotton holds its shape when hanging and doesn’t stretch much under its own weight. Acrylic works too, but strips made with it may lengthen over time.
- Dusty Rose (Color A): 1,100 g / 2,200 m
- Cream (Color B): 350 g / 700 m
- Mustard Yellow (Color C): 200 g / 400 m
All quantities include a margin of about 10% for gauge differences and a test square.
Tools:
– 5.0 mm (H-8) crochet hook
– Tapestry needle
– Scissors
– Stitch markers
– Blocking mats and rust-proof pins
– Spray bottle
– Tape measure
– Curtain rod, 42–45 in (106.7–114.3 cm) long, up to 1 in (2.5 cm) in diameter
Abbreviations (US Terms)
- ch – chain
- sl st – slip stitch
- sc – single crochet
- dc – double crochet
- tr – treble crochet
- sp(s) – space(s)
- st(s) – stitch(es)
- RS – right side
- PC – petal cluster
Petal Cluster (PC): [Yo twice, insert hook in stitch, yo, pull up a loop, (yo, draw through 2 loops) twice] 4 times in the same stitch. Yo and draw through all 5 loops on the hook.
Beginning Petal Cluster (beg PC): Ch 3 (counts as the first leg). Then [yo twice, insert hook, yo, pull up a loop, (yo, draw through 2 loops) twice] 3 times in the same stitch. Yo and draw through all 4 loops on the hook.
Gauge and Checkpoints
Make one test square before anything else. Size errors multiply by 13 along each strip, so a small difference becomes a big one.
- Rnd 1: 1.5 in (3.8 cm) across
- Rnd 2: 3 in (7.6 cm) from petal tip to petal tip
- Rnd 4: 4 in (10.2 cm) square
- Rnd 5: 4.75 in (12.1 cm) square
- Rnd 6: 5 in (12.7 cm) square, with 21 sc per side
Edge gauge: 21 sc = 5 in (12.7 cm), about 4.2 sc per inch.
- Square too big: go down 0.5 mm in hook size.
- Square too small: go up 0.5 mm.
Change the hook, not the stitch counts. Every border count later depends on 21 stitches per side.
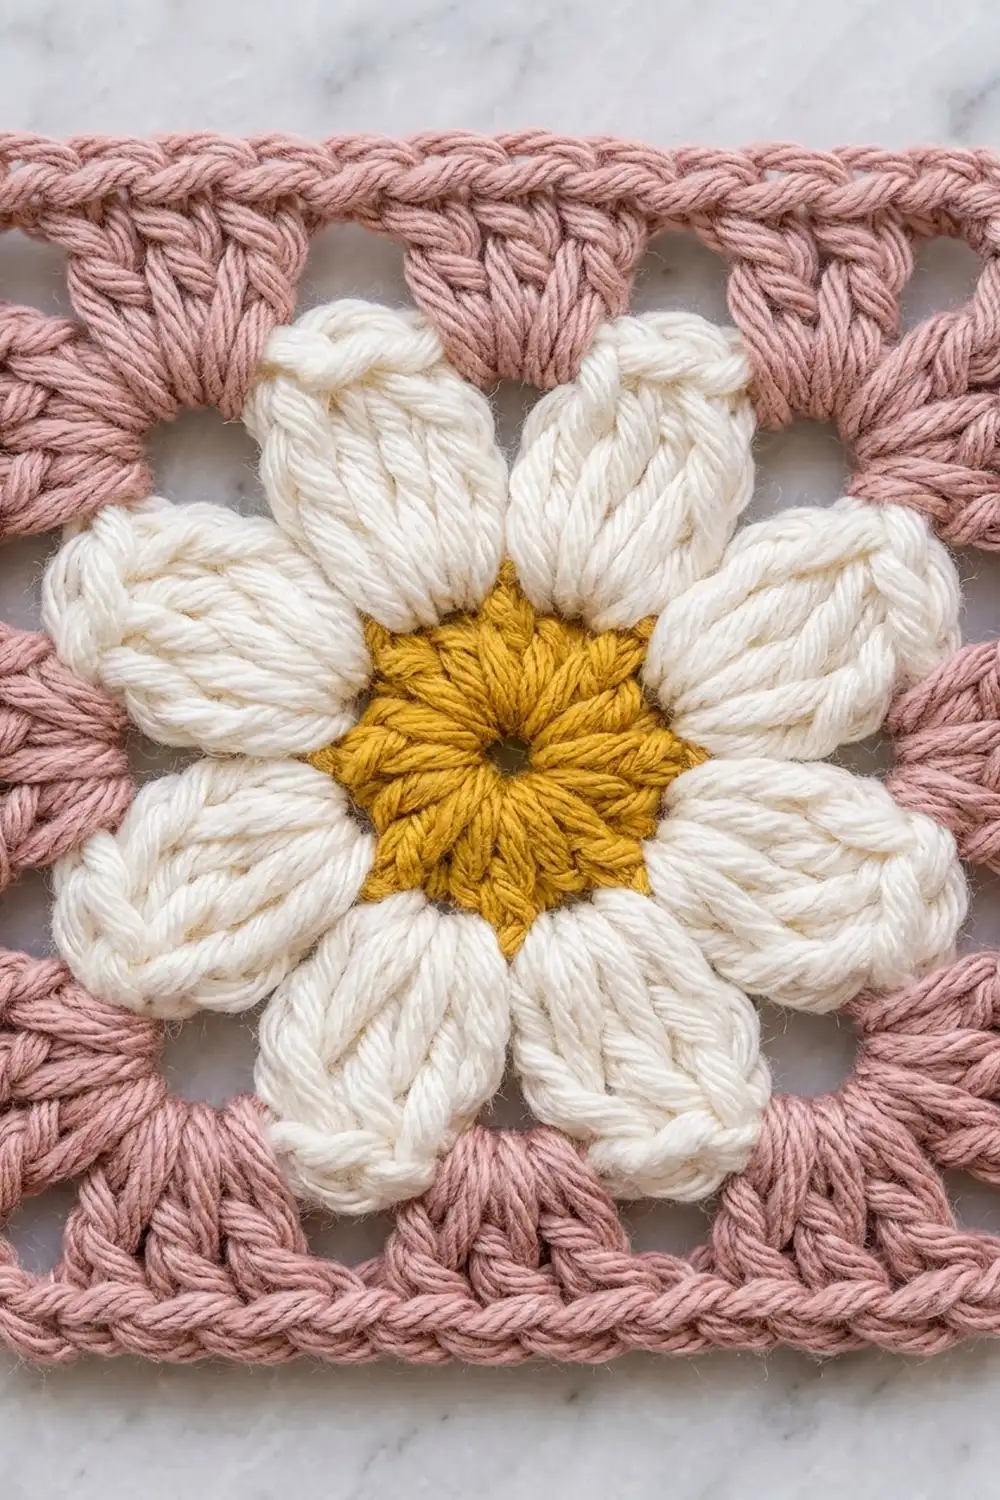
Daisy Square (Make 91)
Rnd 1 (Mustard)
With Color C, make a magic ring. Ch 3 (counts as dc), then work 15 dc in the ring. Join with sl st to the top of the beginning ch-3. Pull the ring closed tightly.
Stitch count: 16 dc. Fasten off.
Rnd 2 (Cream)
Join Color B in any dc.
Work beg PC in the same st, then ch 3. Skip next st, PC in next st, ch 3. Repeat from * 6 more times. Join with sl st to the top of the beg PC.
Stitch count: 8 PC and 8 ch-3 sps. Fasten off.
Each petal sits on every second mustard stitch, so the eight petals are evenly spaced around the center.
Rnd 3 (Dusty Rose)
This round squares off the flower. Petals 1, 3, 5, and 7 become side petals, and petals 2, 4, 6, and 8 become corner petals.
Join Color A in the top of any PC. Ch 1, sc in the same st. Ch 4, (dc, ch 3, dc) in the top of the next PC, ch 4, sc in the top of the next PC. Repeat from * 3 more times, omitting the final sc on the last repeat. Join with sl st to the first sc.
Stitch count: 4 sc, 8 dc, 8 ch-4 sps, and 4 corner ch-3 sps.
Do not fasten off.
Rnd 4
Ch 3 (counts as dc). 4 dc in the next ch-4 sp, dc in the next dc, (2 dc, ch 2, 2 dc) in the corner ch-3 sp, dc in the next dc, 4 dc in the next ch-4 sp, dc in the next sc. Repeat from * around, omitting the final dc on the last repeat. Join to the top of the beginning ch-3.
Stitch count: 60 dc (15 per side between the corner ch-2 sps) and 4 corner ch-2 sps.
Per side, that is 2 + 1 + 4 + 1 + 4 + 1 + 2 = 15. The chain-4 spaces pull slightly over the petal tips, which leaves the small openings between the petals and the frame.
Rnd 5
Sl st in the next dc. Ch 3 (counts as dc). Dc in each dc to the corner. Work (2 dc, ch 2, 2 dc) in each corner ch-2 sp, and dc in each dc around. Join.
Stitch count: 76 dc, which is 60 dc worked one per stitch plus 16 added at the corners. That gives 19 dc per side between the corner spaces, plus 4 corner ch-2 sps.
The opening sl st moves the start one stitch forward. Your first ch-3 then sits on the second dc of the side, and the last dc of the round lands in the joining stitch from Rnd 4. Count each side as you go.
Rnd 6 (Trim)
Ch 1. Sc in each dc around, working (sc, ch 2, sc) in each corner ch-2 sp. Join to the first sc.
Stitch count: 84 sc, which is 76 sc worked one per stitch plus 8 added at the corners. Each side has 21 sc, including the corner sc at each end, plus 4 corner ch-2 sps.
Fasten off and weave in the ends on the wrong side. Your square should now measure 5 in (12.7 cm).
Make All Pieces
- Total squares: 91
- Per square: Color C for Rnd 1, Color B for Rnd 2, Color A for Rnds 3–6
- Color A also covers the joining and the strip borders
The text grid below shows the layout. D = daisy square, oo = two hanging loops.
Strip:    1   2   3   4   5   6   7
Top:      oo  oo  oo  oo  oo  oo  oo
Row 1:    D   D   D   D   D   D   D
Row 2:    D   D   D   D   D   D   D
 ...      (rows 3–12 identical)
Row 13:   D   D   D   D   D   D   D
Each strip is 1 square wide. The strips are never joined to each other.
Joining
Lay out 13 squares in a vertical line, all RS up. Join them one seam at a time, working from the top of the strip down.
Method: Hold two squares with RS together and work in Color A. Begin in the corner ch-2 sp. Sl st through the back loops of both squares in each of the 21 sc along the edge, then finish in the opposite corner ch-2 sp. Fasten off.
Stitch-to-stitch logic: Each square has exactly 21 sc per edge, corner sc included. That means the two edges match one to one, with no skipped or doubled stitches. The corner ch-2 sps at each seam are used only to anchor the start and end. They stay closed inside the seam and are not worked into later.
When you open the squares out, this method leaves a raised rose ridge on the RS between each pair of daisies.
Tension: Keep the slip stitches about as loose as your sc. Seams that are too tight pucker the strip and shorten it. If you have trouble keeping them loose, go up 0.5 mm in hook size for the joining only.
Checkpoint: A joined strip measures 5 in x 65 in (12.7 cm x 165.1 cm). If yours is more than 1 in (2.5 cm) longer or shorter, check your seam tension before adding the border.
Make 7 strips.
Border
Border gauge: 4.2 sc per inch along the edge. Two rounds of sc add 0.5 in (1.3 cm) of depth on every edge.
Border Rnd 1
With RS facing, join Color A in a bottom outer corner ch-2 sp of a strip. Ch 1, then work (sc, ch 2, sc) in the same sp.
Work 1 sc in each sc along every edge. Work (sc, ch 2, sc) in each of the remaining three outer corner ch-2 sps. Skip the closed corner sps at the seams; don’t add stitches there. Join.
Stitch counts per side, corner sc included:
– Short sides: 1 + 21 + 1 = 23 sc each
– Long sides: 1 + (13 × 21 = 273) + 1 = 275 sc each
Total: 596 sc, which is 588 sc worked one per stitch plus 8 added at the corners, plus 4 corner ch-2 sps.
Border Rnd 2 (with Hanging Loops)
Ch 1. Sc in each sc around. At the 2 bottom corners, work (sc, ch 2, sc) in the ch-2 sp. At the 2 top corners, work (sc, ch 12, sc) in the ch-2 sp to make the hanging loops. Join and fasten off.
Stitch counts per side, corner sc included:
– Short sides: 25 sc each
– Long sides: 277 sc each
Total: 604 sc, which is 596 sc worked one per stitch plus 8 added at the corners, plus 2 ch-2 sps and 2 ch-12 loops.
Why the Math Works
The border works one sc into each existing edge stitch. Because 21 sc measure 5 in (12.7 cm), the border keeps the strip the same length as the squares beneath it.
Increases happen only at the 4 outer corners, 2 per corner per round. That is just enough to turn the corner without cupping or ruffling. No stitches are added at the seams, so the long edges stay straight.
Each ch-12 loop folds into a loop about 1.5 in (3.8 cm) long. That fits a rod up to 1 in (2.5 cm) thick.
Final Blocking
- Weave in any remaining ends along the seam ridges.
- Pin one strip flat to 6 in x 66 in (15.2 cm x 167.6 cm), working in sections if your mats are short.
- Pin each seam line straight across, at a right angle to the long edges.
- Shape each petal outward with your fingertips.
- Spray until the strip is damp but not soaked.
- Let it dry completely before you unpin it.
- Repeat for all 7 strips. Lay them side by side to check that they match in length within 0.5 in (1.3 cm).
Final Quality-Control Checklist
- 91 squares, each 5 in (12.7 cm), with 21 sc per side
- 7 strips of 13 squares, each 65 in (165.1 cm) long before the border
- Seam ridges all on the RS, with no puckering
- Border Rnd 1 has 596 sc and Rnd 2 has 604 sc
- Loops at both top corners, the same size on every strip
- All strips the same length within 0.5 in (1.3 cm)
- No loose ends showing on either side
Troubleshooting
- Petals lean or twist: Pull the magic ring fully closed, and make sure every cluster sits on alternating mustard stitches.
- Square cups: The ch-4 sps in Rnd 3 are too short for your tension. Try ch 5, but keep working 4 dc into each sp.
- Square ruffles: The chains are too loose. Go down a hook size for Rnd 3 only.
- Strips are different lengths: Usually caused by seam tension. Re-block the short strip and stretch it gently to match the others.
- Border waves: You probably worked extra stitches at the seams. Count each long side again; it should be 275 sc.
- Loops stretch out of shape: Make each loop chain more firmly, or work a round of sl sts back along the loop chain.
Care
Hand wash in cool water and roll the strips in a towel to remove water. Dry them flat; never hang them wet, because the weight will stretch them.
Final Notes
The measurement chain is simple. Each square is 21 sc and 5 in (12.7 cm) per side. Thirteen joined squares make a strip 65 in (165.1 cm) long. Two border rounds bring it to 6 in x 66 in (15.2 cm x 167.6 cm). Seven strips hung edge to edge are 42 in (106.7 cm) wide.
If you match gauge on your first square, every count that follows will fall into place. Make your test square, check it at every checkpoint, and then enjoy making the rest.
Happy crocheting!