

This curtain is a field of small lace Christmas trees. Each tree has three tiers of fan-shaped shells (one, two and three fans) and a small solid trunk underneath. Short chain links hold the trees together in a lattice, so light comes through every gap.
The sample is worked in one soft cream cotton. A single neutral color keeps the look calm and lets the texture of the fans stand out, both against a bright window and in the evening.
The pattern uses US crochet terms. One finished panel measures about 36.5 x 80.5 in (92.7 x 204.5 cm) after the border, plus hanging loops. Make two panels for the pair shown.
Each tree is worked top-down in rows, starting from a small chain ring. You join the trees as you go: each new tree links to its side neighbor on its widest row and to the tree above through its starting ring. A two-round frame and a row of hanging loops finish the panel.
Finished Size and Construction
- Finished panel size: about 36.5 x 80.5 in (92.7 x 204.5 cm), plus 1.5 in (3.8 cm) hanging loops
- Skill level: Intermediate
- Terminology: US crochet terms
- Yarn weight: DK (weight 3) cotton
- Hook: 4.0 mm (G-6)
- Number of pieces: 128 tree motifs per panel (256 for a pair)
- Layout: 8 trees across x 16 trees down, in straight columns
- Single tree size: 4 in (10.2 cm) wide x 4.5 in (11.4 cm) tall, plus a 0.5 in (1.3 cm) ring
- Size before border: 35.5 x 80 in (90.2 x 203.2 cm), measured to the top of the top rings
- Border depth: about 0.25 in (0.6 cm) per edge
Materials
Use a smooth mercerized or combed DK cotton. It holds the fan shapes crisply, blocks well and doesn’t stretch much when it hangs. Avoid fuzzy or splitty yarns, because the fans lose their definition.
- Cream: 350 g / about 788 m (862 yd) per panel, or 700 g / about 1,575 m (1,722 yd) for a pair (based on 225 m per 100 g)
Each tree uses about 4.5 m (4.9 yd), including tails. One panel needs about 576 m for the trees and about 76 m for the border. The quantities above include a margin of about 20% for swatches, tails and dye-lot differences. Buy all of the yarn from one dye lot.
Tools:
- 4.0 mm (G-6) crochet hook
- Tapestry needle
- Scissors
- Rustproof pins and blocking mats
- Spray bottle
- Measuring tape
Abbreviations (US Terms)
- ch: chain
- sl st: slip stitch
- sc: single crochet
- dc: double crochet
- sp: space
- st(s): stitch(es)
- RS / WS: right side / wrong side
Special stitch – Fan: 7 dc worked into the same ch-5 sp (or into the ring for Row 1). All seven stitches start from one space, so they gather into a point at the top and spread into a scalloped edge at the bottom.
Gauge and Checkpoints
Gauge: 21 dc and 12 dc rows = 4 in (10.2 cm). Also, 6 ch = 1 in (2.5 cm) and 6 sc = 1 in (2.5 cm).
Make one complete tree first, block it lightly and measure it:
- After Row 1: the fan is about 1.25 in (3.2 cm) wide.
- After Row 3: the two fans together are about 2.5 in (6.4 cm) wide.
- After Row 5: the tree is 4 in (10.2 cm) from corner to corner and 3.5 in (8.9 cm) tall from the bottom of the ring.
- After Row 8: the trunk is 0.75 in (1.9 cm) wide x 1 in (2.5 cm) tall, and the whole tree is 4.5 in (11.4 cm) tall.
If your tree is too big, go down to a 3.75 mm hook. If it’s too small, go up to a 4.5 mm hook. Being off by 0.25 in (0.6 cm) per tree adds up to 2 in (5.1 cm) across the panel and 4 in (10.2 cm) down it.
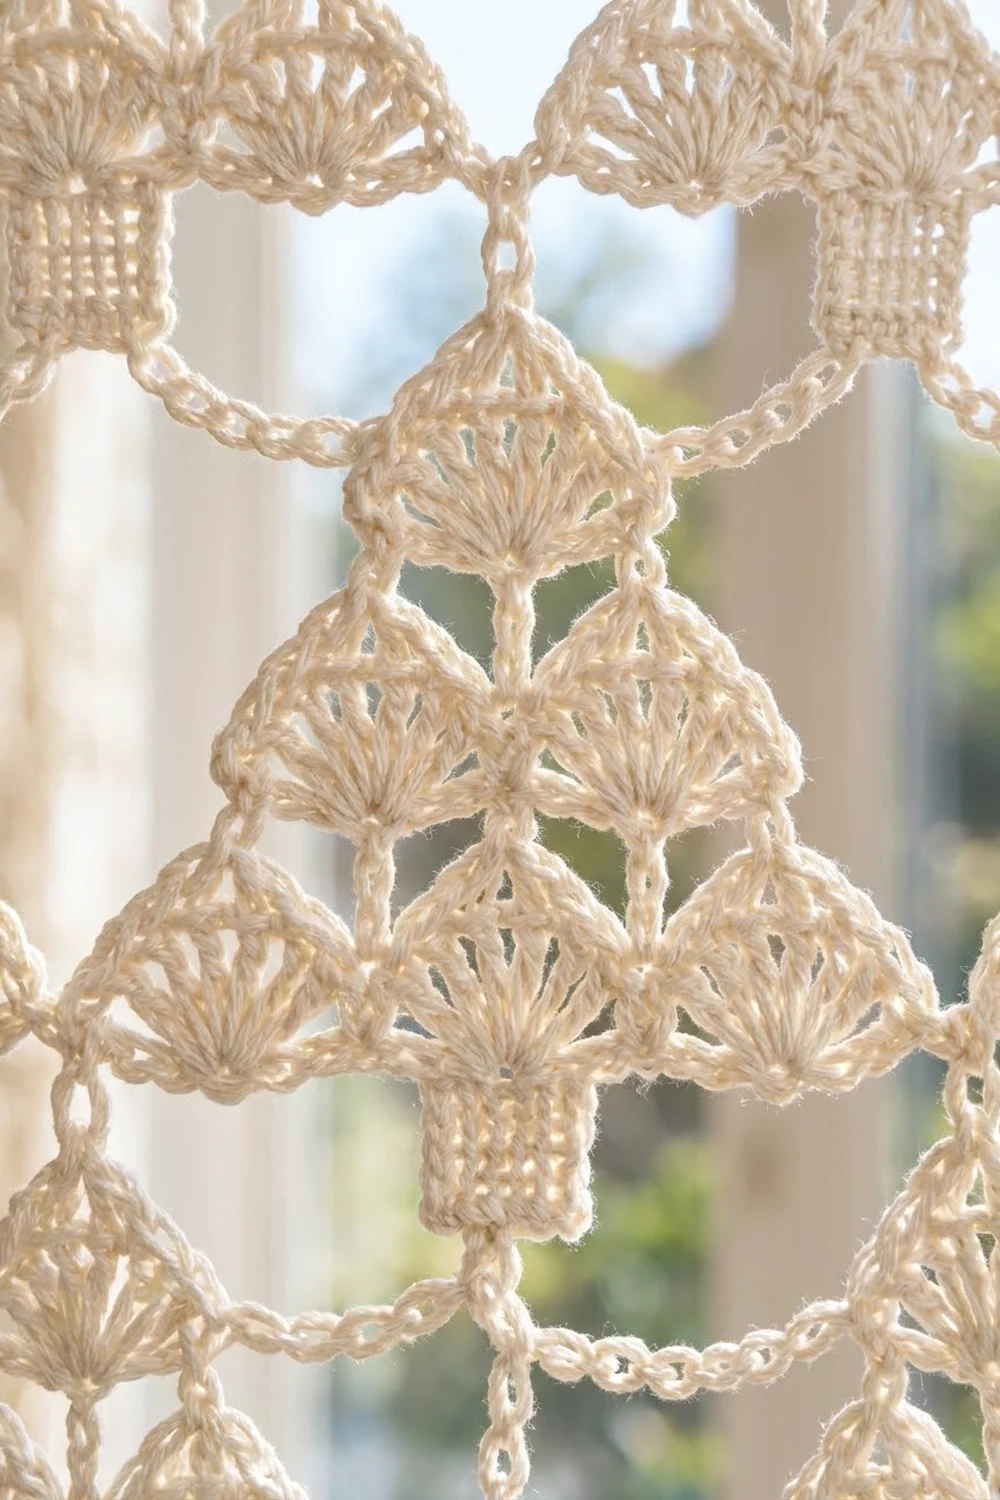
Tree Motif
Top-row trees start with a plain ring. All other trees start with a linked ring (see Joining).
Plain ring: Ch 6 and join with a sl st in the first ch to form a ring.
Row 1 (RS): Ch 3 (counts as dc), 6 dc in the ring. Turn. (7 dc, one Fan)
Row 2 (WS): Ch 1, sc in the first dc, ch 5, skip 2 dc, sc in the 4th (center) dc, ch 5, skip 2 dc, sc in the top of the turning ch. Turn. (3 sc, 2 ch-5 sps)
Row 3 (RS): Ch 1, sc in the first sc, Fan in the next ch-5 sp, sc in the next sc, Fan in the next ch-5 sp, sc in the last sc. Turn. (14 dc + 3 sc = 17 sts; 2 Fans)
Row 4 (WS): Ch 1, sc in the first sc, ch 5, sc in the center (4th) dc of the next Fan, ch 5, sc in the center dc of the next Fan, ch 5, sc in the last sc. Turn. (4 sc, 3 ch-5 sps)
Don’t work into the middle sc of Row 3. Skipping it lets the middle arch bridge the two fans, so the new middle fan sits centered between them.
Row 5 (RS): Ch 1, sc in the first sc, Fan in the next ch-5 sp, sc in the next sc; repeat from * 2 more times. (21 dc + 4 sc = 25 sts; 3 Fans)
The first and last sc of Row 5 are the tree’s two bottom corners. Fasten off, or work the side join described below.
Trunk: The tops of the Row 5 dc point downward, so you work the trunk into them.
Row 6 (RS): With RS facing, join yarn with a sl st in the 2nd dc of the middle Fan. Ch 3 (counts as dc), dc in the next 3 dc. Turn. (4 dc)
Rows 7–8: Ch 3 (counts as dc), dc in the next 2 dc, dc in the top of the turning ch. Turn. (4 dc)
Fasten off after Row 8 and weave in the ends. The trunk bottom is the space between the 2nd and 3rd dc of Row 8.
Make All Pieces
One panel needs 128 trees in Cream (8 across x 16 down), and a pair needs 256. All trees are identical. Only the ring type and the end of Row 5 change, depending on where the tree sits.
Build the panel one tree row at a time, from the top down:
Row 1:   T  T  T  T  T  T  T  T     (plain rings)
Row 2:   T  T  T  T  T  T  T  T     (linked rings)
Row 3:   T  T  T  T  T  T  T  T
  ...    8 trees per row
Row 16:  T  T  T  T  T  T  T  T
Each T links to the T beside it. Each T in Rows 2–16 hangs from the trunk of the T directly above it.
Joining (Join-As-You-Go)
Side join (horizontal): This applies to the 2nd through 8th tree in each row.
- Work Row 5 as written through the last sc.
- Ch 3, then sl st in the free bottom corner sc of the finished tree next to it.
- Ch 3, then sl st in the last sc of the new tree.
- Fasten off.
This makes a doubled chain bar about 0.5 in (1.3 cm) long. If you crochet right-handed, add each new tree on the left. If you crochet left-handed, add it on the right. That way, the end of Row 5 always meets the neighbor’s free corner.
Each bar joins one corner sc to another corner sc. No stitches are added to the trees, so every tree keeps its 25-stitch Row 5.
Linked ring (vertical): Trees in Rows 2–16 start with this ring instead of the plain ring.
- Ch 3.
- Sl st in the trunk bottom of the tree directly above.
- Ch 3.
- Sl st in the first ch.
This makes a 6-ch ring threaded through the trunk above. Work Row 1 into the lower half of the ring. The ring creates the 0.5 in (1.3 cm) vertical gap.
Tension: Chain the links at the same tension as your gauge chains. If the bars are tight, the rows of trees will cup inward. If they are loose, the lattice will sag.
Size checkpoints:
- After the first tree row: 35.5 in (90.2 cm) from outer corner to outer corner (8 x 4 in + 7 x 0.5 in).
- After 4 tree rows: 20 in (50.8 cm) from the top of the top rings to the bottom of the 4th row of trunks (4 x 5 in).
Border
Border gauge: 6 ch = 1 in (2.5 cm) and 6 sc = 1 in (2.5 cm). Across the panel, one tree plus one gap is 4.5 in (11.4 cm), or 27 sts. Down the panel, one tree plus its ring is 5 in (12.7 cm), or 30 sts.
Round 1 (chain frame): With RS facing, place a slip knot on your hook at the top-left corner of the panel.
- Top: Ch 13, sc in the top of the ring of the next top-row tree, ch 13; repeat from * 7 more times. (8 x 27 = 216 sts)
- Corner: Ch 2.
- Right side, working down: Ch 23, sc in the free bottom corner of the next right-edge tree, ch 6; repeat from * 15 more times. (16 x 30 = 480 sts)
- Corner: Ch 2.
- Bottom, working right to left: Ch 13, sc in the trunk bottom of the next bottom-row tree, ch 13; repeat from * 7 more times. (8 x 27 = 216 sts)
- Corner: Ch 2.
- Left side, working up: Ch 6, sc in the free bottom corner of the next left-edge tree, ch 23; repeat from * 15 more times. (16 x 30 = 480 sts)
- Corner: Ch 2, then sl st in the first ch of the round.
Total: 216 + 480 + 216 + 480 = 1,392 side sts, plus 4 corner ch-2 sps.
Round 2: Ch 1. Sc in each ch and sc around, with 3 sc in each corner ch-2 sp. Join with a sl st in the first sc. (Top 216, right 480, bottom 216, left 480 sc, plus 4 x 3 corner sc = 1,404 sc)
Row 3 (hanging loops, top edge only): With RS facing, join yarn in the last sc of the top-left corner group. Ch 1, sc in the same st, ch 18, sl st in the sc just made. Sc in the next 31 sts, ch 18, sl st in the last sc made; repeat from * 6 more times. Fasten off. (218 sc, 8 loops)
Why the math works:
- Width: Each top-row tree adds exactly 27 frame sts. At 6 sts per inch, that’s 4.5 in, the width of one tree plus one gap. 8 x 27 = 216 sts = 36 in (91.4 cm), which leaves 0.25 in (0.6 cm) of ease past each outer corner.
- Height: Each tree row adds 30 side sts, which is 5 in, the height of one tree plus its ring. 16 x 30 = 480 sts = 80 in (203.2 cm), the same as the height before the border.
- No extra seam stitches: The bars and rings are already counted in those 4.5 in and 5 in spacings.
- Loops: The loop row covers 1 + 216 + 1 = 218 sts, and 1 + 7 x 31 = 218. So the first and last loops land on the end stitches and the loops are evenly spaced.
Final Blocking
- Weave in any remaining ends along the chain links or through the trunk stitches.
- Soak the panel in cool water with a little gentle wash for 15 minutes, then press the water out without wringing.
- Roll the panel in towels to remove more moisture.
- Lay it flat on mats. If you’re short on space, block one half at a time.
- Pin the frame straight to 36.5 x 80.5 in (92.7 x 204.5 cm).
- Pin the corners of each tree so Row 5 is 4 in (10.2 cm) wide, and shape each fan tip into a neat point.
- Let it dry completely, then hang it right away so the drape can settle.
Final Quality-Control Checklist
- Every tree has 1, 2 and 3 fans, with 7 dc per fan.
- Every trunk is 4 dc wide and 3 rows tall.
- All side bars are the same length, and all rings are 6 ch.
- The panel is 8 trees across and 16 down, in straight columns.
- Border counts are 216 / 480 / 216 / 480 sc, plus the corners.
- There are 8 evenly spaced hanging loops.
- The blocked panel measures 36.5 x 80.5 in (92.7 x 204.5 cm).
- No ends show on either side.
Troubleshooting
- Fans look flat instead of pointed: The ch-5 arches are too loose. Chain more tightly.
- Tree edges curl: The Row 4 arches are too tight. Loosen your chains.
- Trunk is off-center: Join in the 2nd dc of the middle Fan, not the 1st.
- Panel narrows toward the bottom: Your side bars are tightening. Check each tree row against the 35.5 in (90.2 cm) checkpoint.
- Frame ripples: Round 1 is too loose. Rework it with a 3.75 mm hook.
- Loops twist on the rod: Block the top edge flat and check that every loop is exactly 18 ch.
Care
Hand wash cool, or machine wash on a gentle cycle in a mesh bag. Dry flat, and re-pin if the trees lose their shape.
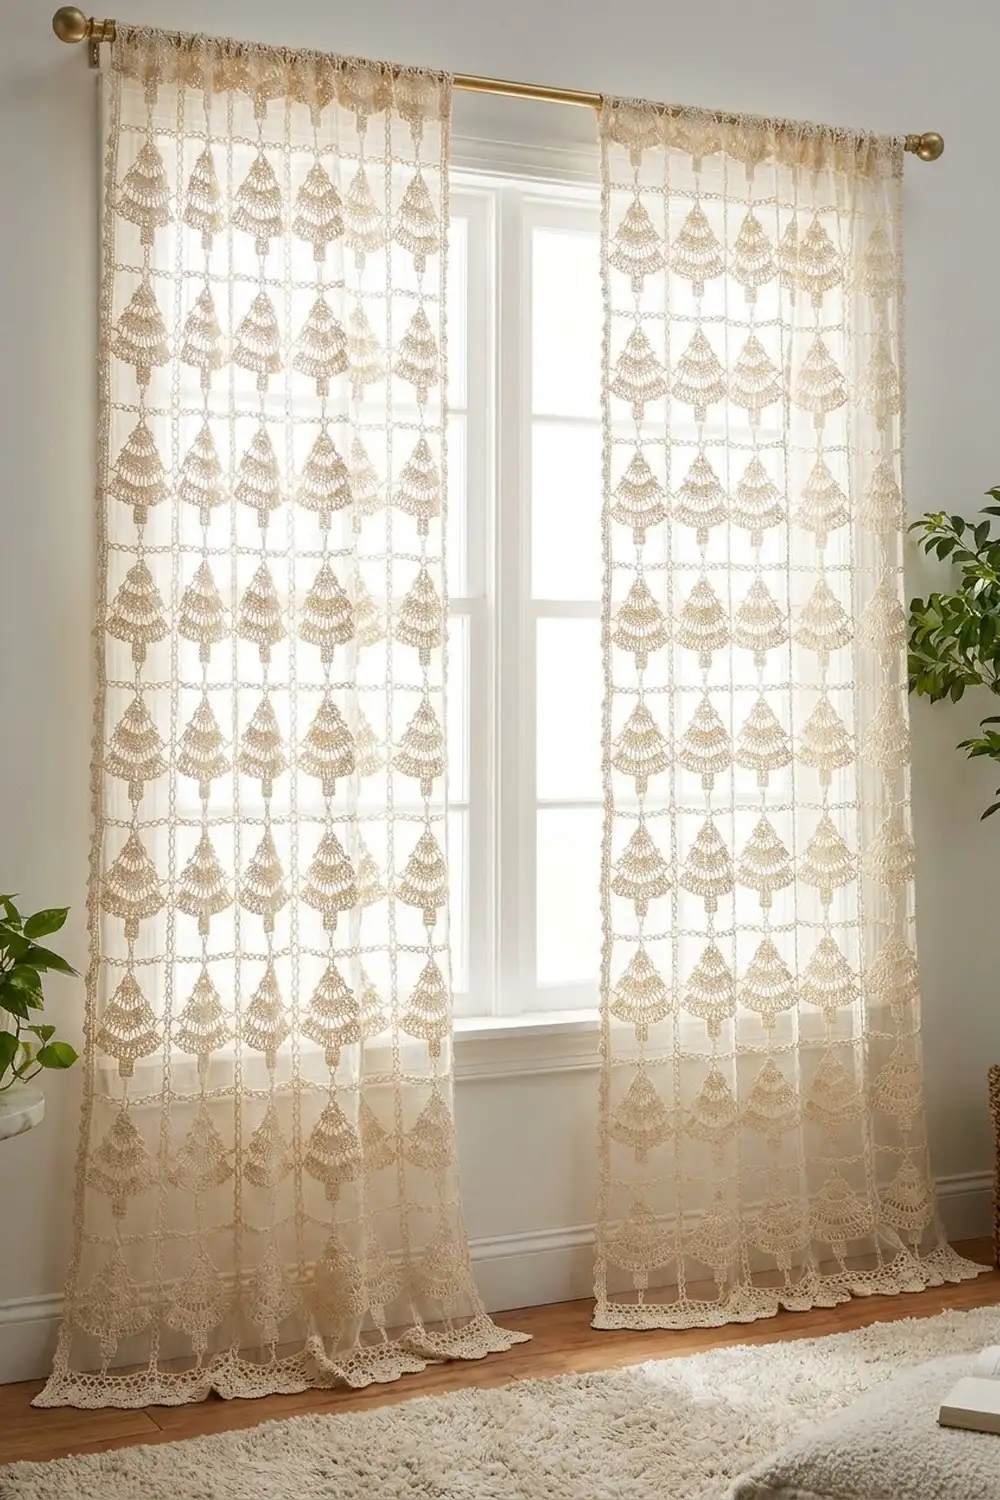
Final Notes
Each measurement builds on the one before it:
- A 7-dc Fan sets the size of the tree, and one tree is 4 x 4.5 in (10.2 x 11.4 cm).
- The 0.5 in (1.3 cm) links make each tree-plus-gap unit 4.5 x 5 in (11.4 x 12.7 cm).
- Eight trees across and sixteen down give 35.5 x 80 in (90.2 x 203.2 cm).
- The chain frame squares that up to 36 x 80 in (91.4 x 203.2 cm).
- The sc round brings the panel to 36.5 x 80.5 in (92.7 x 204.5 cm).
If your first tree measures correctly, the rest of the panel will come out to size.
Happy crocheting!