

These lace curtain panels are made from rows of small Christmas trees. Each tree has three stacked tiers with pointed corners, a band of eyelets in every tier, and a neat little trunk. Thin chain links join the trees into an open grid, so daylight shows between them like a snowy forest at the window.
The panels use one color, a soft dusty rose. A single color makes the tree outlines and their shadows the focus, and it fits holiday decor or a cozy winter room. Cotton gives crisp stitches and hangs heavily enough for a curtain.
This pattern uses US crochet terms. One finished panel measures 42.2 in wide x 84.0 in long (107.2 cm x 213.4 cm), including the header. Make two panels for a pair.
Each tree is worked top-down in turned rows of double crochet. The trees are joined as you go: each new tree starts with a chain link to the tree above, and a corner link to its left neighbor. A firm header band worked across the top-row tips finishes each panel.
Finished Size and Construction
- Finished panel size: 42.2 x 84.0 in (107.2 x 213.4 cm)
- Skill level: Intermediate
- Terminology: US
- Yarn weight: DK (#3) cotton
- Hook: 3.5 mm (E-4)
- Number of pieces: 72 tree motifs per panel (144 for a pair)
- Layout: 6 trees across x 12 trees down
- Tree motif size: 6.2 in wide x 6.0 in tall (15.7 x 15.2 cm)
- Size before border: 42.2 x 83.0 in (107.2 x 210.8 cm)
- Border (header) depth: 1.0 in (2.5 cm), top edge only
Materials
Use a smooth mercerized or combed cotton in DK weight, about 115 m per 50 g (2.3 m per gram). Cotton blocks flat and drapes well. Avoid acrylic, because the tree points will curl.
- Dusty Rose: 700 g (1,610 m) per panel, or 1,400 g (3,220 m) for a pair. That is 14 balls of 50 g per panel.
Tools:
– 3.5 mm (E-4) crochet hook
– Tapestry needle
– Stitch markers
– Scissors
– Rustproof pins and a large blocking surface
– 8 curtain clip rings per panel
These quantities include a margin of about 10 percent for swatching and weaving in ends.
Abbreviations (US Terms)
- ch: chain
- sl st: slip stitch
- sc: single crochet
- dc: double crochet
- sk: skip
- st(s): stitch(es)
- sp: space
- corner dc: the center dc of a 3-dc group at either end of Row 12
Special technique: Bar Link. Ch 5, sl st in the target stitch, then sl st in each of the 5 ch back toward your work. This makes a firm single bar 1.0 in (2.5 cm) long.
Gauge and Checkpoints
Gauge: 20 dc x 10 rows = 4 in (10.2 cm). In dc, each stitch is 0.2 in (0.5 cm) wide and each row is 0.4 in (1.0 cm) tall.
Make one full tree before you start the panel, then check it against these measurements:
- After Row 4: bottom edge 3.0 in (7.6 cm) across
- After Row 8: bottom edge 4.6 in (11.7 cm) across
- After Row 12: 6.2 in (15.7 cm) wide, 4.8 in (12.2 cm) tall
- After Row 15: 6.0 in (15.2 cm) tall overall. The trunk is 1.0 in (2.5 cm) wide and 1.2 in (3.0 cm) tall.
If your tree is too big, go down a hook size. If it’s too small, go up one. Also measure a loose ch 5: it should be about 1.0 in (2.5 cm) long. If your chains run tight, chain more loosely rather than adding chains. The header math depends on links of exactly 5 ch.
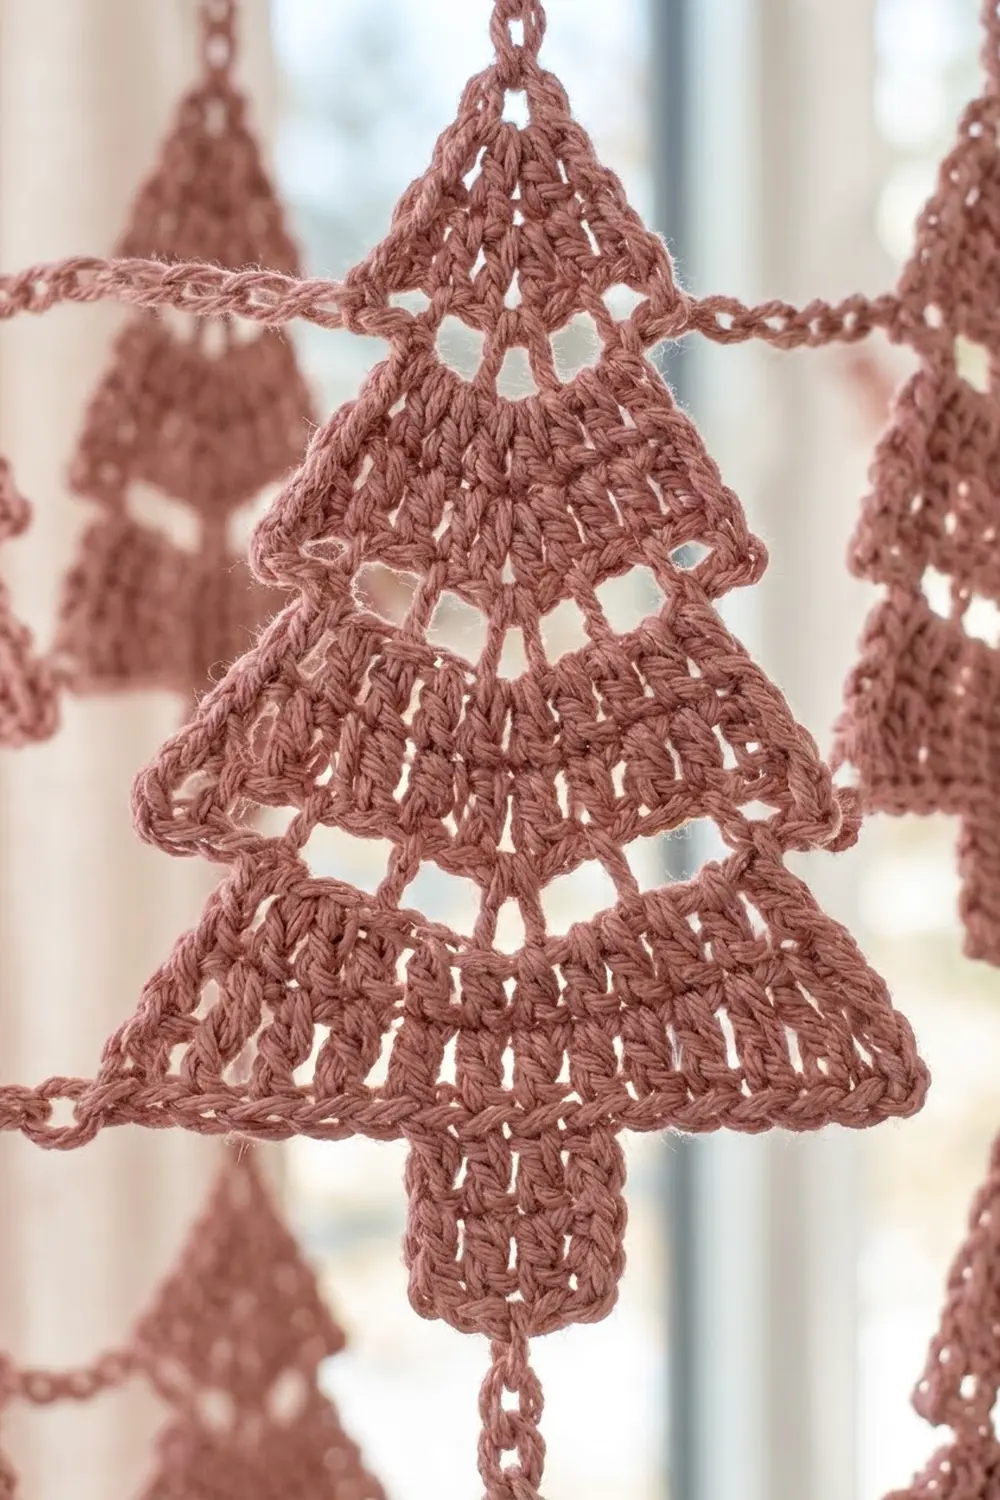
Tree Motif
The ch 3 at the start of each row counts as 1 dc. The last stitch of each row is worked into the top of the previous turning ch. Turn at the end of every row.
Tier 1
Row 1: Ch 4, 2 dc in 4th ch from hook. (3 sts)
The ch where these stitches sit is the tip point.
Row 2: Ch 3, 2 dc in first st, dc in next st, 3 dc in last st. (7 sts)
Row 3 (eyelet row): Ch 3, 2 dc in first st, [ch 1, sk next st, dc in next st] 2 times, ch 1, sk next st, 3 dc in last st. (11 sts: 8 dc and 3 ch-1 sps)
Row 4: Ch 3, 2 dc in first st, dc in each dc and ch-1 sp across to last st, 3 dc in last st. (15 sts)
Each growth row adds 2 stitches at each end. The ch-1 spaces make a row of eyelets across the tier.
Tier 2
Row 5 (step-in): Sl st in each of the first 3 sts, ch 3, dc in each of the next 10 sts. Leave the last 2 sts unworked. (11 sts)
Two stitches at each end of Row 4 are now left out of the new tier. They become the pointed bottom corners of Tier 1.
Row 6: Ch 3, 2 dc in first st, dc in each st across to last st, 3 dc in last st. (15 sts)
Row 7 (eyelet row): Ch 3, 2 dc in first st, [ch 1, sk next st, dc in next st] 6 times, ch 1, sk next st, 3 dc in last st. (19 sts: 12 dc and 7 ch-1 sps)
Row 8: Work as for Row 4. (23 sts)
Tier 3
Row 9 (step-in): Sl st in each of the first 3 sts, ch 3, dc in each of the next 18 sts. Leave the last 2 sts unworked. (19 sts)
Row 10: Work as for Row 6. (23 sts)
Row 11 (eyelet row): Ch 3, 2 dc in first st, [ch 1, sk next st, dc in next st] 10 times, ch 1, sk next st, 3 dc in last st. (27 sts: 16 dc and 11 ch-1 sps)
Row 12: Work as for Row 4. (31 sts)
On the test tree, place markers in both corner dc. For the panel trees, see the joining section.
Trunk
Row 13: Sl st in each of the first 14 sts, ch 3, dc in each of the next 4 sts. (5 sts)
This leaves 13 sts unworked on each side, so the trunk is centered (13 + 5 + 13 = 31). If you prefer, fasten off and rejoin in the 14th st instead of slip stitching across. Keep the slip stitches loose so they lie flat on the back.
Rows 14–15: Ch 3, dc in each st across. (5 sts)
Fasten off. The trunk center is the 3rd stitch of Row 15.
Make All Pieces
Make 72 trees per panel, or 144 for a pair. All trees are worked in Dusty Rose and use about 8 g each. You make and join them at the same time, top row first and left to right within each row.
Layout for one panel (T = tree, — = corner Bar Link, | = trunk-to-tip link):
Row 1:   T — T — T — T — T — T
         |   |   |   |   |   |
Row 2:   T — T — T — T — T — T
         |   |   |   |   |   |
 ...       (repeat for Rows 3–11)
         |   |   |   |   |   |
Row 12:  T — T — T — T — T — T
That gives 6 columns x 12 rows = 72 trees, with 5 horizontal links per row and 11 vertical links per column.
Joining
Vertical links (trunk to tip)
The six trees in Row 1 start with a plain Row 1 (ch 4).
From Row 2 down, start each tree like this:
1. Make a slip knot and sl st in the trunk center of the tree directly above.
2. Ch 9, then 2 dc in the 4th ch from the hook.
The first 5 ch form the link, and the stitch count for Row 1 stays at 3. Finish the tree as written.
Horizontal links (corner to corner)
The first tree in each row has no left link. For every other tree, work Row 12 until 1 st remains, then work the last 3-dc group like this:
1. Dc in the last st.
2. Dc in the same st. This is the corner dc.
3. Work a Bar Link into the right-hand corner dc of the tree to the left.
4. Dc in the same last st.
The count is still 31. The link chains belong to the gap between trees, not to the tree.
Turned dc rows look almost the same on both sides. If Row 12 is going to end on the far side, flip the tree over before Row 12 so it ends next to its neighbor.
Tension
Keep every link the same length. A tight link pulls the grid sideways, and a loose one makes the lace sag. Hold the links slightly stretched to compare them.
Size checkpoints
- After tree Row 1: width = (6 x 6.2) + (5 x 1.0) = 42.2 in (107.2 cm)
- After 3 tree rows: height = (3 x 6.0) + (2 x 1.0) = 20.0 in (50.8 cm)
- After 6 tree rows: height = 41.0 in (104.1 cm)
- After 12 tree rows: height = (12 x 6.0) + (11 x 1.0) = 83.0 in (210.8 cm)
Border (Top Header)
Border gauge: 20 sc x 20 rows = 4 in (10.2 cm). An sc row is 0.2 in (0.5 cm) tall and a dc row is 0.4 in (1.0 cm) tall.
The header goes along the top edge only. The sides and bottom take 0 stitches, so the tree silhouettes stay open.
Each top-row tree gets 31 header stitches, which matches its 31-stitch Row 12. Each of the 5 gaps between trees gets 5 ch, which matches a Bar Link. So the header has (6 x 31) + (5 x 5) = 186 + 25 = 211 sts.
Hold the panel with the top-row tips pointing up and work from right to left.
Header Row 1: Make a slip knot, ch 15, sc through the tip point of the first tree. Ch 35 (15 + 5 + 15), sc through the tip point of the next tree. Repeat from * 4 more times, then ch 15. (211 sts: 205 ch and 6 sc)
Header Row 2: Ch 1, sc in each st across. (211 sts)
Header Row 3: Ch 3 (counts as dc), dc in each st across. (211 sts)
Header Row 4: Ch 1, sc in each st across. (211 sts)
Fasten off.
Why the math works: 211 sts at 5 sts per inch = 42.2 in (107.2 cm), the exact width of the joined panel. The 15 ch on each side of a tip covers half a tree, from its center to its outer edge. The extra 5 ch match the corner link. The header depth is 0.2 + 0.2 + 0.4 + 0.2 = 1.0 in (2.5 cm), so the panel measures 83.0 + 1.0 = 84.0 in (213.4 cm).
Clip 8 rings along Header Row 4: one at each corner and one above each tree tip.
Final Blocking
- Weave in all ends, and trim them only after blocking.
- Soak the panel in cool water for 15 minutes, then press the water out without wringing.
- Roll it in towels to remove more water.
- Lay it flat in sections. Pin each tree to 6.2 x 6.0 in (15.7 x 15.2 cm), and pin out all the tier corners.
- Stretch each link to 1.0 in (2.5 cm).
- Pin the header straight at 42.2 in (107.2 cm).
- Let each section dry completely before you move to the next.
Final Quality-Control Checklist
- Every tree has 31 sts in Row 12 and 5 sts in its trunk.
- All tier corners stick out cleanly on both sides.
- The eyelet bands sit level across each tree.
- All links are 5 ch and measure 1.0 in (2.5 cm).
- The header has 211 sts in every row.
- The panel measures 42.2 x 84.0 in (107.2 x 213.4 cm).
- All ends are secure and hidden.
Troubleshooting
- The tree leans to one side: You probably left a different number of stitches unworked at each end of a step-in row. Check Rows 5, 9, and 13.
- The tiers don’t flare: You worked into the edge stitches you were meant to leave out. Recount the step-in rows.
- The edges ruffle: Your increases are too loose. Go down a hook size for the 3-dc groups.
- The grid pulls sideways: The links are uneven. Redo any link that is shorter or longer than the rest.
- The header is wider than the panel: Your chains are too loose. Work Header Row 1 with a tighter chain.
Care
Hand wash in cool water with mild soap and dry flat, pinning the tree corners if needed. Don’t tumble dry, because the weight of the wet lace will stretch it.
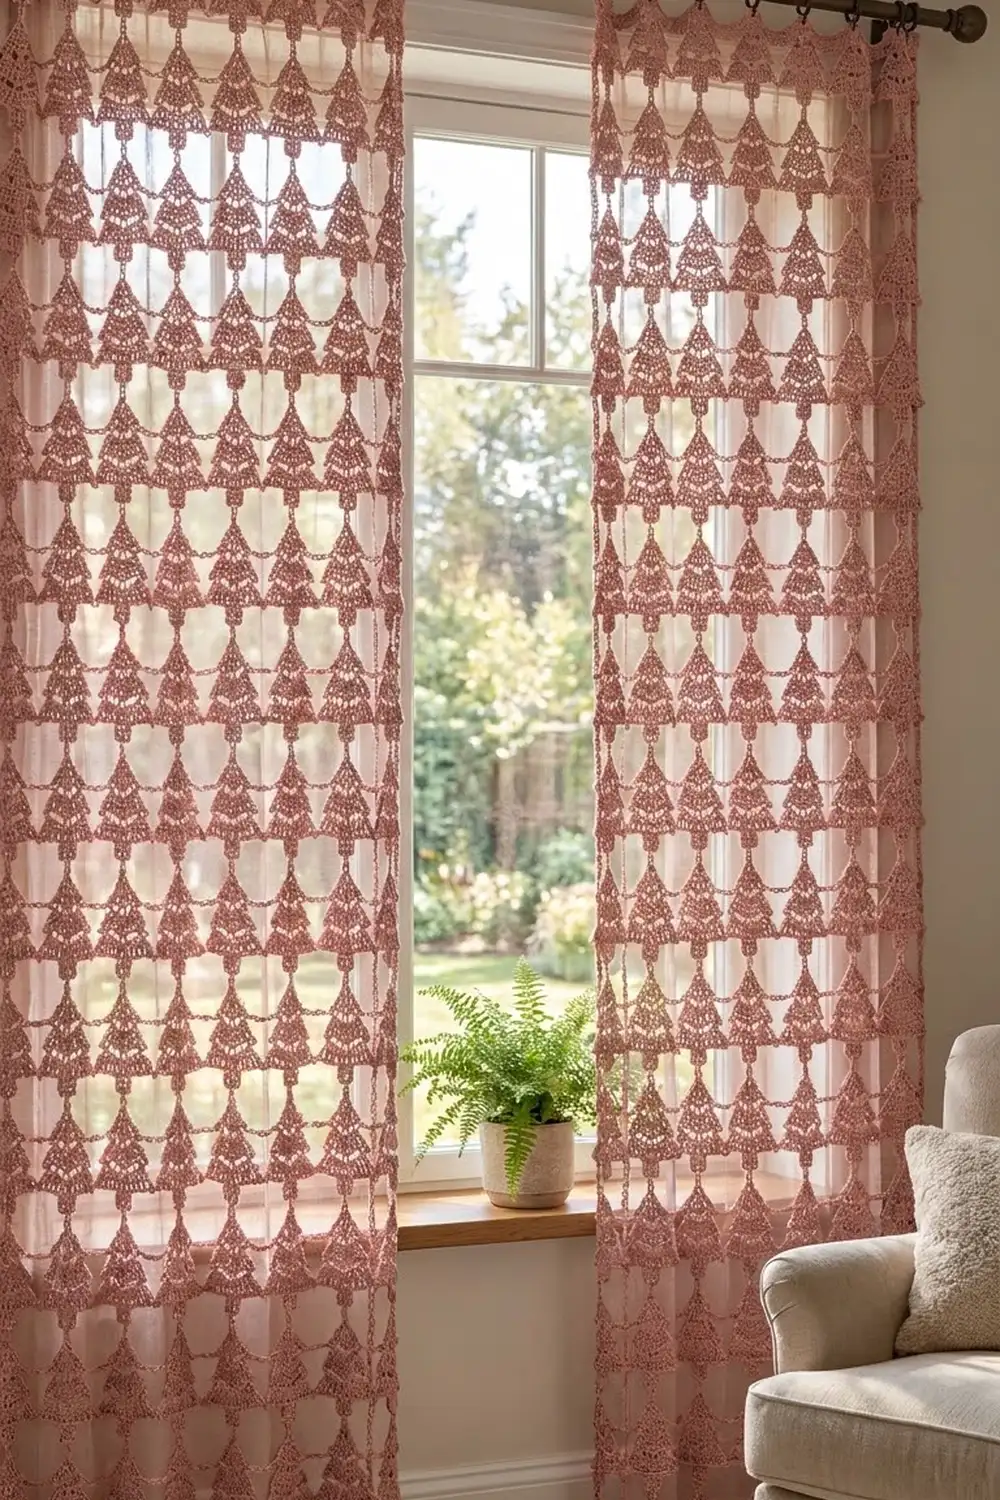
Final Notes
All the measurements build on each other. Gauge gives each tree its 6.2 x 6.0 in (15.7 x 15.2 cm) size. Six trees plus five 1.0 in (2.5 cm) links make the 42.2 in (107.2 cm) width. Twelve trees plus eleven links make 83.0 in (210.8 cm), and the 1.0 in (2.5 cm) header brings the panel to 84.0 in (213.4 cm). Check the first tree carefully and the rest of the panel will fall into place.
Happy crocheting!