

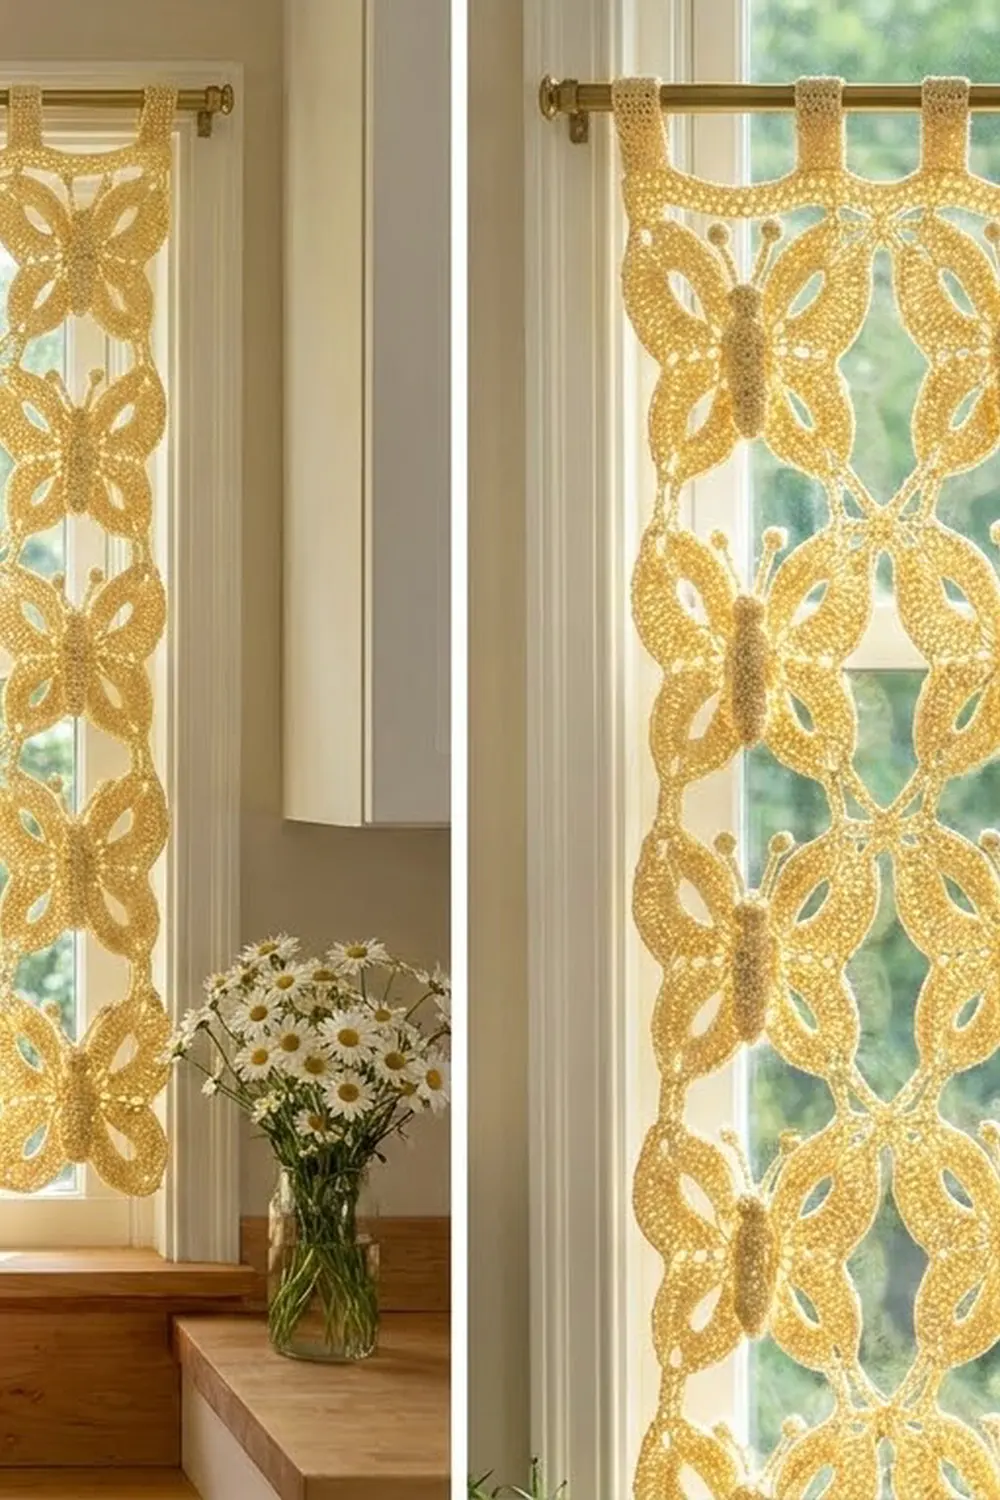
This curtain fills a window with soft yellow butterflies. Each butterfly has a raised, beaded body, two knobbed antennae and four open wings with radiating stitches around a teardrop-shaped window. When light comes through, the open wing centers and the diamond gaps between motifs throw a lacy shadow across the room.
The design uses one color, a warm butter yellow, in smooth mercerized cotton for crisp stitch definition. It suits farmhouse kitchens, sunrooms and cottage-style windows. The pattern uses US crochet terms throughout.
Each finished panel measures 11.5 in (29.2 cm) wide and 44.25 in (112.4 cm) long including the header and tabs. The pattern makes a matching pair, as shown.
The construction is straightforward. You crochet a short bobble body, then build all four wings around it, then work one continuous edging round that adds the antennae and four corner loops. Motifs join as you go at their corner loops. A solid header with five tabs finishes the top of each panel.
Finished Size and Construction
- Finished panel size: 11.5 in x 44.25 in (29.2 cm x 112.4 cm), tabs included
- Skill level: Intermediate
- Terminology: US crochet terms
- Yarn weight: Sport (2), mercerized cotton
- Hook: 3.25 mm (US D-3)
- Number of pieces: 32 butterfly motifs (16 per panel)
- Layout: each panel is 2 motifs wide x 8 motifs tall
- Single motif size: 5.5 in wide x 4.75 in tall (14.0 cm x 12.1 cm), measured wingtip to wingtip
- Size before border: 11.5 in x 41.5 in (29.2 cm x 105.4 cm) per panel
- Border depth: header 1.25 in (3.2 cm), plus tab loops 1.5 in (3.8 cm)
Materials
Yarn: Use a smooth, tightly plied mercerized cotton in sport weight, about 125 m per 50 g. Cotton keeps the wing ridges sharp and resists sagging when the curtain hangs. Avoid fuzzy or very stretchy blends, because they blur the open wing centers.
- Butter Yellow: 250 g (approximately 625 m), which is five 50 g balls, for both panels
Each motif uses about 6 g (15 m), and each header uses about 10 g (25 m). The quantity above includes a margin of roughly 15% for swatching, joins and weaving in ends.
Tools:
– 3.25 mm (US D-3) crochet hook
– Tapestry needle
– 4 locking stitch markers
– Rust-proof blocking pins and foam mats
– Measuring tape
– Scissors
– Spray starch (optional, for a crisper drape)
Abbreviations (US Terms)
- ch – chain
- sl st – slip stitch
- sc – single crochet
- hdc – half double crochet
- dc – double crochet
- st(s) – stitch(es)
- sp – space
- RS / WS – right side / wrong side
Special stitches
- Bobble (3-dc cluster): Yarn over, insert hook in the stitch, pull up a loop, yarn over, draw through 2 loops; repeat from * to * twice more in the same stitch (4 loops on hook). Yarn over and draw through all 4 loops.
- Corner loop: Ch 5. On a joining motif, replace this with: ch 2, sl st into the neighboring motif’s corner loop, ch 2.
Gauge and Checkpoints
Gauge: 20 sc and 21 rows = 4 in (10.2 cm) in sc worked in rows.
Make and block one complete motif before starting the curtain. The motif size controls every later measurement, so check it at each stage:
- After the body: 2.25 in x 0.5 in (5.7 cm x 1.3 cm)
- After all four wings: about 5 in x 4.25 in (12.7 cm x 10.8 cm)
- After the edging, blocked: 5.5 in x 4.75 in (14.0 cm x 12.1 cm)
If your motif is too big by more than 1/4 in (0.6 cm), go down half a hook size. If it is too small, go up half a hook size. Don’t change chain counts to fix the size, because that changes the wing shape.
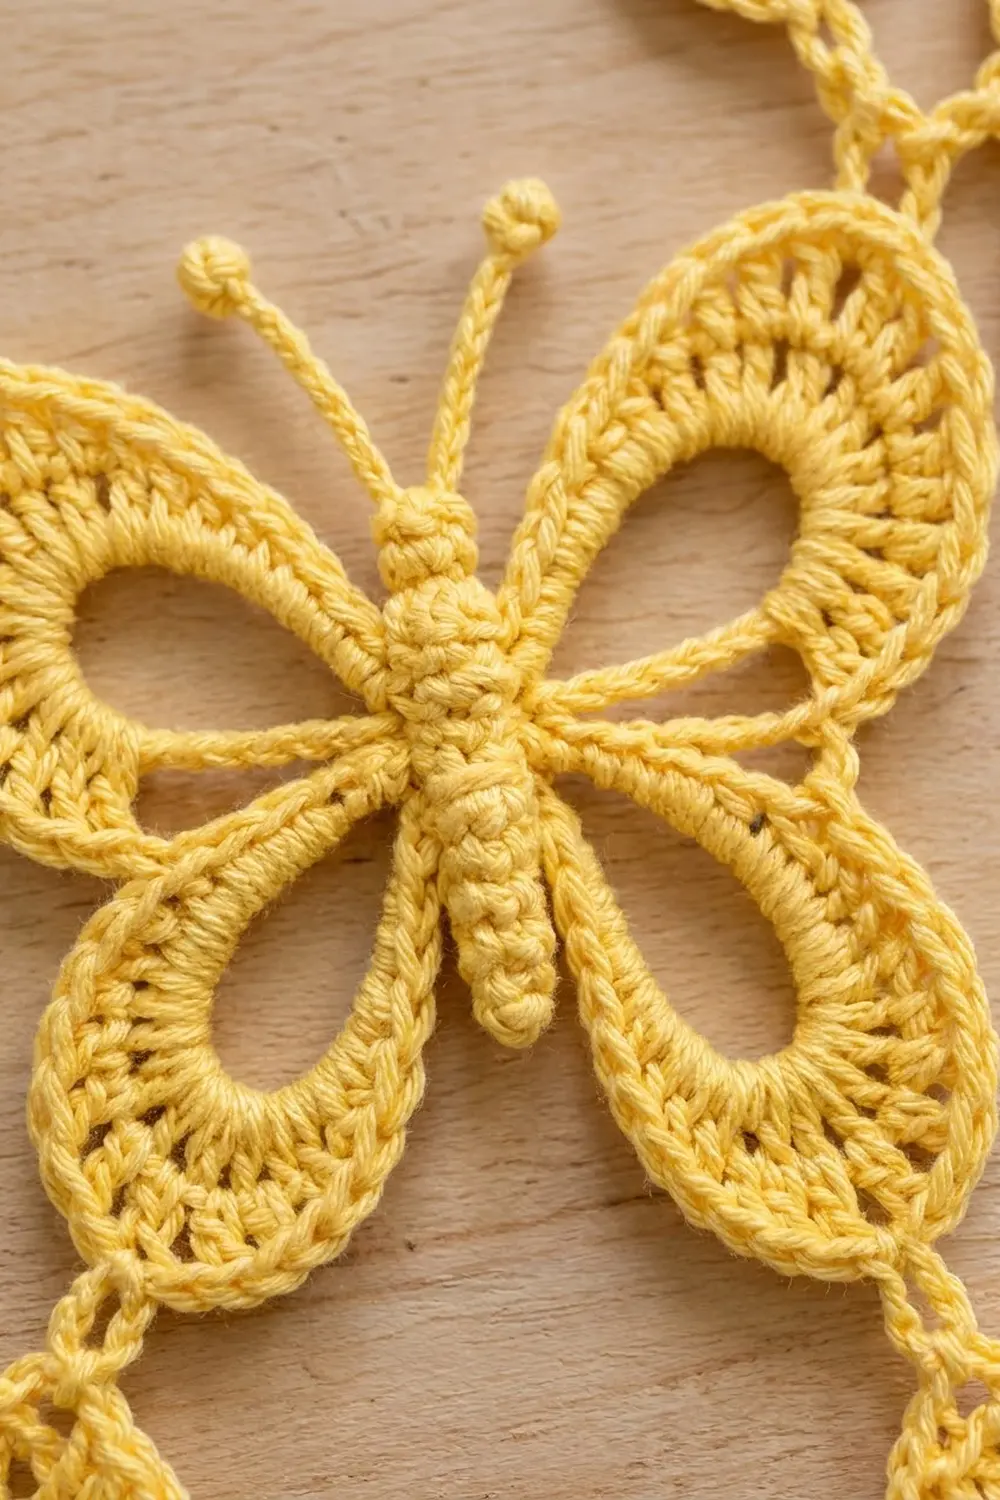
Butterfly Motif (Make 32)
Body
Ch 12.
Row 1 (RS): Sc in 2nd ch from hook and in each ch across. Ch 1, turn. (11 sc)
Row 2 (WS): Sc in first sc, bobble in next sc, sc in next sc; repeat from * to * 4 more times. Do not fasten off. (11 sts: 5 bobbles, 6 sc)
The bobbles pop toward the RS, which creates the segmented body. Turn the piece so the RS faces you.
In the steps below, the top edge of Row 2 is the right long edge. Number its stitches 1 to 11 from the head end (the end where you finished Row 2) down to the tail. The free loops of the foundation chain are the left long edge. Number them 1 to 11 from the tail up to the head.
Checkpoint: 2.25 in x 0.5 in (5.7 cm x 1.3 cm).
Wings
Work the wings continuously around the body with the RS facing.
Upper-right wing: Sl st in sts 1, 2 and 3 of the right long edge. Ch 22, then sl st in st 1 to make the wing loop. Work into the ch-22 loop: 2 sc, 2 hdc, 22 dc, 2 hdc, 2 sc. Sl st in st 3. (30 sts in the wing)
Lower-right wing: Sl st in sts 4 through 11. Ch 18, then sl st in st 8. Work into the ch-18 loop: 2 sc, 2 hdc, 16 dc, 2 hdc, 2 sc. Sl st in st 11. (24 sts in the wing)
Lower-left wing: Rotate the piece to work along the left long edge. Sl st in loops 1 through 4. Ch 18, then sl st in loop 1. Work into the ch-18 loop: 2 sc, 2 hdc, 16 dc, 2 hdc, 2 sc. Sl st in loop 4. (24 sts in the wing)
Upper-left wing: Sl st in loops 5 through 11. Ch 22, then sl st in loop 9. Work into the ch-22 loop: 2 sc, 2 hdc, 22 dc, 2 hdc, 2 sc. Sl st in loop 11. (30 sts in the wing)
Sl st across the head end so you are at the top center of the body.
Wing total: 108 sts (30 + 24 + 24 + 30). The chain loops stay open in the center of each wing, which forms the teardrop windows.
Checkpoint: about 5 in x 4.25 in (12.7 cm x 10.8 cm).
Edging Round with Antennae and Corner Loops
This is a conversion round. Each wing is worked 1 sc per existing stitch, plus increases. Continue in the same direction as the wings, starting at the head.
Antennae: Ch 9, bobble in 4th ch from hook, sl st in each of the next 5 ch, sl st in the head. Repeat once more for the second antenna.
Upper-right wing (30 sts): Sc in first 6 sts, 2 sc in next st, sc in next st 3 times, corner loop, 2 sc in next st, sc in next st 6 times, sc in last 6 sts. That gives 30 + 9 = 39 sc plus 1 corner loop.
Sl st in the body between the wings.
Lower-right wing (24 sts): Sc in first 4 sts, 2 sc in next st, sc in next st 5 times, corner loop, 2 sc in next st, sc in next st 3 times, sc in last 4 sts. That gives 24 + 8 = 32 sc plus 1 corner loop.
Sl st at the tail end of the body.
Lower-left wing (24 sts): Sc in first 4 sts, 2 sc in next st, sc in next st 3 times, corner loop, 2 sc in next st, sc in next st 5 times, sc in last 4 sts. (32 sc plus 1 corner loop)
Sl st in the body between the wings.
Upper-left wing (30 sts): Sc in first 6 sts, 2 sc in next st, sc in next st 6 times, corner loop, 2 sc in next st, sc in next st 3 times, sc in last 6 sts. (39 sc plus 1 corner loop)
Sl st in the head to join. Fasten off and weave in ends.
Edging total: 142 sc (39 + 32 + 32 + 39) and 4 corner loops: upper-left (UL), upper-right (UR), lower-left (LL) and lower-right (LR).
Checkpoint (blocked): 5.5 in x 4.75 in (14.0 cm x 12.1 cm).
Make All Pieces
Make 32 motifs in Butter Yellow, 16 per panel. Make Motif 1 of each panel complete with ch-5 corner loops. Join all the others as you go during their edging round.
Layout of one panel (A = left column, B = right column):
Row 1:  A1  B1   <- header edge
Row 2:  A2  B2
Row 3:  A3  B3
Row 4:  A4  B4
Row 5:  A5  B5
Row 6:  A6  B6
Row 7:  A7  B7
Row 8:  A8  B8
Make two identical panels.
Joining
Method: Join as you go at the corner loops only. The wing edges never touch, which leaves the diamond-shaped gaps.
Stitch-to-stitch logic:
– A1: complete motif with all 4 corner loops.
– B1: its LL joins A1’s LR, and its UL joins A1’s UR.
– A2: its UL joins A1’s LL, and its UR joins A1’s LR.
– B2: its UL joins A1’s LR, which is the center point where four motifs meet. Always sl st into the first motif’s loop at a four-way point. Its LL joins A2’s UR, and its UR joins B1’s LR.
– Continue the same way down the panel. Each four-way meeting point anchors into one loop only.
Tension: Keep the ch 2 on each side of the joining sl st loose and even. Tight joins pucker the wingtips. Loose joins make the curtain sag.
Checkpoint: About 0.5 in (1.3 cm) between neighboring wingtips. The joined panel measures 11.5 in x 41.5 in (29.2 cm x 105.4 cm): 2 x 5.5 in + 0.5 in for the width, and 8 x 4.75 in + 7 x 0.5 in for the length.
Border: Header and Tabs
The border is a header worked across the top of each panel. Border gauge: 5 sc = 1 in (2.5 cm).
Row 1 (RS): Join the yarn in A1’s UL corner loop.
– Across A1: sc in the UL loop, ch 13, sc in the head between the antennae, ch 13, sc in the UR loop. That gives 1 + 13 + 1 + 13 + 1 = 29 sts.
– Across B1: sc in the UL loop, ch 13, sc in the head, ch 13, sc in the UR loop. (29 sts)
Row total: 2 motifs x 29 = 58 sts. Nothing is added at the seam: the UR sc of A1 and the UL sc of B1 sit side by side, and both are already counted. Ch 1, turn.
Row 2: Sc in each sc and each ch across. Ch 1, turn. (58 sc)
Row 3: Ch 3 (counts as dc), dc in each st across. Turn. (58 dc)
Row 4: Ch 1, sc in each st across. Do not fasten off. (58 sc)
Tabs: Work 5 tabs, each 6 sts wide, with 7 sts between tabs.
- Tab 1: Ch 1, turn. Sc in the first 6 sts. Work 15 more rows of 6 sc, for 16 rows in total, about 3 in (7.6 cm). Fasten off.
- Tabs 2 to 5: Skip the next 7 sts of Row 4, join the yarn in the next st, and work each tab the same way as Tab 1.
Tab check: 5 tabs x 6 sts + 4 gaps x 7 sts = 30 + 28 = 58 sts.
Fold each tab to the WS and whipstitch its last row to the back of Row 2. This makes a loop about 1.5 in (3.8 cm) tall that fits a rod up to 0.75 in (1.9 cm) across.
Why the math works: 58 sts at 5 sc per in gives 11.6 in (29.5 cm). That is 0.1 in (0.3 cm) of ease over the 11.5 in (29.2 cm) panel width, so the header lies flat without pulling the wingtips together or ruffling.
Final Blocking
- Soak each panel in cool water with a little wool wash for 10 minutes.
- Press out the water by rolling the panel in a towel. Don’t wring it.
- Lay the panel on foam mats and pin it to 11.5 in x 41.5 in (29.2 cm x 105.4 cm), plus the header.
- Pin each corner loop first, then the outer curve of every wing.
- Shape the antennae straight and slightly apart, with the knobs rounded.
- Mist with spray starch if you want a crisper drape.
- Leave the panel pinned until it is completely dry, which takes 24 hours.
Final Quality-Control Checklist
- Every motif measures 5.5 in x 4.75 in (14.0 cm x 12.1 cm), within 1/4 in (0.6 cm).
- Each upper wing has 39 sc and each lower wing has 32 sc.
- All four-way join points anchor into a single loop.
- Each panel is 2 motifs wide and 8 tall.
- The header has 58 sts in every row.
- The 5 tabs are evenly spaced and sewn securely.
- All ends are woven in and invisible from the RS.
Troubleshooting
- Wings cup or curl: Your edging is too tight. Loosen your tension or check that you worked all the increases.
- Wings ruffle: You added extra stitches. Recount the 39 sc and 32 sc.
- Body bobbles point backward: Bobbles belong in Row 2, worked with the WS facing.
- Join points gape: Shorten the bridges to ch 1 on each side of the sl st, and use that on every join.
- Header pulls in: Loosen the chains in Row 1 or go up a hook size for the header only.
- Panel too long: Leave off one row of motifs. Each row takes off 5.25 in (13.3 cm).
Care
Hand wash cool and lay flat to dry, reshaping the wings while damp. Re-starch lightly if the curtain softens after washing.
Final Notes
The measurement chain is simple to follow:
– one motif at 5.5 in x 4.75 in (14.0 cm x 12.1 cm),
– joined into a 11.5 in x 41.5 in (29.2 cm x 105.4 cm) panel,
– topped with a 58-stitch header and five tabs,
– for a finished panel of 11.5 in x 44.25 in (29.2 cm x 112.4 cm).
Check the size at each stage, block carefully, and your window will fill with sunlit butterflies.
Happy crocheting!