

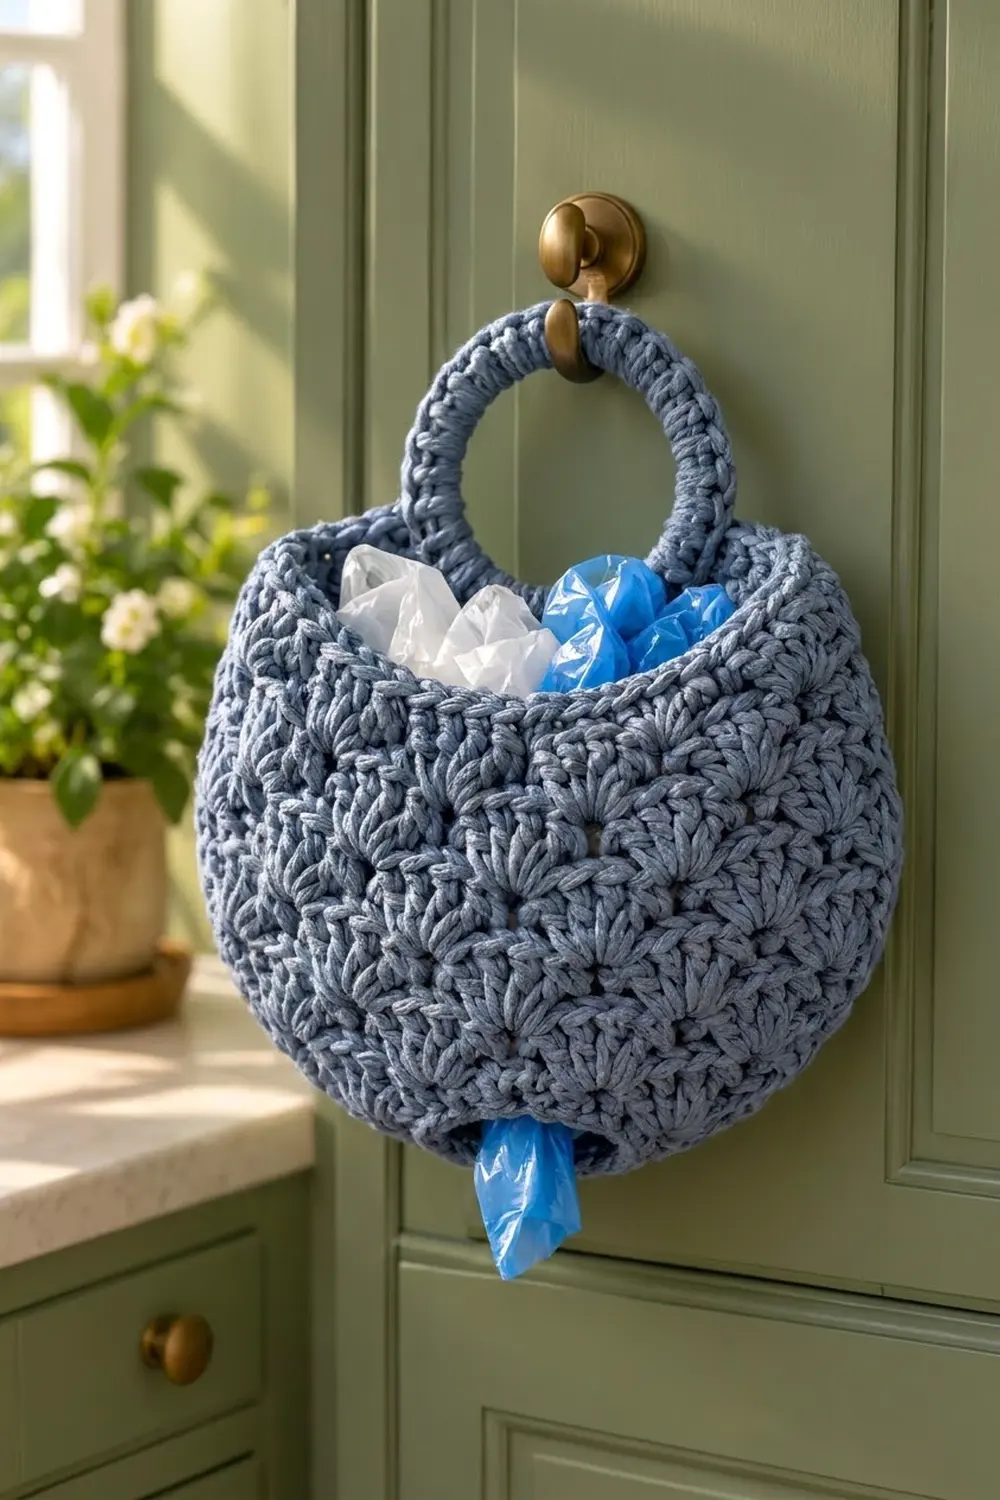
This Denim Shell Grocery Bag Holder gives all those loose plastic bags one tidy, good-looking home. It is a rounded pouch covered in deep, offset shells. You stuff bags in through the top and pull them out one at a time through a small hole in the bottom. A thick crocheted ring at the top hooks over a cabinet knob, a door hook, or a peg.
The sample uses a single dusty denim blue, which looks calm in a kitchen and hides everyday wear. Any solid or softly heathered color will show the shell texture well. Busy variegated yarns tend to blur it.
The pattern uses US crochet terms. The finished pouch measures about 10 inches (25.4 cm) wide and 10 inches (25.4 cm) tall when laid flat. With the hanging ring, the total height is about 13 inches (33.0 cm).
Construction is simple and seamless. You start at the dispensing hole with a short chain ring, increase over a few rounds to shape a curved bottom, then work the body in shell rounds with no further shaping. A decrease round and a rope-edge rim pull the top in. Finally, you crochet a cover over a 2.5-inch (6.4 cm) ring, add a short tab, and sew the tab inside the back rim.
Finished Size and Construction
- Finished size: 10 in (25.4 cm) wide x 10 in (25.4 cm) tall, flattened; about 13 in (33.0 cm) tall including the ring
- Skill level: Easy to intermediate (confident beginner)
- Terminology: US crochet terms
- Yarn weight: Bulky (#5)
- Hook: 6.0 mm (US J-10)
- Number of pieces: 1 body plus 1 covered hanging ring (no motifs, no joining)
- Layout: Single pouch worked in joined rounds from the bottom hole upward
- Piece size: Body 10 in (25.4 cm) wide x 10 in (25.4 cm) tall; ring about 3.25 in (8.3 cm) across
- Size before border: 10 in (25.4 cm) wide x 9 in (22.9 cm) tall
- Border depth: about 1 in (2.5 cm), worked as the top rim
Materials
Pick a sturdy bulky yarn with some structure, such as a cotton blend, a cotton-acrylic blend, or a smooth cord-style yarn. Cotton holds the rounded shape best and does not stretch out when the pouch is full. Very soft, fuzzy acrylic will sag more.
- Denim blue, bulky (#5): about 220 g / 330 m (361 yd)
This is the only color. The quantity already includes a margin of roughly 15 percent for your gauge swatch and small differences in tension.
Tools:
- 6.0 mm (US J-10) crochet hook
- 1 metal, wooden, or plastic ring, 2.5 in (6.4 cm) outside diameter
- Tapestry needle
- 4 to 6 locking stitch markers
- Scissors
- Measuring tape
- Spray bottle and a rolled towel or small balloon for blocking
Abbreviations (US Terms)
- ch – chain
- sl st – slip stitch
- sc – single crochet
- dc – double crochet
- sc2tog – single crochet 2 together
- rev sc – reverse single crochet (crab stitch)
- sk – skip
- st(s) – stitch(es)
- rnd(s) – round(s)
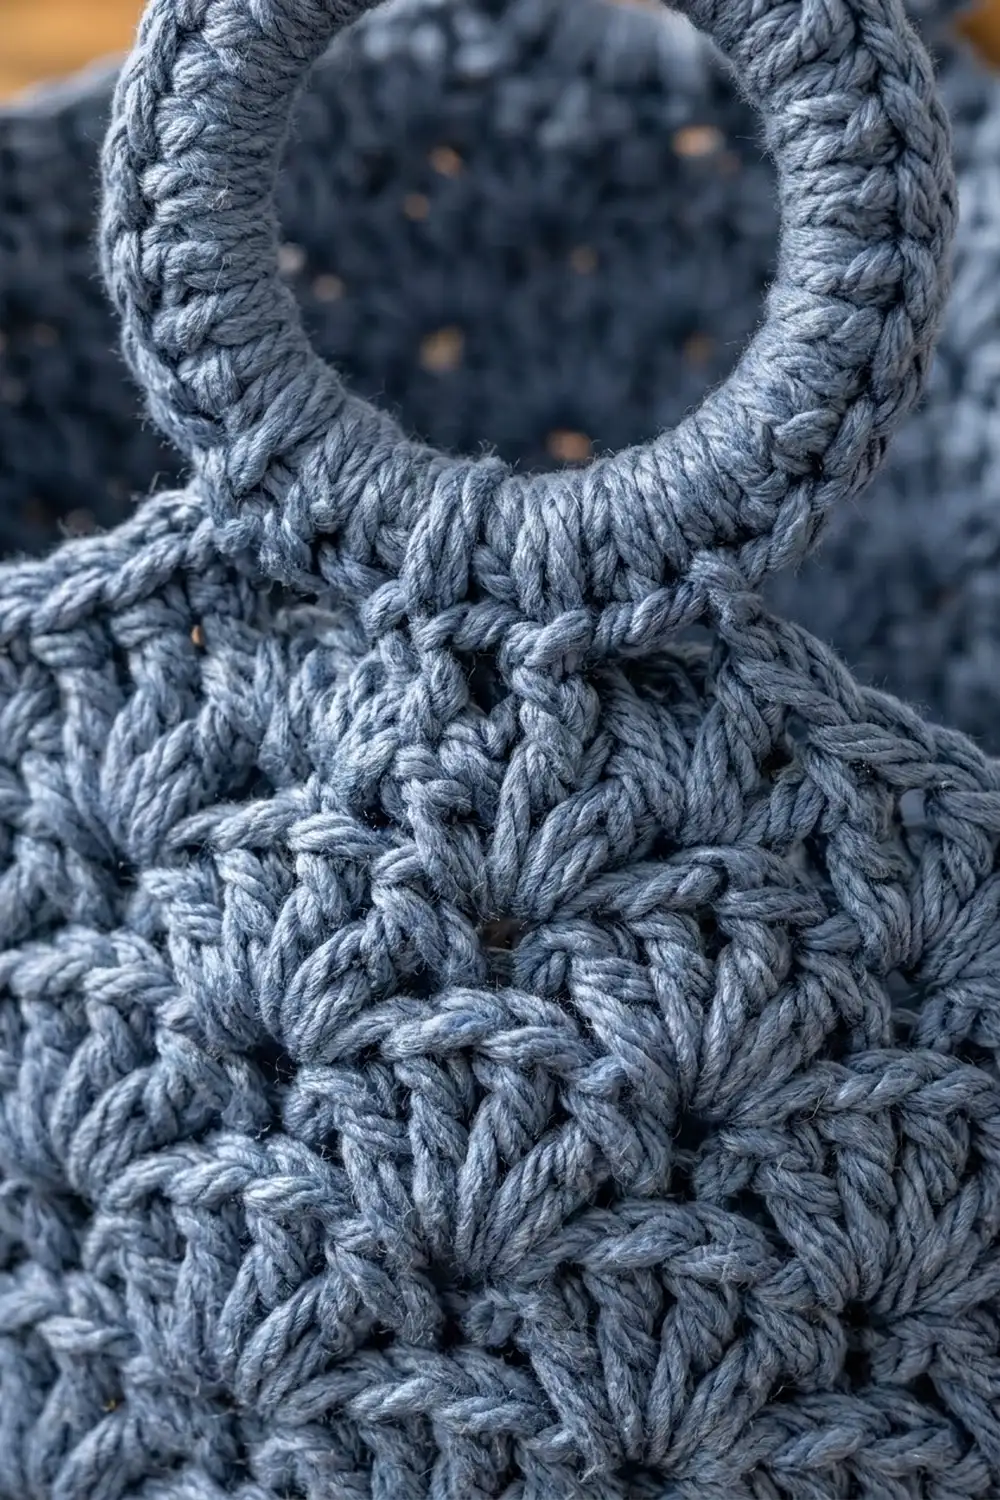
Shell: 5 dc worked in the same stitch.
Reverse sc (rev sc): Work from left to right (if you are right-handed). Insert the hook into the next stitch to the right, yarn over, pull up a loop, yarn over, and pull through both loops. This makes a twisted, rope-like edge.
Gauge and Checkpoints
Gauge in shell pattern: 2 shell repeats (12 sts) = 4 in (10.2 cm) wide, and 4 rnds = 3 in (7.6 cm) tall.
Gauge in sc: 12 sc = 4 in (10.2 cm).
Before you commit, work Rnds 1 to 6 as your test piece and measure it. If it matches the checkpoints below, keep going.
Checkpoints:
- After Rnd 1: the hole is about 2 in (5.1 cm) across.
- After Rnd 4: the piece is about 6 in (15.2 cm) across when pressed flat and has started to cup.
- After Rnd 14: the flattened tube is 10 in (25.4 cm) wide and about 9 in (22.9 cm) tall from the hole edge.
- After Rnd 17: the rim is about 8 in (20.3 cm) wide flattened, and the body is 10 in (25.4 cm) tall.
If your piece is too big, go down to a 5.5 mm hook. If it is too small, go up to a 6.5 mm hook. Being off by 0.5 in (1.3 cm) across the flattened width adds up to a full 1 in (2.5 cm) around the body, so fix it early. Do not change the stitch counts, because the shell repeat needs a multiple of 6.
Body
Bottom and Dispensing Hole
Foundation: Ch 20, join with a sl st to the first ch to form a ring. Do not twist the chain.
Rnd 1: Ch 1 (does not count as a st), sc in each ch around, join with a sl st to the first sc. (20 sc)
This firm edge is the dispensing hole. Keep it snug so it grips the bags.
Rnd 2 (growth): Ch 1, sc in next st, 2 sc in next st; repeat from * 9 more times, join to first sc. (30 sc)*
Rnd 3 (growth): Ch 1, sc in first st, sk 1, 3 dc in next st, sc in next st, sk 1, 3 dc in next st; repeat from * 8 more times, join to first sc. (10 sc + 30 dc = 40 sts)*
Each repeat uses 3 stitches and makes 4, so 10 repeats turn 30 stitches into 40.
Rnd 4 (growth): Ch 3 (counts as dc), 4 dc in same sc, sk 1 dc, sc in center dc of next 3-dc group, sk 1 dc, 5 dc in next sc, sk 1 dc, sc in center dc, sk 1 dc; repeat from * 8 more times, join to top of beg ch-3. (10 shells + 10 sc = 60 sts)*
Each repeat now uses 4 stitches and makes 6. The bottom is complete and should look like a shallow bowl with a hole in the center.
Shell Body
The body uses two alternating rounds. Each repeat always uses 6 stitches and makes 6, so every round stays at 60 sts (10 shells + 10 sc). The shells offset automatically: each new shell goes into an sc, and that sc sits on the center of a shell below.
Rnd 5 (Round B): Sl st in next 2 dc to reach the center dc of the first shell. Ch 1, sc in same st, sk 2 dc, 5 dc in next sc, sk 2 dc, sc in next dc (center of shell), sk 2 dc, 5 dc in next sc, sk 2 dc; repeat from * 8 more times, join to first sc. (60 sts)*
Rnd 6 (Round A): Ch 3 (counts as dc), 4 dc in same sc, sk 2 dc, sc in center dc, sk 2 dc, 5 dc in next sc, sk 2 dc, sc in center dc, sk 2 dc; repeat from * 8 more times, join to top of beg ch-3. (60 sts)*
Rnds 7 to 14: Repeat Rnds 5 and 6 four more times. (60 sts in every round)
You now have the shell growth round (Rnd 4) plus 10 shell body rounds (Rnds 5 to 14). The body is about 9 in (22.9 cm) tall from the hole edge to the top of Rnd 14. Rnd 14 is a Round A, so it ends at the top of a ch-3.
Checkpoint: Flatten the tube with the join at one side. It should be 10 in (25.4 cm) wide, which is 30 of the 60 stitches across each face at 3 sts per inch (2.54 cm).
Hanging Ring
Rnd 1: Make a slip knot on the hook. Work sc over the 2.5 in (6.4 cm) ring: insert the hook through the center, yarn over, and pull up a loop around the ring. Work 32 sc around, pushing the stitches together so the ring is fully hidden. Join to the first sc. (32 sc)
If the ring still shows, add 2 to 4 sc. If the stitches buckle, take out 2. The tab only uses 6 stitches, so changing the total is fine.
Tab, Row 1: Do not fasten off. Ch 1, sc in the next 6 sts, turn. (6 sc)
Rows 2 to 4: Ch 1, sc in each st across, turn. (6 sc)
The tab is 2 in (5.1 cm) wide and about 1.25 in (3.2 cm) long. Fasten off, leaving a 12 in (30.5 cm) tail for sewing. The covered ring measures about 3.25 in (8.3 cm) across.
Border (Top Rim)
The rim pulls the top in and gives it a firm, rope-like edge that holds the pouch open.
Border gauge: 12 sc = 4 in (10.2 cm), the same as the sc gauge.
Rnd 15 (trim/decrease round): Ch 1, sc in same st, sc in next 2 sts, sc2tog, sc in next 3 sts, sc2tog; repeat from * 10 more times, join to first sc. (12 repeats x 4 sts = 48 sc)*
This round turns 60 stitches into 48. Each repeat covers 5 stitches of Rnd 14 and makes 4 sc.
Rnd 16: Ch 1, sc in each st around, join. (48 sc)
Rnd 17: Ch 1, rev sc in each st around, join. Fasten off and weave in the end. (48 rev sc)
Count per side: The rim has no corners. Flatten it with the round join at one fold: there are 24 sts across the front and 24 sts across the back. Place markers at stitches 1 and 25 so you can find the center back for the ring.
Why the math works: At 3 sts per inch (2.54 cm), 48 sc go 16 in (40.6 cm) around, so the rim lies flat at 8 in (20.3 cm) wide. The body below stays 10 in (25.4 cm) wide. That 2 in (5.1 cm) difference gives the top its rounded, bulb-like curve. The three rim rounds add about 1 in (2.5 cm), so the body goes from 9 in (22.9 cm) to 10 in (25.4 cm) tall.
Attaching the Ring
Find the center 6 sts of the back, which are stitches 34 to 39 counting from the round join. Lay the tab on the inside of the back rim so its bottom edge sits on Rnd 15 and the ring stands upright above the rim. Whipstitch all four sides of the tab through Rnds 15 and 16. Catch only the back loops so the stitching does not show on the outside. Sew over the top edge a second time for strength. The ring should rise about 3 in (7.6 cm) above the rim.
Final Blocking
- Weave in all ends securely, splitting the yarn as you go. A full pouch puts stress on the ends.
- Spritz the whole pouch evenly with water until it is damp but not dripping.
- Stuff it firmly with a rolled towel, plastic bags, or a lightly inflated balloon to shape the bulb.
- Pat it into shape: 10 in (25.4 cm) wide through the middle and 8 in (20.3 cm) wide at the rim, with the hole centered on the bottom.
- Open each shell slightly with your fingers so the fans sit evenly.
- Roll the rev sc rim so it sits straight and level.
- Let it dry fully, standing upright, for 24 hours before hanging.
You can steam block acrylic blends instead. Hold the iron above the fabric and never press it flat.
Final Quality-Control Checklist
- Rnd 1 has 20 sc, and the hole is about 2 in (5.1 cm) across.
- Rnd 4 and every body round have 60 sts: 10 shells and 10 sc.
- The shells offset in every round, and no shell sits directly on top of another.
- Before the rim, the body is 10 in (25.4 cm) wide flattened and 9 in (22.9 cm) tall.
- The rim has 48 sts and is 8 in (20.3 cm) wide flattened.
- The finished body is 10 in (25.4 cm) tall.
- The ring is fully covered, and the tab is centered on the back and sewn down on all four sides.
- All ends are woven in, and none poke through the shells.
Troubleshooting
The bottom ruffles. Your sc rounds are loose. Redo Rnds 1 and 2 with a hook one size smaller, then switch back for Rnd 3.
The shells stack in straight columns instead of offsetting. You probably put a shell into a shell’s center. Shells always go into an sc, and each sc always goes into a shell’s center.
The stitch count drifts away from 60. Check the start of each round. On Round B, slip stitch over exactly 2 dc before the ch 1.
Bags fall out of the bottom. The hole is too loose. Weave a strand of yarn through Rnd 1 and snug the hole to about 1.5 in (3.8 cm).
Bags are hard to pull out. Loosen that strand, or rework Rnd 1 with a larger hook.
The ring tilts forward. Sew the tab lower so it sits on Rnd 15, and stitch down both side edges, not just the top and bottom.
The rim flares. Your rev sc is too loose. Work it with a hook one size smaller.
Care
Hand wash in cool water and dry flat, reshaping the bulb over a towel while it is damp. If you used a metal ring that may rust, remove it before washing.
Final Notes
The whole design follows one measurement chain. The 20-stitch hole grows to 60 stitches by Rnd 4. Ten shell rounds at 60 stitches make a body 10 in (25.4 cm) wide and 9 in (22.9 cm) tall. The rim decreases to 48 stitches, pulls the top in to 8 in (20.3 cm), and brings the height to 10 in (25.4 cm). A 3.25 in (8.3 cm) covered ring finishes the holder at about 13 in (33.0 cm) tall. Check your gauge first and count your shells every round, and your bag holder will match the sample.
Happy crocheting!