

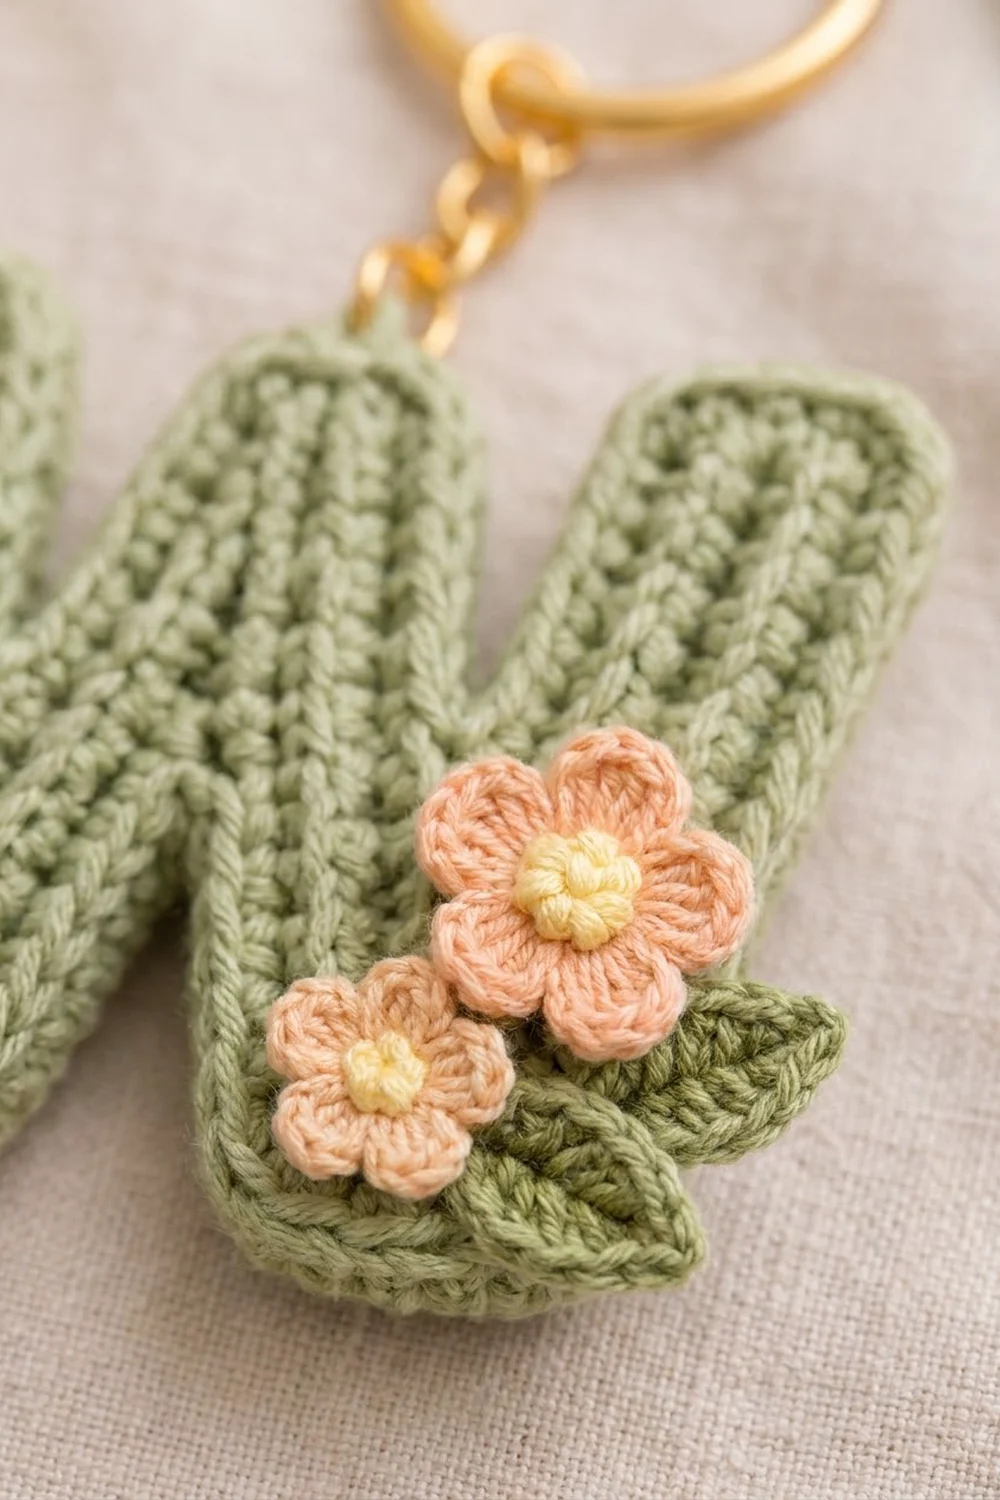
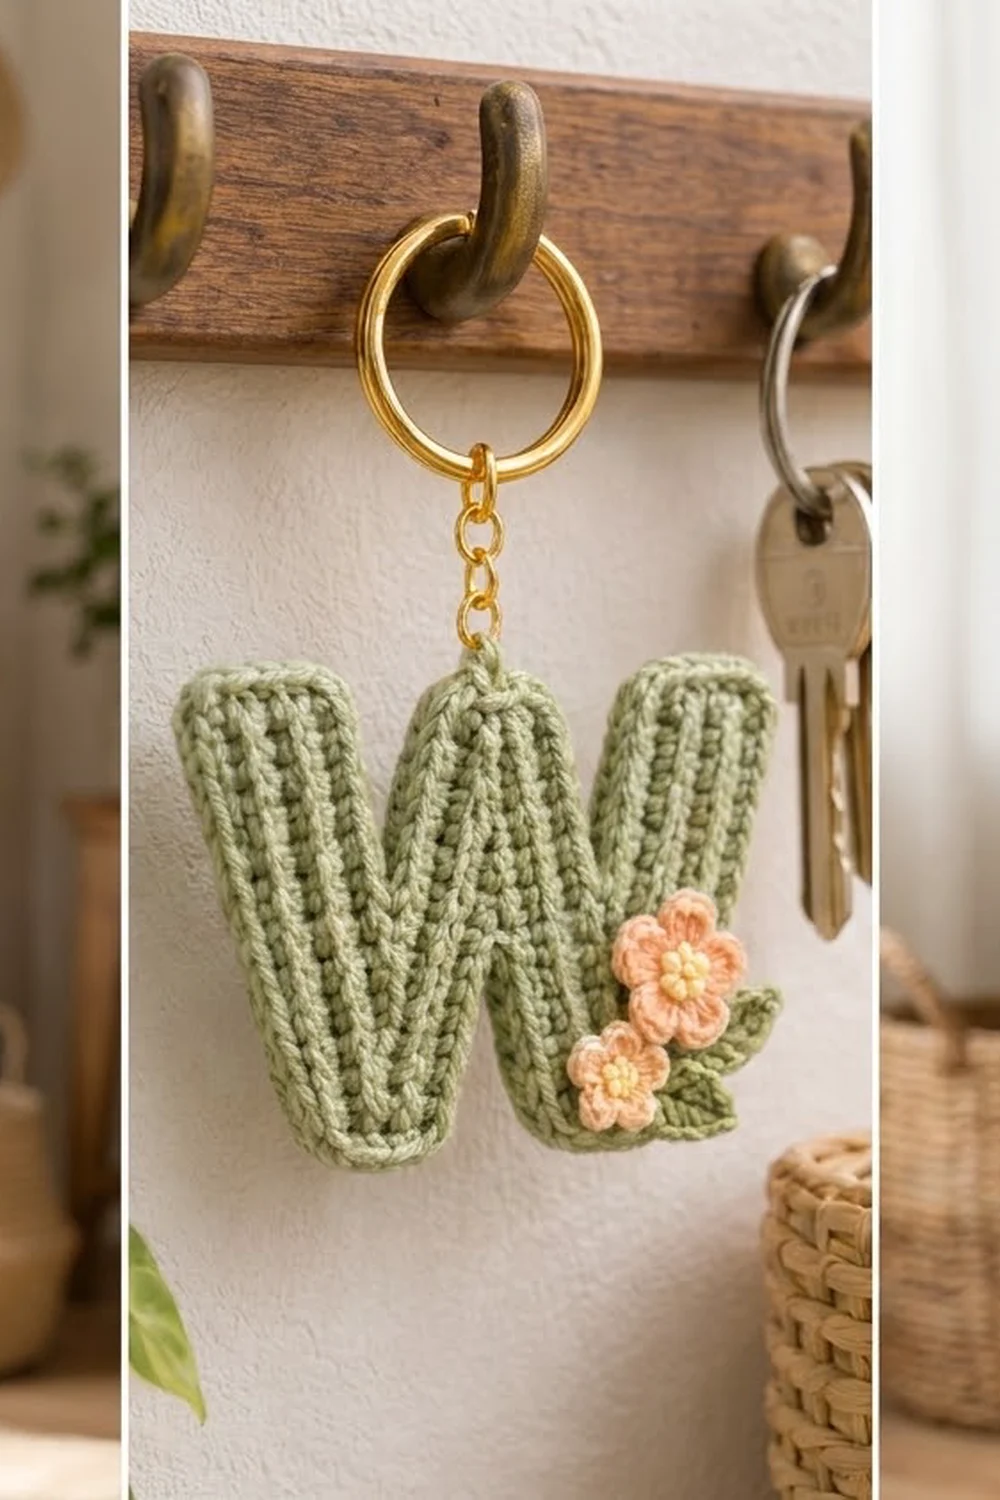
This keychain is a chunky letter W in soft sage green with ridges along every stroke. A smooth rolled outline finishes the edge, and a small cluster of peach blossoms and a leaf sits at the lower right. It hangs from a gold split ring and a short chain attached at the center peak of the letter.
The colors are calm and spring-like: sage for the letter, peach for the flowers, butter yellow for the flower centers, and a deeper olive for the leaf. The ridges come from working the rounds in the back loop only, so the lines follow each stroke of the letter.
This pattern uses US crochet terms. The finished keychain measures about 3.5 in wide x 3 in tall (8.9 cm x 7.6 cm), not counting the ring and chain.
The letter is one flat piece. You work it in rounds around a zigzag foundation chain that traces the W. Two rounds of single crochet build the strokes. Two border rounds then square the edges, roll them into a neat cord and add a hanging loop. Last, you sew on three small appliqués.
Finished Size and Construction
- Finished size: about 3.5 in wide x 3 in tall (8.9 cm x 7.6 cm)
- Skill level: Easy-intermediate
- Terminology: US crochet terms
- Yarn weight: Sport weight (#2), cotton or cotton blend
- Hook: 2.75 mm (C-2)
- Number of pieces: 1 letter body plus 3 small appliqués (2 flowers, 1 leaf)
- Layout: a single letter, with the appliqués grouped at the lower right
- Size before border: about 3.1 in x 2.6 in (7.9 cm x 6.6 cm) after Round 2
- Border depth: about 0.2 in (0.5 cm) on every edge (Rounds 3 and 4)
- Finished stroke width: about 1.1 in (2.8 cm)
Materials
Choose a smooth, tightly plied cotton. Mercerized cotton shows the back-loop ridges best, and it keeps its shape on a keychain that gets handled every day.
- Sage green (letter): 8 g, about 24 m
- Peach (flowers): 2 g, about 6 m
- Butter yellow (flower centers): 1 g, about 3 m
- Olive green (leaf): 1 g, about 3 m
These amounts include extra for a gauge swatch and sewing tails.
Tools:
- 2.75 mm (C-2) crochet hook
- Tapestry needle
- 1 in (2.5 cm) gold split key ring
- Short gold chain (3 to 4 links) and two 6 mm jump rings
- Two pairs of flat-nose pliers
- Stitch markers (at least 4)
- Pins and a blocking mat
- Scissors
Abbreviations (US Terms)
- ch: chain
- sl st: slip stitch
- sc: single crochet
- hdc: half double crochet
- dc: double crochet
- st(s): stitch(es)
- BLO: back loop only
- MR: magic ring
- sc3tog: single crochet 3 together
Special stitch: sc3tog. (Insert hook in next st, yarn over, pull up a loop) 3 times, yarn over, pull through all 4 loops on hook. This turns 3 stitches into 1. You use it at every inside bend of the W.
Gauge and Checkpoints
Gauge: 6 sc and 6 rounds = 1 in (2.5 cm) in BLO single crochet. A quick swatch of 12 sc x 12 rows should measure 2 in x 2 in (5.1 cm x 5.1 cm).
Because the letter is small, the best gauge test is the letter itself. Work Rounds 1 and 2, then measure before you go on.
Checkpoints:
- Foundation chain: 50 ch, laid flat without stretching, about 8.2 in (20.8 cm) long.
- After Round 1: each stroke is about 0.33 in (0.8 cm) wide.
- After Round 2: each stroke is about 0.67 in (1.7 cm) wide, and the letter measures about 3.1 in x 2.6 in (7.9 cm x 6.6 cm).
- After Round 4: about 3.5 in x 3 in (8.9 cm x 7.6 cm).
If your letter is too big, go down to a 2.5 mm hook. If it’s too small, go up to a 3 mm hook.
If the bottom points ruffle, your tension is loose there. Going down half a hook size usually fixes it. If the letter cups toward you, your stitches are too tight, so go up half a size.
Letter Body
The foundation chain traces the center line of the W. It has five landmarks:
- TR: top-right end
- BR: bottom-right point
- P: center peak
- BL: bottom-left point
- TL: top-left end
Round 1 works along the top side of the chain first. This side becomes the inner edges of the outer strokes and the upper edges of the middle strokes. You then turn around TL and work along the bottom side, which becomes the outer edges and the lower edges under the peak.
At every bend, the outside of the curve gets 3 sc in one stitch (+2), and the inside gets an sc3tog (−2). This keeps the letter flat.
Number the chain stitches from the hook. St 1 is the 2nd ch from the hook (TR end), and st 49 is the last ch (TL end). The bends are st 15 (BR), st 25 (P) and st 35 (BL).
With sage green, ch 50.
Round 1 (into the chain):
- TR end: sc in 2nd ch from hook (st 1).
- Top side: sc in sts 2–13 (12 sc), sc3tog over sts 14–16 (BR inside), sc in sts 17–24 (8 sc), 3 sc in st 25 (P outside), sc in sts 26–33 (8 sc), sc3tog over sts 34–36 (BL inside), sc in sts 37–48 (12 sc).
- TL end: 3 sc in st 49.
- Bottom side (into the other side of the chain): sc in sts 48–36 (13 sc), 3 sc in st 35 (BL outside), sc in sts 34–27 (8 sc), sc3tog over sts 26–24 (P inside), sc in sts 23–16 (8 sc), 3 sc in st 15 (BR outside), sc in sts 14–2 (13 sc).
- TR end: 2 sc in st 1. Join with sl st to first sc.
Stitch count: 100 sc (TR end 3, top side 45, TL end 3, bottom side 49).
Check: 49 chain stitches x 2 sides = 98. Each end chain holds 3 sc instead of 2, which adds 2 more, for 100. The three +2 bends and three −2 bends cancel out.
Place markers in the center sc of the P group and of the BL and BR 3-sc groups so the bends are easy to find.
Round 2 (BLO throughout): Ch 1 (does not count).
- TR end: 3 sc in first st.
- Top side: sc in next 11, sc3tog, sc in next 8, 3 sc in next st (P center), sc in next 8, sc3tog, sc in next 11.
- TL end: 3 sc in next st, sc in next st, 3 sc in next st.
- Bottom side: sc in next 14, 3 sc in next st (BL center), sc in next 8, sc3tog (centered on the P sc3tog), sc in next 8, 3 sc in next st (BR center), sc in next 14.
- TR end: 3 sc in next st, sc in next st. Join with sl st to first sc.
Stitch count: 108 sc (TR end 7, top side 43, TL end 7, bottom side 51).
- Each end grows from 3 to 7 sts (+4), which squares off the stroke tops.
- The top side loses 2 at BR and 2 at BL and gains 2 at P (45 − 2 = 43).
- The bottom side gains 2 at BL and 2 at BR and loses 2 at P (49 + 2 = 51).
Measure now. The letter should be about 3.1 in x 2.6 in (7.9 cm x 6.6 cm).
Border
The border is two rounds in sage green. The first is a BLO sc round that squares the corners. The second is a slip stitch round that rolls the edge into a neat cord and adds the hanging loop.
Border gauge: same as the body, 6 sc = 1 in (2.5 cm). The sc round adds about 0.17 in (0.4 cm) to each edge, and the sl st round adds a little more. Total border depth is about 0.2 in (0.5 cm).
Round 3 (BLO throughout): Ch 1 (does not count).
- TR end, first part: sc in first st, 3 sc in next st (corner), sc in next st (5 sc).
- Top side: sc in next 10, sc3tog, sc in next 8, 3 sc in next st (P center), sc in next 8, sc3tog, sc in next 10 (41 sc).
- TL end: sc in next st, 3 sc in next st (corner), sc in next 3, 3 sc in next st (corner), sc in next st (11 sc).
- Bottom side: sc in next 15, 3 sc in next st (BL center), sc in next 8, sc3tog, sc in next 8, 3 sc in next st (BR center), sc in next 15 (53 sc).
- TR end, second part: sc in next st, 3 sc in next st (corner), sc in next 2 (6 sc). Join with sl st to first sc.
Stitch count: 116 sc (TR end 5 + 6 = 11, top side 41, TL end 11, bottom side 53).
Why the math works: in every round, each corner and each outside bend gains exactly 2 stitches, and each inside bend loses exactly 2.
- Each end has 2 corners, so it gains 4 (7 to 11).
- The top side has one outside bend (P) and two inside bends: 43 + 2 − 4 = 41.
- The bottom side has two outside bends (BL and BR) and one inside bend: 51 + 4 − 2 = 53.
- Total: 108 + 8 = 116.
In Round 3, the P center sc is the 26th stitch of the round.
Round 4 (both loops): Do not ch. Sl st loosely in each st around until you reach the P center st. In the P center st, work (sl st, ch 5, sl st) for the hanging loop. Continue with sl st in each st to the end, then join to the first sl st.
Stitch count: 117 sl st plus one ch-5 loop (one sl st in each of the 116 sts, with 2 sl st in the P center).
Fasten off. Weave in the ends on the back, running the tails along the ridges so they disappear.
Appliqués
Large flower (make 1):
- Center: With yellow, MR, 5 sc in ring, pull closed, join with sl st to first sc (5 sc). Fasten off.
- Petals: Join peach in any st. (Sc, hdc, dc, hdc, sc) in each st around, join with sl st to first sc (5 petals, 25 sts). Fasten off, leaving a 10 in (25.4 cm) tail.
- Size: about 0.9 in (2.3 cm) across.
Small flower (make 1):
- With peach, MR, (ch 2, dc, ch 2, sl st) 5 times in ring, pull closed (5 petals). Fasten off, leaving a 10 in (25.4 cm) tail.
- With yellow, work a French knot (2 wraps) in the center.
- Size: about 0.6 in (1.5 cm) across.
Leaf (make 1):
- With olive, ch 8. Starting in 2nd ch from hook: sc, hdc, dc, dc, hdc, sc (6 sts).
- In last ch: (sc, ch 2, sc) for the tip.
- Working along the other side of the chain: sc, hdc, dc, dc, hdc, sc (6 sts), sl st in first sc. Fasten off, leaving a tail.
- With a strand of sage, backstitch a center vein from base to tip.
- Size: about 1 in (2.5 cm) long.
Placement:
- Lay the letter right side up.
- Tuck the leaf behind the spot where the large flower will sit, pointing right so its tip extends past the outer edge of the right stroke.
- Center the large flower on the lower part of the right outer stroke.
- Place the small flower just below and to the left of it, near the bottom-right point, overlapping the large flower slightly.
- Pin everything, then sew each piece down around its center and under each petal tip so nothing flips up.
Final Blocking
- Lightly mist the letter until it’s damp, not soaked.
- Lay it right side up on a blocking mat with a grid.
- Pin the two stroke tops, the peak and both bottom points to the target size of 3.5 in x 3 in (8.9 cm x 7.6 cm).
- Smooth the strokes so each is about 1.1 in (2.8 cm) wide and the ridges run straight.
- Pin at an angle into the border, never through the flowers.
- Let it dry completely, about 4 to 6 hours.
- Attach a jump ring through the ch-5 loop, add the chain, then add the split ring. Close each jump ring firmly with pliers.
Final Quality-Control Checklist
- Round 4 has 117 sl st plus one ch-5 loop.
- The letter measures about 3.5 in x 3 in (8.9 cm x 7.6 cm).
- Both stroke tops are squared and level with each other.
- The peak sits centered between the two outer strokes.
- The letter lies flat with no ruffling or cupping.
- All tails are woven in along the ridges on the back.
- The flowers and leaf are secure, with no loose petal tips.
- The jump rings are fully closed with no gap.
Troubleshooting
Bottom points ruffle. Your 3-sc groups are too loose. Work them a little tighter or go down half a hook size.
Inside bends pucker or gape. Make sure each sc3tog is centered on the previous round’s sc3tog.
Stitch count is off on one side. Recount section by section between the landmarks. Each side should match the per-side counts listed for that round.
Ridges look faint. Check that Rounds 2 and 3 are worked in the back loop only.
Hanging loop stretches. Work the ch-5 tightly, or sl st back along it to double the loop.
Flower edges curl. Steam them lightly and pin the petals flat while they dry.
Care
Hand wash in cool water with mild soap, press out the water in a towel, and dry flat. Take off the key ring before washing so the metal doesn’t mark the yarn.
Final Notes
Here is the measurement chain from start to finish:
- The 50-chain foundation is about 8.2 in (20.8 cm) long.
- After Round 2, the strokes are about 0.67 in (1.7 cm) wide.
- Before the border, the letter is about 3.1 in x 2.6 in (7.9 cm x 6.6 cm).
- The 0.2 in (0.5 cm) border brings it to about 3.5 in x 3 in (8.9 cm x 7.6 cm).
Check each stage and your finished keychain will match.
Happy crocheting!