

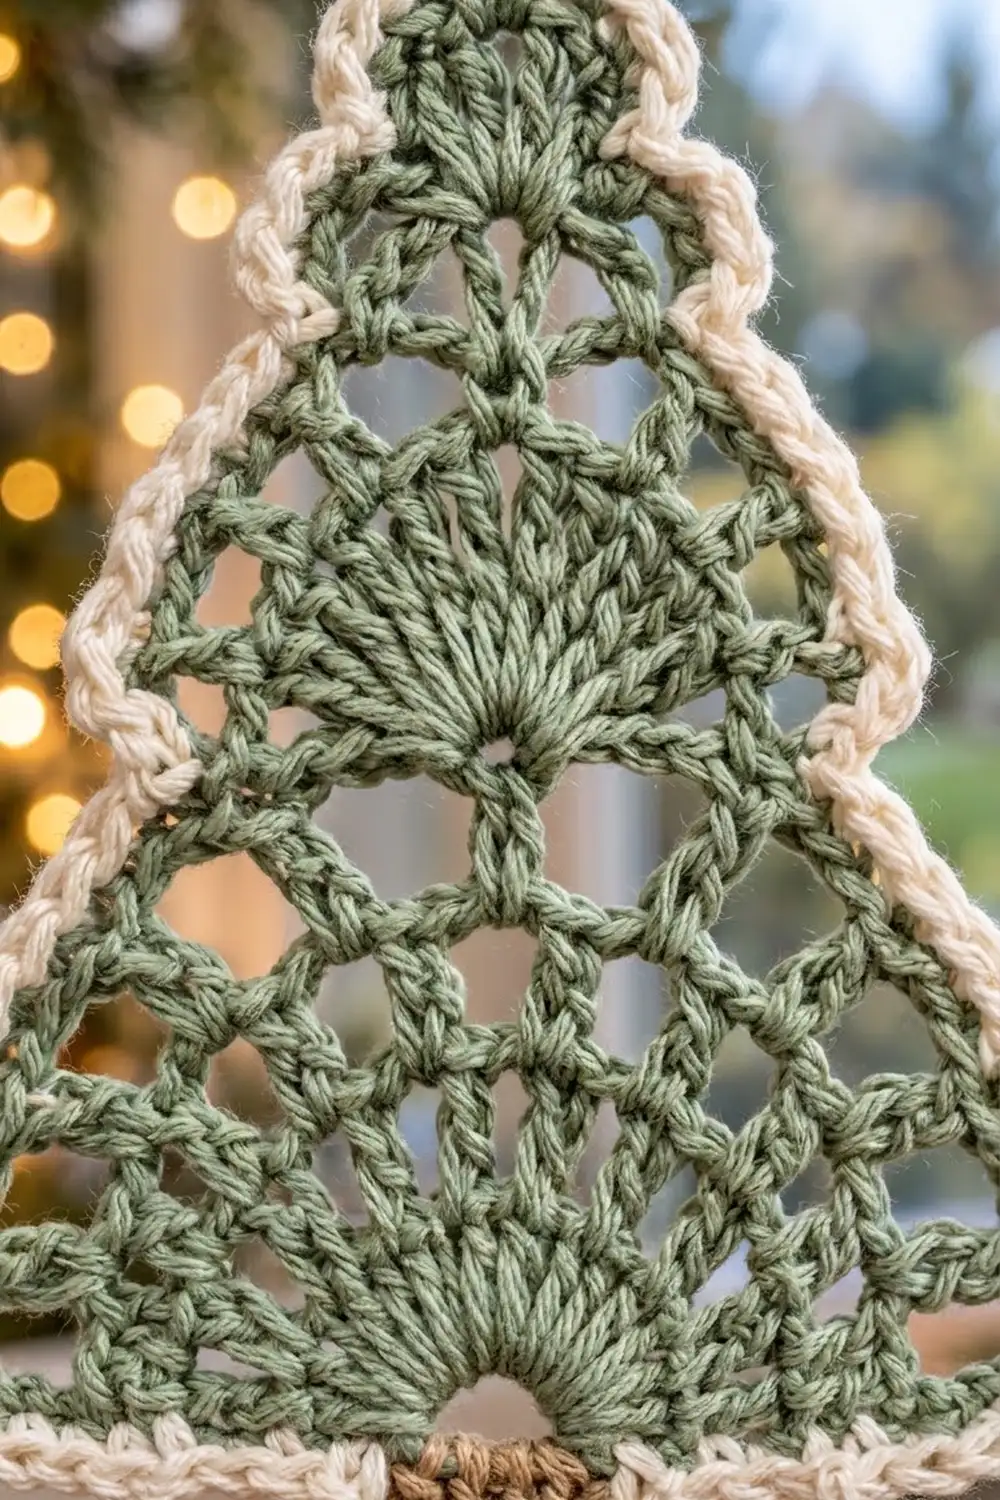
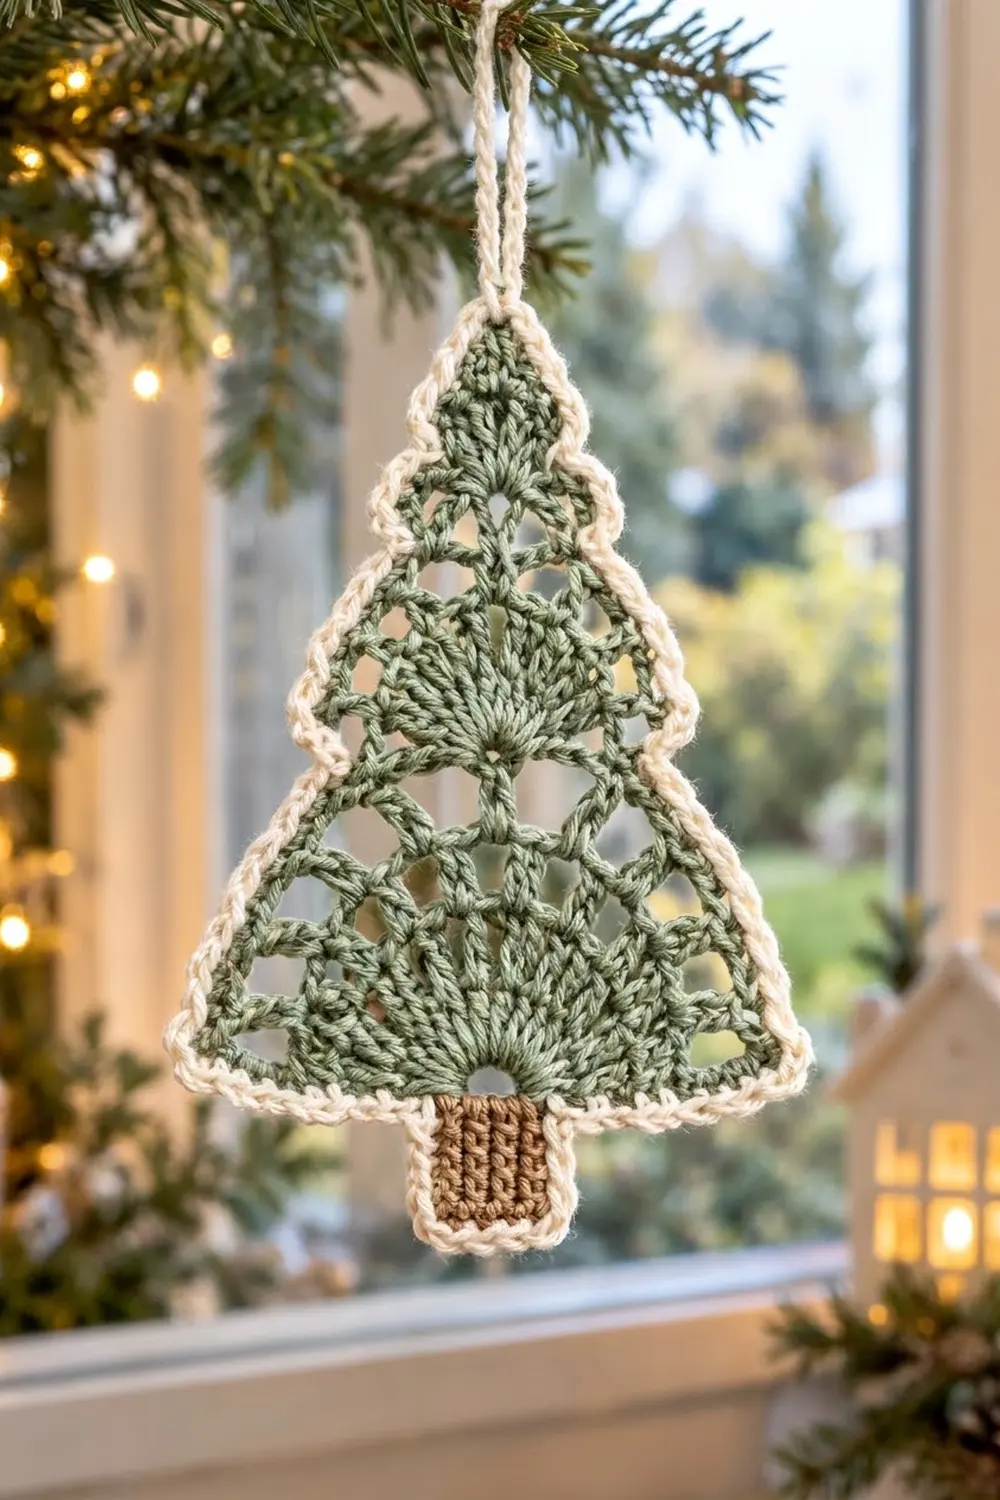
This little tree ornament combines airy fan lace with a crisp, raised outline. It has three tiers of sage green fans stacked into a stepped tree, a short tan trunk with vertical ridges, and a cream crab-stitch border that frames every curve and notch.
The colors are soft and natural: sage green, warm cream and light tan. The ornament looks right hung in a window, tied onto a gift, or clipped onto a real tree.
This pattern uses US crochet terms. The finished ornament measures about 3.9 in (9.9 cm) wide and 5.3 in (13.5 cm) tall, not counting the hanging loop, which adds about 1.1 in (2.8 cm).
You make the tree in one piece. Tier 1 is worked in rows from a foundation chain. Tiers 2 and 3 are worked straight into the chain arches at the top of the tier below. The trunk is worked sideways onto the foundation chain. Then one cream border goes around everything and finishes with the hanging loop.
Finished Size and Construction
- Finished size: 3.9 in (9.9 cm) wide × 5.3 in (13.5 cm) tall, plus a 1.1 in (2.8 cm) loop
- Skill level: Intermediate
- Terminology: US
- Yarn weight: DK / light (#3) cotton
- Hook: 3.25 mm (US D-3)
- Number of pieces: 1 (worked continuously, with no sewing)
- Layout: three stacked lace tiers, a centered trunk and a full outline border
- Size before border: 3.4 in (8.6 cm) wide × 4.8 in (12.2 cm) tall
- Border depth: about 0.25 in (0.6 cm) on every edge
Materials
Choose a smooth mercerized or matte cotton in DK weight. Cotton holds the fan rays open and blocks to a sharp point. Avoid fuzzy yarns, because they blur the lace.
- Sage green: 7 g (16 m)
- Cream: 4 g (9 m)
- Tan / light brown: 2 g (4.6 m)
These quantities include a margin of about 25% for your gauge swatch and weaving in ends.
Tools
– 3.25 mm (US D-3) hook
– Tapestry needle
– Scissors
– Stitch marker
– Blocking mat and rust-proof pins
– Spray bottle
Abbreviations (US Terms)
- ch – chain
- sl st – slip stitch
- sc – single crochet
- dc – double crochet
- sp – space
- sk – skip
- BLO – back loop only
- RS / WS – right side / wrong side
- rsc – reverse single crochet (crab stitch)
Special stitch – reverse sc (rsc): Work from left to right (left-handers work right to left). Insert the hook into the next stitch to the right, yarn over, pull up a loop, then yarn over and draw through both loops. Each rsc twists into a rounded bump, which makes the rope-like edge.
Gauge and Checkpoints
Gauge: 20 dc and 10 dc rows = 4 in (10.2 cm). That means 5 stitches per inch, and each dc row is about 0.4 in (1.0 cm) tall.
Make one complete tree before you buy yarn for a batch. Measure it at each of these stages:
- After Row 1: 3.4 in (8.6 cm) wide
- After Tier 1: 3.4 in (8.6 cm) wide × 1.5 in (3.8 cm) tall
- After Tier 2: 2.9 in (7.4 cm) total height, with Tier 2 about 2.8 in (7.1 cm) across at its widest
- After Tier 3: 4.2 in (10.7 cm) total height, with Tier 3 about 2.0 in (5.1 cm) across
- After the trunk: 4.8 in (12.2 cm) total height; the trunk is 0.9 in (2.3 cm) wide × 0.6 in (1.5 cm) tall
- After the border: 3.9 in (9.9 cm) × 5.3 in (13.5 cm)
If Row 1 comes out wider than 3.4 in (8.6 cm), go down one hook size. If it’s narrower, go up one size. Check the fans too: if they cup instead of lying flat, your rays are too tight, so loosen up on the dc and ch-1 rows.
Tier 1 (Largest Tier)
Use sage green.
Row 1 (RS): Ch 19. Dc in 4th ch from hook and in next 5 ch. Ch 3, sk 3 ch (this makes the fan hole). Dc in last 7 ch. Turn.
(14 dc and 1 ch-3 sp = 17 sts across; the skipped 3 ch count as the first dc.)
Row 2 (WS): Sl st in first 3 dc. Ch 4 (counts as dc + ch 1), sk next dc, dc in next dc, sk next 2 dc, 11 dc in ch-3 sp, sk next 2 dc, dc in next dc, ch 1, sk next dc, dc in next dc. Leave the last 2 dc unworked. Turn.
(15 dc, including the 11-dc fan, and 2 ch-1 sps.)
Row 3 (RS): Sl st in first dc, next ch-1 sp and next dc. Ch 4 (counts as dc + ch 1), [dc in next dc, ch 1] 11 times across the fan, dc in next dc. Leave the last ch-1 sp and the turning ch unworked. Turn.
(13 dc and 12 ch-1 sps. The 11 fan stitches now open into rays.)
Row 4 (WS): Ch 1, sc in first dc, [ch 3, sc in next dc] 12 times, working the last sc in the 3rd ch of the turning ch. Fasten off.
(13 sc and 12 ch-3 arches.)
The slip-stitch steps in Rows 2 and 3 pull the edges in by 2 stitches on each side, so the tier tapers while the fan domes upward. The center sc of Row 4 is sc 7, with arch 6 and arch 7 on either side of it.
Tier 2 (Middle Tier)
Row 5 (RS): With RS facing, join sage green with a sl st in arch 6 of Row 4. Ch 3 (counts as dc), 2 dc in same arch. Ch 3. Then 3 dc in arch 7. Turn.
(6 dc and 1 ch-3 sp. The ch-3 bridges the center sc and forms the next fan hole.)
Row 6 (WS): Ch 4 (counts as dc + ch 1), sk next dc, dc in next dc, 9 dc in ch-3 sp, dc in next dc, ch 1, sk next dc, dc in top of beginning ch-3. Turn.
(13 dc, including the 9-dc fan, and 2 ch-1 sps.)
Row 7 (RS): Sl st in first dc, next ch-1 sp and next dc. Ch 4 (counts as dc + ch 1), [dc in next dc, ch 1] 9 times across the fan, dc in next dc. Leave the last ch-1 sp and the turning ch unworked. Turn.
(11 dc and 10 ch-1 sps.)
Row 8 (WS): Ch 1, sc in first dc, [ch 3, sc in next dc] 10 times, working the last sc in the 3rd ch of the turning ch. Fasten off.
(11 sc and 10 ch-3 arches. The center sc is sc 6, with arch 5 and arch 6 on either side.)
Tier 2 starts narrow, about 1.8 in (4.6 cm), on top of Tier 1. Its fan then spreads wider than that base, and the overhang creates the first step in the tree outline.
Tier 3 (Top Tier)
Row 9 (RS): With RS facing, join sage green with a sl st in arch 5 of Row 8. Ch 3 (counts as dc), dc in same arch. Ch 3. Then 2 dc in arch 6. Turn.
(4 dc and 1 ch-3 sp.)
Row 10 (WS): Ch 3 (counts as dc), sk next dc, 7 dc in ch-3 sp, sk next dc, dc in top of beginning ch-3. Turn.
(9 dc.)
Row 11 (RS): Ch 4 (counts as dc + ch 1), [dc in next dc, ch 1] 7 times, dc in top of beginning ch-3. Turn.
(9 dc and 8 ch-1 sps.)
Row 12 (WS, tip row): Ch 1, sc in first dc, [ch 3, sc in next dc] 3 times, ch 3, (sc, ch 3, sc) in next dc (the center dc, which forms the tip), [ch 3, sc in next dc] 4 times. Fasten off.
(10 sc and 9 ch-3 sps: 4 arches on each side plus 1 tip arch.)
Trunk
Use tan. You work the trunk sideways in short rows. Every up-row attaches to the free loops of the Row 1 foundation chain. Number the foundation loops 1 to 17 from one edge; the trunk uses the center loops, 7 to 11.
Row 1: With RS facing and the tree upside down, join tan with a sl st in loop 7. Ch 4. Sc in 2nd ch from hook and in next 2 ch (3 sc). Sl st in loop 8. Turn.
Row 2: Sk the sl st, sc BLO in each of the 3 sc. Turn.
Row 3: Ch 1, sc BLO in each of the 3 sc, sl st in loop 9. Turn.
Rows 4–7: Repeat Rows 2–3 twice. The sl sts go into loops 10 and 11. Fasten off after Row 7.
(7 rows of 3 sc each.) The BLO ridges run vertically, which gives the trunk its knit-like columns. It measures 0.9 in (2.3 cm) wide × 0.6 in (1.5 cm) tall.
Border
Border gauge: about 5 sc per inch (2.5 cm) along the edges. Use these placement rules:
– 2 sc in each dc row-end
– 1 sc in each sc row-end
– 3 sc in each free ch-3 arch
– 1 sc in each stitch or space along a slip-stitch step
– 1 sc in each free foundation loop
Arches that are covered by the tier above get no stitches.
Rnd 1: With RS facing, join cream with a sl st in the tip ch-3 sp. Ch 1, 2 sc in the same sp. Then work around the tree as follows.
Side (66 sc per side, worked downward):
– Tier 3 (19 sc): 3 sc in each of 4 arches (12), 1 sc in the Row 12 end, then 2 sc in each of the Row 11, 10 and 9 ends (6).
– Tier 2 (21 sc): 3 sc in each of the 4 free arches of Row 8 (12), 1 sc in the Row 8 end, 2 sc in the Row 7 end, 2 sc along the step, then 2 sc in each of the Row 6 and Row 5 ends (4).
– Tier 1 (26 sc): 3 sc in each of the 5 free arches of Row 4 (15), 1 sc in the Row 4 end, 2 sc in the Row 3 end, 2 sc along the step, 2 sc in the Row 2 end, 2 sc along the step, and 2 sc in the Row 1 end.
Bottom (31 sc):
– 3 sc in loop 1 (corner)
– 1 sc in each of loops 2–6 (5)
– 3 sc down the trunk side
– 2 sc in the first trunk row-end, 1 sc in each of the next 5 row-ends, and 2 sc in the last row-end (9)
– 3 sc up the other trunk side
– 1 sc in each of loops 12–16 (5)
– 3 sc in loop 17 (corner)
Second side: 66 sc, mirroring the first side (Tier 1, then Tier 2, then Tier 3, working upward).
Tip: 2 sc in the tip sp, ch 2, then sl st to the first sc.
Total: 66 + 31 + 66 + 4 tip sc = 167 sc, plus 1 ch-2 tip sp.
Don’t add extra stitches at the inside corners where one tier meets the next. A plain sc there lets the notch stay crisp.
Rnd 2: Ch 1. Rsc in each sc around (167 rsc). In the tip ch-2 sp, work (rsc, ch 18, rsc); the ch-18 is the hanging loop. Sl st to the first rsc and fasten off.
(169 rsc in total, plus the ch-18 loop.)
Why the math works: Each dc row-end is 0.4 in (1.0 cm) tall, and at 5 sc per inch that takes exactly 2 sc. Each ch-3 arch spans about 0.6 in (1.5 cm), which takes 3 sc. The 3-sc base corners turn the 90-degree corners without cupping. The ch-2 at the tip keeps the point sharp. Both sides use identical counts because every shaping step is symmetric. The sc round plus the crab-stitch round adds 0.25 in (0.6 cm) all around, so 3.4 in (8.6 cm) becomes 3.9 in (9.9 cm) wide and 4.8 in (12.2 cm) becomes 5.3 in (13.5 cm) tall.
Final Blocking
- Weave in all ends along the matching color: green into the rays, cream into the border, tan into the trunk.
- Lay the ornament RS up on a blocking mat.
- Pin the tip, both base corners and the two bottom trunk corners first.
- Pin each notch where one tier steps out over the one below, so the steps match on both sides.
- Open each fan with your fingertips until the rays are evenly spaced and the hole at the base of each fan is round.
- Check the size: 3.9 in (9.9 cm) wide × 5.3 in (13.5 cm) tall.
- Mist the piece until it’s damp, not soaked, and let it dry completely before you unpin it.
- For a stiffer hanging ornament, brush on a light fabric stiffener before it dries.
Final Quality-Control Checklist
- The fans have 11, 9 and 7 rays, from the bottom tier to the top.
- Each fan hole sits centered above the tier below it.
- Both sides of each tier have the same number of arches and steps.
- The trunk is centered on foundation loops 7–11.
- Border Rnd 1 has 167 sc and Rnd 2 has 169 rsc.
- The tip comes to a clear point and the hanging loop is centered.
- The finished size is within 0.2 in (0.5 cm) of 3.9 in × 5.3 in (9.9 cm × 13.5 cm).
- No ends show on the right side.
Troubleshooting
The fans ruffle or cup. The ch-1 spaces in the ray rows are too tight. Loosen them, or go up half a hook size for Rows 3, 7 and 11 only.
One side of the tree is shorter than the other. You probably slip-stitched over the wrong number of stitches in a step row. Recount Rows 2, 3 and 7.
The upper tier sits off-center. Count the arches again before joining. Tier 2 goes into arches 6–7 of 12, and Tier 3 goes into arches 5–6 of 10.
The border waves. You have too many stitches, often at the notches. Stick strictly to the placement rules.
The border pulls the edges in. You have too few stitches, or your rsc is tight. Work Rnd 2 with a slightly looser hand.
The trunk flares. Make sure each row has exactly 3 sc and that only the up-rows attach to the foundation.
Care
Hand wash in cool water with mild soap, press out the water in a towel, and reshape the ornament flat to dry. Store it flat or hanging so the loop doesn’t crush.
Final Notes
Here is the measurement chain. With a gauge of 5 stitches per inch, Row 1 is 17 stitches wide, or 3.4 in (8.6 cm). The three tiers build to a height of 4.2 in (10.7 cm), and the trunk brings that to 4.8 in (12.2 cm). The two-round border of 167 sc and 169 rsc adds 0.25 in (0.6 cm) on every edge, for a finished ornament of 3.9 in (9.9 cm) × 5.3 in (13.5 cm). If you check each stage against its checkpoint, every tree in a batch will match.
Happy crocheting!