

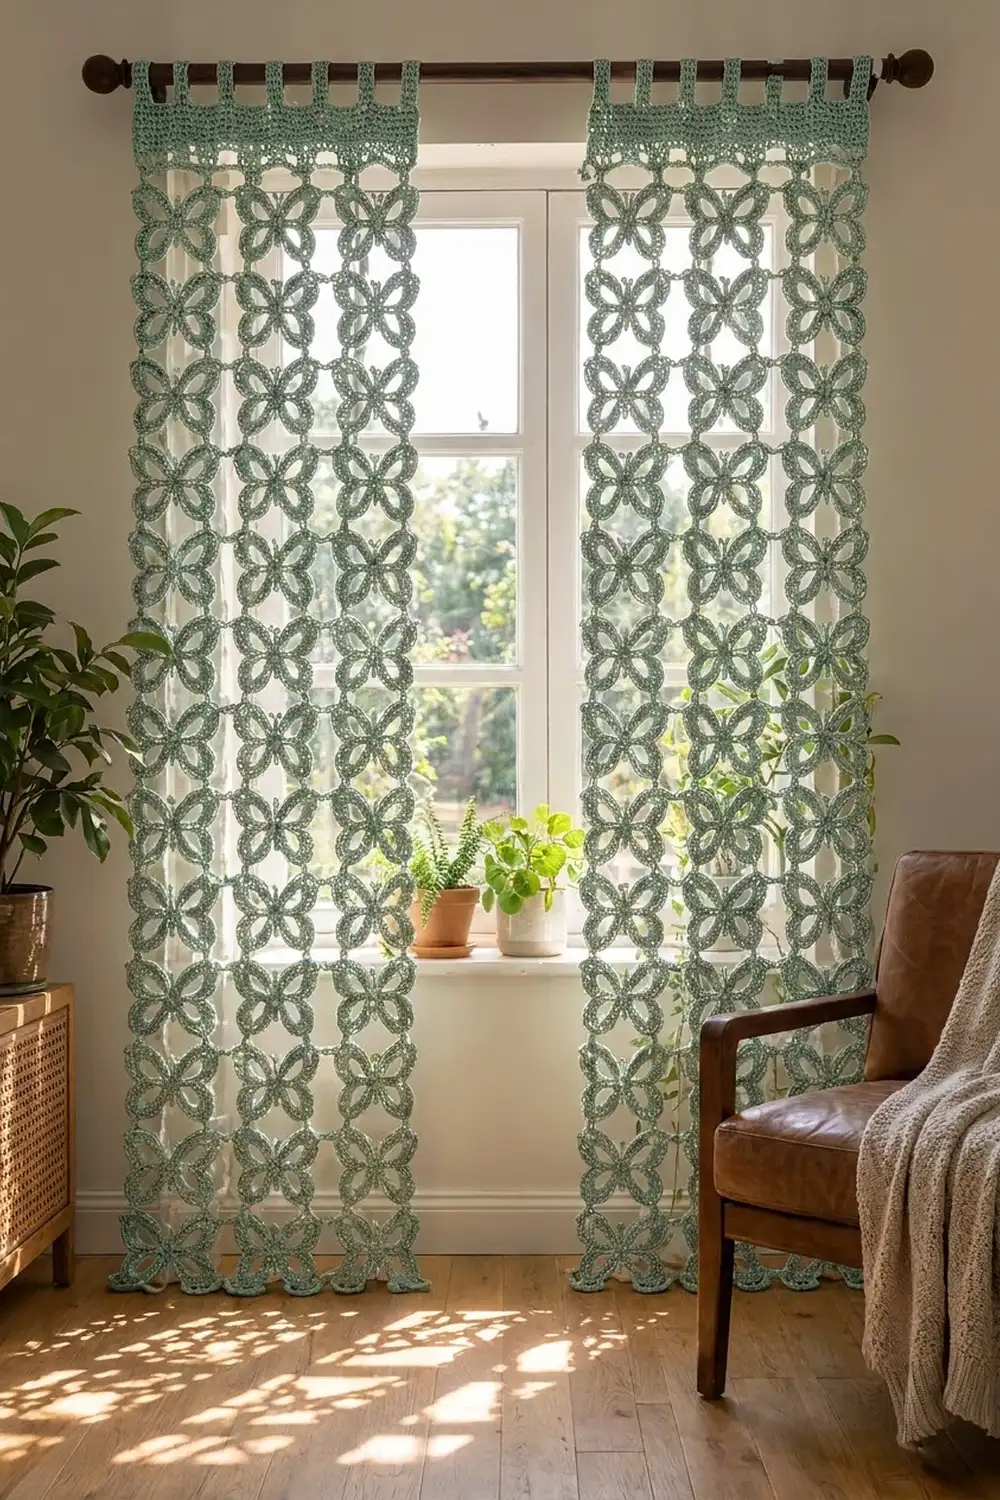
This curtain pair is made entirely from open butterfly motifs in soft sage green. Each butterfly has four padded wing loops around a small center ring, a wrapped body and two short antennae. Hundreds of little openings let light through, so the curtain filters the sun instead of blocking it.
The design uses one color, a muted sage green in worsted-weight cotton. The look is airy, botanical and calm. It suits a bright window, a reading corner or a doorway.
The pattern uses US crochet terms. Each finished panel measures 20 in (50.8 cm) wide and 77 in (195.6 cm) long, including the tab loops. You make two identical panels.
The construction is simple and repetitive. You crochet butterfly motifs and join them as you go at the wing tips, 5 across and 18 down. Then you work a solid header band across the top edge and add 6 tab loops for the rod.
Finished Size and Construction
- Finished panel size: 20 in (50.8 cm) wide x 77 in (195.6 cm) long, including tabs
- Skill level: Intermediate
- Terminology: US crochet terms
- Yarn weight: Worsted (#4) cotton
- Hook: 4.5 mm (US 7)
- Number of pieces: 2 panels, each with 90 butterfly motifs (180 total)
- Layout per panel: 5 motifs across x 18 motifs down
- Motif size: 4 in x 4 in (10.2 cm x 10.2 cm), wing tip to wing tip, blocked
- Motif area before header: 20 in x 72 in (50.8 cm x 182.9 cm)
- Header band depth: 3 in (7.6 cm)
- Tab loop depth: 2 in (5.1 cm) when folded
Materials
Choose a smooth mercerized or combed worsted cotton. Cotton holds the wing loops open and hangs straight. Avoid fuzzy or very stretchy acrylic, which lets a long panel grow.
- Sage Green: 800 g / 1,520 m (about 8 balls of 100 g / 190 m)
These amounts include a margin of about 25% for gauge swatches, tails and differences between yarn brands.
Tools:
- 4.5 mm (US 7) crochet hook
- Tapestry needle
- Scissors
- Stitch markers
- Rust-proof pins and a blocking mat or folded towels
- Spray bottle
- Measuring tape
Abbreviations (US Terms)
- ch – chain
- sl st – slip stitch
- sc – single crochet
- hdc – half double crochet
- dc – double crochet
- st(s) – stitch(es)
- sp – space
- sk – skip
- rep – repeat
Special stitches:
- Tip picot: Ch 3. This sits at the outer point of each wing and becomes a joining point.
- Joining picot: Ch 1. Remove the hook and insert it from front to back through the neighboring motif’s tip picot (or its joined point). Pick up the dropped loop, pull it through, then ch 1. Use this instead of a tip picot wherever a neighbor is already in place.
Gauge and Checkpoints
Motif gauge: One blocked motif = 4 in x 4 in (10.2 cm x 10.2 cm), measured between the outer tips of the picots.
Header gauge: 16 hdc and 12 rows = 4 in x 4 in (10.2 cm x 10.2 cm).
Make one full motif before anything else. Measure it, block it and measure it again.
Checkpoints:
- After Round 1, each long chain loop should reach about 1 1/2 in (3.8 cm) from the ring when stretched lightly.
- After Round 2, the unblocked motif should measure about 3 3/4 in (9.5 cm) tip to tip.
- After blocking, it should open to 4 in (10.2 cm) in both directions.
If your motif is too big, go down to a 4 mm hook. If it is too small, go up to a 5 mm hook. Being off by 1/4 in (0.6 cm) per motif adds up to 4 1/2 in (11.4 cm) over 18 motifs, so take gauge seriously.
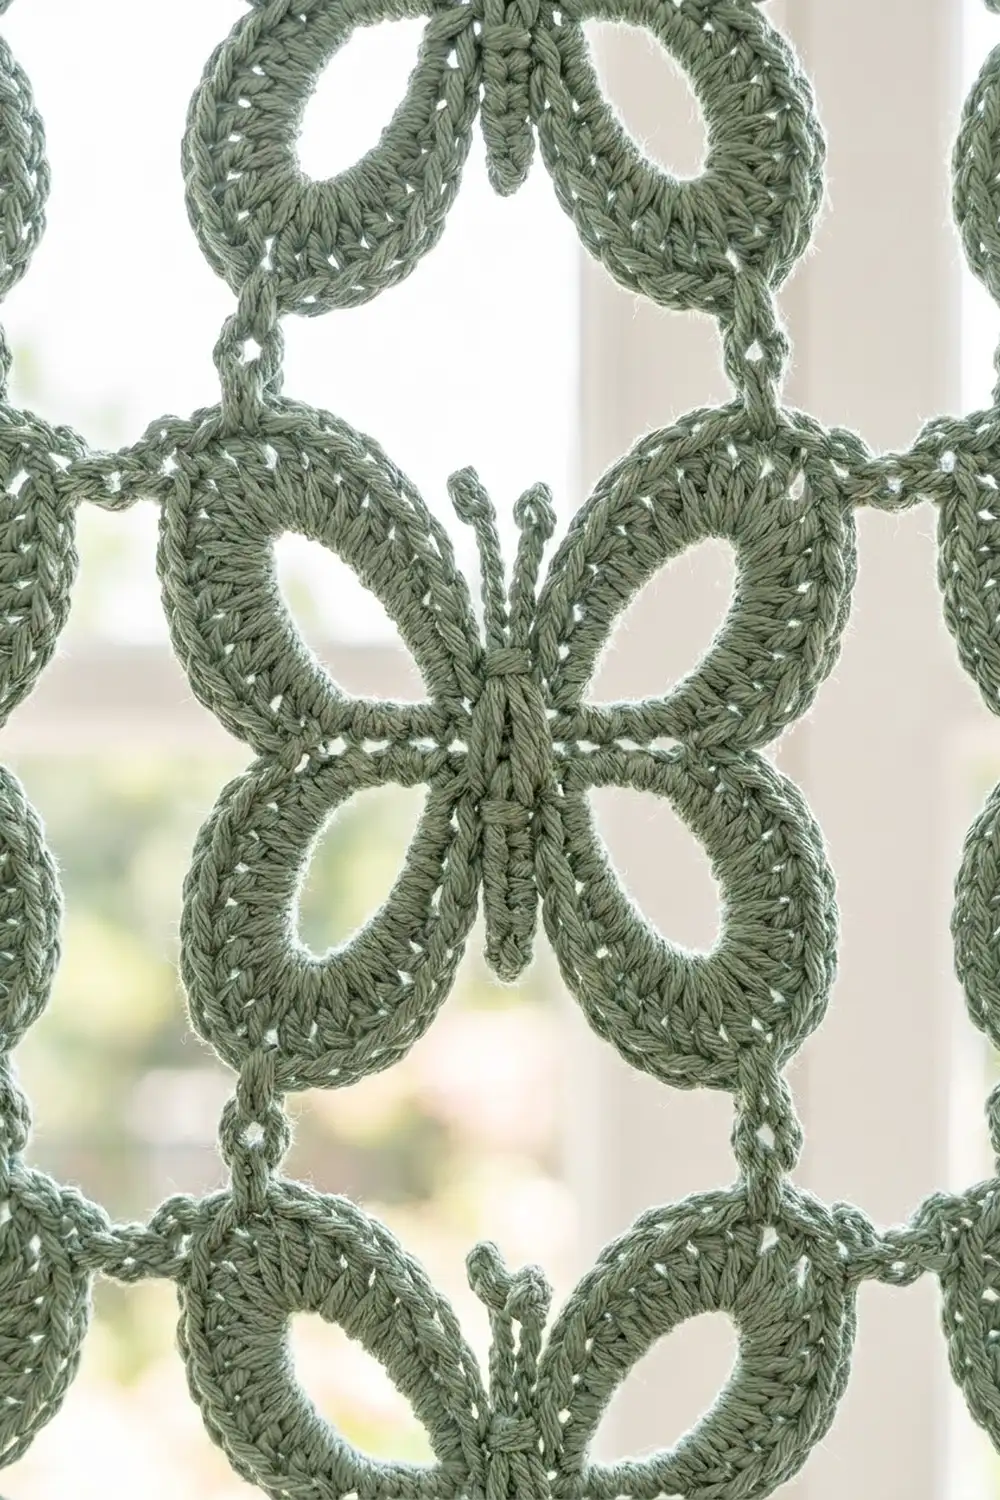
Butterfly Motif
You work the motif in the round around a small center ring. The upper wings are larger than the lower wings, and every wing ends in a picot at its outer point.
Ring: Ch 4, sl st in first ch to form a ring.
Round 1 (wing loops): Ch 14, sl st in ring (upper right wing). Ch 12, sl st in ring (lower right wing). Ch 12, sl st in ring (lower left wing). Ch 14, sl st in ring (upper left wing).
(4 chain loops: 2 loops of 14 ch and 2 loops of 12 ch.)
Space the four sl sts evenly around the ring so the loops point toward the four corners of a square.
Round 2 (padding the wings): Work around each chain loop, not into the chains.
- Upper right wing (ch-14 loop): sc, hdc, 9 dc, tip picot, 9 dc, hdc, sc. Sl st in ring.
- Lower right wing (ch-12 loop): sc, hdc, 7 dc, tip picot, 7 dc, hdc, sc. Sl st in ring.
- Lower left wing (ch-12 loop): sc, hdc, 7 dc, tip picot, 7 dc, hdc, sc. Sl st in ring.
- Upper left wing (ch-14 loop): sc, hdc, 9 dc, tip picot, 9 dc, hdc, sc. Sl st in ring.
Stitch count: 22 sts on each upper wing and 18 sts on each lower wing = 80 sts total, plus 4 tip picots and 4 sl sts in the ring.
Packing 22 sts onto a 14-ch loop is on purpose. Crowding the stitches makes the wing ridge stand up thick and round and leaves a clean open teardrop in the center of each wing.
Antennae: Sl st along the ring to the top center, between the two upper wings. Ch 6, sl st in 2nd ch from hook and in each of the next 4 ch, then sl st in ring. Repeat once for the second antenna. Fasten off, leaving a 16 in (40.6 cm) tail.
Body: Thread the tail on a tapestry needle. Wrap it vertically over the center ring 8 times, from just below the antennae to just below the lower wings. Pull each wrap snug so the body forms a raised, rounded bar. Secure the tail on the back and weave it in.
Make All Pieces
You need 90 motifs per panel, or 180 in total, all in Sage Green. Finish one panel completely before starting the second.
Layout for each panel (B = one butterfly motif, joined at every tip it touches):
Row  1:  B  B  B  B  B   <- header attaches here
Row  2:  B  B  B  B  B
Row  3:  B  B  B  B  B
 ...     (Rows 4-16 repeat the same way)
Row 17:  B  B  B  B  B
Row 18:  B  B  B  B  B   <- bottom edge, left open
Each panel: 5 columns x 18 rows = 90 motifs.
Joining As You Go
Motifs join only at the tip picots. Neighboring motifs touch point to point, which creates the open grid of diamonds between the butterflies.
Which picots join:
- A motif’s upper left picot joins the motif to its left (that motif’s upper right picot) and the motifs above.
- A motif’s lower left picot joins the motif to its left (that motif’s lower right picot).
- A motif’s upper right picot joins the motif above (that motif’s lower right picot).
Work Round 2 of each new motif as written, but use a joining picot instead of a tip picot wherever a neighbor already exists. Work the first motif of each panel with all 4 tip picots.
Four-way corners: Where four motifs meet, two or three picots are already joined. Work the joining picot into the very first picot of that group. All of them then share one strong point instead of forming a chain of links.
Tension: Keep the ch 1 on each side of the join at the same tension as a normal chain. If you pull it tight, the corners pucker. If you leave it loose, the grid sags.
Order: Work each motif row from left to right, then start the next row down with its left-hand motif. Leave the top row’s upper picots as tip picots, because the header attaches there.
Size checkpoint: After the first row of 5 motifs, the strip should measure 20 in (50.8 cm) wide when lightly stretched. After 4 rows, the piece should measure 20 in x 16 in (50.8 cm x 40.6 cm).
Header Band and Tabs (Border)
The only border on this curtain is the solid band across the top. The sides and lower edge stay as open butterfly points.
Border gauge: 16 sts = 4 in (10.2 cm), so each 4 in (10.2 cm) motif needs exactly 16 sts across its top.
Row 1 (foundation): With the right side facing, join yarn in the upper left tip picot of the top-left motif and ch 1. *Sc in the tip picot (or joined point), ch 7, sc in the base of the antennae (the top sl st on the ring, keeping the antennae in front), ch 7; repeat from * across all 5 motifs. Sc in the upper right tip picot of the last motif. Turn.
Count: 16 sts per motif (1 sc + 7 ch + 1 sc + 7 ch) x 5 motifs = 80 sts, plus 1 closing sc on the final tip = 81 sts.
You work each joined top point between two motifs only once, as the first sc of the next motif’s repeat, so no stitches are added at the seams.
Why the math works: The first and last sc sit exactly on the outer tips. Between them are 80 stitch widths, and 80 sts at 4 sts per inch is 20 in (50.8 cm), the same width as the motif area.
Row 2: Ch 2 (does not count as a st), hdc in each sc and each ch across. Turn. (81 hdc)
Rows 3–9: Ch 2, hdc in each st across. Turn. (81 hdc per row)
The header is now about 3 in (7.6 cm) deep: 8 hdc rows at 3 rows per inch, plus the height of Row 1. Fasten off.
Tabs: Each panel has 6 tabs, each 5 sts wide.
Stitch placement across the 81 sts of Row 9:
- Edge margin: sts 1–3
- Tab 1: sts 4–8
- Gap: sts 9–17 (9 sts)
- Tab 2: sts 18–22
- Gap: sts 23–31
- Tab 3: sts 32–36
- Gap: sts 37–45
- Tab 4: sts 46–50
- Gap: sts 51–59
- Tab 5: sts 60–64
- Gap: sts 65–73
- Tab 6: sts 74–78
- Edge margin: sts 79–81
Check: 3 + (6 x 5) + (5 x 9) + 3 = 81 sts.
For each tab: Join yarn in the first st of the tab, ch 2, and hdc in the same st and the next 4 sts. (5 hdc) Work 11 more rows of 5 hdc, for 12 rows in total, or 4 in (10.2 cm). Fasten off, leaving a 12 in (30.5 cm) tail. Fold the tab to the back and sew its last row along Row 9. This makes a loop 2 in (5.1 cm) deep and 1 1/4 in (3.2 cm) wide.
Repeat the header and tabs on the second panel.
Final Blocking
- Lay one panel flat on towels or a blocking mat. Work in sections if your space is smaller than the panel.
- Mist it evenly with water until damp but not dripping.
- Pin the four corners of the motif area to 20 in x 72 in (50.8 cm x 182.9 cm).
- Pin every joined tip point along the side edges so the columns run straight.
- Gently open each wing loop with a fingertip so the teardrop centers are even.
- Straighten the header to 20 in x 3 in (50.8 cm x 7.6 cm) and flatten the tabs.
- Lift the antennae slightly so they curl outward.
- Let the panel dry completely before unpinning. Block the second panel the same way.
Final Quality-Control Checklist
- Each panel has 90 motifs in a 5 x 18 grid.
- Every interior corner is joined at a single shared point.
- On every motif, the upper wings are larger than the lower wings, and all butterflies face up.
- Each motif blocks to 4 in x 4 in (10.2 cm x 10.2 cm).
- Header Row 1 has 81 sts, and every hdc row has 81 sts.
- Each panel has 6 evenly placed tabs, each 5 sts wide.
- Both panels measure 20 in x 77 in (50.8 cm x 195.6 cm).
- All tails are woven in and can’t be seen from the front.
Troubleshooting
Wings look flat and thin. Make sure you work Round 2 around the chain loop, not into the individual chains. The crowded stitches create the padded ridge.
Wing loops are lopsided. The sl sts in the ring bunched together. Space them evenly around the ring on Round 1.
Corners pucker. The joining chains are too tight. Loosen the ch 1 on each side of the join.
Panel is wider at the top than the bottom. Your header tension is too loose. Go down one hook size for the header only and recount 81 sts.
Header ripples. You added stitches at the joined top points. Work each shared point only once.
Panel grows longer after hanging. Some stretch is normal with long lace. Block it, hang it for a day, then block again if needed.
Tabs twist. Sew each folded tab flat and straight, lining up its 5 sts with the 5 header sts beneath it.
Care
Hand wash in cool water with a mild detergent, then press out the water in a towel. Dry flat and pin the outer corners again so the panel keeps its shape.
Final Notes
Every size in this curtain comes from one measurement: a single motif blocked to 4 in (10.2 cm). Five motifs give 20 in (50.8 cm) of width, and 18 motifs give 72 in (182.9 cm) of length. The header has 81 sts, worked as 16 sts per motif plus 1 closing stitch, so it matches that width exactly. The 3 in (7.6 cm) header and 2 in (5.1 cm) tabs bring each panel to 77 in (195.6 cm).
Check your first motif and keep your joins even, and the panels will hang straight and full of light.
Happy crocheting!