

This curtain panel looks like a climbing garden caught in lace. Cream five-petal flowers with wheat centers sit in green vine rings, and four ridged sage leaves reach out from each ring. All of it floats in an open cream chain mesh, so soft light comes through.
The palette has three colors: cream, muted sage, and a little warm wheat. It has a cottage, Irish-lace look, but the build is modular and easy to repeat, so you don’t need freeform skills.
The pattern uses US crochet terms. One finished panel measures 44 in wide x 86 in long (111.8 x 218.4 cm), plus hanging loops. The photo shows a matching pair, so make two panels for one window.
Each square motif is worked from the center out: flower, vine ring, leaves, then cream mesh. The motifs are joined as you go in their last round, so there’s no sewing. A three-round scalloped border and hanging loops finish the panel.
Finished Size and Construction
- Finished panel size: 44 x 86 in (111.8 x 218.4 cm)
- Skill level: Intermediate
- Terminology: US crochet terms
- Yarn weight: Sport weight (#2) cotton
- Hook: 3.25 mm (US D/3)
- Number of pieces: 98 motifs per panel (196 for the pair)
- Layout: 7 motifs wide x 14 motifs tall
- Motif size: 6 x 6 in (15.2 x 15.2 cm), blocked
- Size before border: 42 x 84 in (106.7 x 213.4 cm)
- Border depth: 1 in (2.5 cm) on every side
Materials
Choose a smooth, mercerized sport-weight cotton or cotton blend. It holds its shape and shows the leaf ridges clearly. Fuzzy yarns blur the mesh, so avoid them.
Per panel:
– Color A, Cream: 400 g / about 1,200 m (flowers, mesh, border, loops)
– Color B, Sage Green: 275 g / about 825 m (vine rings, leaves)
– Color C, Wheat: 40 g / about 120 m (flower centers)
For the pair: 800 g / 2,400 m of A, 550 g / 1,650 m of B, and 80 g / 240 m of C.
These amounts include a margin of about 15% for gauge differences and swatching.
Tools:
– 3.25 mm (US D/3) crochet hook
– Tapestry needle
– Scissors
– Stitch markers
– Blocking mats, rustproof pins, and blocking wires
– Spray bottle
– 8 curtain rings with eyelets per panel (16 for the pair)
Abbreviations (US Terms)
- ch – chain
- sl st – slip stitch
- sc – single crochet
- hdc – half double crochet
- dc – double crochet
- tr – treble crochet
- BPsc – back post single crochet
- sk – skip
- sp(s) – space(s)
- st(s) – stitch(es)
- rnd(s) – round(s)
Special stitch – Leaf:
1. Ch 13. Sl st in the 2nd ch from the hook and in each of the next 11 ch. That’s 12 sl sts, and you are back at the base. This row is the center vein.
2. Working up the free loops on the other side of the chain, work sc, hdc, 2 dc, 4 tr, 2 dc, hdc, sc (12 sts).
3. At the tip, work (sc, ch 2, sc) around the turning ch.
4. Working back down along the sl st vein, work sc, hdc, 2 dc, 4 tr, 2 dc, hdc, sc (12 sts).
5. Sl st into the base st.
You now have 26 sts and a ch-2 tip sp. The leaf is about 2.25 in (5.7 cm) long, with a raised vein down its middle.
Gauge and Checkpoints
Make one complete motif and block it before you start the panel. Every later measurement depends on this square.
Gauge: 1 blocked motif = 6 x 6 in (15.2 x 15.2 cm).
Checkpoints:
– After Rnd 3 (flower): 1.75 in (4.4 cm) across
– After Rnd 5 (vine ring): 2.75 in (7.0 cm) across
– After Rnd 6: about 7 in (17.8 cm) from one leaf tip to the opposite leaf tip
– After Rnd 9, blocked: 6 in (15.2 cm) per side
If your motif is larger than 6.25 in (15.9 cm), go down one hook size. If it’s smaller than 5.75 in (14.6 cm), go up one size. A small error per motif adds up quickly over 14 rows.
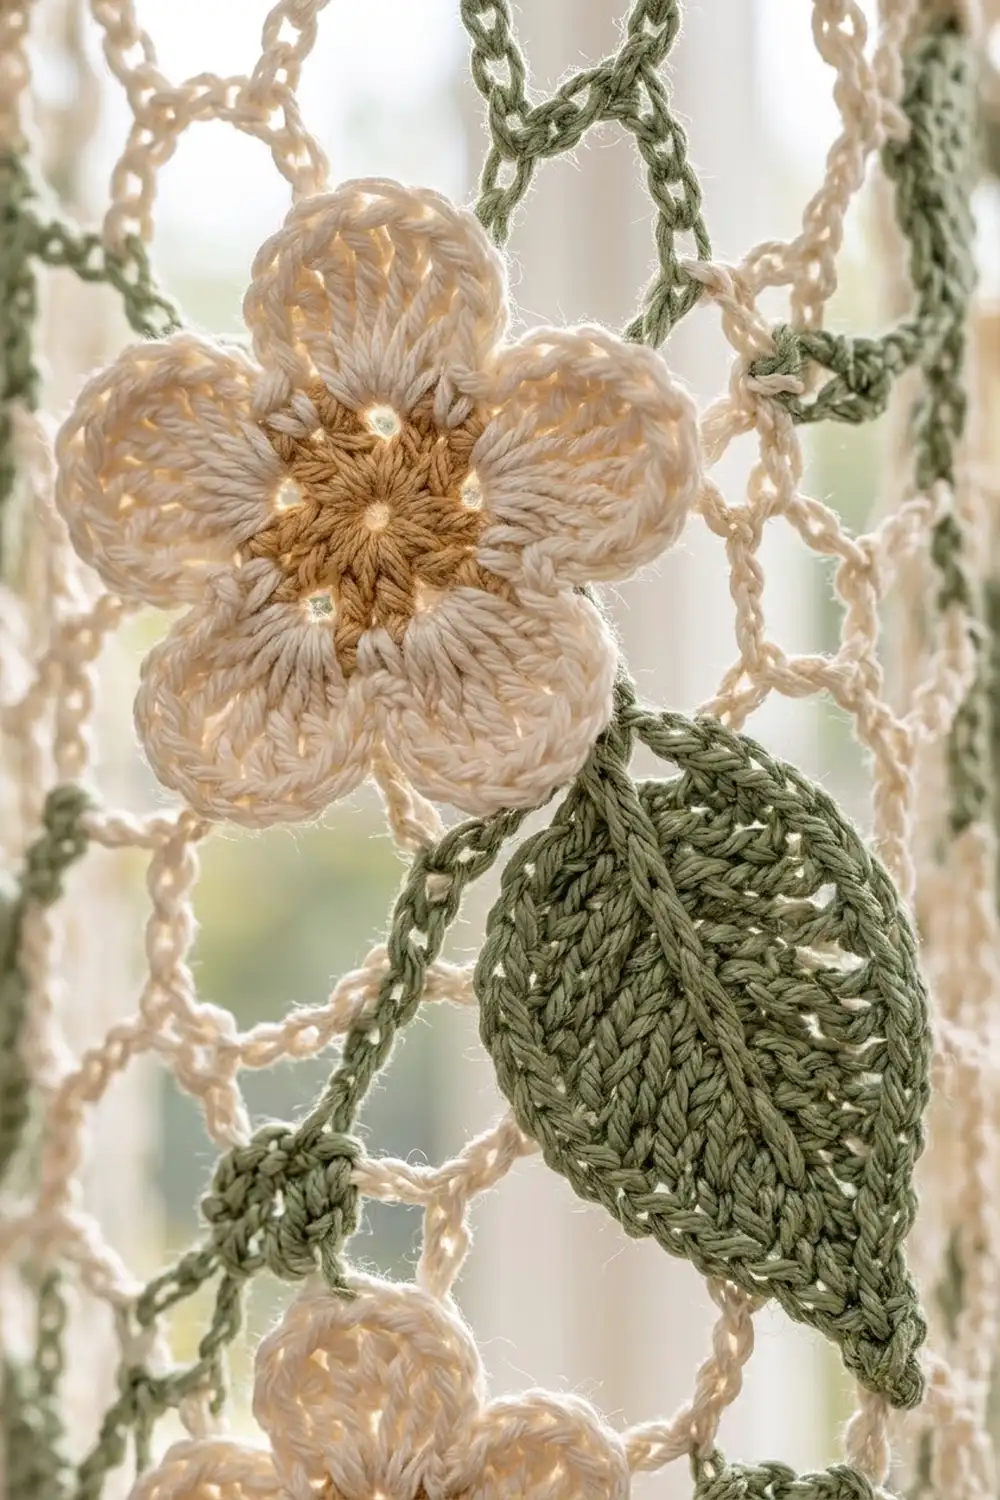
Motif (Make 98 per Panel)
Rnd 1 (C): In a magic ring, ch 1 and work 10 sc. Sl st to the first sc and pull the ring closed. (10 sc) Fasten off.
Rnd 2 (A): Join A in any sc. Ch 1, sc in the same st, ch 3, sk 1. Sc in the next st, ch 3, sk 1; repeat from * 4 more times. Sl st to the first sc. (5 sc, 5 ch-3 sps)
Rnd 3 (A, petals): In each ch-3 sp, work (sc, hdc, 3 dc, hdc, sc). Sl st to the first sc. (5 petals, 35 sts) Fasten off.
Rnd 4 (B): Turn the flower so the back faces you. Join B around the post of any Rnd 2 sc. Ch 1, BPsc around that same sc, ch 6. BPsc around the next Rnd 2 sc, ch 6; repeat from * 3 more times. Sl st to the first BPsc. (5 sc, 5 ch-6 loops) The loops sit behind the petals, so the flower stands forward.
Rnd 5 (B, vine ring): Sl st into the first loop. Ch 1 and work 8 sc in each ch-6 loop. Sl st to the first sc. (40 sc)
Rnd 6 (B, leaves): Ch 1. Sc in each of the next 9 sts, then sc in the next st and work a Leaf from it; repeat from * 3 more times. Sl st to the first sc. (40 ring sts plus 4 Leaves) There are 9 sc between each pair of leaf bases, and the leaves point toward the four corners. Fasten off.
Rnd 7 (A, first mesh): Join A in any leaf’s ch-2 tip sp. Ch 1 and work (sc, ch 3, sc) in that sp. Then repeat this side sequence 4 times:
– Ch 7, sc in the 3rd of the 9 ring sc.
– Ch 5, sk 3 sc, sc in the 7th of the 9 ring sc.
– Ch 7.
– Work (sc, ch 3, sc) in the next leaf tip. On the 4th repeat, skip this step and sl st to the first sc instead.
(4 corner ch-3 sps, 8 ch-7 sps, 4 ch-5 sps)
Rnd 8 (A): Sl st into the corner ch-3 sp. Ch 1 and work (sc, ch 5, sc) in that sp. Then repeat this side sequence 4 times:
– Ch 5, sc in the next ch-7 sp.
– Ch 5, sc in the ch-5 sp.
– Ch 5, sc in the next ch-7 sp.
– Ch 5, then work (sc, ch 5, sc) in the corner sp. On the 4th repeat, sl st to the first sc instead of working the corner.
(4 corner loops, 16 side loops, 4 per side)
Rnd 9 (A, final mesh): Sl st in the next 2 ch and into the corner loop. Ch 1 and work (sc, ch 5, sc) in that loop. Ch 5, sc in the next ch-5 loop, 4 times; ch 5, then work (sc, ch 5, sc) in the corner loop. Repeat from * 3 more times, but on the last repeat, sl st to the first sc instead of working the corner. (4 corner loops, 20 side loops, 5 per side) Fasten off.
Make All Pieces
Work all 98 motifs through Rnd 8. Finish Rnd 9 on the first motif normally, then finish Rnd 9 on the rest as you join them.
- Color C: Rnd 1, all 98 motifs
- Color A: Rnds 2–3 and 7–9, all 98 motifs
- Color B: Rnds 4–6, all 98 motifs
Layout grid (M = motif, 7 wide x 14 tall, top edge first):
MMMMMMM
MMMMMMM
MMMMMMM
MMMMMMM
MMMMMMM
MMMMMMM
MMMMMMM
MMMMMMM
MMMMMMM
MMMMMMM
MMMMMMM
MMMMMMM
MMMMMMM
MMMMMMM
Rotate the motifs as you place them, so the leaves look scattered instead of all leaning the same way.
Joining
Join as you go in Rnd 9. Build Row 1 from left to right, then join each new row to the row above it.
Sides: For each loop that meets a neighbor, replace “ch 5” with “ch 2, sl st in the matching loop of the finished motif, ch 2.” A joined side has 5 joined side loops plus the 2 joined corner loops. Loop 1 always meets loop 1, so the edges stay aligned.
Corners: In a shared corner, work sc, ch 2, sl st in the neighbor’s corner loop, ch 2, sc. Where 4 motifs meet, sl st into the sl st of the existing join. That locks all four corners at one point.
Tension: Keep the joining ch-2s at the same tension as your normal chains. Tight joins ridge the seams, and loose joins open gaps. Insert the hook from the front every time so all the joins lean the same way.
Size checkpoint: Row 1 should measure 42 in (106.7 cm) laid flat without stretching. Two rows should measure 12 in (30.5 cm) tall. If either is off by more than 1/2 in (1.3 cm), adjust your tension before you go on.
Border
Border gauge: 4 sc = 1 in (2.5 cm), worked into the ch loops.
Each motif side carries exactly 24 border sc:
– 4 sc in each of its 5 side loops (20 sc)
– 2 sc in the outer ch-2 half of each of its 2 corner loops (4 sc)
The corner halves are already counted in those 24 sc, so you add nothing extra at the seams.
Border Rnd 1 (A): Join A in the top left corner loop and ch 1. In each of the panel’s 4 outer corner loops, work (2 sc, ch 2, 2 sc). Along the edges, work 4 sc in each side loop and 2 sc in each corner ch-2 half. Sl st to the first sc.
– Top and bottom: 7 x 24 = 168 sc per side
– Long sides: 14 x 24 = 336 sc per side
– Total: 1,008 sc plus 4 corner ch-2 sps
Border Rnd 2 (A): Sl st into the corner sp. Ch 1 and work (sc, ch 3, sc) in that sp. Along each side, ch 3, sk 1 st, sc in the next st. End each side with a ch 3 into the next corner, and work (sc, ch 3, sc) in each corner.
– Top and bottom: 168 ÷ 2 = 84 ch-3 sps per side
– Long sides: 336 ÷ 2 = 168 ch-3 sps per side
– Plus 4 corner ch-3 sps
Border Rnd 3 (A, scallops): Work (sc, hdc, sc) in each side ch-3 sp. In each corner sp, work (sc, hdc, ch 2, hdc, sc). Sl st to join and fasten off.
– Top and bottom: 84 x 3 = 252 sts per side
– Long sides: 168 x 3 = 504 sts per side
Why the math works: Every motif side gives the same 24 sc. That puts 168 sc over 42 in (106.7 cm) and 336 sc over 84 in (213.4 cm), which is exactly 4 sc per inch on every side. Rnd 2 halves the count evenly, so each motif width gets 12 scallops (84 ÷ 7). The three rounds together add 1 in (2.5 cm) per side, so the panel finishes at 44 x 86 in (111.8 x 218.4 cm).
Hanging loops (8 per panel): On the top edge, place a loop at each top corner sp and between scallops 12/13, 24/25, 36/37, 48/49, 60/61, and 72/73. At each spot:
1. Join A.
2. Ch 10 and sl st in the same place.
3. Work 16 sc over the chain loop, then sl st to the border.
Each loop is about 1.5 in (3.8 cm) long, and the loops sit 6 in (15.2 cm) apart, one at each corner and one over each seam. Slip them onto the ring eyelets.
Final Blocking
- Weave in the ends along the green vine rings or inside the mesh chains.
- Soak the panel in cool water for 15 minutes. Press the water out gently without wringing.
- Roll the panel in towels to remove extra moisture.
- Lay it on mats in sections. Thread blocking wires through the border Rnd 2 sps on the long edges.
- Pin the panel to 44 x 86 in (111.8 x 218.4 cm).
- Open the corner loops, pin the leaf tips toward the corners, and shape the petals with your fingers.
- Let it dry completely before you hang it.
Final Quality-Control Checklist
- Each motif measures 6 in (15.2 cm) per side.
- Each motif has 5 petals, 40 ring sts, 4 leaves, and 5 side loops per side.
- Every leaf shows its raised center vein on the right side.
- All joins lean the same way, and every 4-way corner is locked at one point.
- Border counts are 168/336 sc, 84/168 sps, and 252/504 sts.
- The blocked panel measures 44 x 86 in (111.8 x 218.4 cm).
- There are 8 hanging loops, spaced 6 in (15.2 cm) apart.
- All ends are woven in and trimmed.
Troubleshooting
- Flower cups forward: The Rnd 4 loops are too tight. Loosen them or work ch 7.
- Leaves curl: Pin the leaf tips during blocking, and keep the tr sts looser next time.
- Motif ruffles: The mesh chains are too long. Use a hook one size smaller for Rnds 7–9.
- Motif pulls into a star shape: The Rnd 7 ch-7s are too tight. Loosen them.
- Seams form ridges: Match the tension of your joining chains to your normal chains.
- Border waves: Recount. Each motif side needs exactly 24 sc in Rnd 1.
- Panel grows after hanging: Re-block it, pinning the length 1 in (2.5 cm) shorter.
Care
Hand wash the panel in cool water with a mild detergent, then press out the water and dry it flat. Don’t tumble dry it, because the mesh can stretch.
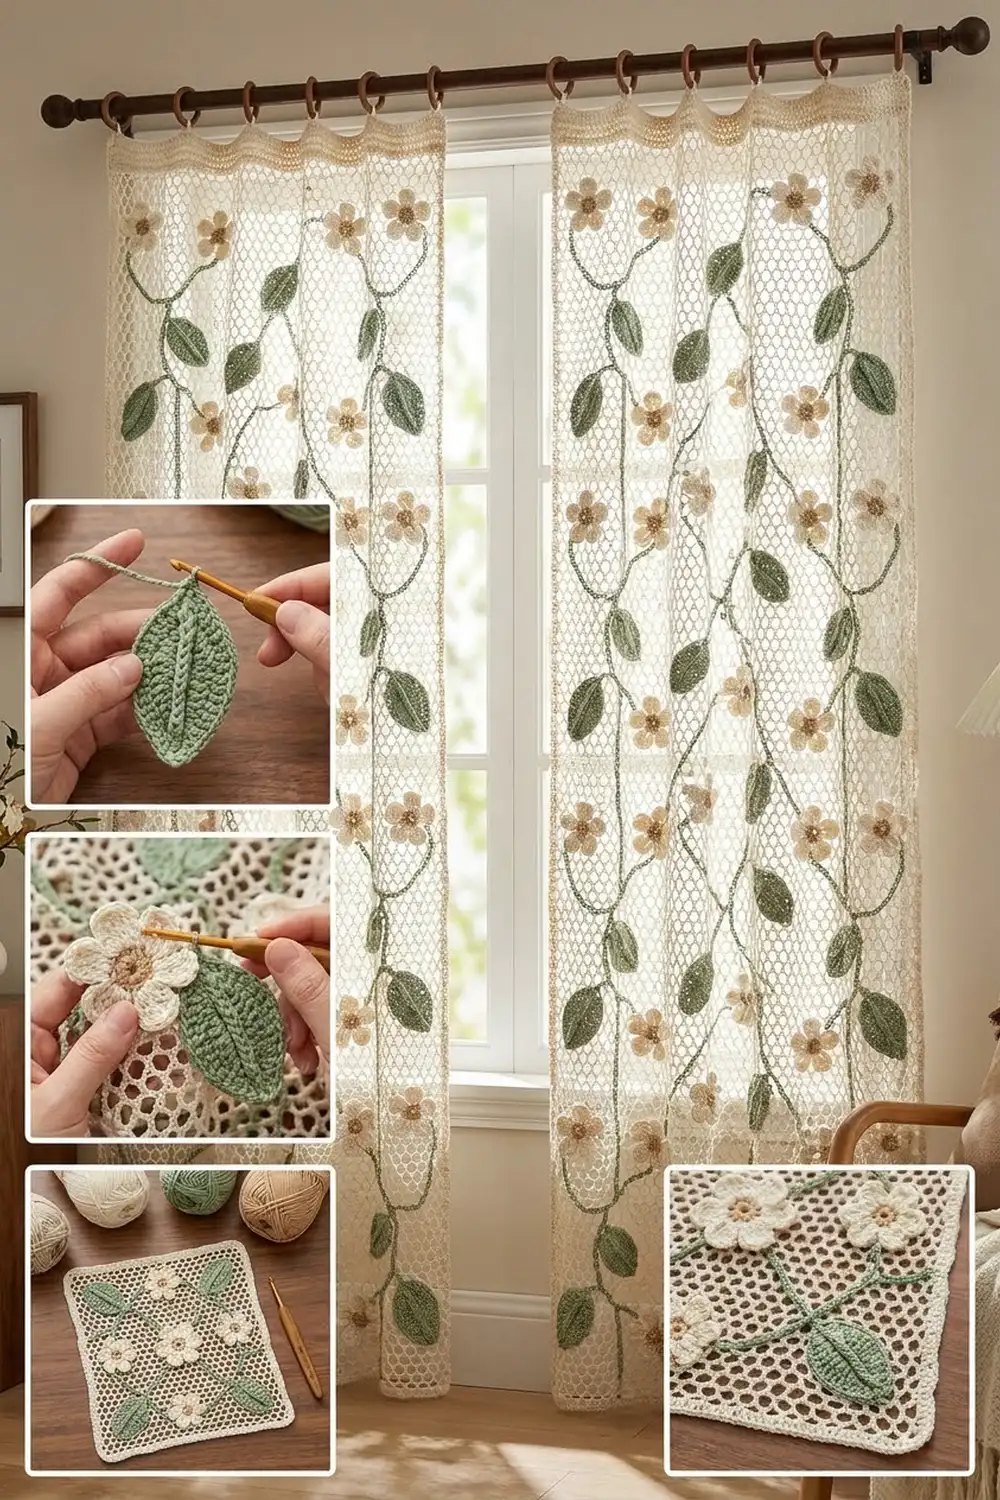
Final Notes
The measurement chain runs like this:
- A 1.75 in (4.4 cm) flower grows into a 2.75 in (7.0 cm) vine ring and then a 6 in (15.2 cm) square.
- Seven squares make 42 in (106.7 cm) across, and fourteen make 84 in (213.4 cm) down.
- A 1 in (2.5 cm) border brings each panel to 44 x 86 in (111.8 x 218.4 cm).
If your first motif comes out right, the rest of the panel will follow. Make two panels to dress the window.
Happy crocheting!