

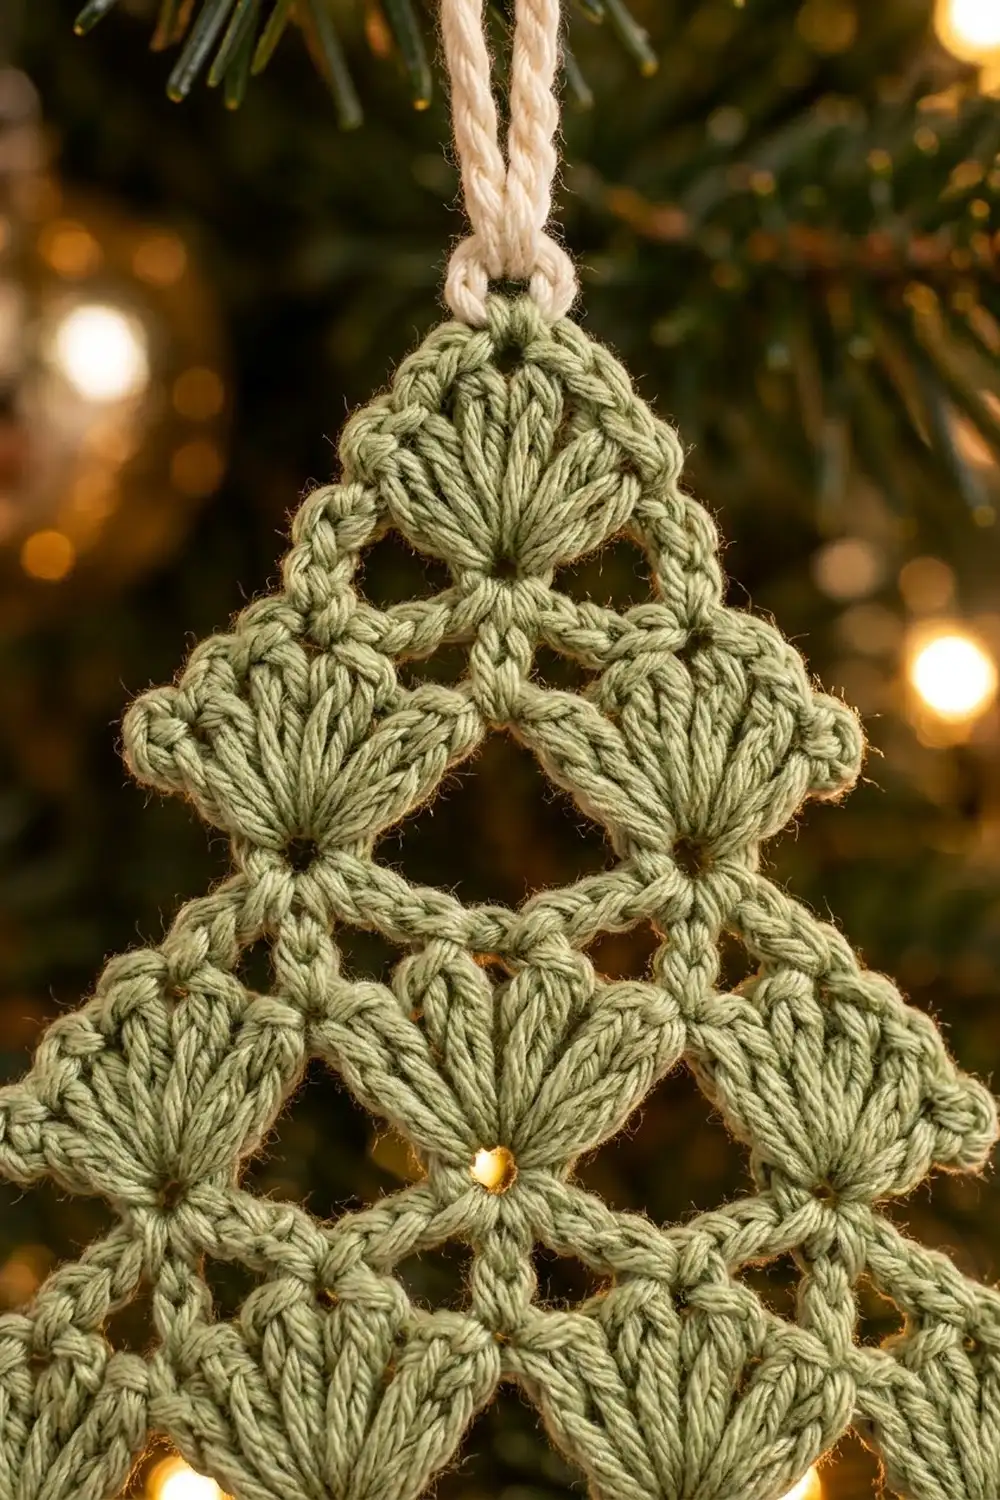
This little tree ornament is made of stacked shell fans: four across the bottom, then three, then two, and one at the tip. Small open windows between the fans let the tree lights show through, so it looks light and lacy on a branch.
The palette is simple. Soft sage green makes the tree, and warm cream makes the trunk and hanging loop. Mercerized cotton gives crisp stitches with a slight sheen, and the sage tone suits both rustic and modern trees.
The pattern uses US crochet terms. The finished ornament measures about 5 in (12.7 cm) wide and 4.25 in (10.8 cm) tall from the base of the trunk to the tip. The hanging loop adds about 2 in (5.1 cm) more.
Construction is quick. You work the tree flat in rows from the base up, alternating shell rows and lattice rows so each tier has one fewer fan. Then you add one single crochet border round, work the trunk in rows off the center of the base, and finish with a slip-stitched cream loop at the tip.
Finished Size and Construction
- Finished size: about 5 in (12.7 cm) wide × 4.25 in (10.8 cm) tall, not counting the loop
- Skill level: Easy
- Terminology: US crochet terms
- Yarn weight: Sport weight (CYC 2), mercerized cotton
- Hook: 2.5 mm
- Number of pieces: 1 (one ornament)
- Layout: single triangular tree with a centered trunk below and a hanging loop above
- Tree body size before border: about 4.7 in (11.9 cm) wide × 3.2 in (8.1 cm) tall
- Border depth: 1 round of sc, about 1/8 in (0.3 cm)
- Trunk: about 1 in (2.5 cm) wide × 0.75 in (1.9 cm) tall
- Hanging loop: about 2 in (5.1 cm) tall
Materials
Yarn: Use a sport weight mercerized cotton (CYC 2). Cotton keeps the shells crisp, blocks flat and doesn’t stretch out of shape when the ornament hangs. Acrylic works too, but the fans will look softer and rounder. Most sport cottons give about 3.1 m per gram.
- Sage green (tree and border): 12 g, about 37 m
- Cream (trunk and loop): 4 g, about 12 m
These amounts are for one ornament and include a small margin for your gauge swatch and weaving in ends.
Tools:
– 2.5 mm crochet hook
– Tapestry needle
– Scissors
– 2 stitch markers
– Blocking mat and rustproof pins
– Spray bottle with water
– Ruler or tape measure
Abbreviations (US Terms)
- ch – chain
- sl st – slip stitch
- sc – single crochet
- dc – double crochet
- tr – treble crochet
- st(s) – stitch(es)
- sp – space
- sk – skip
- RS / WS – right side / wrong side
Special stitch:
– Shell: 7 dc worked into the same stitch. The 4th dc is the center dc of the shell.
Gauge and Checkpoints
Gauge: 14 sc and 16 rows = 2 in (5.1 cm) in sport weight cotton with a 2.5 mm hook.
This is a small project, so the ornament itself is your best test piece. Make one, measure it at each checkpoint below and adjust before you make a set.
Checkpoints:
– After Row 1: the base strip is 33 sc and about 4.7 in (11.9 cm) wide.
– After Row 3: the piece is about 1 in (2.5 cm) tall.
– After Row 5: about 1.8 in (4.6 cm) tall.
– After Row 7: about 2.6 in (6.6 cm) tall.
– After Row 9: about 3.2 in (8.1 cm) tall.
– After the border: about 5 in (12.7 cm) wide × 3.5 in (8.9 cm) tall.
– After the trunk: about 4.25 in (10.8 cm) total height.
If your piece is too big: go down to a 2.25 mm hook, or check that your chains aren’t loose. Loose chains make the lattice rows tall and floppy.
If your piece is too small: go up to a 2.75 mm hook. Tight shells also tend to cup, so a larger hook helps the fans lie flat.
A difference of 1/4 in (0.6 cm) in the finished width is fine for an ornament. Only adjust if you’re off by more than that, or if you want a matched set.
Tree Body
Use sage green. Row 1 is the RS.
Row 1 (RS): Ch 34. Sc in 2nd ch from hook and in each ch across. Turn. (33 sc)
Check that the strip measures about 4.7 in (11.9 cm). Leave the free loops of the foundation chain unworked, because the border goes into them later.
Row 2 (shell row, tier 1): Ch 1. Sc in first st, sk 3 sts, shell in next st, sk 3 sts, sc in next st; repeat from * 3 more times. Turn. (4 shells and 5 sc = 33 sts)
Each repeat uses 8 sts and the first sc uses 1, so 1 + (4 × 8) = 33. The four fans now stand side by side along the base.
Row 3 (lattice row): Sl st in first sc and in next 3 dc (4 sl sts, not counted). Ch 1, sc in next dc (the center dc of the first shell). Ch 3, tr in next sc, ch 3, sc in center dc of next shell; repeat from * 2 more times. Turn. (4 sc, 3 tr and 6 ch-3 sps)
The row stops at the center of the last shell. The outer halves of the two end shells stay outside the next tier and form the first step of the tree’s sides. The ch-3 / tr / ch-3 sections make the open triangular windows.
Row 4 (shell row, tier 2): Ch 1. Sc in first sc, shell in next tr, sc in next sc; repeat from * 2 more times. Skip all ch-3 sps. Turn. (3 shells and 4 sc = 25 sts)
Each new fan grows from the tr in the valley between two fans below, so the tiers interlock.
Row 5 (lattice row): Sl st in first sc and in next 3 dc (4 sl sts). Ch 1, sc in center dc of first shell. Ch 3, tr in next sc, ch 3, sc in center dc of next shell; repeat from * once more. Turn. (3 sc, 2 tr and 4 ch-3 sps)
Row 6 (shell row, tier 3): Ch 1. Sc in first sc, shell in next tr, sc in next sc; repeat from * once more. Turn. (2 shells and 3 sc = 17 sts)
Row 7 (lattice row): Sl st in first sc and in next 3 dc (4 sl sts). Ch 1, sc in center dc of first shell, ch 3, tr in next sc, ch 3, sc in center dc of next shell. Turn. (2 sc, 1 tr and 2 ch-3 sps)
Row 8 (shell row, tier 4): Ch 1. Sc in first sc, shell in next tr, sc in next sc. Turn. (1 shell and 2 sc = 9 sts)
Row 9 (tip): Sl st in first sc and in next 3 dc (4 sl sts). Ch 1, sc in center dc of the shell. (1 sc) Fasten off.
The body should now measure about 4.7 in (11.9 cm) wide × 3.2 in (8.1 cm) tall. Weave in the ends now so they don’t get caught in the border.
Shell row stitch totals: 33, 25, 17, 9. Each tier loses exactly 8 sts, which is one full shell repeat: half a repeat comes off each side. That is why the sides of the tree step in evenly.
Border
Use sage green. Border gauge: the same as the body, 7 sc per inch (2.5 cm).
How to read the edge: Each side of the tree is a staircase of four tiers. On each step you’ll find four stitch tops: the end sc of the shell row plus the 3 outer dc of the end shell. On one side these four tops are covered by the 4 slip stitches from the lattice row, so work into those slip stitches instead. Above each step is the short side of the lattice-row sc that sits on the center dc.
Border Round (RS): With the RS facing and the foundation chain at the top, join sage green with a sc in the first free loop of the foundation chain. Work 2 more sc in the same loop. This is the first base corner.
- Base: Sc in each of the next 31 free loops, then 3 sc in the last free loop for the second base corner.
- First side, 20 sc:
- 1 sc in the side of Row 1.
- For each of tiers 1, 2 and 3: 1 sc in each of the 4 edge sts of the step (or into the 4 sl sts), then 1 sc in the side of the lattice-row sc. That is 5 sc per tier, 15 sc in all.
- For tier 4: 1 sc in each of the 4 edge sts (or sl sts), 4 sc.
- Tip: 3 sc in the Row 9 sc.
- Second side, 20 sc: Work the same placements in reverse order: 4 sc on tier 4, then 5 sc on each of tiers 3, 2 and 1, then 1 sc in the side of Row 1.
Sl st to the first sc to join. Fasten off and weave in the end. (80 sc)
Count per side: Count the middle sc of each 3-sc corner group as the corner stitch. Each side then includes its 2 corner sts:
– Base: 1 corner + 1 + 31 + 1 + 1 corner = 35 sc
– Each slanted side: 1 corner + 1 + 20 + 1 + 1 corner = 24 sc
Add the sides (35 + 24 + 24 = 83) and subtract the 3 corners that were counted twice. The result is 80, which matches the round total of 3 + 31 + 3 + 20 + 3 + 20 = 80.
Why the math works: The base has 33 foundation loops. Two of them are corners, which leaves 31 for the straight section. Each slanted side gets 1 sc for Row 1, 5 sc for each of the three full tiers and 4 sc for the top tier: 1 + 15 + 4 = 20. Five sc per tier fits the tier height at this gauge, so the sides don’t ruffle or pull.
Place markers in the 13th and 19th sc of the 31-sc base section. These mark the 7 center sts for the trunk.
Trunk
Use cream. The trunk is worked in rows into the center 7 sts of the base border.
Row 1: With the WS of the tree facing, join cream with a sc in the 13th sc of the 31-sc base section. This is the 16th sc from the beginning of the round, counting the 3 corner sc. Sc in the next 6 sts. Turn. (7 sc)
That leaves 12 sts before the trunk and 12 after it: 12 + 7 + 12 = 31.
Rows 2–6: Ch 1, sc in each st across. Turn. (7 sc)
Fasten off after Row 6. The trunk should measure about 1 in (2.5 cm) wide × 0.75 in (1.9 cm) tall. Weave in the ends through the back of the trunk stitches so they stay hidden.
Hanging Loop
Use cream.
- Join cream with a sl st in the center sc of the 3-sc tip group.
- Ch 30, then sl st in the same tip st to close the loop.
- Sl st in the back bump of each of the 30 ch around the loop, then sl st in the tip st again.
- Fasten off. Weave the end down into the tip and back up through the sage border so it can’t slip out.
The slip stitches thicken the chain into a firm cord. The loop stands about 2 in (5.1 cm) above the tip.
Final Blocking
- Draw a guide on paper: a base line 5 in (12.7 cm) long and a center line 3.5 in (8.9 cm) tall. Connect the ends to make a triangle, then mark a rectangle 1 in (2.5 cm) wide × 0.75 in (1.9 cm) tall centered below the base.
- Place the guide under clear plastic on your blocking mat.
- Mist the ornament until it’s damp but not dripping.
- Pin the three corners first, then pin the middle of each side so the sides are straight.
- Push the top of each shell gently so the fans open evenly. Pin the open windows into neat triangles if they’ve closed up.
- Pin the trunk square to the base, and pin the loop straight up from the tip.
- Let it dry completely, which usually takes 12–24 hours.
For a stiffer ornament, mist lightly with fabric stiffener before it dries.
Final Quality-Control Checklist
- The tiers have 4, 3, 2 and 1 shells from base to tip.
- Every shell has 7 dc, with the center dc in line with the tr or sc above it.
- The border has 80 sc: 35 on the base and 24 on each slanted side, including corners.
- The sides are straight, not wavy or pulled in.
- The trunk is 7 sc wide and centered, with 12 sts on each side.
- The ornament is about 5 in (12.7 cm) wide and 4.25 in (10.8 cm) tall without the loop.
- The loop is firm and anchored, and all ends are woven in on the WS.
Troubleshooting
The fans cup or curl. Your dc are too tight for the base. Go up 0.25 mm in hook size, or make each dc a little taller.
The tree leans to one side. You probably slip-stitched over the wrong number of sts. Use exactly 4 sl sts (sc + 3 dc) so each lattice row starts on a center dc.
The windows sag. Your chains are too loose. Make the ch-3s firmer, or use ch 2 if your tr are short.
The border ripples along the sides. Check that you used 5 sc per tier and not more. If the sides pull in instead, add 1 sc to each tier and to the matching tier on the other side.
The trunk is off-center. Count again from the corner: 3 corner sc, then 12 sc, then the trunk starts.
The loop twists. Block it pinned straight. A light mist of fabric stiffener holds it in place.
Care
Hand-wash in cool water with mild soap, press out the water in a towel and lay flat to dry. Re-pin to your blocking guide if the shells need to be reshaped.

Final Notes
The measurements build on each other in a simple chain:
– 33 foundation sc give a base 4.7 in (11.9 cm) wide.
– Four interlocking tiers that each lose one 8-st shell repeat bring the tree to a point about 3.2 in (8.1 cm) tall.
– An 80-sc border (35 + 24 + 24, minus 3 shared corners) brings it to about 5 in × 3.5 in (12.7 cm × 8.9 cm).
– A 7-sc cream trunk adds 0.75 in (1.9 cm), for 4.25 in (10.8 cm) total.
– The cream loop adds 2 in (5.1 cm) for hanging.
If your gauge matches at Row 1, the rest will follow. Make one, check your numbers, then make a whole forest for your tree.
Happy crocheting!