

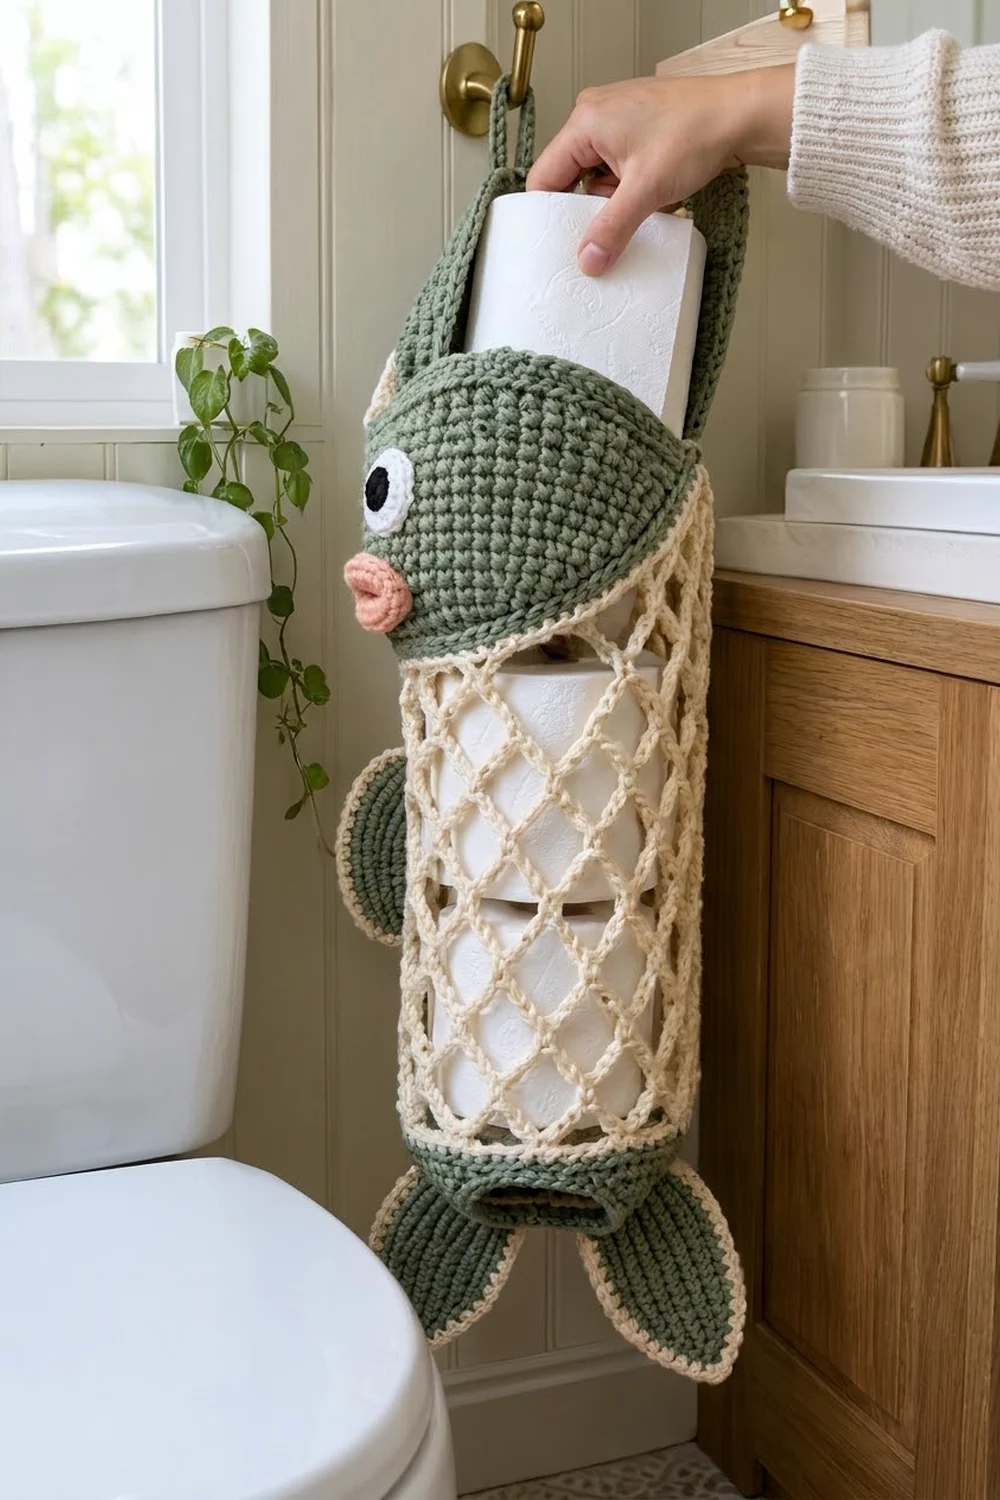
The Sage Minnow is a hanging toilet paper holder shaped like a cheerful fish. It has a pointed sage green head, round white-and-black eyes, puckered coral lips, a long cream diamond-mesh body that shows the rolls inside, and sage fins edged in cream.
The colors are soft: sage green, cream, coral, white, and black. The style is playful but tidy, so it fits a farmhouse or cottage bathroom. It holds three standard rolls. You load them through the hinged head and pull paper from the open tail.
This pattern uses US crochet terms. The finished holder is about 24 1/2 in (62.2 cm) long without the hanging loop. The body is 8 in (20.3 cm) wide laid flat and about 13 in (33.0 cm) wide across the side fins.
You crochet the body from the bottom up in joined rounds: a sage tail band first, then the cream mesh, then a solid trim. The head is a separate cone worked from the top down, with a hanging loop. The eyes, lips, and four fins are small pieces that you sew on at the end.
Finished Size and Construction
- Finished size: about 24 1/2 in (62.2 cm) long, plus a 1 3/4 in (4.4 cm) loop
- Body width: 8 in (20.3 cm) flat, 16 in (40.6 cm) around
- Skill level: Intermediate
- Terminology: US
- Yarn weight: worsted (#4) cotton
- Hook: 4.5 mm (US 7)
- Number of pieces: 1 finished holder made from 9 parts (body, head, 2 eyes, lips, 2 side fins, 2 tail fins)
- Layout: a vertical fish with the head on top, the mesh body in the middle, and the tail band and tail fins at the bottom
- Side fin size: 3 1/2 x 2 in (8.9 x 5.1 cm)
- Tail fin size: 4 1/2 x 2 in (11.4 x 5.1 cm)
- Size before border: side fins 3 x 1 1/2 in (7.6 x 3.8 cm); tail fins 4 x 1 1/2 in (10.2 x 3.8 cm)
- Border depth: one cream round, about 1/4 in (0.6 cm)
Materials
Choose a smooth worsted-weight yarn in 100% cotton or a cotton blend. Cotton holds its shape in a humid bathroom and keeps the mesh crisp. The amounts below assume about 85 yd (78 m) per 50 g.
- Sage green: 70 g, about 110 m (head, tail band, fins)
- Cream: 80 g, about 125 m (mesh body, fin edging)
- Coral: 5 g, about 8 m (lips)
- White: 5 g, about 8 m (eyes)
- Black: 3 g, about 5 m (pupils)
All amounts include a margin of about 15-20% to cover a test piece and sewing tails.
Tools:
- 4.5 mm (US 7) crochet hook
- Tapestry needle
- 4 stitch markers
- Scissors
- Measuring tape
- Pins and a blocking mat
- Spray bottle
Abbreviations (US Terms)
- ch – chain
- sl st – slip stitch
- sc – single crochet
- hdc – half double crochet
- dc – double crochet
- inc – 2 sc in the same stitch
- sk – skip
- st(s) – stitch(es)
- sp – space
- MR – magic ring
- Rnd – round
Special stitch – ch-5 mesh loop: Ch 5, then sc into the next anchor point (a stitch, or the next ch-5 loop). Rounds of these loops stacked on top of each other form the diamond net.
Gauge and Checkpoints
- Solid sc gauge: 16 sts x 18 rnds = 4 in (10.2 cm)
- Mesh gauge: 4 ch-5 loops = 4 in (10.2 cm) wide; 4 mesh rnds = 3 in (7.6 cm) tall, measured relaxed
Test one piece first. Make one side fin through Rnd 3. It should measure about 3 x 1 1/2 in (7.6 x 3.8 cm). If it does, your sc gauge is right for the head and the band.
Checkpoints:
- Head after Rnd 7: 24 sts, 6 in (15.2 cm) around.
- Head after Rnd 14: 64 sts, 16 in (40.6 cm) around.
- Body after Rnd 7: 64 sts, 16 in (40.6 cm) around; band about 1 1/2 in (3.8 cm) tall.
- Body after 8 mesh rounds: mesh about 6 in (15.2 cm) tall.
- Body after Rnd 28: about 15 3/4 in (40.0 cm) tall.
If your pieces are too big, go down a hook size (0.5 mm). If they are too small, go up a hook size. The head and body must both reach 64 sts at 16 in (40.6 cm) around, or the lid will not sit flush.
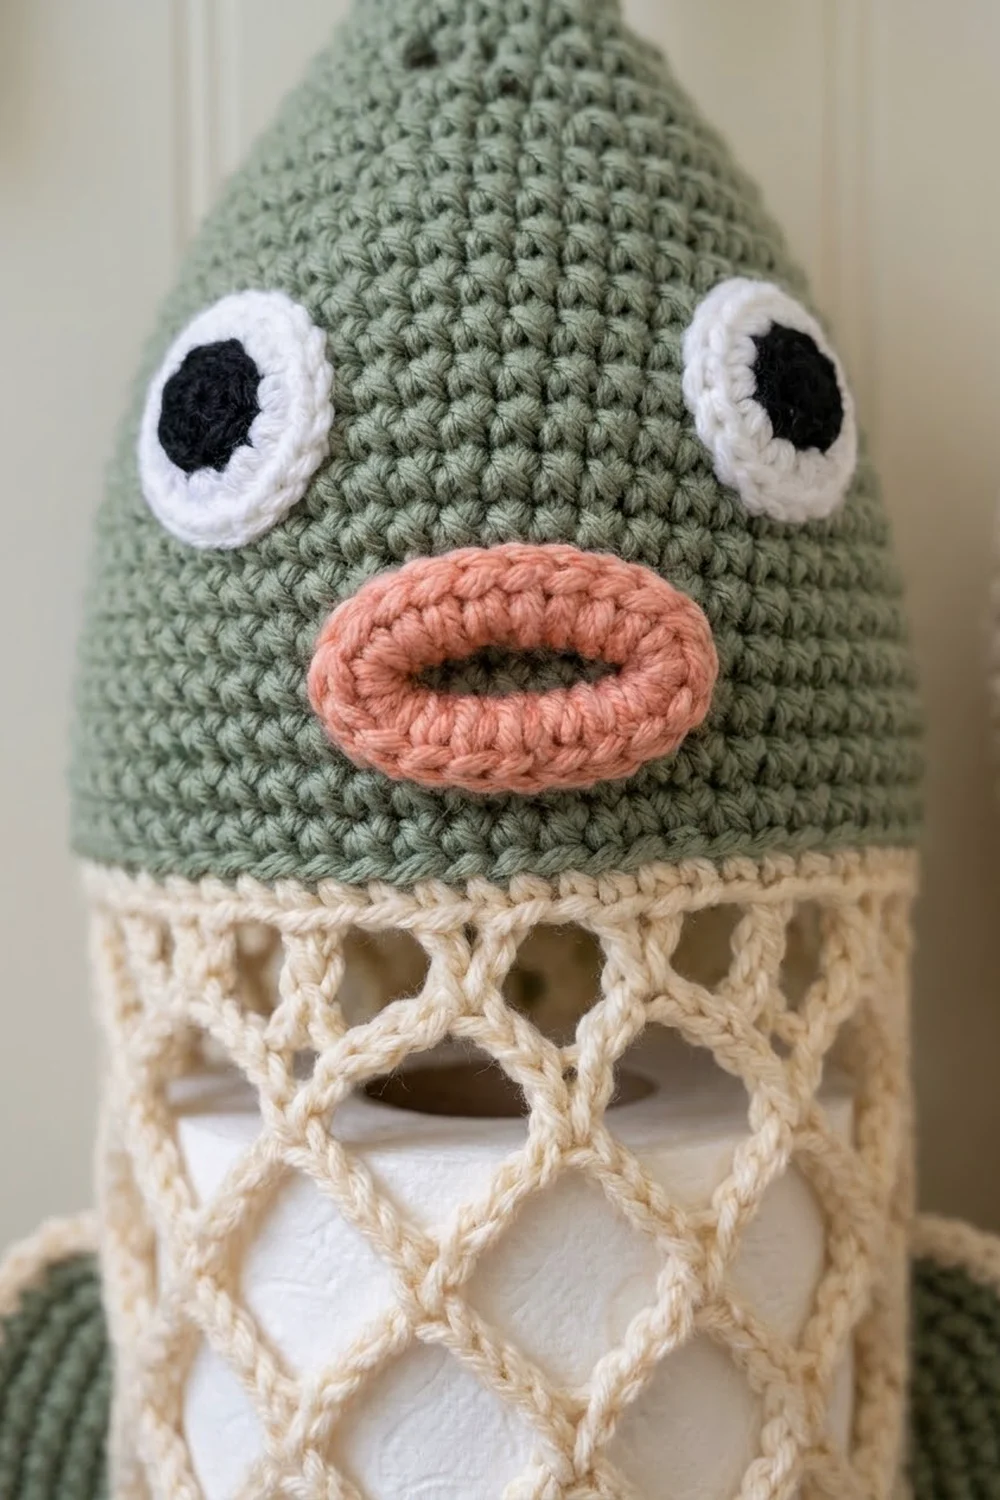
Head (Sage, Worked Top-Down)
Work in continuous rounds without joining. Mark the first st of each round.
- Rnd 1: 6 sc in MR. (6)
- Rnd 2: Sc in each st. (6)
- Rnd 3: Inc in each st. (12)
- Rnd 4: Sc in each st. (12)
- Rnd 5: (Sc 1, inc) x 6. (18)
- Rnd 6: Sc in each st. (18)
- Rnd 7: (Sc 2, inc) x 6. (24)
- Rnd 8: (Sc 3, inc) x 6. (30)
- Rnd 9: (Sc 4, inc) x 6. (36)
- Rnd 10: (Sc 5, inc) x 6. (42)
- Rnd 11: (Sc 6, inc) x 6. (48)
- Rnd 12: (Sc 7, inc) x 6. (54)
- Rnd 13: (Sc 8, inc) x 6. (60)
- Rnd 14: (Sc 14, inc) x 4. (64)
- Rnds 15-24: Sc in each st. (64)
Sl st into the next st and fasten off, leaving a 24 in (61.0 cm) tail for sewing. The slow increases in Rnds 1-7 create the pointed nose-cone top. The head is about 5 1/4 in (13.3 cm) tall.
Hanging loop: Join sage at the center top of the head. Ch 14 and sl st into the same st. Work 20 sc into the loop, sl st at the base, and fasten off. The finished loop is about 1 3/4 in (4.4 cm) tall.
Eyes (Make 2)
- Rnd 1 (black): 6 sc in MR, sl st to join. (6) Change to white.
- Rnd 2 (white): Inc in each st. (12)
- Rnd 3: (Sc 1, inc) x 6, sl st to join. (18)
Fasten off, leaving a long tail. Each eye is about 1 1/4 in (3.2 cm) across, with a 1/2 in (1.3 cm) black pupil.
Lips (Coral)
Ch 8 and sl st into the first ch to form a ring. Ch 1, then work 14 sc into the ring itself (around the chain, not into the chain stitches). Sl st to the first sc. (14) Fasten off, leaving a long tail.
Flatten the ring into an oval so the center hole becomes a slit. The lips measure about 1 3/4 x 3/4 in (4.4 x 1.9 cm). Packing the stitches around a small ring makes them bunch up, which gives the puckered, open-mouth look.
Body (Bottom-Up)
Tail band (sage):
- Rnd 1: Ch 48 and sl st into the first ch, without twisting the chain. Ch 1, sc in each ch, sl st to join. (48)
- Rnd 2: Sc in each st. (48)
- Rnd 3: (Sc 5, inc) x 8. (56)
- Rnd 4: Sc in each st. (56)
- Rnd 5: (Sc 6, inc) x 8. (64)
- Rnds 6-7: Sc in each st. (64) Fasten off sage.
The 48-st opening is 12 in (30.5 cm) around, or about 3 3/4 in (9.5 cm) across. A roll is about 4 1/2 in (11.4 cm) wide, so it rests on this narrower lip while the paper feeds out through the center.
Mesh (cream):
- Rnd 8: Join cream. Ch 1, sc in each st, sl st to join. (64)
- Rnd 9: Ch 1, sc in the first st, ch 5, sk 3, sc in next st; repeat from * around, ending with ch 5, sk 3, sl st to the first sc. (16 sc, 16 ch-5 loops)
- Rnd 10: Sl st in the first 3 ch of the first loop. Ch 1, sc in the same loop, ch 5, sc in next loop; repeat from * around, ending with ch 5, sl st to the first sc. (16 sc, 16 ch-5 loops)
- Rnds 11-26: Repeat Rnd 10. (16 loops in each round)
That makes 18 mesh rounds (Rnds 9-26), about 13 1/2 in (34.3 cm) tall. Each sc sits in the center of a loop from the round below, which pulls the loops into diamond shapes.
Top trim (cream):
- Rnd 27: Ch 1, sc in the joining sc, 3 sc in the next ch-5 loop, sc in next sc, 3 sc in next ch-5 loop; repeat from * around, sl st to join. (16 sc, 1 into each existing sc + 48 sc worked into the loops = 64)
- Rnd 28: Ch 1, sc in each st, sl st to join. (64)
Fasten off. The body is about 15 3/4 in (40.0 cm) tall.
Side Fins (Make 2, Sage)
- Rnd 1: Ch 9. Sc in the 2nd ch from the hook, sc 6, 3 sc in the last ch. Working along the other side of the chain, sc 6, then 2 sc in the first ch. (18)
- Rnd 2: Inc, sc 6, inc x 3, sc 6, inc x 2. (24)
- Rnd 3: Sc 1, inc, sc 6, (sc 1, inc) x 3, sc 6, (sc 1, inc) x 2. (30)
Sl st into the next st and fasten off sage. Each fin now has two curved ends of 9 sts each and two straight sides of 6 sts each. You will edge it in cream in the Border section.
Tail Fins (Make 2, Sage)
- Rnd 1: Ch 15. Sc in the 2nd ch from the hook, hdc 2, dc 8, hdc 2, sc 1, then ch 2 (first tip). Working along the other side of the chain, sc 1, hdc 2, dc 8, hdc 2, sc 1, then ch 2 (second tip), sl st to the first sc. (28 sts, 2 ch-2 tips)
- Rnd 2: Ch 1, sc in each st, working (sc, ch 2, sc) in each ch-2 tip, sl st to join. (28 + 4 = 32 sc, 2 ch-2 tips)
Fasten off sage. The tall dc in the middle and the short sc at each end create the pointed leaf shape.
Assembly
- Side fins: Pin one fin to each side of the body, halfway between front and back, 4 mesh rounds (3 in / 7.6 cm) below the top trim. Sew one curved end through the mesh with cream yarn so the fin sticks out about 2 1/2 in (6.4 cm).
- Tail fins: Pin one end of each tail fin to the tail band, one on each side, lined up with the side fins. Angle the fins down and out by about 30 degrees. Sew them to the band with sage.
- Head: Set the head on top of the body, matching Rnd 24 of the head to Rnd 28 of the body. Whipstitch only the back 32 sts together with sage. Leave the front 32 sts unsewn. The head now lifts forward like a lid for loading rolls.
- Face: On the front half of the head, sew the eyes centered on Rnd 15, 14 sts (3 1/2 in / 8.9 cm) apart, measured center to center. Sew the lips centered between the eyes, over Rnds 19-21. Stitch around the outer edge of the lips only, so the slit stays open.
Border
The border is one cream round around each fin. It uses the same sc gauge of 16 sts = 4 in (10.2 cm) and adds about 1/4 in (0.6 cm) all around. If possible, work the border before sewing the fins on (see Final Blocking).
Side fins, Rnd 4 (cream): Join cream in the first st. Sc 1, inc, sc 1, sc 6, (sc 1, inc, sc 1) x 3, sc 6, (sc 1, inc, sc 1) x 2, sl st to join. (30 + 6 = 36)
- Each straight side: 6 sc
- Each curved end: 9 sts + 3 increases = 12 sc
- Total: 6 + 6 + 12 + 12 = 36
Tail fins, Rnd 3 (cream): Join cream next to a tip. Sc in each st, working (sc, ch 2, sc) in each ch-2 tip, sl st to join. (32 + 4 = 36 sc, 2 ch-2 tips)
- Each long side: 16 sc from Rnd 2 + 2 new sc at the tips = 18 sc
- Total: 18 + 18 = 36
Why the math works: The straight edges get 1 sc per st, so they stay flat. The curved ends need extra stitches because the outer edge of a curve is longer than the inner edge. Three increases per 9-st curve add just enough length to lie flat. The ch-2 at each tail fin tip keeps the leaf points sharp instead of rounded.
Final Blocking
- Lightly mist all the fins with water.
- Pin each side fin to 3 1/2 x 2 in (8.9 x 5.1 cm).
- Pin each tail fin to 4 1/2 x 2 in (11.4 x 5.1 cm), pulling the tips into points.
- Let the fins dry completely before sewing them on.
- For the body, slide three rolls inside, mist the mesh, and ease the diamonds into even shapes.
- Mist the head and shape it over a small bowl or ball so the cone stays smooth.
Final Quality-Control Checklist
- The head and body both have 64 sts and measure 16 in (40.6 cm) around.
- The mesh has 18 rounds of 16 loops, with no skipped or doubled loops.
- The body is about 15 3/4 in (40.0 cm) tall.
- Side fins measure 3 1/2 x 2 in (8.9 x 5.1 cm); tail fins measure 4 1/2 x 2 in (11.4 x 5.1 cm).
- The fins on the left and right sit at the same height.
- The head lid opens easily and closes flush.
- The eyes are level, and the lips are centered with the slit open.
- The hanging loop is firm and centered.
- Three rolls fit inside, and the paper pulls smoothly through the tail.
Troubleshooting
- The mesh twists into a spiral: You may be starting rounds in the wrong place. Always sl st over to the center of the first loop before working the first sc.
- The mesh is too short: Your chains are tight. Relax your tension, or add 1-2 more mesh rounds. Each round adds about 3/4 in (1.9 cm).
- The head cone ripples: You have too many stitches for your tension. Rework Rnds 1-14 with a hook one size smaller.
- Rolls slip out the bottom: The band is too loose. Rework Rnds 1-2 with a hook one size smaller.
- Fin edges cup: Add one more increase to each curve. If the edges ruffle instead, remove one increase.
- The lid gaps at the front: Extend the back seam by sewing one or two more sts on each side.
Care
Hand wash in cool water with mild soap and lay flat to dry. Reshape the mesh while it is still damp, and don’t put it in the dryer.
Final Notes
The sizes in this pattern all follow from a few counts. The head and body both reach 64 sts at 16 in (40.6 cm) around, so the lid fits the body. The 18 mesh rounds make the body 13 1/2 in (34.3 cm) tall, enough for three rolls. The 48-st tail opening holds the rolls in while letting the paper out. Each fin gets one cream round that adds 1/4 in (0.6 cm). Together these make a 24 1/2 in (62.2 cm) fish that is ready to hang.
Happy crocheting!