

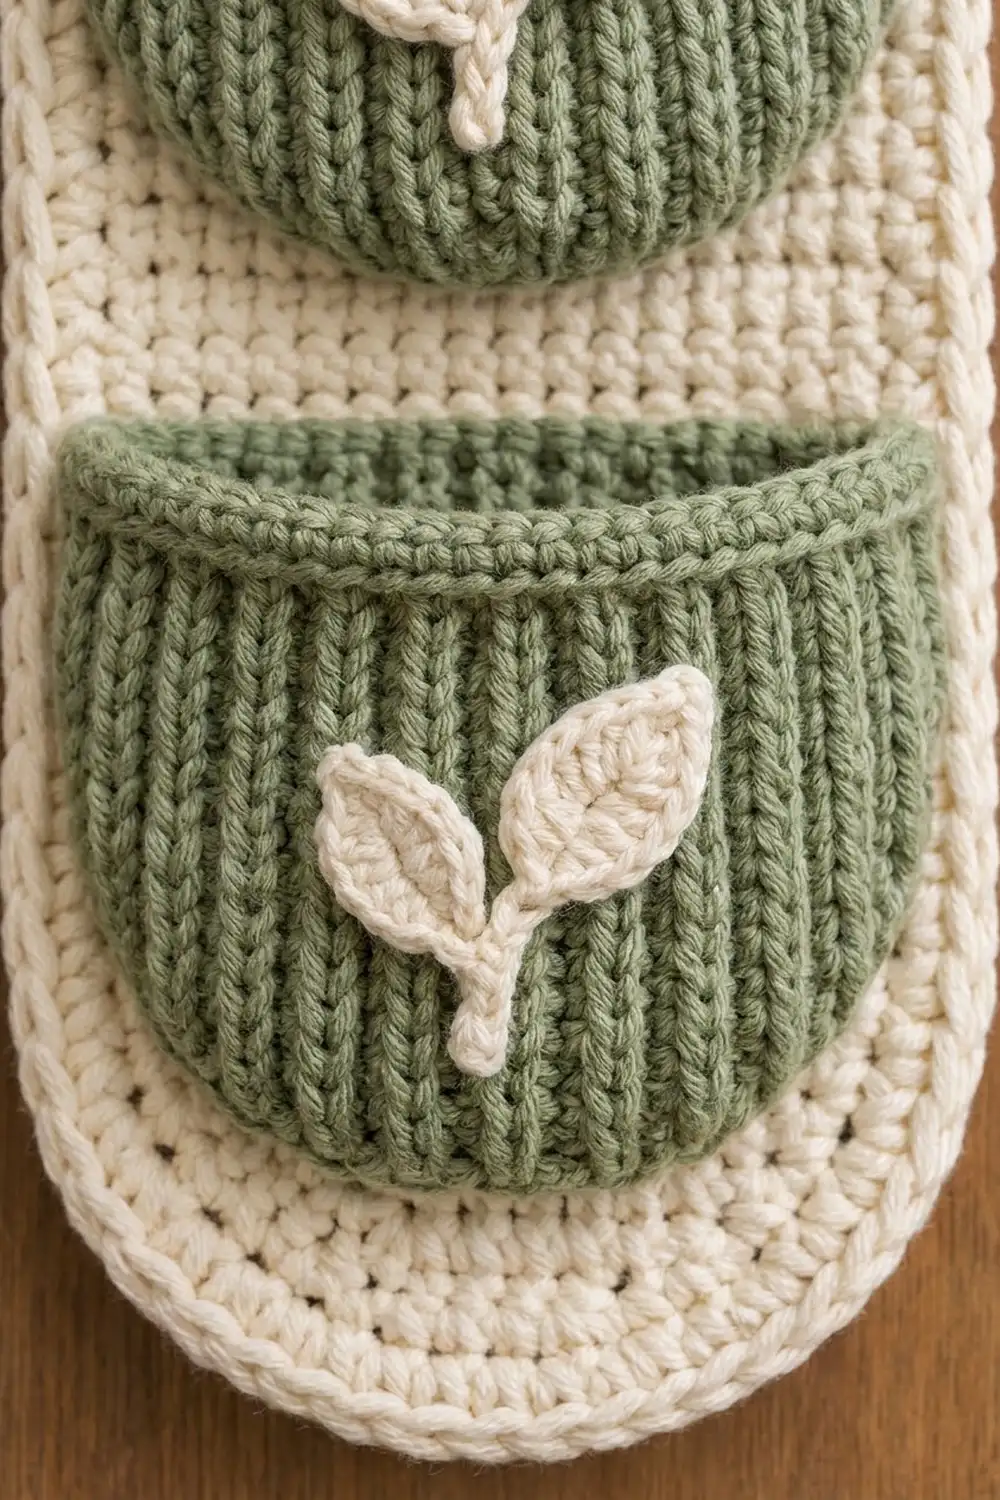
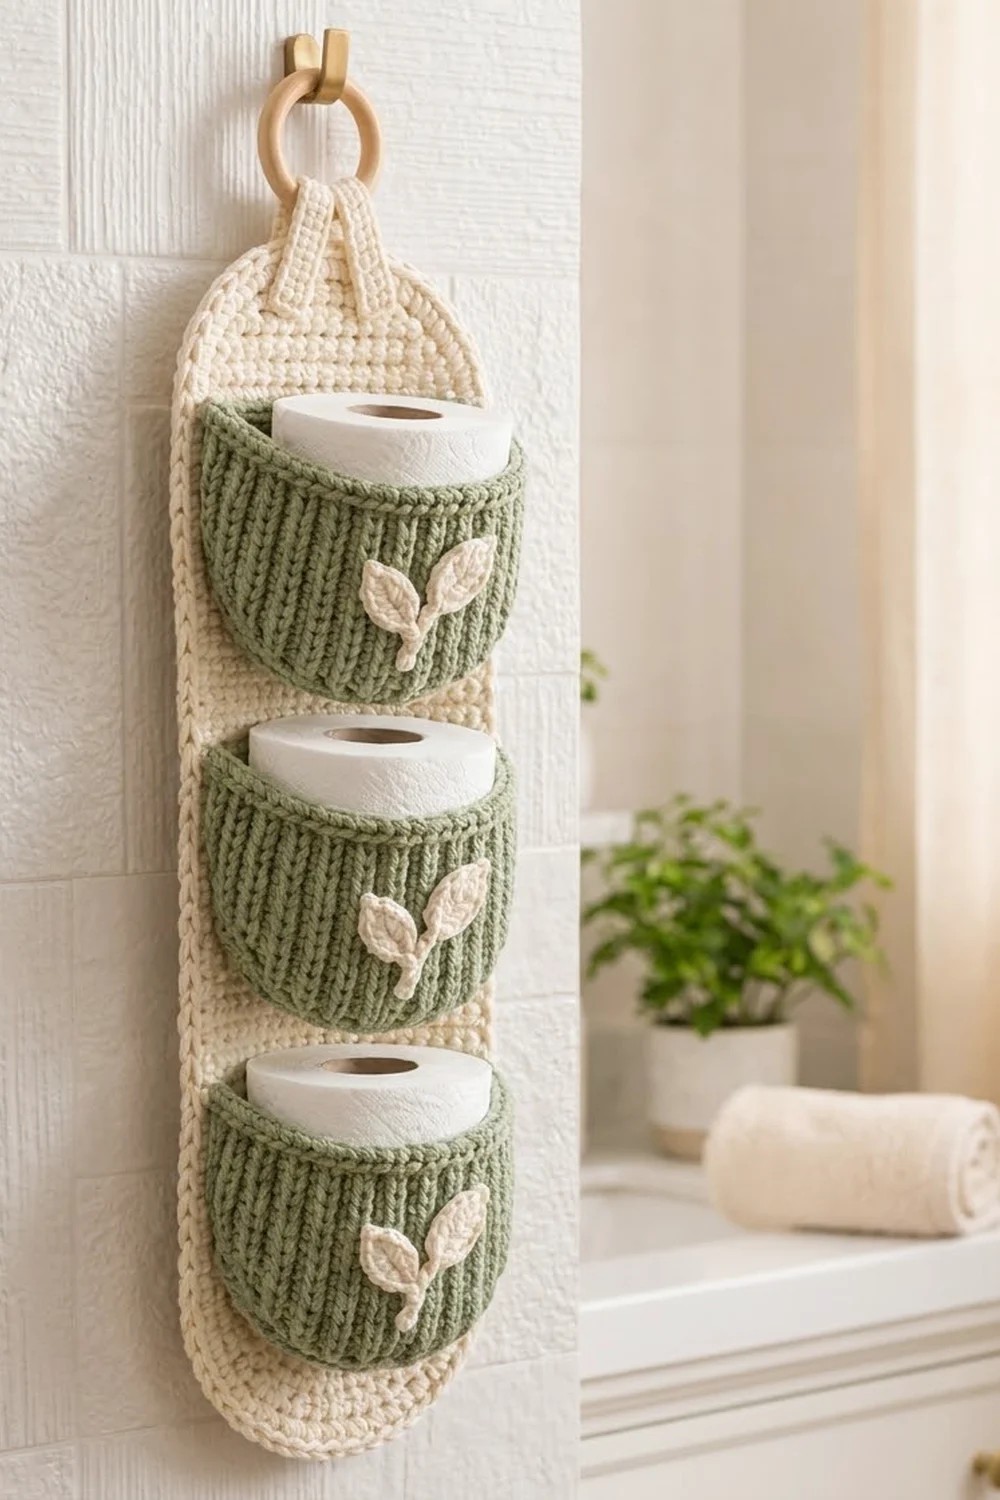
This hanging holder keeps three spare rolls tidy and within reach. A long cream panel hangs from a wooden ring, and three ribbed sage-green pockets curve outward to cradle the rolls. A small cream leaf sprig sits on the front of each pocket.
The palette is soft and natural: warm cream, muted sage, and a pale wooden ring. The raised vertical ribs look a little like knitting and contrast with the smooth single crochet panel. A rope-like reverse single crochet edge frames the whole piece.
This pattern uses US crochet terms. The finished holder measures 7 in (17.8 cm) wide and 23 in (58.4 cm) long, not counting the ring.
You’ll crochet the panel in rows with rounded ends and then add a three-round border. The pockets are worked from the bottom up in post-stitch ribbing, with a band of single crochet at the top. After that you make the straps and leaves and sew everything together.
Finished Size and Construction
- Finished size: 7 in × 23 in (17.8 × 58.4 cm), not counting the ring
- Skill level: Intermediate
- Terminology: US
- Yarn weight: Worsted (#4), cotton or cotton blend
- Hook: 5.0 mm (H-8)
- Number of pieces: 12 crocheted pieces (1 panel, 2 straps, 3 pockets, 3 large leaves with stems, 3 small leaves) plus 1 wooden ring
- Layout: 3 pockets stacked vertically, one above the other
- Pocket size (flat, with edging): about 10.25 in (26.0 cm) wide at the top and 5.75 in (14.6 cm) tall
- Panel size before border: 6 in × 22 in (15.2 × 55.9 cm)
- Border depth: 0.5 in (1.3 cm) on each side
Materials
Use a smooth cotton or cotton-blend worsted yarn. Cotton holds its shape in a humid bathroom and makes the ribs and the reverse single crochet edge stand out clearly. The quantities below assume about 170 m (186 yd) per 100 g.
- Cream: 80 g / 135 m (148 yd), for the panel, border, straps, and leaves
- Sage green: 65 g / 110 m (120 yd), for the pockets
Quantities include a margin of about 25% for your gauge swatch and sewing.
Tools:
– 5.0 mm (H-8) crochet hook
– Wooden ring, 2.75 in (7.0 cm) across
– Tapestry needle
– 10–12 locking stitch markers or pins
– Scissors
– Measuring tape
– Blocking mat and spray bottle
Abbreviations (US Terms)
- ch: chain
- sl st: slip stitch
- sc: single crochet
- hdc: half double crochet
- dc: double crochet
- sc2tog: single crochet 2 together
- FPdc: front post double crochet
- BPdc: back post double crochet
- rev sc: reverse single crochet (crab stitch)
- st(s): stitch(es)
- RS / WS: right side / wrong side
Special stitch: rev sc. Work single crochet from left to right (right to left if you crochet left-handed). Insert the hook into the next stitch to the right, yarn over, pull up a loop, then yarn over and pull through both loops. This makes the twisted, rope-like edge.
Gauge and Checkpoints
- Single crochet: 16 sts and 16 rows = 4 in (10.2 cm)
- Dc ribbing: 16 sts and 9 rows = 4 in (10.2 cm)
Make one pocket before you start the panel. It is the quickest way to check both your ribbing gauge and your stitch counts.
Checkpoints:
– Pocket after Row 11: 10.25 in (26.0 cm) wide and about 4.9 in (12.4 cm) tall
– Panel after Row 11: 6 in (15.2 cm) wide and 2.75 in (7.0 cm) tall
– Panel after Row 78: 19.5 in (49.5 cm) long
– Panel after Row 88: 22 in (55.9 cm) long
– Panel after the border: 7 in × 23 in (17.8 × 58.4 cm)
If your piece is too big, go down 0.5 mm in hook size. If it’s too small, go up 0.5 mm. Don’t add or remove stitches, because all the placement measurements depend on these counts.
Backing Panel (Cream)
At the beginning of each row, ch 1. The ch 1 does not count as a stitch.
Row 1: Ch 13. Sc in the 2nd ch from the hook and in each ch across. (12 sts)
Row 2: 2 sc in the first st, sc in each st to the last st, 2 sc in the last st. (14 sts)
Row 3: Repeat Row 2. (16 sts)
Row 4: Repeat Row 2. (18 sts)
Row 5: Sc in each st across. (18 sts)
Row 6: Repeat Row 2. (20 sts)
Row 7: Sc in each st across. (20 sts)
Row 8: Repeat Row 2. (22 sts)
Rows 9–10: Sc in each st across. (22 sts)
Row 11: Repeat Row 2. (24 sts)
Checkpoint: 6 in (15.2 cm) wide, with a smoothly rounded bottom.
Rows 12–78: Sc in each st across. (24 sts, 67 rows)
Row 79: Sc2tog, sc in each st to the last 2 sts, sc2tog. (22 sts)
Rows 80–81: Sc in each st across. (22 sts)
Row 82: Repeat Row 79. (20 sts)
Row 83: Sc in each st across. (20 sts)
Row 84: Repeat Row 79. (18 sts)
Row 85: Sc in each st across. (18 sts)
Row 86: Repeat Row 79. (16 sts)
Row 87: Repeat Row 79. (14 sts)
Row 88: Repeat Row 79. (12 sts)
The top shaping (Rows 79–88) mirrors the bottom shaping (Rows 1–11) row for row, so both ends are the same shape. Don’t fasten off; the border starts here.
Pocket (Sage, Make 3)
Ch 2 at the start of each dc row; it does not count as a stitch.
Every ribbing row has an odd number of stitches. The first and last stitches are plain dc, and the post stitches fall on every even-numbered stitch. On increase rows you work 3 dc into one edge stitch, which adds 2 stitches at each end. That keeps the rib pattern lined up. The middle dc of each 3-dc group becomes a new rib on the next row.
Row 1 (WS): Ch 15. Dc in the 3rd ch from the hook and in each ch across. (13 sts)
Row 2 (RS): 3 dc in the first st, [FPdc around the next st, dc in the next st] 5 times, FPdc around the next st, 3 dc in the last st. (17 sts)
Row 3 (WS): 3 dc in the first st, [BPdc around the next st, dc in the next st] 7 times, BPdc around the next st, 3 dc in the last st. (21 sts)
Row 4 (RS): 3 dc in the first st, [FPdc, dc] 9 times, FPdc, 3 dc in the last st. (25 sts)
Row 5 (WS): 3 dc in the first st, [BPdc, dc] 11 times, BPdc, 3 dc in the last st. (29 sts)
Row 6 (RS): 3 dc in the first st, [FPdc, dc] 13 times, FPdc, 3 dc in the last st. (33 sts)
Row 7 (WS): 3 dc in the first st, [BPdc, dc] 15 times, BPdc, 3 dc in the last st. (37 sts)
Row 8 (RS): 3 dc in the first st, [FPdc, dc] 17 times, FPdc, 3 dc in the last st. (41 sts)
Row 9 (WS): Dc in the first st, [BPdc, dc] 20 times. (41 sts)
Row 10 (RS): Dc in the first st, [FPdc, dc] 20 times. (41 sts)
Row 11 (WS): Repeat Row 9. (41 sts)
The pocket has 20 raised ribs, and they fan gently toward the rounded bottom.
Rows 12–14 (top band): Ch 1, sc in each st across. (41 sts per row) This makes a smooth band about 0.75 in (1.9 cm) deep.
Edging: Don’t turn. Ch 1, then work down the side: 1 sc in each of the 3 band row-ends and 2 sc in each of the 11 dc row-ends (25 sc). Along the free loops of the foundation chain, work 2 sc in the first loop, 1 sc in each of the next 11 loops, and 2 sc in the last loop (15 sc). Work up the second side the same way as the first (25 sc). Fasten off and leave a 36 in (91.4 cm) tail for sewing. (65 edging sts)
Hanging Straps (Cream, Make 2)
Row 1: Ch 4. Sc in the 2nd ch from the hook and in each ch across. (3 sts)
Rows 2–24: Ch 1, sc in each st across. (3 sts)
Fasten off and leave a 12 in (30.5 cm) tail. Each strap measures 0.75 in × 6 in (1.9 × 15.2 cm).
Leaf Sprigs (Cream, Make 3 of Each Leaf)
Large leaf with stem: Ch 9. Sc in the 2nd ch from the hook, hdc in the next ch, dc in each of the next 4 ch, hdc in the next ch, 3 sc in the last ch. Rotate and work along the free loops on the other side of the chain: hdc in the next loop, dc in each of the next 4 loops, hdc in the next loop, sc in the last loop. (17 sts)
For the pointed tip, ch 2, sl st in the 2nd ch from the hook, then sl st in the first sc. For the stem, sl st across to the center of the 3-sc end, ch 9, then sl st in the 2nd ch from the hook and in each ch back to the leaf (8 sl sts). Fasten off and leave a tail.
The leaf is about 1.75 in (4.4 cm) long and 1 in (2.5 cm) wide, and the stem is about 1.5 in (3.8 cm) long.
Small leaf: Ch 7. Sc in the 2nd ch from the hook, hdc in the next ch, dc in each of the next 2 ch, hdc in the next ch, 3 sc in the last ch. Working along the free loops on the other side: hdc in the next loop, dc in each of the next 2 loops, hdc in the next loop, sc in the last loop. (13 sts) Make the tip the same way as on the large leaf. Fasten off and leave a tail. The small leaf is about 1.25 in (3.2 cm) long.
Make All Pieces
- Cream: 1 panel, 2 straps, 3 large leaves with stems, 3 small leaves
- Sage: 3 pockets
- Other: 1 wooden ring
Layout (front view, top to bottom):
        ( ring )
         /    \        straps
   .--------------.
   |    pocket 1  |    top at 2.75 in / 7.0 cm
   |--------------|
   |    pocket 2  |    top at 9 in / 22.9 cm
   |--------------|
   |    pocket 3  |    top at 15.25 in / 38.7 cm
   |              |
   '--------------'    23 in / 58.4 cm
Border (Cream, Worked Around the Panel)
Border gauge: 1 sc per row-end and 1 sc per stitch. This works because the single crochet gauge is square (16 sts and 16 rows = 4 in), so it lies flat without ruffling or puckering.
Round 1: Ch 1 and turn so you’re working along Row 88.
– Top end: 2 sc in the first st, sc in each of the next 10 sts, 2 sc in the last st. (14 sts)
– Side 1: 1 sc in each row-end of Rows 87 through 2. (86 sts)
– Bottom end: Along the free loops of Row 1, 2 sc in the first loop, sc in each of the next 10 loops, 2 sc in the last loop. (14 sts)
– Side 2: 1 sc in each row-end of Rows 2 through 87. (86 sts)
– Sl st to the first sc. (200 sts total)
Round 2: Ch 1. On each end, sc in each st and add 3 increases spaced evenly: 2 sc in the 4th, 7th, and 11th sts of that end, so 14 becomes 17. On each side, sc in each st (86 sts). Sl st to the first sc. (17 + 86 + 17 + 86 = 206 sts)
Round 3: Ch 1, rev sc in each st around. Sl st to the first st and fasten off. (206 sts)
Why the math works: The straight sides don’t get longer as you add rounds, so they need no increases. The curved ends do. Each 0.25 in (0.6 cm) of border adds about 1.5 in (3.8 cm) to the total curved distance, and 6 extra stitches (3 per end) cover that at 4 sts per inch. Three rounds add 0.5 in (1.3 cm) on every side, which takes the panel from 6 × 22 in to 7 × 23 in (17.8 × 58.4 cm).
Joining
Pockets: Measure down from the finished top edge of the panel and mark where each pocket’s top edge goes: 2.75 in (7.0 cm), 9 in (22.9 cm), and 15.25 in (38.7 cm). Pin each pocket’s two top corners 6 in (15.2 cm) apart, just inside the border. Pin the bottom center of the pocket to the panel’s center line, 5.75 in (14.6 cm) below the top marker. Add one pin on each side, halfway down.
The pocket’s 65 edging stitches are longer than the U-shaped line they’re sewn to on the panel. The extra length is what lets the front bow outward. Ease it in evenly between the pins. Whipstitch through the back loop of each pocket edging stitch and one stitch or row-end of the panel. Keep the tension firm but not tight, so the panel doesn’t wrinkle behind the pocket.
Checkpoint: The top center of each pocket stands about 3 in (7.6 cm) away from the panel, and there is a 0.5 in (1.3 cm) cream gap between pockets.
Leaves: Center each sprig on its pocket, about 0.75 in (1.9 cm) below the band. Angle the large leaf up and to the right. Sew the base of the small leaf to the left side of the stem, about two-thirds of the way up. Sew down the leaf edges with small stitches.
Straps: Loop each strap through the ring. Sew one end to the front of the panel and the other to the back, so the straps overlap the panel’s top edge by 1 in (2.5 cm). Space the two straps 1.5 in (3.8 cm) apart at the panel so they angle inward toward the ring.
Final Blocking
- Lay the holder flat with the pockets facing up.
- Pin the panel out to 7 in × 23 in (17.8 × 58.4 cm).
- Mist it until it’s damp but not soaked.
- Stuff each pocket lightly with a rolled towel so it dries in its bowed shape.
- Let it dry completely, which takes about 24 hours.
- Remove the pins and the towels.
Final Quality-Control Checklist
- [ ] The panel measures 7 × 23 in (17.8 × 58.4 cm), and both rounded ends match.
- [ ] The rev sc edge is even all the way around, with no gaps at the curves.
- [ ] Each pocket has 20 straight ribs and a smooth band 0.75 in (1.9 cm) deep.
- [ ] The pocket tops line up at 2.75, 9, and 15.25 in (7.0, 22.9, 38.7 cm).
- [ ] All sprigs face the same way and sit at the same height.
- [ ] The straps are secure and the holder hangs straight.
- [ ] All yarn ends are woven in.
Troubleshooting
The ribs lean or don’t line up. Every post stitch has to go around a post stitch from the row below. Count your bracketed repeats again on each row.
The panel edge ruffles. Check your row gauge. If you have more than 16 rows per 4 in, skip every 9th row-end in Round 1.
A pocket lies flat instead of bowing out. The top corners are too far apart. Pin them closer together, at 6 in (15.2 cm).
The holder tilts when hung. Make sure both straps are the same length and are spaced evenly from the center of the panel.
The leaf tips curl. Pin them flat and steam them before sewing them down.
Care
Hand wash in cool water and dry flat, reshaping the pockets while they’re damp. Take the wooden ring off before washing.
Final Notes
Here is the measurement chain. The single crochet gauge of 16 sts and 16 rows per 4 in gives a panel of 6 × 22 in (15.2 × 55.9 cm). The three-round border adds 0.5 in (1.3 cm) on every side, for a finished size of 7 × 23 in (17.8 × 58.4 cm). Each 41-stitch pocket is 10.25 in (26.0 cm) wide and is sewn onto 6 in (15.2 cm) of panel, which gives it the curved, roll-holding shape. If you check your gauge on the first pocket, everything else falls into place.
Happy crocheting!