

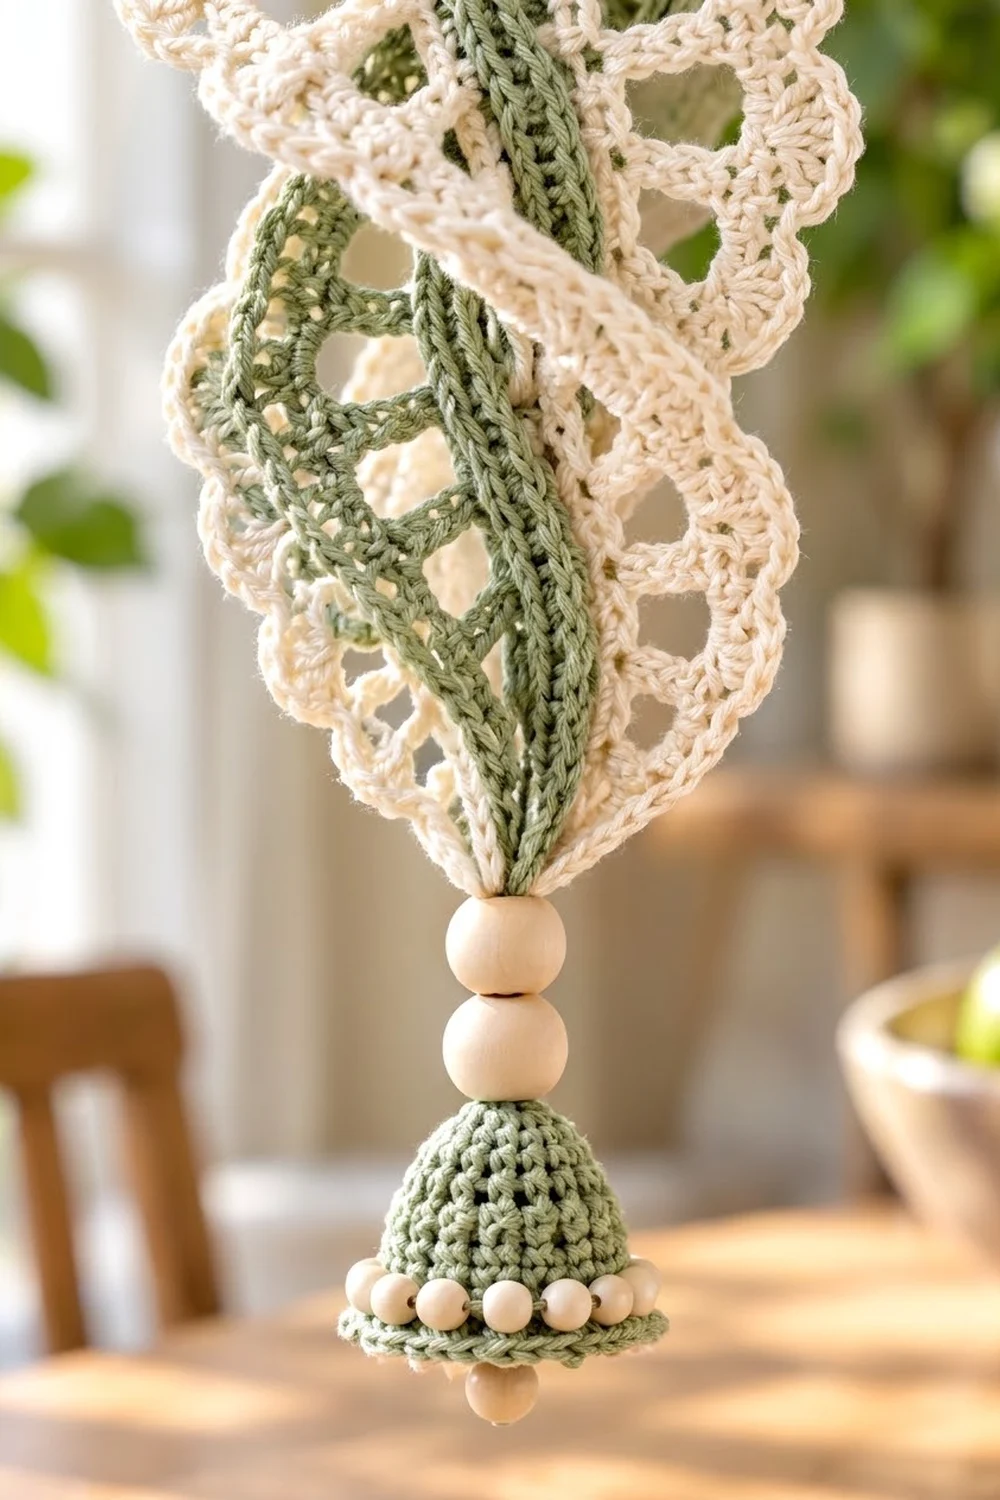
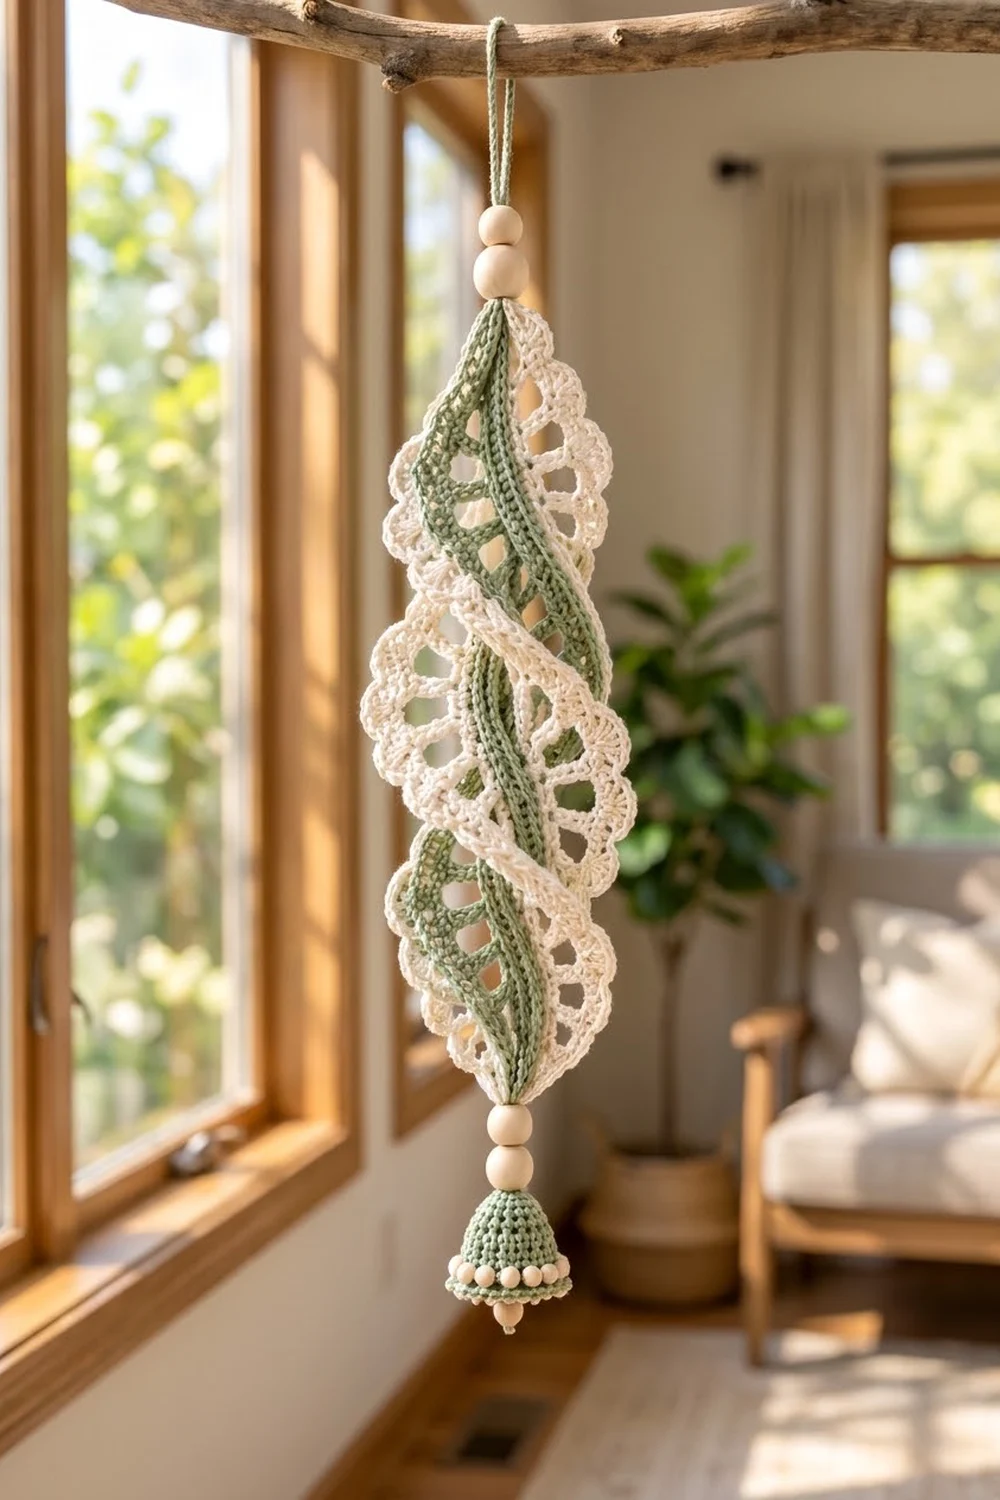
The Sage Twist Spiral is a hanging lace ornament made from one flat crocheted strip. Once you twist it, a sage-green spine winds through cream scalloped lace like a ribbon, which gives it a light, airy shape. Natural wooden beads and a tiny green bell finish the bottom.
The colors are soft and botanical: sage green for the solid spine and spoke row, and cream for the arches, fans and picot edge. It suits a sunny window, a plant shelf, a nursery or a spring table.
This pattern uses US crochet terms. The flat strip measures 4.2 in x 12 in (10.7 cm x 30.5 cm). Once twisted and gathered, the spiral is about 3.5 in (8.9 cm) wide and 10 in (25.4 cm) tall. With the beads, the bell and the hanging loop, the full ornament hangs about 16 in (40.6 cm) long.
Construction is simple. You crochet a narrow green spine in short rows, then work a lace edging along each long side. A small bell cap is worked in the round. Finally, you block the strip, twist it into a spiral and set it with starch, then string everything onto a cord.
Finished Size and Construction
- Finished size (twisted): about 3.5 in x 10 in (8.9 cm x 25.4 cm)
- Total hanging length: about 16 in (40.6 cm)
- Skill level: Intermediate
- Terminology: US crochet terms
- Yarn weight: Sport (#2) mercerized cotton
- Hook: 3.0 mm (US C/2 or D/3)
- Number of pieces: 1 lace strip + 1 small bell cap, assembled into one ornament
- Layout: a single strip twisted 3 full turns
- Piece size (flat, finished): 4.2 in x 12 in (10.7 cm x 30.5 cm)
- Size before border: spine 1.2 in x 12 in (3.0 cm x 30.5 cm)
- Border depth: 1.5 in (3.8 cm) on each long side
Materials
Use a smooth mercerized cotton or cotton blend in sport weight, about 170 m per 50 g. Cotton holds the spiral well after starching and shows off the lace. Avoid fuzzy or very stretchy yarns; they blur the windows and the spiral sags.
- Sage green: 20 g (68 m) for the spine, the spoke rows and the bell cap
- Cream: 25 g (85 m) for the arches, fans and picot edge
Both quantities include a margin of about 25% for your gauge swatch and weaving in ends.
Tools and notions:
- 3.0 mm crochet hook
- Tapestry needle
- Scissors and stitch markers
- 2 wooden beads, 16 mm and 12 mm (top)
- 2 wooden beads, 12 mm (above the bell)
- 1 wooden bead, 10 mm (dangling below the bell)
- 10 cream wooden beads, 6 mm (bell brim)
- 24 in (61.0 cm) of thin cotton cord or doubled crochet thread
- Fabric stiffener or strong starch
- A tube or dowel about 1.5 in (3.8 cm) across, plastic wrap and rustproof pins
Abbreviations (US Terms)
- ch: chain
- sl st: slip stitch
- sc: single crochet
- dc: double crochet
- sk: skip
- sp: space
- st(s): stitch(es)
- tch: turning chain
- MR: magic ring
- FLO: front loop only
- rep: repeat
Special stitches:
- Fan: (dc, ch 1) 5 times, then dc, all in the same space. Each fan has 6 dc and 5 ch-1 spaces.
- Picot loop: (sc, ch 3, sc) worked in the same ch-1 space.
Gauge and Checkpoints
Gauge: 20 dc and 10 dc rows = 4 in wide x 3 in tall (10.2 cm x 7.6 cm). Each dc row is 0.3 in (0.8 cm) tall.
Test the spine first. Work Rows 1 to 10 of the spine (below) and measure:
- Checkpoint 1: After 10 rows, the spine is 1.2 in (3.0 cm) wide and 3 in (7.6 cm) long.
- Checkpoint 2: After 40 rows, the spine is 12 in (30.5 cm) long.
- Checkpoint 3: After Edge Row 1 on both sides, the strip is 2.0 in (5.1 cm) wide.
- Checkpoint 4: After the full border, the strip is 4.2 in (10.7 cm) wide.
If your strip is too long: go up 0.25 mm in hook size if you are under, or down if you are over. Keep the row count at exactly 40, because the border math depends on it.
If your strip is too long: your dc stitches are tall. Go down to a 2.75 mm hook, or pull up less of a loop on each dc. Don’t change the row count.
If your strip is too short: go up to a 3.25 mm hook. Again, keep the row count at 40.
Spine (Sage Green)
The spine is worked in short rows across its narrow width. It has two solid columns of 2 dc each, with a ch-2 window between them. Stacked rows form the ladder down the center.
Foundation: With sage green, ch 8.
Row 1: Dc in the 4th ch from hook (the skipped 3 ch count as the first dc). Ch 2, sk next 2 ch, dc in each of the last 2 ch. Turn.
(4 dc + one ch-2 sp = 6 sts across)
Row 2: Ch 3 (counts as dc throughout), dc in next dc, ch 2, sk ch-2 sp, dc in next dc, dc in top of tch. Turn.
(4 dc + one ch-2 sp = 6 sts across)
Rows 3 to 40: Rep Row 2.
(40 rows total, each with 4 dc + one ch-2 sp)
At the end of Row 40, fasten off and leave a 6 in (15.2 cm) tail. You will use it later to gather the end.
Measure: The spine should be 1.2 in x 12 in (3.0 cm x 30.5 cm). The ch-2 windows should form one straight ladder down the center. Each long edge has 40 row ends, one per row.
Bell Cap (Sage Green)
The bell is worked in continuous rounds from the top down. Place a marker in the first stitch of each round.
Rnd 1: 6 sc in MR. (6 sts)
Rnd 2: 2 sc in each st around. (12 sts)
Rnd 3: Sc in each st around. (12 sts)
Rnd 4: (Sc in next st, 2 sc in next st) 6 times. (18 sts)
Rnd 5: Sc in each st around. (18 sts)
Rnd 6: Sc in each st around. (18 sts)
Rnd 7: (Sc in next 2 sts, 2 sc in next st) 6 times. (24 sts)
Rnd 8 (brim): Working in FLO, (sc in next 3 sts, 2 sc in next st) 6 times. Sl st to the first st. (30 sts)
Fasten off, leaving a 10 in (25.4 cm) tail for sewing on beads. Working Rnd 8 in the front loops makes the brim flare outward like the bell in the photo.
Measure: The bell is about 1.5 in (3.8 cm) tall, and the brim is about 1.7 in (4.3 cm) across.
Using the tail, sew the ten 6 mm cream beads evenly around the brim, one every 3 sts (30 ÷ 10 = 3). Weave in the end.
Border (Lace Edging)
The border is worked separately along each long edge of the spine, into the row ends. The short ends get no border, because they will be gathered into points.
Border gauge: Edge Row 1 adds 0.4 in (1.0 cm) and Edge Row 2 adds 0.2 in (0.5 cm). Edge Row 3 (the fans) adds 0.6 in (1.5 cm), and Edge Row 4 (the picots) adds 0.3 in (0.8 cm). Together that is 1.5 in (3.8 cm) per side.
Edge Row 1 (Sage Green, Spokes): Both Long Sides
With the right side facing, join sage green in the row end of Row 1. Ch 4 (this counts as dc + ch 1). Work dc around the end post of the next row, then ch 1. Rep from * along the edge, then work dc in the row end of Row 40 with no ch after it. Fasten off.
(40 dc + 39 ch-1 sps = 79 sts)
Repeat on the second long edge. (40 dc + 39 ch-1 sps = 79 sts)
These green dc are the spokes that show inside the cream lace once the strip is twisted.
Checkpoint: The strip is 2.0 in (5.1 cm) wide.
Edge Row 2 (Cream, Arches)
Join cream in the first dc of Edge Row 1 on the first side. Ch 1, sc in the same dc. Ch 4, sk the next 2 dc (and the ch-1 sps around them), sc in the next dc. Rep from * to the end. Turn.
(14 sc + 13 ch-4 arches)
The sc land on dc 1, 4, 7 and so on up to dc 40, which is the last dc. Because 40 − 1 = 39 and 39 ÷ 3 = 13, you get exactly 13 arches with no leftover stitches.
Checkpoint: The strip is 2.4 in (6.1 cm) wide once this row is done on both sides.
Edge Row 3 (Cream, Fans)
Ch 1. Sc in the first ch-4 arch. Work a Fan in the next arch, then sc in the next arch. Rep from * 5 more times. Turn.
(7 sc + 6 Fans, where each Fan is 6 dc + 5 ch-1 sps = 7 + 66 = 73 sts)
The 7 sc go into the odd-numbered arches (1, 3, 5 and so on up to 13). The 6 fans go into the even-numbered arches (2 to 12).
Edge Row 4 (Cream, Picot Scallops)
Ch 1, sl st in the first sc. Work a Picot Loop in each of the 5 ch-1 sps of the next Fan, then sl st in the next sc. Rep from * 5 more times. Fasten off.
(6 scallops x 5 picot loops = 30 picot loops + 7 sl sts)
Work Edge Rows 2 to 4 along the second long edge in the same way, with the same counts.
Checkpoint: The strip is 4.2 in x 12 in (10.7 cm x 30.5 cm).
Why the math works: The 40 spine rows give 40 row ends, and Edge Row 1 puts one dc in each, so you have 40 dc. Anchoring an sc on every 3rd dc gives 14 sc and an odd number of arches (13). With an odd number of arches, the fans fit the even arches and an sc anchor sits at each end. Both edges come out symmetrical, and each starts and ends flush with the spine corners.
Final Blocking
- Weave in all ends except the two 6 in (15.2 cm) spine tails. Leave the Row 1 foundation tail long too, or add a new 6 in (15.2 cm) tail there.
- Wet the strip and press out the water. Pin it flat to 4.2 in x 12 in (10.7 cm x 30.5 cm). Pin each picot open and keep the spine ladder straight. Let it dry.
- Cover the tube with plastic wrap. Soak the dry strip in fabric stiffener and squeeze out the excess.
- Pin one short end of the spine to the top of the tube. Wrap the strip around the tube in 3 full twists, letting the cream edges spiral outward. Pin the other end at the bottom. The wrapped height should be about 10 in (25.4 cm).
- Lift each fan away from the tube so the scallops stand open. Let everything dry completely, ideally overnight.
- Slide the tube out. Thread a tail through the end posts of Row 1 with running stitch, pull it tight into a point and knot it. Do the same at Row 40.
- Fold the cord in half and knot it to form a hanging loop of about 2 in (5.1 cm). Thread on the 16 mm and 12 mm beads. Take the cord down through the top point, through the center of the spiral and out the bottom point.
- Thread on the two 12 mm beads. Pass the cord through the top of the bell, add the 10 mm bead and knot it so the bead hangs just below the brim. Trim the ends.
Final Quality-Control Checklist
- The spine has 40 rows, each with 4 dc and one ch-2 window.
- Edge Row 1 has 40 dc on each side.
- Edge Row 2 has 14 sc and 13 arches on each side.
- Each side has 6 fans and 30 picot loops.
- The flat blocked strip measured 4.2 in x 12 in (10.7 cm x 30.5 cm).
- The spiral has 3 even twists and stands about 10 in (25.4 cm) tall.
- The bell has 30 brim sts and 10 evenly spaced beads.
- Both ends are gathered tightly, with no gaps.
- The ornament hangs straight, about 16 in (40.6 cm) in total.
Troubleshooting
The spine is ruffling or curving. Your turning chain may be too tight or too loose. The ch 3 should be as tall as a dc. Check that you work the last dc into the top of the tch every row.
You came up short on the arch row. You probably skipped the wrong number of dc. Count 2 skipped dc between each sc, and ignore the ch-1 sps when counting.
The fans cup instead of lying flat. Loosen the ch-1 sps or go up 0.25 mm for Edge Row 3 only.
The spiral sags or untwists. It needs more stiffener. Soak it again and dry it back on the tube.
The bell brim curls up. You may have worked Rnd 8 in both loops. Redo it in FLO.
The spiral leans when hanging. The cord is off-center. Re-thread it through the middle of the gathered points.
Care
Dust it gently, or spot-clean with a damp cloth. If you hand-wash it, starch it and dry it on the tube again to restore the spiral.
Final Notes
Everything rests on one measurement chain. At gauge, 10 rows = 3 in (7.6 cm), so 40 rows make a 12 in (30.5 cm) spine that is 1.2 in (3.0 cm) wide. Edge Row 1 adds 0.4 in (1.0 cm) per side, for 2.0 in (5.1 cm). The arches bring it to 2.4 in (6.1 cm), and the fans and picots finish it at 4.2 in (10.7 cm). Three twists turn that flat strip into a 10 in (25.4 cm) spiral, and the beads and bell bring the ornament to about 16 in (40.6 cm). If you check each stage as you go, the spiral will come out even and balanced.
Happy crocheting!