

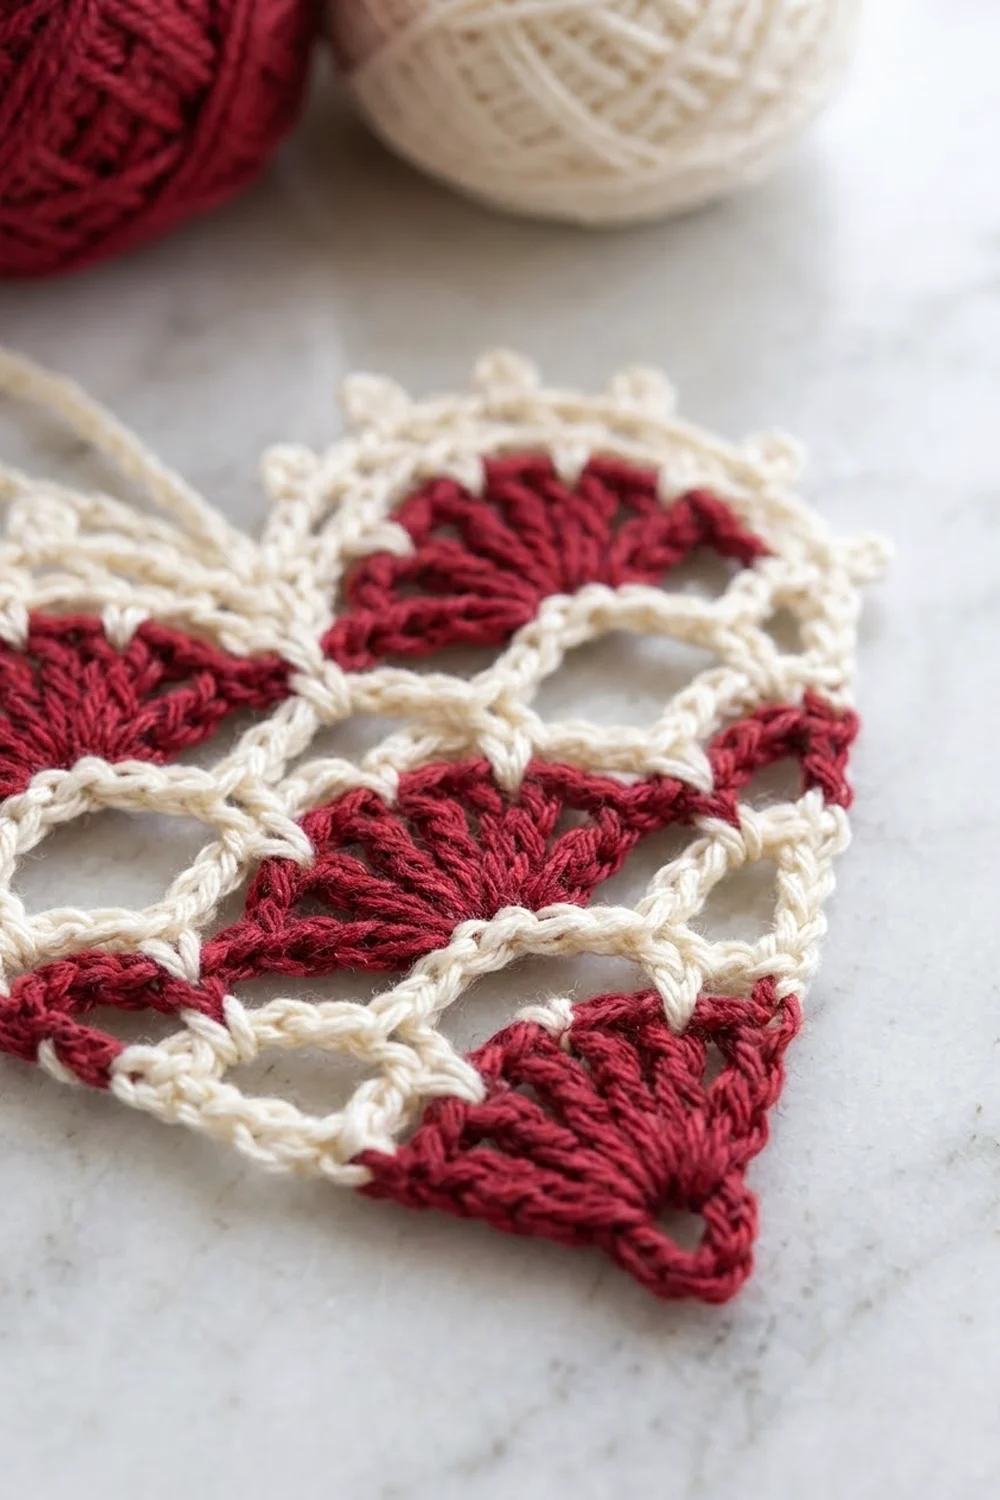
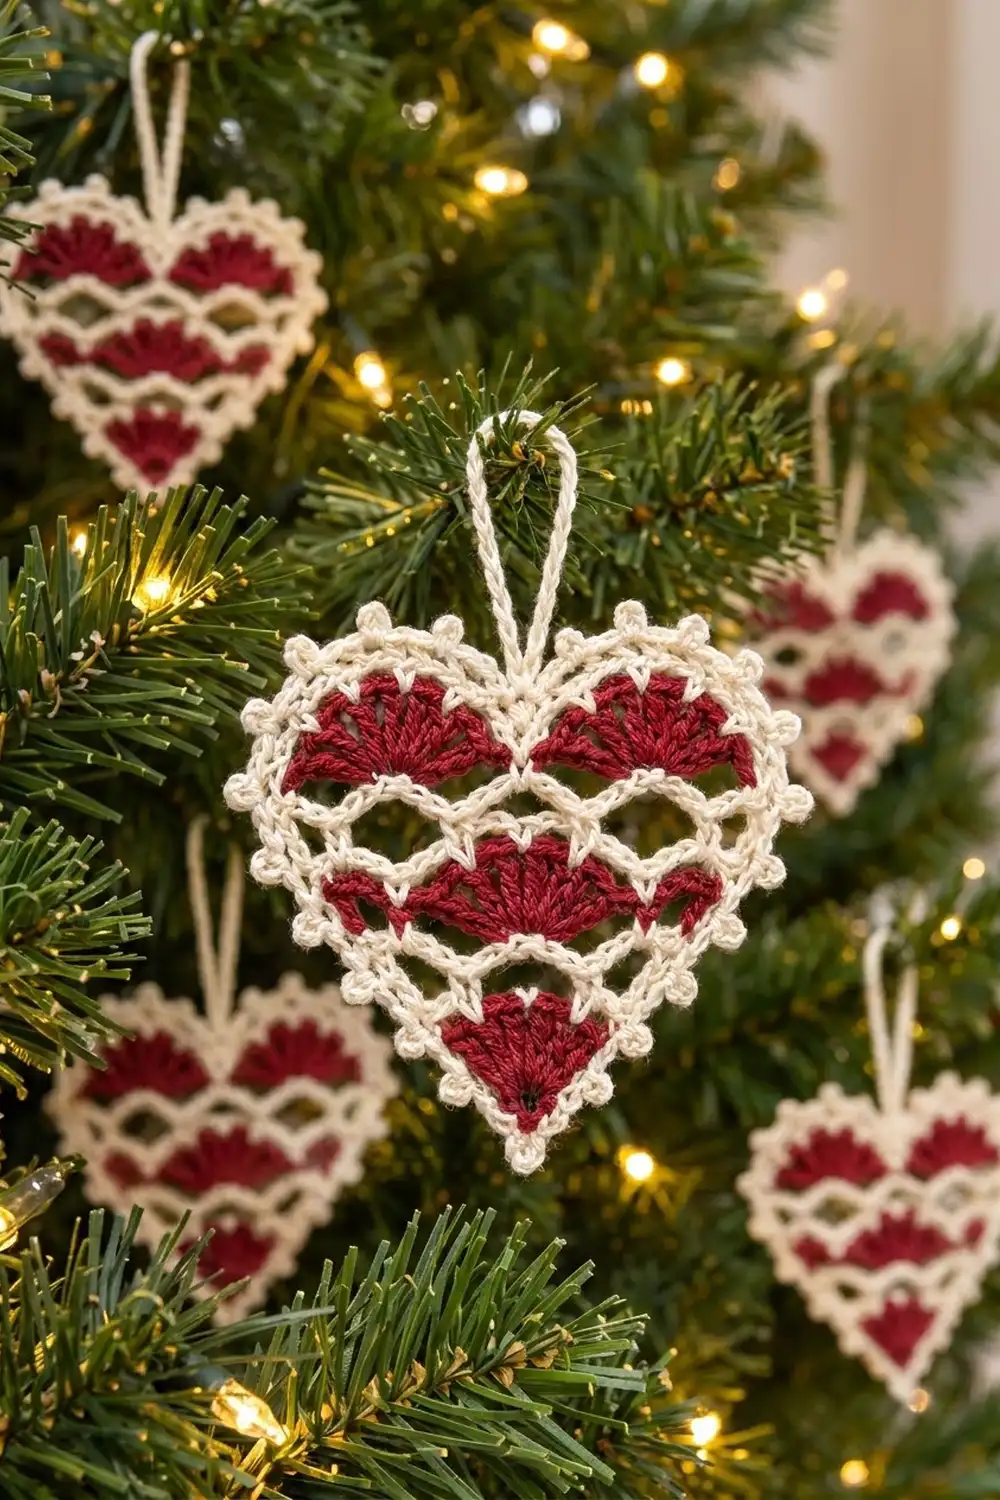
The Scarlet Lace Heart is a small, lacy ornament. Deep cranberry fans sit inside a creamy white chain-loop mesh. A picot edge and a corded hanging loop finish it, so it looks like a piece of heirloom lace on a tree branch.
There are only two colors. Cranberry red is for the fans. Ivory cream is for the mesh, outline, border, and loop. The red appears in three bands:
– One fan at the bottom point.
– A full center fan in the middle, with a half-fan at each edge.
– Two rounded fans at the top that form the lobes.
The pattern uses US crochet terms. The finished heart is 4 in wide x 4 in tall (10.2 cm x 10.2 cm), including the border. The hanging loop adds about 1.5 in (3.8 cm) above the center dip.
You work the heart flat in rows, from the bottom point upward, starting from a small ring. You change color at each band. A two-round cream border then goes around the whole outline, and a chain loop finishes the top. The heart has no separate pieces, so there is no sewing.
Finished Size and Construction
- Finished size: 4 in x 4 in (10.2 cm x 10.2 cm), plus a 1.5 in (3.8 cm) hanging loop
- Skill level: Easy-intermediate
- Terminology: US crochet terms
- Yarn weight: Sport weight (#2 fine) mercerized cotton
- Hook: 3.0 mm
- Number of pieces: 1 heart, worked in one piece
- Layout: Single motif; no joining needed
- Piece size before border: 3.5 in x 3.5 in (8.9 cm x 8.9 cm)
- Border depth: 0.25 in (0.6 cm) on each side
Materials
Choose a smooth mercerized cotton or cotton blend. It shows the fan stitches clearly, blocks crisply, and keeps its heart shape on a branch. Avoid fuzzy or very stretchy yarns, which blur the open mesh. Pick a red with good contrast against the cream, so the fans stand out from across the room.
- Color A, Cranberry Red: about 6 g / 19 m
- Color B, Ivory Cream: about 8 g / 25 m
These amounts assume a typical sport cotton with 155 m per 50 g. They include a small margin for a test swatch and for weaving in ends.
Tools:
– 3.0 mm crochet hook
– Tapestry needle
– Scissors
– Rust-proof pins and a foam blocking board
– Spray bottle with water
– Ruler or tape measure
– Optional: fabric stiffener
Abbreviations (US Terms)
- ch – chain
- sl st – slip stitch
- sc – single crochet
- dc – double crochet
- sk – skip
- sp(s) – space(s)
- st(s) – stitch(es)
- L1, L2… – loop 1, loop 2…, counted from the start of the row
- [ ] – repeat the steps inside the brackets as directed
Special stitch – Picot: Ch 3, sl st in the 3rd ch from the hook.
Fan: A group of dc worked into one stitch or space. Fans are 11 dc in the middle band and 13 dc in the top band.
Gauge and Checkpoints
Exact gauge is not critical for an ornament, but it does set the final size. Work Rows 1–2 first as your test piece and measure before you go on.
Gauge: Rows 1–2 = 1.75 in (4.4 cm) wide x 0.75 in (1.9 cm) tall, measured from the ring to the top of the fan.
Checkpoints (measure across the widest point, with the piece lying flat and unstretched):
| Stage | Width |
|---|---|
| After Row 2 | 1.75 in (4.4 cm) |
| After Row 4 | 2.25 in (5.7 cm) |
| After Row 5 | 2.75 in (7.0 cm) |
| After Row 7 | 3.25 in (8.3 cm) |
| After Row 9 | 3.5 in x 3.5 in (8.9 cm x 8.9 cm) |
| After border | 4 in x 4 in (10.2 cm x 10.2 cm) |
If you are more than 0.125 in (0.3 cm) too big at any checkpoint, change to a 2.75 mm hook. If you are too small, change to a 3.25 mm hook. Mesh rows stretch during blocking, so measure mainly at the red fan rows.
Heart Pattern
Work flat in rows and turn at the end of every row. At the end of each color band, fasten off and leave a 6 in (15.2 cm) tail. Join the new color in the first stitch of the next row.
Color-change tip: Join the new color with a firm slip knot on the hook. Keep both tails at the back. You can crochet over the tails for a few stitches, which saves weaving time later.
Bottom Fan (Color A)
Foundation: With Color A, ch 5. Sl st in the first ch to form a ring.
Row 1: Ch 3 (counts as dc), 8 dc in the ring. Turn. (9 dc)
The ring stays open and becomes the small hole at the bottom point of the heart.
Row 2: Ch 3 (counts as dc), dc in the first st, 2 dc in each of the next 7 dc, 1 dc in the top of the turning ch. (17 dc: 2 + 14 + 1) Fasten off Color A.
The odd count of 17 lets the next mesh row land evenly on both edge stitches.
First Mesh Band (Color B)
Row 3: Turn. Join Color B in the first dc, ch 1, sc in the same dc, [ch 5, sk 3 dc, sc in next dc] 4 times. Turn. (5 sc, 4 ch-5 loops)
The sc land on dc 1, 5, 9, 13, and 17, so the last sc lands exactly on the last dc.
Row 4: Ch 1, sc in the first sc, ch 5, sc in the first ch-5 loop, [ch 5, sc in next ch-5 loop] 3 times, ch 5, sc in the last sc. Turn. (6 sc, 5 ch-5 loops)
Working into the edge sc at both ends adds one loop, which widens the heart. Fasten off Color B.
Middle Fan Band (Color A)
Label the five loops of Row 4 as L1 to L5.
Row 5: Join Color A in the first sc, ch 3 (counts as dc), 4 dc in the same sc (half-fan made), sc in L1, ch 3, sc in L2, 11 dc in L3 (center fan made), sc in L4, ch 3, sc in L5, 5 dc in the last sc (half-fan made). Turn. (21 dc: 5 + 11 + 5; 4 sc; 2 ch-3 sps)
This makes a full center fan with a half-fan at each outer edge. Fasten off Color A.
Second Mesh Band (Color B)
Row 6: Join Color B in the first dc, ch 1, sc in the same dc, ch 5, sc in the next ch-3 sp, ch 5, sc in the 3rd dc of the center fan, ch 5, sc in the 6th dc of the center fan, ch 5, sc in the 9th dc of the center fan, ch 5, sc in the next ch-3 sp, ch 5, sc in the last dc. Turn. (7 sc, 6 ch-5 loops)
The 6th dc is the middle of the 11-dc fan, so the loops sit evenly on both sides.
Row 7: Ch 1, sc in the first sc, ch 5, sc in the first ch-5 loop, [ch 5, sc in next ch-5 loop] 5 times, ch 5, sc in the last sc. Turn. (8 sc, 7 ch-5 loops) Fasten off Color B.
Top Lobe Fans (Color A)
Label the seven loops of Row 7 as L1 to L7. L4 is the center loop.
Row 8: Join Color A in the first sc, ch 1, sc in the same sc, ch 2, sc in L1, 13 dc in L2, sc in L3, ch 3, sk L4, sc in L5, 13 dc in L6, sc in L7, ch 2, sc in the last sc. Turn. (26 dc in two 13-dc fans; 6 sc; 2 ch-2 sps; 1 ch-3 sp)
Skipping L4 pulls the center down and forms the V-dip between the two rounded lobes. Fasten off Color A.
Lobe Outline (Color B)
Row 9: Join Color B in the first sc, ch 1, sc in the same sc, ch 3, sc in the 1st dc of the first fan, [ch 3, sk 2 dc, sc in next dc] 4 times, ch 3, sc in the center ch-3 sp, ch 3, sc in the 1st dc of the second fan, [ch 3, sk 2 dc, sc in next dc] 4 times, ch 3, sc in the last sc. (13 sc, 12 ch-3 loops)
In each fan, the sc land on dc 1, 4, 7, 10, and 13. The 7th sc of the row is the center sc, in the dip. Do not fasten off. Go straight on to the border.
Checkpoint: 3.5 in x 3.5 in (8.9 cm x 8.9 cm).
Border
Work both border rounds in Color B.
Border gauge: About 4.5 sc per 1 in (2.5 cm) along the edges. This is why the side counts are fairly low.
Round 1: Ch 1. Work down the side edge into the row-ends, using this many sc in each:
| Row-end | Sc |
|---|---|
| Row 8 | 1 |
| Row 7 | 1 |
| Row 6 | 1 |
| Row 5 (dc) | 2 |
| Row 4 | 1 |
| Row 3 | 1 |
| Row 2 (dc) | 2 |
| Row 1 (dc) | 2 |
| Total per side | 11 |
- Bottom point: Work (sc, ch 2, sc) into the foundation ring, between the first and last dc of Row 1.
- Second side: Work up the other side using the same counts in reverse order. (11 sc)
- Top:
- Sc in the end sc of Row 9 (the shoulder).
- 3 sc in each of the next 6 ch-3 loops. (18 sc)
- Skip the center sc so the dip stays sharp.
- 3 sc in each of the next 6 ch-3 loops. (18 sc)
- Sc in the end sc of Row 9 where you started.
- Sl st to the first sc.
Total: 2 point sc + 11 + 11 + 1 + 18 + 18 + 1 = 62 sc, plus 1 ch-2 sp at the point.
Why the math works:
– A dc row-end is about twice as tall as a sc row-end, so it gets 2 sc. This keeps the sides flat, with no ruffling or cupping.
– Each ch-3 loop takes 3 sc, which matches its length.
– Each half of the heart, from the point to the dip, holds 31 stitches: 1 point sc + 11 side sc + 1 shoulder sc + 18 top sc.
– 31 = (3 x 10) + 1, which fits the picot repeat in Round 2 exactly.
Round 2 (picot edge): Sl st into the ch-2 point sp, ch 1, then work (sc, picot, sc) in the point sp. Continue:
- First half: [Sc in next 2 sts, (sc, picot) in next st] 10 times, sc in next st. (31 sc, 10 picots) You are now at the center dip.
- Second half: Sc in next st, [(sc, picot) in next st, sc in next 2 sts] 10 times. (31 sc, 10 picots)
- Sl st to the first sc.
Total: 64 sc and 21 picots (2 point sc + 31 + 31). The two halves mirror each other, so the picots sit at matching spots on both sides.
Hanging Loop
With Color B, join with a sl st in the sc on one side of the center dip. Ch 32, then sl st in the sc on the other side of the dip. Sl st in each ch back around the loop (32 sl sts) to give it a firm, corded look. Sl st into the starting sc and fasten off. The loop stands about 1.5 in (3.8 cm) tall.
Final Blocking
- Weave in all ends through stitches of the same color: red tails into red fans, cream tails into cream mesh.
- Mist the heart with water until it is damp but not dripping.
- Lay it flat on the blocking board, right side up.
- Pin the bottom point, the center dip, and the two shoulders first. Check that the heart measures 4 in x 4 in (10.2 cm x 10.2 cm).
- Pin each picot outward so it shows as a clear bump.
- Open each ch-5 loop gently with your fingertips so the mesh looks even.
- Pin the hanging loop straight up from the dip.
- Let it dry completely. For a stiffer ornament, brush on diluted fabric stiffener before pinning.
Final Quality-Control Checklist
- Row 2 has 17 dc, and the ring at the point stays open.
- Row 5 has a full 11-dc center fan and two 5-dc half-fans.
- Row 8 has two 13-dc fans with a clear V-dip between them.
- The color changes are clean, with no red showing through the cream rows.
- Each half of the border has 31 sts, and there are 21 picots in total.
- The heart measures 4 in x 4 in (10.2 cm x 10.2 cm).
- The loop is centered over the dip.
- All ends are woven in securely.
Troubleshooting
- Fans ruffle: Your tension is loose. Go down a hook size, and check that each fan has exactly 11 or 13 dc.
- Fans cup: Your tension is tight. Go up a hook size.
- Mesh row is short: Recount the loops. You must work the edge sc at both ends of the row.
- Heart leans to one side: A fan or loop is off by one. Check that the Row 5 fan is in L3 and that L4 is skipped in Row 8.
- Border waves: Use 1 sc, not 2, in each sc row-end.
- Dip is flat: Make sure you skipped the center sc in Round 1.
- Loop twists: Before pinning the loop, untwist the chain and work the slip stitches loosely.
Care
Hand wash in cool water with mild soap. Roll the heart in a towel to remove water, then reblock it flat to dry. Store it flat or hanging, out of direct sun, so the red stays bright.
Final Notes
The heart grows in clear stages:
– The bottom fan is 1.75 in (4.4 cm) wide.
– It widens to 2.25 in (5.7 cm) at Row 4, 2.75 in (7.0 cm) at Row 5, 3.25 in (8.3 cm) at Row 7, and 3.5 in (8.9 cm) at Row 9.
– The 0.25 in (0.6 cm) border brings it to 4 in x 4 in (10.2 cm x 10.2 cm).
– The loop adds 1.5 in (3.8 cm) on top.
If you check each stage as you go, the heart will come out at the right size.
Happy crocheting!