

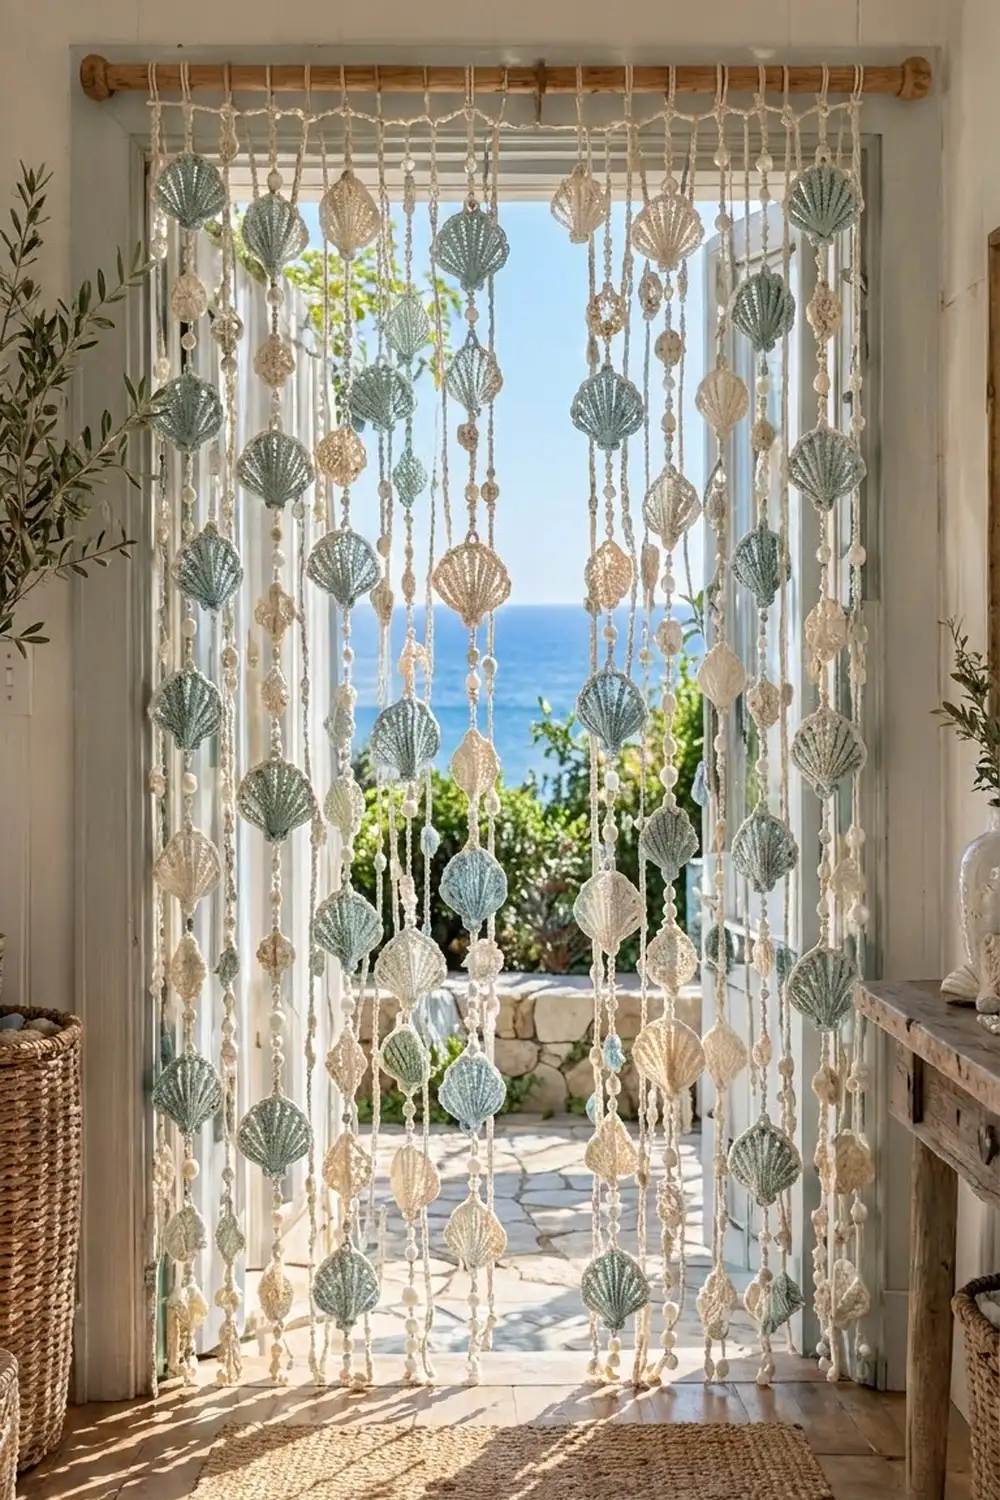
This coastal door curtain hangs like a beaded screen made of seashells. Twelve cream cords drop from a wooden rod. Each one carries ribbed fan shells, small flower medallions, and pearl beads, and it moves in a breeze without blocking the view.
The colors are soft sage green and natural cream, like sea glass and sand. Sage shells get a cream scalloped border, and all-cream shells sit between them. The pearls add shine, and the medallions make the cords look lacy.
All instructions use US crochet terms. The finished curtain is 36 in (91.4 cm) wide with a 78 in (198.1 cm) drop from the rod. Each bordered shell measures 4.5 in (11.4 cm) wide by 2.5 in (6.4 cm) tall.
The construction is simple. Each shell is worked flat in five rows from the hinge outward, then gets a two-round cream border. Medallions are worked in three rounds. Then you chain each cord with two strands held together and join the shells, medallions, and pearls as you go.
Finished Size and Construction
- Finished size: 36 in (91.4 cm) wide × 78 in (198.1 cm) drop
- Skill level: Intermediate
- Terminology: US
- Yarn weight: DK (#3) cotton
- Hooks: 3.5 mm (E-4) for motifs, 4.0 mm (G-6) for cords
- Number of pieces: 96 shells (48 sage, 48 cream), 96 medallions, 12 cords
- Layout: 12 cords spaced 3 in (7.6 cm) apart, each with 8 repeat units of 9 in (22.9 cm)
- Shell size before border: 3.5 in (8.9 cm) wide × 2 in (5.1 cm) tall
- Border depth: 0.5 in (1.3 cm)
- Shell size after border: 4.5 in (11.4 cm) × 2.5 in (6.4 cm)
- Medallion size: 1.5 in (3.8 cm) across
Materials
Use a smooth, mercerized or combed DK cotton. Cotton holds the rib texture crisply and doesn’t stretch much when hanging. These estimates assume about 2.3 m per gram (roughly 115 m per 50 g).
- Sage green: 225 g (518 m), for 48 shell bodies
- Cream: 650 g (1,495 m), for 48 shell bodies, 96 borders, 96 medallions, and 12 cords
Both quantities include a margin of about 12–15% for gauge swatches and tails.
Tools:
– 3.5 mm (E-4) and 4.0 mm (G-6) crochet hooks
– 204 large-hole pearl beads, 12 mm (about 0.5 in / 1.3 cm), with holes of at least 2.5 mm. Buy about 220 to allow for spares.
– Big-eye beading needle
– Tapestry needle
– Stitch markers
– Rustproof pins and a blocking mat
– Tape measure
– Wooden rod, 40 in (101.6 cm) long and 1 in (2.5 cm) thick, plus two brackets
Abbreviations (US Terms)
- ch – chain
- sl st – slip stitch
- sc – single crochet
- dc – double crochet
- fpdc – front post double crochet
- bpdc – back post double crochet
- sk – skip
- st(s) – stitch(es)
- sp – space
- RS / WS – right side / wrong side
Special stitch – Drop-loop join: Remove the hook from the working loop. Insert the hook from front to back through the join point, catch the dropped loop, and pull it through. Ch 1 to lock it. The locking ch counts as part of the next chain section.
Rib logic: Fpdc on RS rows and bpdc on WS rows both push the post toward the RS. That keeps the ribs raised on the front of the shell.
Gauge and Checkpoints
Make one complete sage shell, with its border, before starting the rest. Block it lightly and measure it.
- Shell after Row 3: 2.25 in (5.7 cm) wide × 1.25 in (3.2 cm) tall
- Shell after Row 5: 3.5 in (8.9 cm) wide × 2 in (5.1 cm) tall
- Shell after border: 4.5 in (11.4 cm) × 2.5 in (6.4 cm)
- Medallion after Rnd 3: 1.5 in (3.8 cm)
- Cord (2 strands, 4.0 mm hook): 4 ch = 1 in (2.5 cm)
If your shell comes out more than 0.25 in (0.6 cm) too big, go down half a hook size. If it’s too small, go up half a size. If the cord is off gauge, change the cord hook instead of adjusting chain counts. Every cord length below depends on 4 ch per inch.
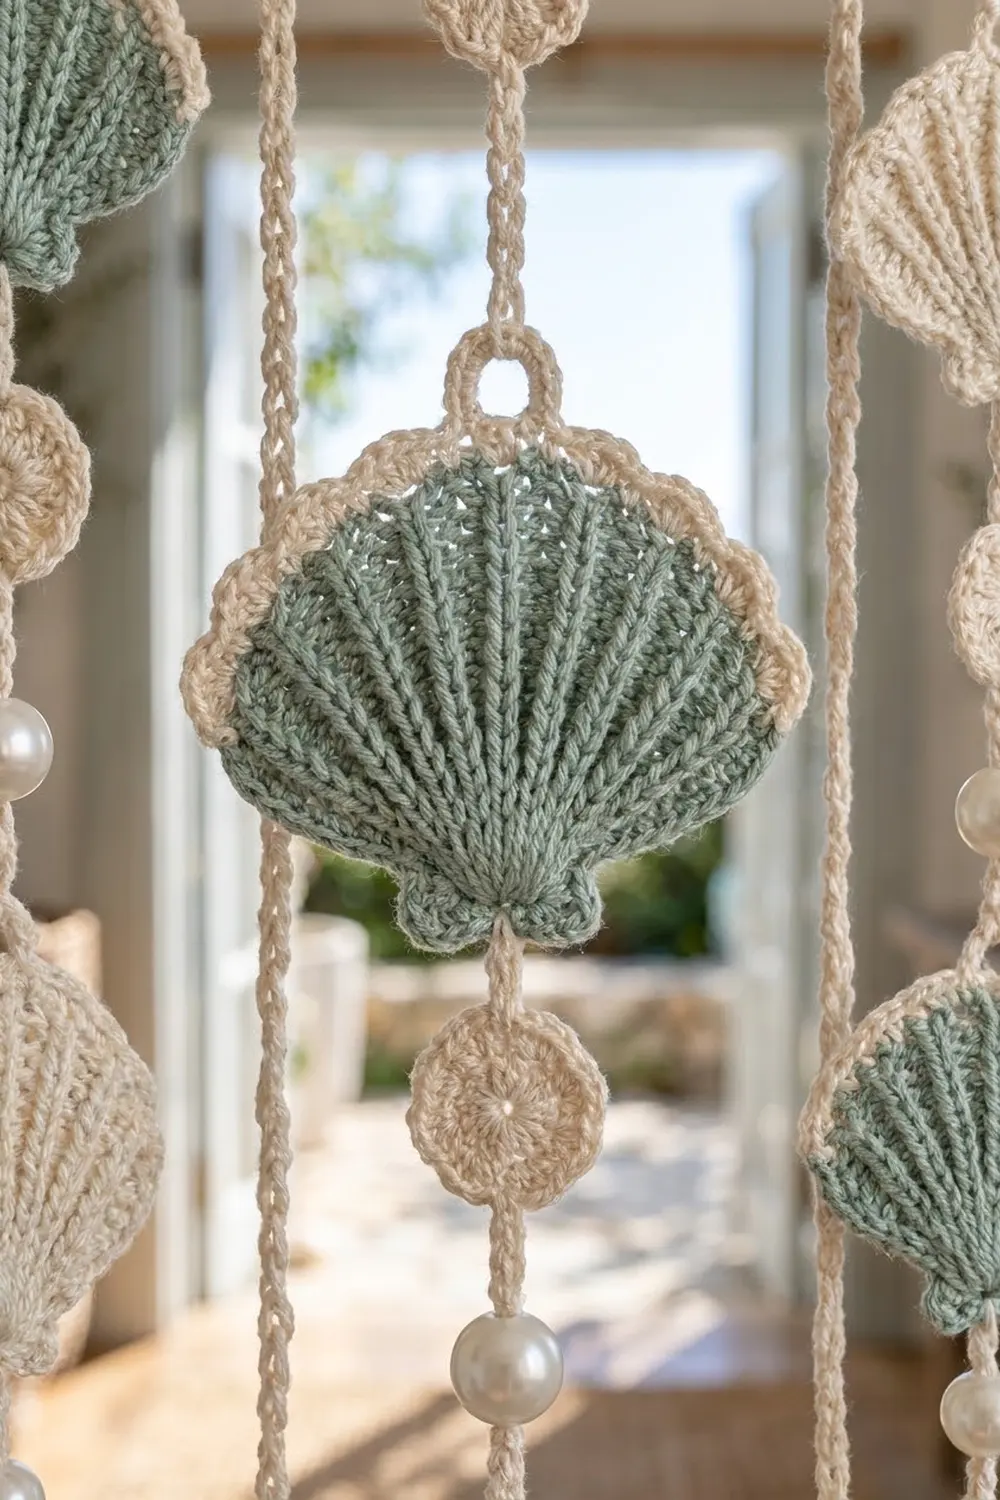
Shell Pattern (Make 96)
Use the 3.5 mm hook. Make 48 shells in sage and 48 in cream.
Row 1 (RS): Ch 4. Work 7 dc in the 4th ch from the hook. The skipped ch-3 counts as a dc. Turn. (8 sts)
Row 2 (WS): Ch 3 (counts as dc). Dc in the first st, then work 2 dc in each of the next 6 sts. Dc in the top of the turning ch. Turn. (15 sts)
Row 3 (RS): Ch 3 (counts as dc). Dc in the first st. Fpdc around the next st, 2 dc in the next st; repeat from * 5 more times. Fpdc around the next st, then work 2 dc in the top of the turning ch. Turn. (23 sts: 7 fpdc ribs and 8 panels of 2 dc)*
Row 4 (WS): Ch 3 (counts as dc). Work 2 dc in the next st. Bpdc around the next st, dc in the next st, 2 dc in the next st; repeat from * 6 more times. Turn. (31 sts: 7 ribs and 8 panels of 3 dc)*
Row 5 (RS): Ch 3 (counts as dc). Dc in the next st, then work 2 dc in the next st. Fpdc around the next st, dc in each of the next 2 sts, 2 dc in the next st; repeat from * 6 more times. Do not turn. (39 sts: 7 ribs and 8 panels of 4 dc)*
Each row adds exactly 1 st to each of the 8 panels: 15 → 23 → 31 → 39. The 7 ribs stay at 1 st each, so they spread out evenly from the hinge.
- Sage shells: Fasten off and work the border in cream (see Border).
- Cream shells: Fasten off and rejoin the same cream for the border.
Every shell must get its border before you join the cord.
Medallion Pattern (Make 96)
Use cream and the 3.5 mm hook.
Rnd 1: Make a magic ring. Ch 1 and work 8 sc in the ring. Sl st to the first sc. (8 sc, 0.75 in / 1.9 cm)
Rnd 2: Ch 1. Sc in the next sc, ch 3; repeat from * 7 more times. Sl st to the first sc. (8 sc and 8 ch-3 sps)*
Rnd 3: In each ch-3 sp, work (sc, dc, dc, dc, sc). Sl st to the first sc. (8 petals, 40 sts)
Fasten off. Number the petals 1 to 8 going around. Petals 1 and 5 sit directly opposite each other and are the cord join points. Join at the center dc of each one.
Make All Pieces
Totals:
– Sage shells (sage body, cream border): 48
– Cream shells: 48
– Medallions: 96
– Pearls: 17 per cord × 12 = 204
Repeat units (9 in / 22.9 cm each):
– Odd cords (1, 3, 5, 7, 9, 11): pearl section, medallion, pearl section, shell
– Even cords (2, 4, 6, 8, 10, 12): pearl section, shell, pearl section, medallion
This places shells on neighboring cords 4 in (10.2 cm) apart vertically. That’s what creates the staggered look.
Shell color layout (G = sage, C = cream; columns are cords 1–12, rows are units from the top):
Unit   1  2  3  4  5  6  7  8  9 10 11 12
 1     G  C  G  C  G  C  G  C  G  C  G  C
 2     C  G  C  G  C  G  C  G  C  G  C  G
 3     G  C  G  C  G  C  G  C  G  C  G  C
 4     C  G  C  G  C  G  C  G  C  G  C  G
 5     G  C  G  C  G  C  G  C  G  C  G  C
 6     C  G  C  G  C  G  C  G  C  G  C  G
 7     G  C  G  C  G  C  G  C  G  C  G  C
 8     C  G  C  G  C  G  C  G  C  G  C  G
Each cord carries 4 sage and 4 cream shells, for 48 of each in total.
Joining
The joining method is a join-as-you-go chain cord. The cord runs behind each motif and is attached at two points, so the pieces hang flat and don’t spin.
Prepare: Thread 17 pearls onto two strands of cream held together, using the beading needle. Work with the 4.0 mm hook and both strands together. Leave a 6 in (15.2 cm) tail.
Top section, 4.5 in (11.4 cm):
– Ch 16 and sl st to the first ch to make the rod loop. It hangs 2 in (5.1 cm) deep.
– Ch 10 for another 2.5 in (6.4 cm).
Pearl section, 2.5 in (6.4 cm): Ch 4, slide 1 pearl up against the hook, then ch 4.
Medallion join, 1.5 in (3.8 cm):
1. Hold the medallion RS facing you, with the cord behind it.
2. Drop-loop join through the center dc of petal 1.
3. Ch 5. Together with the locking ch, that makes 6 ch behind the medallion.
4. Drop-loop join through the center dc of petal 5.
Shell join, 2.5 in (6.4 cm):
1. Hold the shell RS facing you, hinge up.
2. Drop-loop join through the hinge loop.
3. Ch 9, for 10 ch including the lock.
4. Drop-loop join through the center sc of the curved edge. This is the 6th of the 11 sc between scallops.
The lock ch at the start of each pearl section counts as its first ch, so the counts stay 4 + pearl + 4.
Cord sequence: Work the top section, then 8 repeat units in the odd or even order. For the tail, ch 4, slide the last pearl up, and fasten off. Tie an overhand knot snug under the pearl. The tail section is 1.5 in (3.8 cm).
Length check: 4.5 in + (8 × 9 in) + 1.5 in = 78 in (198.1 cm).
Tension: Keep the chains even and medium-firm. The chain behind each motif should match the motif’s height exactly. If it’s too short, the motif buckles. If it’s too long, the motif droops forward.
Size checkpoint: Hang each finished cord from a hook for 10 minutes, then measure. It should be 78 in (198.1 cm), give or take 0.5 in (1.3 cm).
Border
This border is the cream scalloped edging on each shell. Work it after Row 5 and before joining.
Border gauge: Rnd 1 is worked 1 sc per Row 5 st across the curve, so the edge stays flat without stretching or ruffling. Rnd 2 adds 0.5 in (1.3 cm) to the curved edge and each side.
Rnd 1 (RS): Join cream with a standing sc in the top of the beginning ch-3 of Row 5.
1. Sc in the same st, sc in each of the next 37 sts, then 2 sc in the last st. (Curved edge: 39 sc worked 1 per st + 2 extra = 41 sc)
2. Working down the side: 2 sc in each of the 5 row ends. (10 sc)
3. At the hinge, ch 6 for the hanging loop.
4. Working up the other side: 2 sc in each of the 5 row ends. (10 sc)
5. Sl st to the first sc.
(61 sc and a ch-6 loop)
Rnd 2 (RS): Ch 1.
1. Sc in the first sc. Sk 1, 5 dc in the next sc, sk 1, sc in the next sc; repeat from * 9 more times. (Curved edge: 11 sc + 50 dc = 61 sts in 10 scallops)
2. Sc in each of the next 10 sc. (Side: 10)
3. Work 8 sc into the ch-6 loop. (Hinge: 8)
4. Sc in each of the next 10 sc. (Side: 10)*
5. Sl st to the first sc.
(89 sts) Fasten off and weave in the ends.
Why the math works: Each scallop uses 4 sts: skip, 5-dc group, skip, sc. Starting at sc 1, ten repeats end exactly on sc 41 (1 + 4 × 10). That’s why Rnd 1 adds 2 extra sc to Row 5’s 39 sts. The 6th sc (st 21) lands at the exact center of the curve, so it’s the bottom cord join point. Each side gets 2 sc per dc row end, so it lies flat.
Final Blocking
- Before joining, pin each shell to 4.5 in × 2.5 in (11.4 × 6.4 cm). Pin the shells RS up, open each scallop, and keep the ribs straight.
- Pin each medallion to 1.5 in (3.8 cm), opening all 8 petals.
- Mist the pieces with water until damp. Let them dry completely before you unpin them.
- After joining, slide the 12 rod loops onto the rod. Space them 3 in (7.6 cm) apart, with the outer cords 1.5 in (3.8 cm) in from each end of the 36 in (91.4 cm) hanging width.
- Hang the curtain, mist the cords lightly, and run your fingers down each cord so the chains straighten.
- Let it dry while hanging. Check that every cord has a 78 in (198.1 cm) drop.
Final Quality-Control Checklist
- Every shell has 39 sts in Row 5, 61 sc in Border Rnd 1, and 89 sts in Border Rnd 2
- All 7 ribs are raised on the RS of each shell
- Each shell has exactly 10 scallops
- Each medallion has 8 open petals, with the joins on petals 1 and 5
- Shell colors match the layout grid, alternating along each cord and across the rod
- Each cord has 17 pearls, 8 shells, and 8 medallions
- Each cord measures 78 in (198.1 cm) when hanging
- The cords are spaced 3 in (7.6 cm) apart across 36 in (91.4 cm)
- All tails are woven in and the knots under the tail pearls are tight
Troubleshooting
Shell cups or curls: Your Row 5 is probably too tight, or the post stitches are pulling in. Loosen the posts or go up half a hook size.
Shell ruffles: Recount the panels. Each panel should gain exactly 1 st per row.
Wrong scallop count: Recount Border Rnd 1. The curved edge needs exactly 41 sc.
Motif tilts forward: The chain behind it is too long. Remove 1 ch.
Motif buckles: The chain behind it is too short. Add 1 ch.
Pearls slide around: Make sure you ch 4 on both sides of each pearl and keep the chains firm.
Cords are different lengths: Check the cord gauge against 4 ch per inch, then redo the joins on any cord that measures off.
Medallion twists: Check that the joins are on opposite petals, 1 and 5, and not adjacent ones.
Care
Dust the curtain gently or shake it out. If it needs washing, hand wash it in cool water, press out the water in a towel, and re-block it hanging.
Final Notes
The curtain’s size comes down to a short chain of measurements:
– The shell grows 8 sts per row, 15 → 23 → 31 → 39, and measures 3.5 in × 2 in (8.9 × 5.1 cm).
– The border takes it to 41 sc and then 10 scallops, for a finished shell of 4.5 in × 2.5 in (11.4 × 6.4 cm).
– Each cord is a 4.5 in top section, plus eight 9 in (22.9 cm) units, plus a 1.5 in tail, for 78 in (198.1 cm).
– Twelve cords at 3 in (7.6 cm) spacing fill 36 in (91.4 cm).
If you check your gauge at each of these steps, the finished curtain will hang even.
Happy crocheting!