

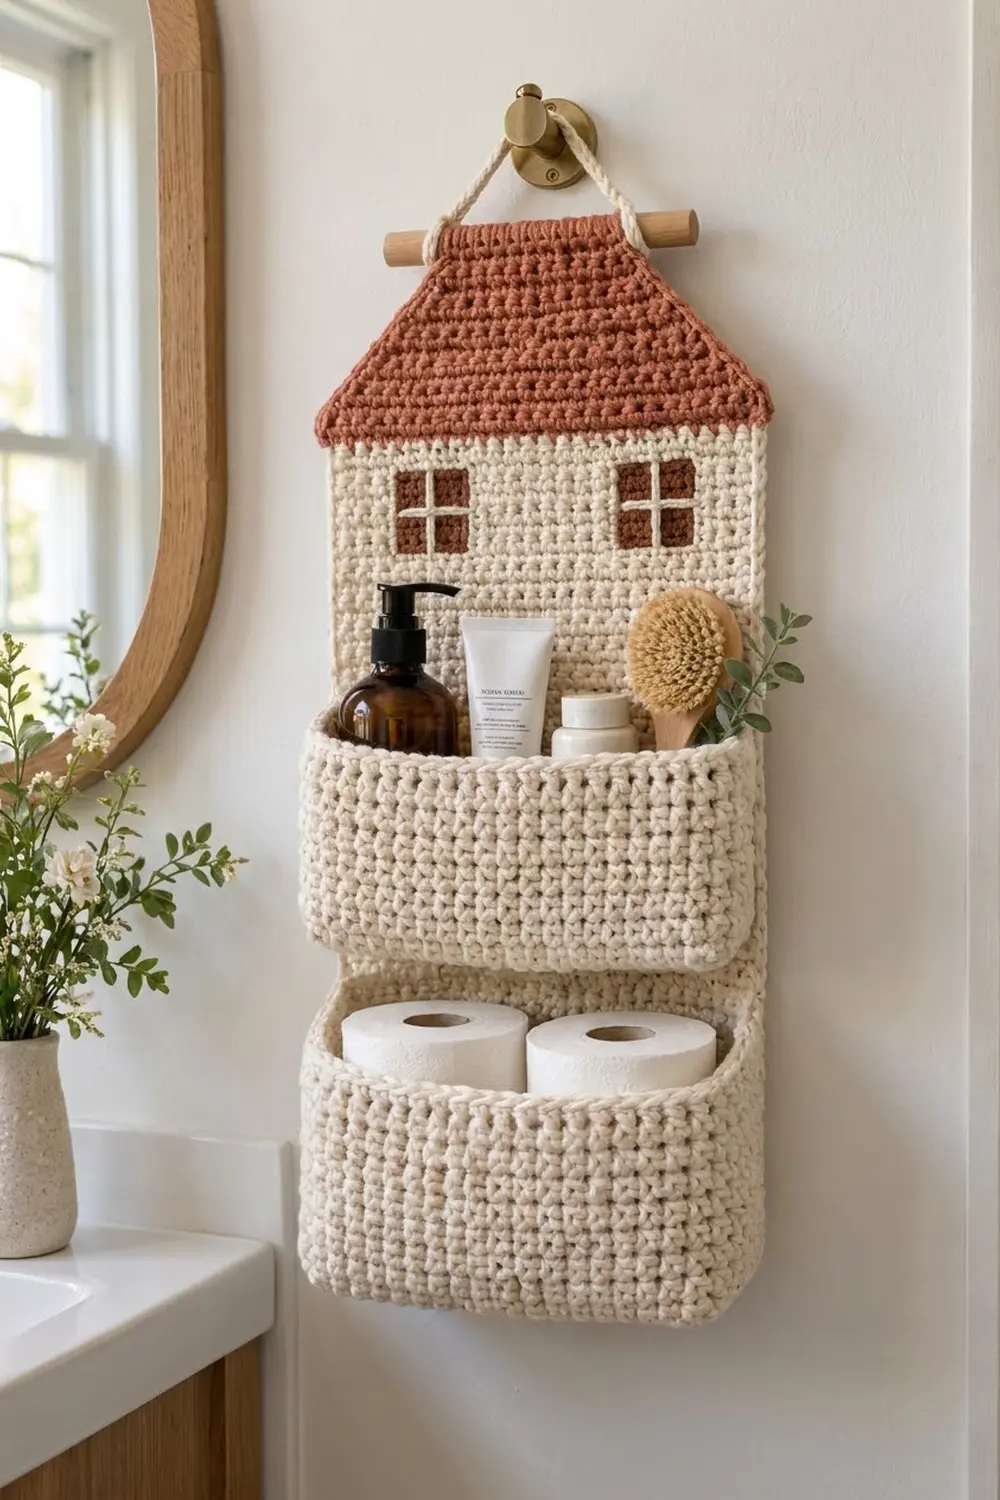
This hanging organizer is shaped like a little cottage. It has a terracotta roof, a cream house front with two four-pane windows, and two deep basket pockets stacked one above the other. It hangs from a short wooden dowel on a cream cord, so it works well on a bathroom wall, in an entryway, or in a craft corner.
The palette is warm and simple: creamy off-white for the house and pockets, and brick terracotta for the roof and windows. Everything is plain single crochet in bulky cotton-blend yarn. That makes a dense, pebbled fabric, so the pockets stand open without a stiffener.
The pattern uses US crochet terms. The finished organizer is 12 in (30.5 cm) wide across the body and 24 in (61.0 cm) tall, not counting the cord. The eaves are 13⅓ in (33.9 cm) wide.
You’ll make three pieces. The back panel is worked bottom-up in rows, with intarsia windows. Each pocket starts as a flat base and is then worked up in joined rounds. You sew the pockets on, add a one-round border, and finish with a dowel casing.
Finished Size and Construction
- Finished size: 12 in (30.5 cm) x 24 in (61.0 cm); eaves 13⅓ in (33.9 cm)
- Skill level: Intermediate
- Terminology: US crochet terms
- Yarn weight: Bulky (#5) cotton or cotton blend
- Hook: 6.0 mm (US J-10)
- Number of pieces: 3 (1 back panel, 2 pockets), plus a cord
- Layout: 2 pockets stacked vertically, centered on the body of the house
- Panel size before border: 11⅓ in (28.8 cm) x 23⅓ in (59.3 cm)
- Pocket size: 10⅔ in (27.1 cm) wide x 3⅓ in (8.5 cm) deep. The upper pocket is 5 in (12.7 cm) tall and the lower one is 6 in (15.2 cm) tall.
- Border depth: ⅓ in (0.8 cm), one round of sc
Materials
Choose a smooth, round bulky cotton or cotton blend with about 100 m per 100 g. Cotton gives crisp stitch definition and keeps its shape when the pockets are full. Avoid fuzzy or stretchy acrylics, because the pockets will sag. Buy all of each color from the same dye lot, since the cream covers large areas.
- Color A – Cream: about 650 g / 650 m (panel body, pockets, border, cord)
- Color B – Terracotta: about 100 g / 100 m (roof, windows, roof border, casing)
These quantities include a margin of about 15% for swatching and sewing.
Tools:
- 6.0 mm (US J-10) crochet hook
- Tapestry needle
- Locking stitch markers
- 2 small yarn bobbins
- Wooden dowel, 7 in (17.8 cm) long, ½ in (1.3 cm) in diameter
- Scissors and measuring tape
- Blocking mat and rust-proof pins
Abbreviations (US Terms)
- ch – chain
- sc – single crochet
- sc2tog – single crochet 2 together (decrease)
- sl st – slip stitch
- st(s) – stitch(es)
- BLO – back loop only
- rnd(s) – round(s)
- RS / WS – right side / wrong side
Special stitch – Crab stitch (reverse sc): With the RS facing, work from left to right. Insert the hook in the next st to the right, pull up a loop, yarn over, and pull through both loops. This makes the corded pocket rim.
Color change: Work the last st in the old color until 2 loops remain, then finish it with the new color.
Gauge and Checkpoints
Gauge: 12 sc and 12 rows = 4 in (10.2 cm). That makes each stitch and each row ⅓ in (0.8 cm). All the shaping and the border rely on this square ratio.
Test one piece first. Make a pocket base before you start the panel. It should measure 10⅔ in (27.1 cm) x 3⅓ in (8.5 cm). If it does, keep going and finish the pocket.
- Too big: go down 0.5 mm in hook size.
- Too small: go up 0.5 mm.
Checkpoints:
- Row 41: 11⅓ in (28.8 cm) wide, 13⅔ in (34.7 cm) tall
- Row 52: 17⅓ in (44.0 cm) tall
- Row 54: eaves 12⅔ in (32.2 cm) wide
- Row 70: 23⅓ in (59.3 cm) tall
- After border: 12 in (30.5 cm) x 24 in (61.0 cm)
Back Panel
Work in turned rows. The ch 1 at the start of a row doesn’t count as a stitch.
House Body (Color A)
Foundation: With A, ch 35.
Row 1: Sc in 2nd ch from hook and in each ch across. (34 sts)
Rows 2–41: Ch 1, turn, sc in each st across. (34 sts)
Windows (Rows 42–48)
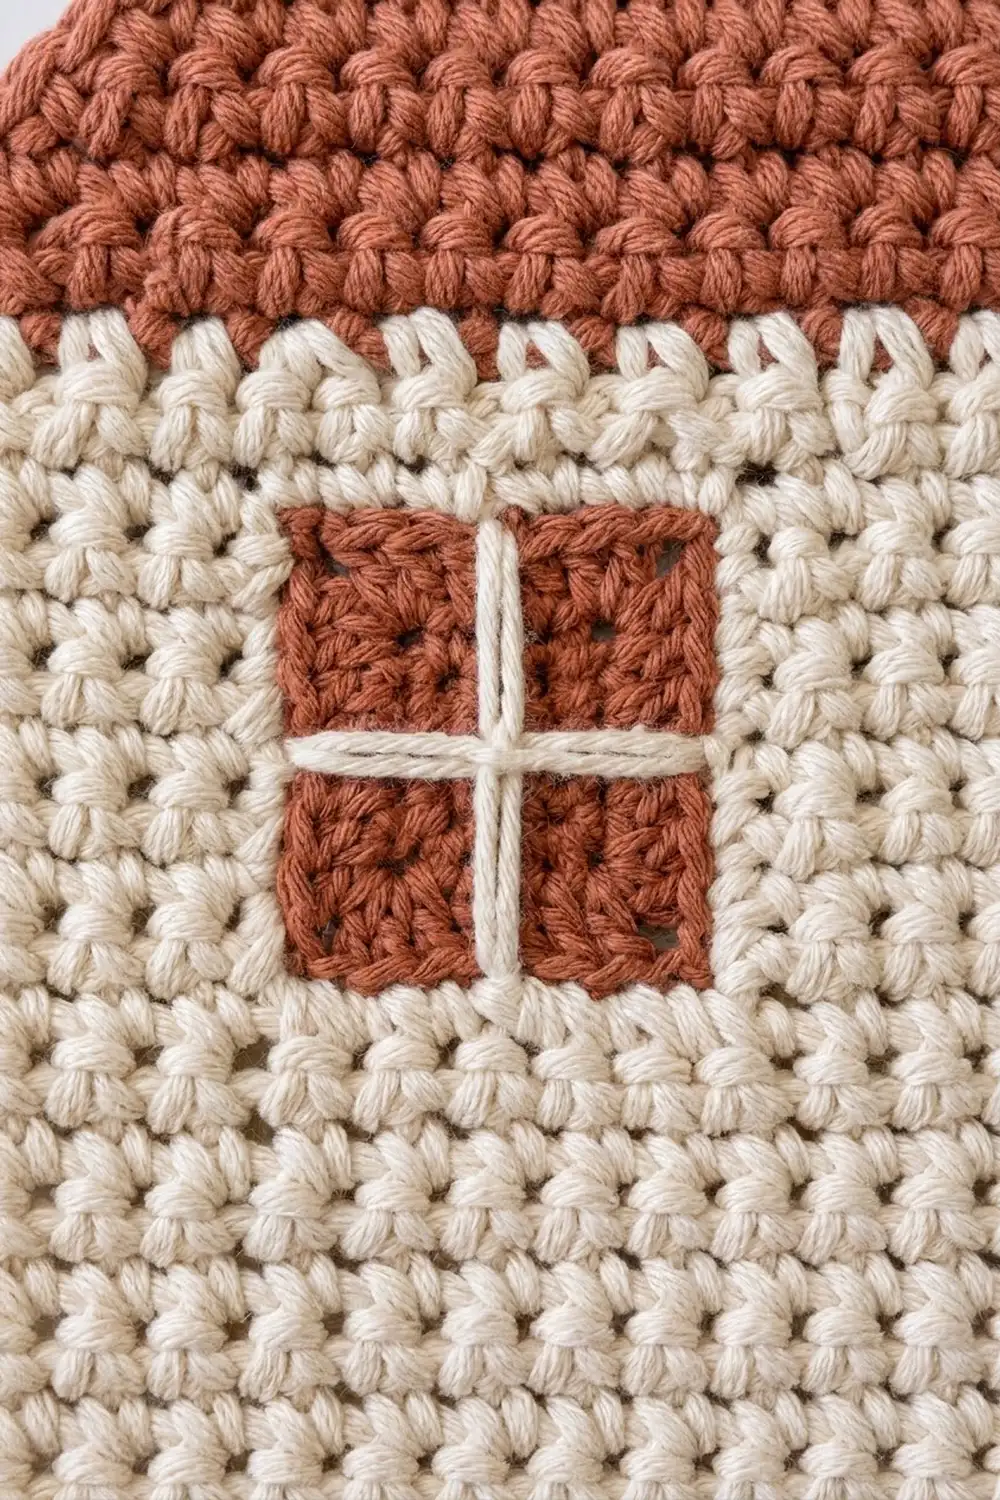
Wind one B bobbin, about 3 yd (2.7 m) long, for each window. Carry A inside the B stitches across each window (tapestry style) so the cross can pick it up. Leave B waiting at the window edge between rows. The rows are symmetrical, so they read the same in either direction.
Row 42: Ch 1, turn, 6 A, 7 B, 8 A, 7 B, 6 A. (34 sts)
Rows 43–44: Ch 1, turn, 6 A, 3 B, 1 A, 3 B, 8 A, 3 B, 1 A, 3 B, 6 A. (34 sts)
Row 45: Ch 1, turn, 6 A, 1 B, 5 A, 1 B, 8 A, 1 B, 5 A, 1 B, 6 A. (34 sts)
Rows 46–47: Repeat Row 43.
Row 48: Repeat Row 42.
Each window is 7 sts x 7 rows, about 2⅓ in (5.9 cm) square. Each one has a terracotta frame with a cream cross that divides it into four panes. Cut the bobbins and leave 6 in (15.2 cm) tails.
Rows 49–52: With A, ch 1, turn, sc across. (34 sts) Change to B in the last st of Row 52.
Roof (Color B)
Row 53: Ch 1, turn, 2 sc in first st, sc in next 32 sts, 2 sc in last st. (36 sts)
Row 54: Ch 1, turn, 2 sc in first st, sc in next 34 sts, 2 sc in last st. (38 sts) These two rows form the overhanging eaves.
Row 55: Ch 1, turn, sc2tog, sc in next 32 sts, sc2tog. (36 sts)
Rows 56–68: Ch 1, turn, sc2tog, sc to last 2 sts, sc2tog. Each row has 2 fewer sts than the row before: Row 56 has 34 sts, Row 60 has 26 sts, Row 64 has 18 sts, and Row 68 has 10 sts.
Rows 69–70: Ch 1, turn, sc across. (10 sts) Fasten off and weave in the window tails on the WS.
The roof is 18 rows, or 6 in (15.2 cm), tall. Each edge moves in one stitch per row, so the slope is a steady 45 degrees up to a flat top 3⅓ in (8.5 cm) wide.
Pockets
Both pockets are the same through Rnd 16, and the lower pocket gets 3 extra rounds. The rounds are joined and turned so the fabric matches the panel’s texture and gauge.
Pocket Base (make 2)
Foundation: With A, ch 33.
Row 1: Sc in 2nd ch from hook and in each ch across. (32 sts)
Rows 2–10: Ch 1, turn, sc across. (32 sts)
Walls
Rnd 1 (conversion round): Ch 1, don’t turn. Sc around the whole base: 32 across Row 10, 10 in the row ends, 32 in the foundation loops, and 10 in the row ends. Sl st to join. (32 + 10 + 32 + 10 = 84 sts, + 0 added) Mark the 32 foundation-side sts as the back wall.
Rnd 2: Ch 1, don’t turn, sc in BLO around, then sl st to join. (84 sts) This makes a crisp fold, so the walls stand straight up.
Rnds 3–16: Ch 1, turn, sc around, then sl st to join. (84 sts) On even rounds the outside faces you.
Upper pocket – Rnd 17 (rim): Ch 1, don’t turn, crab stitch around, then sl st to join. (84 sts) Leave a 40 in (101.6 cm) tail. The wall is 15 rnds, or 5 in (12.7 cm), tall.
Lower pocket – Rnds 17–19: Work as for Rnd 3. (84 sts)
Rnd 20 (rim): Ch 1, turn so the outside faces you, crab stitch around, then sl st to join. (84 sts) Leave a 40 in (101.6 cm) tail. The wall is 18 rnds, or 6 in (15.2 cm), tall.
Wall check: 84 sts = 28 in (71.1 cm). That’s 10⅔ in (27.1 cm) x 2 plus 3⅓ in (8.5 cm) x 2.
Make All Pieces
- Color A with Color B: 1 back panel
- Color A: 2 pockets (1 upper, 1 lower) and 1 cord
Layout grid (panel rows, bottom to top):
Rows 69-70 | roof top, 10 sts
Rows 53-68 | roof (B), 38 to 10 sts
Rows 49-52 | cream
Rows 42-48 | A6 | WINDOW 7 | A8 | WINDOW 7 | A6
Rows 39-41 | cream
Rows 24-38 | UPPER POCKET back wall, sts 2-33
Rows 19-23 | gap, 1 2/3 in (4.2 cm)
Rows 1-18  | LOWER POCKET back wall, sts 2-33
Joining
Whipstitch the pockets on with the A tails before you add the border. Each 32-stitch back wall sits on panel sts 2–33, which leaves 1 free stitch at each edge. The gauges match, so join 1 to 1: one pocket stitch to one panel stitch across, and one pocket round to one panel row going up.
- Lower pocket: Lay the panel RS up. Sew the 32 back-wall sts of Rnd 1 to Row 1, sts 2–33.
- Sew each back corner up panel st 2 and st 33 to Row 18, one round to one row.
- Sew the top of the back wall, just below the rim, to Row 18, sts 2–33.
- Upper pocket: Repeat, with Rnd 1 on Row 24 and the top on Row 38.
Tension: Pull each stitch snug enough to close the gap but not so tight that it puckers the panel. Go through both loops of the panel stitch so the seam sinks into the texture.
Checkpoint: The panel should still lie flat and measure 11⅓ in (28.8 cm) wide at Rows 18 and 38.
Border
Border gauge: One sc per stitch on the top and bottom edges, and one sc per row end on the sides. Each corner stitch gets 3 sc. Corners count in the top and bottom totals, not the sides.
Border Rnd: With RS facing, join A at a bottom corner.
- Bottom: 3 sc in corner, sc in next 32, 3 sc in corner. (38 sts = 34 + 4 added)
- First body side: 1 sc per row end, Rows 1–52. (52 sts) Change to B.
- First roof side: Rows 53–70. (18 sts)
- Top: 3 sc in corner, sc in next 8, 3 sc in corner. (14 sts = 10 + 4 added)
- Second roof side: Rows 70–53. (18 sts) Change to A.
- Second body side: Rows 52–1. (52 sts) Sl st to join.
Total: 38 + 52 + 18 + 14 + 18 + 52 = 192 sts.
Why the math works: A row is as tall as a stitch is wide, so 1 sc per row end lies flat. The border adds one stitch, or ⅓ in (0.8 cm), to each edge:
- The body goes from 34 to 36 sts, which is 12 in (30.5 cm).
- The height goes from 70 to 72 rows, which is 24 in (61.0 cm).
- The eaves go from 38 to 40 sts, which is 13⅓ in (33.9 cm).
- The top goes from 10 to 12 sts, which is 4 in (10.2 cm).
Dowel Casing and Cord
With B and the RS facing, sc in the 14 top border sts, then work 5 more rows of 14 sc (6 rows total). That makes a flap 4⅔ in (11.9 cm) wide and 2 in (5.1 cm) tall. Fold it to the WS and whipstitch the last row down about 1 in (2.5 cm) below the top edge. Slide the dowel through. About 1⅙ in (3.0 cm) sticks out on each side.
Cord: With A, ch 46, then sl st in the back bump of each ch. It should be about 15 in (38.1 cm) long. Tie it around both ends of the dowel.
Final Blocking
- Weave in all remaining ends, running each through at least 2 in (5.1 cm) of stitches.
- Lay the organizer face up with the pockets empty.
- Pin it to 12 in (30.5 cm) x 24 in (61.0 cm), with the eaves at 13⅓ in (33.9 cm).
- Pin both roof slopes straight and check that they match.
- Stuff the pockets with rolled towels so the walls stand square.
- Steam lightly, holding the iron above the yarn without touching it.
- Let it dry for at least 12 hours before you unpin it.
Final Quality-Control Checklist
- Body is 12 in (30.5 cm) wide and total height is 24 in (61.0 cm)
- Eaves overhang evenly on both sides
- Windows are level, with complete frames and centered crosses
- Pockets are centered, with a 1⅔ in (4.2 cm) gap between them
- Rims are even and the walls stand straight
- Border has 192 sts and lies flat
- Dowel hangs level
Troubleshooting
- Wavy roof: Work the sc2tog right at the edge and block along the slope.
- Blurry windows: Tug the carried strand gently after each window.
- Cream showing through the terracotta: Keep the carried strand at the back of each stitch.
- Pockets lean forward: Re-sew the top of the back wall more firmly.
- Saggy pockets: Your gauge is loose. Remake them with a 0.5 mm smaller hook.
- Border ruffles or cups: Recount for 52 + 18 sts on each side.
- Panel too wide: Confirm 34 sts, then block it firmly to 11⅓ in (28.8 cm) before you add the border.
Care
Empty the pockets and hand wash in cool water with mild soap. Reshape and dry flat with the pockets stuffed.
Final Notes
Every measurement comes from one gauge: 3 sts and 3 rows per inch.
- The 34-stitch, 70-row panel is 11⅓ in (28.8 cm) x 23⅓ in (59.3 cm).
- The 32-stitch pockets join 1 to 1 on sts 2–33.
- The 192-stitch border adds ⅓ in (0.8 cm) all the way around, which brings the house to 12 in (30.5 cm) x 24 in (61.0 cm).
Check your gauge at each checkpoint and the cottage will come out square and flat, and sturdy enough for everyday bathroom storage. Happy crocheting!