

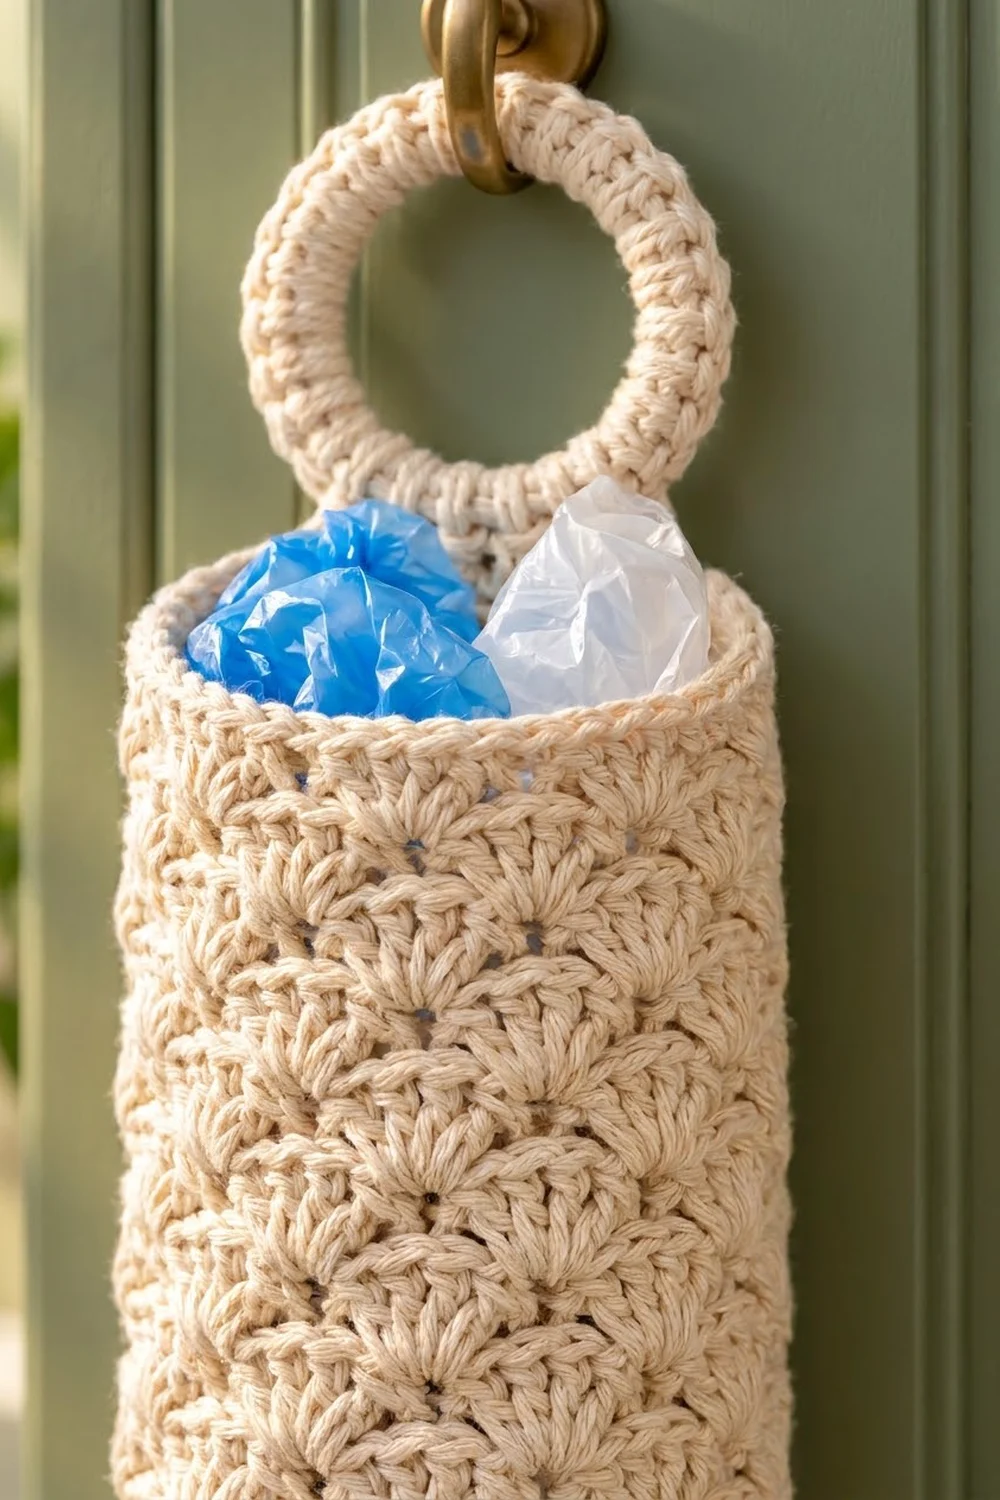
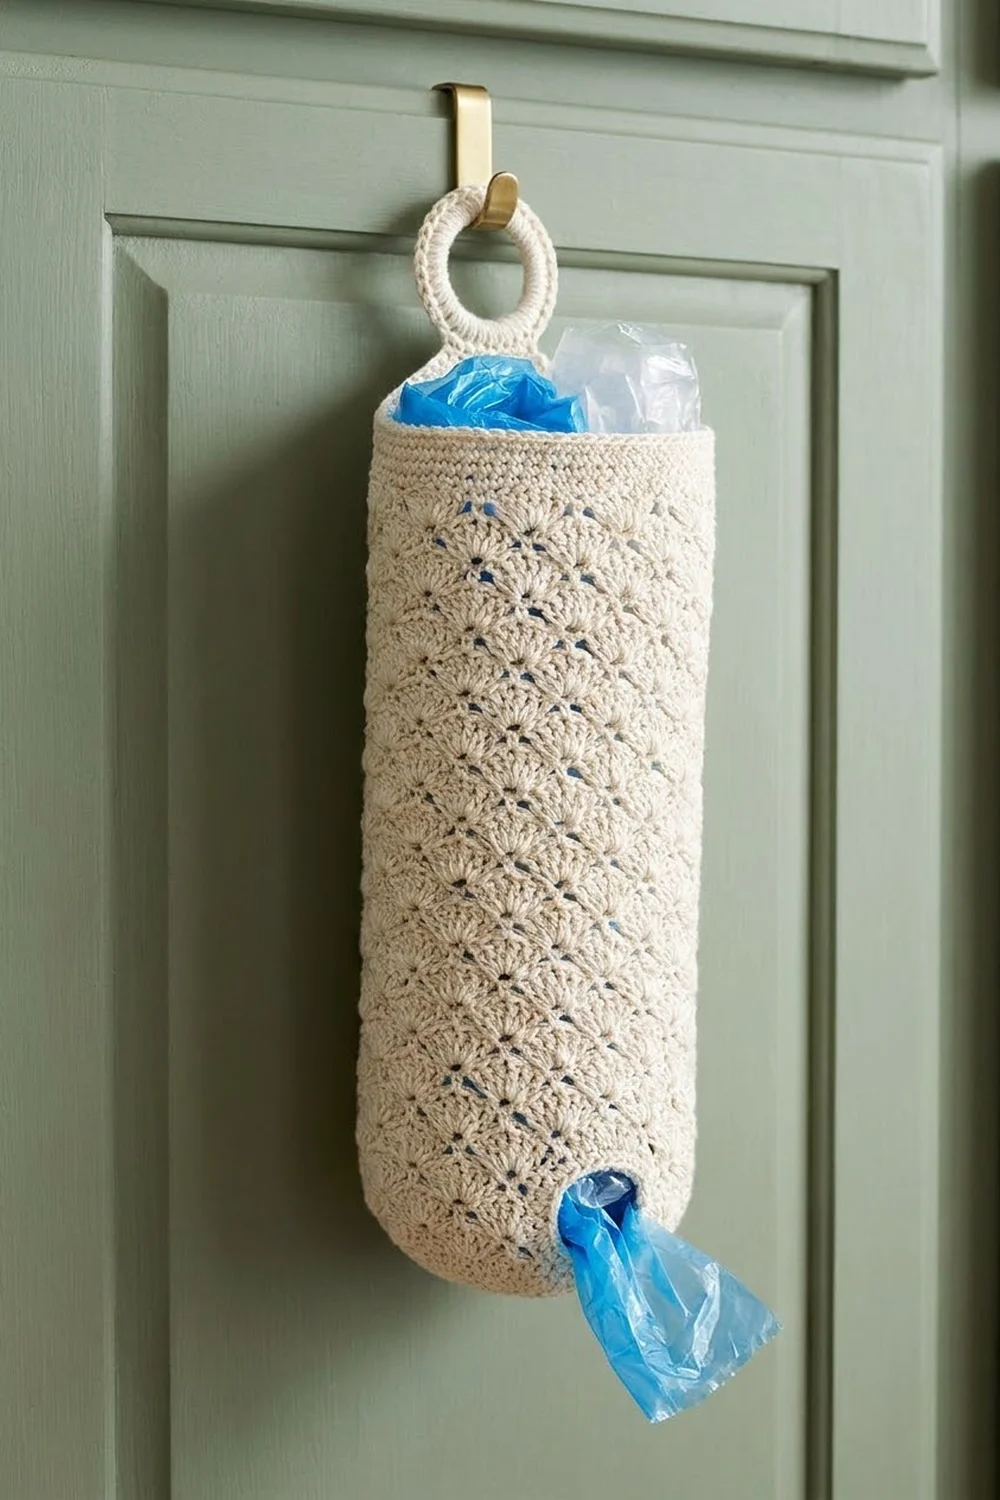
This bag holder turns the drawer full of loose grocery bags into something you are happy to leave out. The Seashell Pantry holder is a tall, soft tube covered in offset shell stitches, with a neat single crochet rim and a round covered ring for hanging. You stuff bags in at the top and pull them out one at a time through a small opening at the bottom.
The sample is worked in a single cream cotton, which shows off the fan texture and suits almost any kitchen. Cream, oatmeal, and natural shades give the same calm farmhouse look. Stronger colors also work, but the shell texture shows best in a light, solid yarn.
This pattern uses US crochet terms. The finished holder is about 4.75 in (12.1 cm) in diameter and 14.5 in (36.8 cm) tall, with a circumference of 15 in (38.1 cm). With the hanging ring, the total length is about 19.25 in (48.9 cm).
Construction is simple. You start at the bottom opening with a chain ring, work a double crochet base outward, then work the shell body upward in joined rounds. A single crochet rim finishes the top. To finish, you work a small tab at the back, cover a ring in single crochet, and sew the ring to the tab.
Finished Size and Construction
- Finished size: 4.75 in (12.1 cm) diameter x 14.5 in (36.8 cm) tall body; 19.25 in (48.9 cm) total with ring
- Skill level: Easy to intermediate
- Terminology: US crochet terms
- Yarn weight: Worsted (#4) cotton
- Hook: 5.0 mm (H-8)
- Number of pieces: 2 (body with tab, covered ring)
- Layout: Single tube worked bottom up in joined rounds; ring sewn to the tab at center back
- Circumference: 60 stitches = 15 in (38.1 cm)
- Height before rim border: 13.5 in (34.3 cm) of shell rounds
- Rim border depth: 1 in (2.5 cm), 4 rounds
- Bottom opening: about 1.75 in (4.4 cm) across
Materials
Choose a smooth worsted-weight cotton or cotton blend. Cotton holds the tube’s shape, washes easily, and doesn’t stretch much under the weight of the bags. Acrylic also works, but it gives a softer, floppier tube.
- Cream (main color): 230 g, about 400 m. The body uses about 190 g, the tab and ring about 10 g, and the rest is margin.
Tools:
- 5.0 mm (H-8) crochet hook
- One 3 in (7.6 cm) metal or plastic ring (macramé or bangle-style)
- 2 locking stitch markers
- Tapestry needle
- Scissors
- Measuring tape
- A tall container about 4.75 in (12.1 cm) across, or a rolled towel, for blocking
These quantities include a margin of about 15% for swatching and differences in tension.
Abbreviations (US Terms)
- ch – chain
- sl st – slip stitch
- sc – single crochet
- hdc – half double crochet
- dc – double crochet
- st(s) – stitch(es)
- rnd(s) – round(s)
- RS – right side
Special stitch – Shell: Work 5 dc in the same stitch. The 3rd dc is the center of the shell.
Split shell: Used at the start of offset rounds. At the start of the round, ch 3 (counts as dc) and work 2 dc. At the end of the round, work 2 dc in the same base stitch. Together these make one 5-stitch shell, and the beginning ch-3 is its center.
Gauge and Checkpoints
Gauge:
– 16 sc = 4 in (10.2 cm)
– 4 shell repeats (24 sts) = 6 in (15.2 cm), so one repeat (shell + sc) = 1.5 in (3.8 cm)
– 4 shell rounds = 3 in (7.6 cm), so 1 shell round = 0.75 in (1.9 cm)
Test the base first. Work Rnds 1–4 of the base and measure before going further. This small disc checks your gauge on the real 60-stitch circumference.
Checkpoints:
- After Rnd 4 (base): the disc is 4.75 in (12.1 cm) across and lies flat or cups slightly upward.
- After Rnd 8 (4 shell rounds): the body is 3 in (7.6 cm) tall above the base, and the circumference is 15 in (38.1 cm).
- After Rnd 22 (all shell rounds): the body is 13.5 in (34.3 cm) tall above the base.
- After Rnd 26 (rim): total body height is 14.5 in (36.8 cm).
If the base is too big, switch to a 4.5 mm hook. If it is too small, switch to a 5.5 mm hook. A 0.25 in (0.6 cm) difference across the base changes the circumference by about 0.75 in (1.9 cm), so fix it now. Height is easier to adjust: add or remove shell rounds in pairs.
Pattern: Base
The base starts at the bottom opening and grows outward.
Rnd 1: Ch 24, sl st to the first ch to form a ring, taking care not to twist. Ch 1, sc in each ch around, sl st to first sc. (24 sc)
Rnd 2: Ch 3 (counts as dc here and throughout), dc in same st, dc in next st, 2 dc in next st, dc in next st, repeat from * 10 more times, sl st to top of ch-3. (36 dc)
Rnd 3: Ch 3, dc in same st, dc in next 2 sts, 2 dc in next st, dc in next 2 sts, repeat from * 10 more times, sl st to top of ch-3. (48 dc)
Rnd 4: Ch 3, dc in same st, dc in next 3 sts, 2 dc in next st, dc in next 3 sts, repeat from * 10 more times, sl st to top of ch-3. (60 dc)
Checkpoint 1: 4.75 in (12.1 cm) across. A slight upward cup is normal and helps the bottom curve inward.
Pattern: Shell Body
Work the body in joined rounds without turning, so the RS always faces you. Two round types alternate: Round A starts with a sc, and Round B starts with a split shell. Each round places its shells over the sc of the round below, creating the offset fan pattern.
Rnd 5 (first shell round, worked into the base): Ch 1, sc in same st, skip 2 sts, shell in next st, skip 2 sts, sc in next st, repeat from * 8 more times, skip 2 sts, shell in next st, skip 2 sts, sl st to first sc. (10 shells + 10 sc = 60 sts)
Rnd 6 (Round B): Ch 3, 2 dc in same st as join (the first sc), sc in center dc of next shell, shell in next sc, repeat from * 8 more times, sc in center dc of last shell, 2 dc in the same sc as the beginning ch-3, sl st to top of ch-3. (9 full shells + 1 split shell + 10 sc = 60 sts)
The beginning ch-3 is now the center of the split shell, because the 2 dc you worked at the end of the round sit just before it.
Rnd 7 (Round A): Ch 1, sc in same st (top of ch-3), skip next 2 dc, shell in next sc, skip next 2 dc, sc in center dc of next shell, repeat from * 8 more times, skip next 2 dc, shell in next sc, skip last 2 dc, sl st to first sc. (10 shells + 10 sc = 60 sts)
Rnds 8–22: Repeat Rnd 6 and Rnd 7 alternately, ending with a Rnd 6. Even-numbered rounds are Round B and odd-numbered rounds are Round A. Every round has 60 sts.
You now have 18 shell rounds (Rnds 5–22). Check Checkpoint 2 after Rnd 8 and Checkpoint 3 after Rnd 22: 13.5 in (34.3 cm) above the base (18 x 0.75 in = 13.5 in).
To change the height, add or remove rounds in pairs (one Round A plus one Round B = 1.5 in / 3.8 cm), so you still finish on a Round B.
Hanging Ring
Cover the ring: Make a slip knot on your hook. Insert the hook through the center of the ring, yarn over, pull up a loop, yarn over, and pull through both loops. That is your first sc. Keep working sc over the ring, packing the stitches tightly, until the ring is fully covered. About 60 sc fits a 3 in (7.6 cm) ring at this gauge. Add or remove a few sc so the ring is covered without ruffling. Sl st to first sc. Fasten off, leaving a 12 in (30.5 cm) tail for sewing.
Turn the stitches so their tops face the outer edge. The covered ring measures about 3.75 in (9.5 cm) across.
Border: Top Rim and Tab
The rim border gives the top a firm, level edge. Border gauge: 4 sc rounds = 1 in (2.5 cm) and 16 sc = 4 in (10.2 cm), the same as the base gauge. Every rim round has 60 sts, so the rim matches the 15 in (38.1 cm) body exactly.
Rnd 23 (leveling round): Ch 1, sc in same st (top of ch-3), sc in next 2 dc, hdc in next sc, sc in next 5 dc, repeat from * 8 more times, hdc in next sc, sc in last 2 dc, sl st to first sc. (60 sts worked 1 per existing st + 0 added = 50 sc + 10 hdc)
The hdc fill the low points between shells and the sc sit on the shell tops, so the edge comes out level.
Rnds 24–26: Ch 1, sc in each st around, sl st to first sc. (60 sc)
Fasten off. Checkpoint 4: 14.5 in (36.8 cm) total body height.
Why the math works: The base ends at 60 sts. Every shell round is 10 repeats of 6 sts (a 5-dc shell + 1 sc) = 60 sts. The leveling round works exactly 1 stitch into each of those 60 sts and adds none, and the sc rounds keep 60. At 4 sc per inch, 60 sts = 15 in (38.1 cm), which matches 10 shell repeats x 1.5 in = 15 in.
Tab: Place a marker in the joining sl st of Rnd 26; this marks center back. Count 3 sts to the right of the marker. With RS facing, join yarn in that st.
Row 1: Ch 1, sc in same st and next 5 sts. (6 sc)
Rows 2–4: Ch 1, turn, sc in each st across. (6 sc)
Fasten off, leaving a 6 in (15.2 cm) tail to weave in. The tab stands 1 in (2.5 cm) above the rim.
Attach the ring: Place the ring’s join at the bottom and center 6 ring stitches over the 6 sts of tab Row 4. Using the ring tail, whipstitch each ring stitch to one tab stitch, going through both loops of each. Pull just firmly enough to close the gaps. Then work back across the 6 stitches a second time for strength, because this seam carries the full weight of the bags. Weave in all ends.
The ring rises 3.75 in (9.5 cm) above the tab, for a total length of 14.5 + 1 + 3.75 = 19.25 in (48.9 cm).
Final Blocking
- Soak the holder in cool water with a little mild soap for 15 minutes.
- Gently squeeze out the water; don’t wring. Roll the holder in a towel and press out more water.
- Slide the body over a tall container or rolled towel about 4.75 in (12.1 cm) across.
- Smooth the shells so each fan opens evenly and the rounds run straight around the tube.
- Check the height: 14.5 in (36.8 cm) from the base to the top of the rim.
- Shape the bottom opening into a neat circle about 1.75 in (4.4 cm) across.
- Lay the ring flat and round it out with your fingers.
- Let it dry completely, standing upright, before hanging.
Final Quality-Control Checklist
- Base has 60 sts and measures 4.75 in (12.1 cm) across
- Every shell round has 60 sts: 10 shells + 10 sc
- Shells alternate, each one sitting above a sc from the round below
- Body is 13.5 in (34.3 cm) tall before the rim
- Rim is 4 rounds of 60 sts, 1 in (2.5 cm) deep, with a level top
- Tab is 6 sts wide and 4 rows tall, centered over the join
- Ring is fully covered with no plastic or metal showing
- Ring seam is doubled and firm
- All ends are woven in securely
Troubleshooting
The shells stack instead of alternating. You worked a shell into a shell center. Shells always go into a sc, and sc always go into a shell center.
A round ends with one stitch too many or too few. Count the shells; there should be 10. In Round A, check that you skipped 2 dc on each side of every shell.
The join line spirals. Always join into the top of the beginning ch-3 or the first sc, never the stitch after it.
The base ruffles. Your dc are loose. Go down a hook size for the base only, then return to 5.0 mm (H-8) for the body.
The rim flares. Check that Rnd 23 has 60 sts. If it still flares, work Rnds 24–26 with a hook one size smaller.
The ring droops forward. Tack the lower edge of the ring to the tab with 2–3 extra stitches on each side.
Care
Machine wash cold on a gentle cycle in a mesh bag, then reshape it and dry it standing upright. Don’t tumble dry, because cotton can shrink and the shells may lose their shape.
Final Notes
The measurement chain is short and easy to check. The base sets the circumference: 60 sts at 4 sts per inch = 15 in (38.1 cm), or about 4.75 in (12.1 cm) across. Eighteen shell rounds at 0.75 in (1.9 cm) each give 13.5 in (34.3 cm). The 1 in (2.5 cm) rim brings the body to 14.5 in (36.8 cm), and the 1 in (2.5 cm) tab plus the 3.75 in (9.5 cm) ring bring the total to 19.25 in (48.9 cm). If your base checkpoint is right, everything after it will line up.
Happy crocheting!