

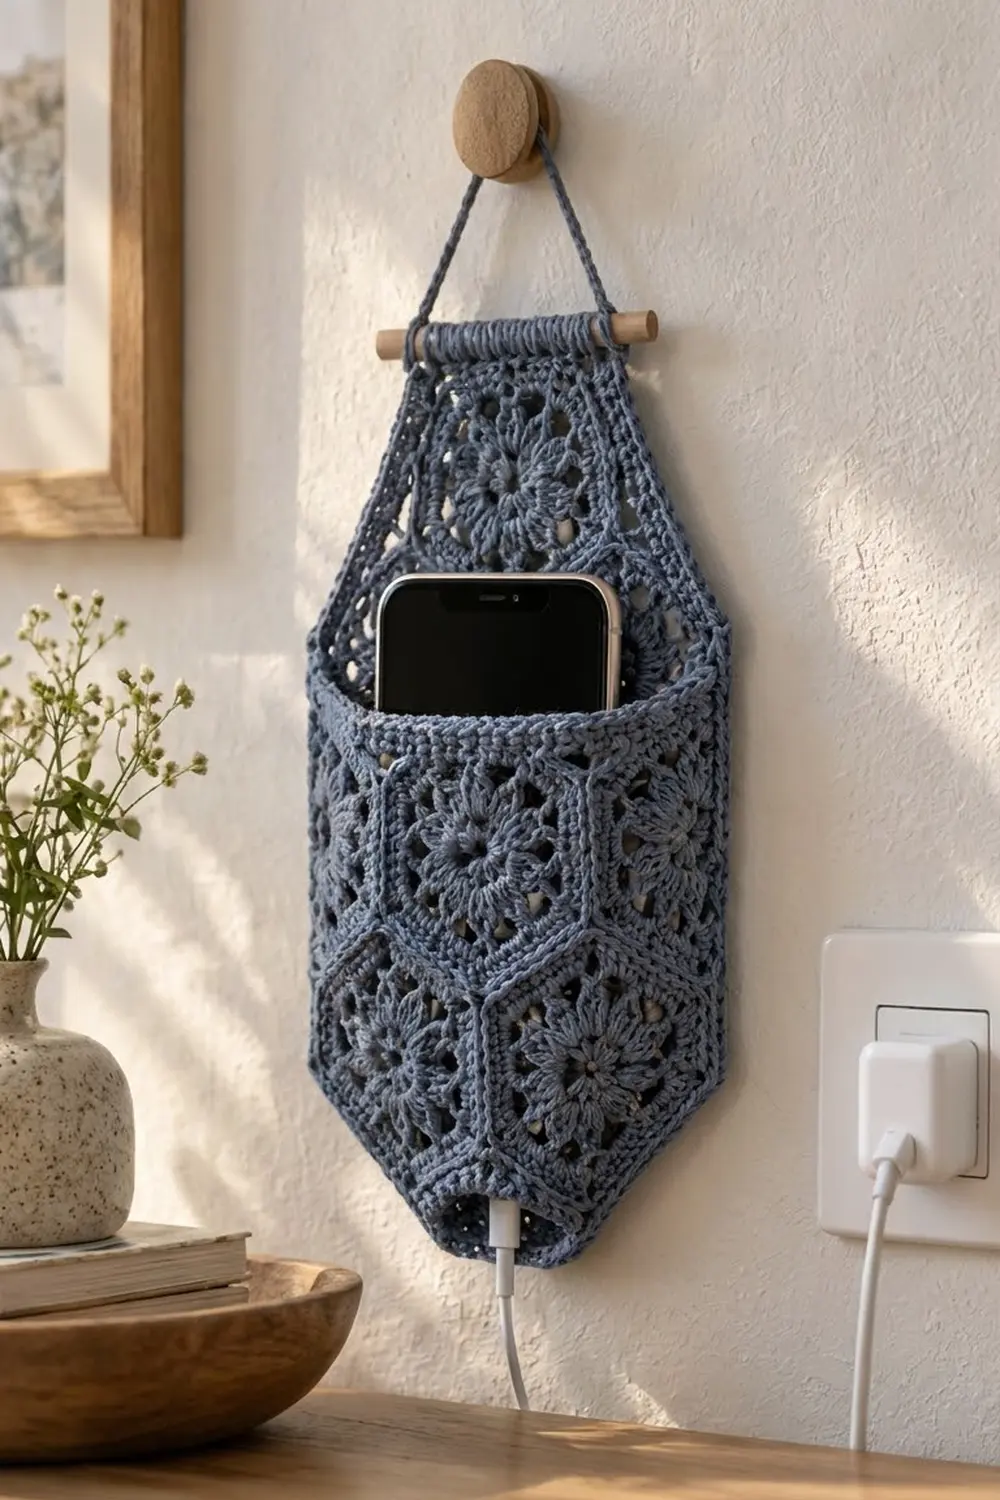
This hanging phone holder is built from small lacy hexagons in calm slate blue. They’re arranged in an offset honeycomb, so the outline naturally narrows at the top and bottom. A front pocket covers the lower half and holds your phone upright while it charges. The cable comes out through a small slot at the bottom point.
The look is quiet and textured. Each hexagon has a solid center, a ring of open petals and a crisp single crochet edge, and one color keeps the honeycomb pattern easy to see. A wooden dowel and a simple chain cord finish the top.
This pattern uses US crochet terms. The finished holder measures about 6.5 in (16.5 cm) wide by 8.9 in (22.6 cm) tall, not counting the hanging cord.
You’ll make 14 identical hexagons: 10 for the back and 4 for the pocket front. You seam each panel flat and edge both panels with one round of sc. Then a second edging round joins the pocket to the back. Finally you work a hanging tab straight off the top edge.
Finished Size and Construction
- Finished size: 6.5 in x 8.9 in (16.5 cm x 22.6 cm)
- Skill level: Intermediate
- Terminology: US
- Yarn weight: Fingering (#1) cotton
- Hook: 2.5 mm
- Number of pieces: 14 hexagons, plus 1 chain cord
- Layout: Back is 3 offset columns (4 in the center, 3 on each side); front pocket is 4 hexagons
- Hexagon size: 2.1 in (5.3 cm) flat to flat, 2.4 in (6.1 cm) point to point, 1.2 in (3.0 cm) per side
- Back size before border: 6.0 in x 8.4 in (15.2 cm x 21.3 cm)
- Border depth: 0.25 in (0.6 cm), 2 rounds
Materials
Choose a smooth, mercerized fingering-weight cotton. It shows the lace clearly and holds the pocket’s shape. Avoid fuzzy or very stretchy yarns, because the pocket will sag.
- Slate blue: 60 g, about 204 m (223 yd). Two 50 g balls are enough.
Quantities include a margin of about 30%. The holder itself uses about 45 g.
Tools:
– 2.5 mm crochet hook
– Tapestry needle
– Wooden dowel, 5 in (12.7 cm) long and 1/4 in (0.6 cm) across
– Stitch markers
– Blocking mat and rust-proof pins
– Spray bottle
– Ruler or tape measure
Abbreviations (US Terms)
- ch – chain
- sl st – slip stitch
- sc – single crochet
- dc – double crochet
- sp – space
- st(s) – stitch(es)
- BLO – back loop only
- sc2tog – single crochet 2 together
- sc3tog – single crochet 3 together
- RS / WS – right side / wrong side
Special stitch – 2-dc cluster (cl): Yarn over, insert hook in the stitch, pull up a loop, yarn over, pull through 2 loops. Repeat once in the same stitch. Yarn over and pull through all 3 loops.
Beginning cluster (beg cl): Ch 2, then work the first half of a cluster in the same stitch. Yarn over and pull through both loops on the hook.
Gauge and Checkpoints
Stitch gauge: 30 sc and 32 rows = 4 in (10.2 cm) in sc.
Make one hexagon before anything else and check it after every round:
- After Round 1: 0.8 in (2.0 cm) across
- After Round 2: 1.3 in (3.3 cm) across
- After Round 3: 1.8 in (4.6 cm) flat to flat
- After Round 4: 2.1 in (5.3 cm) flat to flat and 2.4 in (6.1 cm) point to point
A difference of up to 0.1 in (0.3 cm) is fine.
If your hexagon is too big: Go down to a 2.25 mm hook. Don’t skip stitches, because every side must keep exactly 9 sc.
If it’s too small: Go up to a 2.75 mm hook.
If it cups: Your Round 4 is too tight. Loosen up, or work just that round with a hook one size larger.
If it ruffles: Your corner chains are too loose. Snug them up.

Hexagon Motif (Make 14)
Round 1 (RS): Make a magic ring. Ch 3 (counts as dc), then work 11 dc in the ring. Join with a sl st to the top of the ch-3. Pull the ring closed. (12 dc)
Round 2: Work a beg cl in the same st, then ch 2. Cl in the next st, ch 2. Repeat from * 10 more times. Join to the top of the beg cl. (12 clusters, 12 ch-2 sps)
These open petals make the lacy flower ring.
Round 3: Sl st into the first ch-2 sp. Ch 3 (counts as dc), then work 2 dc in the same sp, ch 1, 3 dc in the next ch-2 sp, and ch 3 (corner).
3 dc in the next ch-2 sp, ch 1, 3 dc in the next ch-2 sp, ch 3. Repeat from * 4 more times. Join to the top of the beginning ch-3. (36 dc, 6 ch-1 sps, 6 ch-3 corner sps)
Each side now has 2 groups of 3 dc separated by a ch-1, and the ch-3 corners set the 6 points.
Round 4: Ch 1. Sc in the same st and in the next 2 dc. Sc in the ch-1 sp, then sc in the next 3 dc. Work (sc, ch 2, sc) in the ch-3 corner sp.
Sc in the next 3 dc, sc in the ch-1 sp, sc in the next 3 dc, (sc, ch 2, sc) in the corner sp. Repeat from * 4 more times. Join to the first sc. Fasten off. (54 sc, 6 ch-2 corner sps)
Count check: Each side is 3 + 1 + 3 = 7 sc, plus 1 corner sc at each end, for 9 sc per side. Every corner’s 2 sc are split between its two sides, so 6 sides x 9 = 54. Nothing is counted twice.
Weave in the ends. Block all 14 hexagons to 2.1 in (5.3 cm) flat to flat before joining.
Make All Pieces
- Back: 10 hexagons
- Front pocket: 4 hexagons
All 14 are slate blue. Every hexagon sits “flat-top,” meaning one straight edge on top and one on the bottom.
Back layout (C = center, L = left, R = right):
        [C1]
  [L1]        [R1]
        [C2]
  [L2]        [R2]
        [C3]
  [L3]        [R3]
        [C4]
The side columns sit half a hexagon lower than the center column.
Front pocket layout: These 4 pieces are copies of the back’s lower positions.
        [C3]
  [L3]        [R3]
        [C4]
The edges of each hexagon are named Top, Upper-Left (UL), Lower-Left (LL), Bottom, Lower-Right (LR) and Upper-Right (UR).
Joining
Method: With WS together, whipstitch the hexagons through the BLO of the outer loops.
Stitch-to-stitch logic: Each shared edge has 11 matching stitches: the corner ch-2 sp, the 9 sc, and the next corner ch-2 sp. Make one whipstitch through each matching pair. The two edges always match exactly.
Back: Join 19 edges.
– Center column: C1–C2, C2–C3, C3–C4
– Left side: L1 to C1 and C2, L2 to C2 and C3, L3 to C3 and C4, plus L1–L2 and L2–L3
– Right side: mirror the left
Front: Join 5 edges: C3–C4, L3–C3, L3–C4, R3–C3 and R3–C4.
Tension: Pull each stitch just snug, so the seam lies flat and doesn’t pucker. Press each seam flat with your fingers as you go.
Size checkpoint: The back should measure 6.0 in (15.2 cm) wide, from the outer point of L2 to the outer point of R2. It should be 8.4 in (21.3 cm) tall, from the top of C1 to the bottom of C4. The front should be 6.0 in (15.2 cm) wide and 4.2 in (10.7 cm) tall through the center.
Border
Border gauge: Each sc round adds 1/8 in (0.3 cm) to every edge. Two rounds give a 0.25 in (0.6 cm) border.
Corner rules for both rounds:
– Convex (outward) corner: This is a point where two free edges of the same hexagon meet. Work (sc, ch 1, sc) in the corner sp.
– Concave (inward) corner: This is the notch where two hexagons meet on the outline.
Round 1 – Back (RS facing)
Join the yarn in the first sc of C1’s Top edge. Ch 1, then work around the outline:
- Sc in each of the 9 sc on every free edge.
- Work (sc, ch 1, sc) in each convex ch-2 corner sp.
- At each concave notch, work sc2tog: put the first leg in one hexagon’s corner ch-2 sp and the second leg in the neighboring hexagon’s corner ch-2 sp.
Join to the first sc.
Counts:
– 22 free edges x 9 sc = 198 sc
– 14 convex corners x 2 sc = 28 sc
– 8 concave sc2tog = 8 sts
– Total: 234 sts and 14 ch-1 sps
Free edges per hexagon:
– C1: Top, UL and UR
– L1: Top, UL and LL
– L2: UL and LL
– L3: UL, LL and Bottom
– C4: LL, Bottom and LR
– R1, R2 and R3: mirror L1, L2 and L3
Fasten off.
Round 1 – Front
Work the same way around the front’s outline. Free edges are:
– C3: Top, UL and UR
– L3: Top, UL, LL and Bottom
– C4: LL, Bottom and LR
– R3: Top, UR, LR and Bottom
Counts:
– 14 edges x 9 = 126 sc
– 10 convex corners x 2 = 20 sc
– 4 concave sc2tog = 4 sts
– Total: 150 sts and 10 ch-1 sps
Fasten off.
Round 2 – Joining and Edging Round (Back)
Stitch rules for this round:
– Sc in each st.
– Work (sc, ch 1, sc) in each convex ch-1 sp.
– At each concave notch, work sc3tog over the sc before the notch, the sc2tog and the sc after it.
Join the yarn in the first sc after C1’s Top/UL ch-1 sp. Work down the left side through the back only.
When you reach the L2/L3 notch, place the front on top, WS against the back’s RS, with the edges lined up. Work the sc3tog like this:
1. First leg: back’s last L2 sc only.
2. Second leg: back’s sc2tog together with the front’s corner sc at L3 Top/UL.
3. Third leg: the first L3 sc of both layers.
Joined section: Work through both layers from here to the R3/R2 notch. On each side, this section has 97 matching sts:
– Back: 1 sc2tog + 81 edge sc + 12 corner sc + 2 sc2tog + 1 sc2tog = 97
– Front: 1 corner sc + 81 + 12 + 2 + 1 corner sc = 97
The counts match stitch for stitch. Work the convex ch-1 sps through both layers too.
Cord slot: On C4’s Bottom edge, work the 9 edge sc through the back layer only. This leaves a 1.2 in (3.0 cm) opening.
Finish the R3/R2 sc3tog the same way as on the left, then continue on the back only up the right side, across the top and back to the start. Join and fasten off.
Round 2 count: 234 + 28 (2 added at each of 14 convex corners) − 16 (2 removed at each of 8 notches) = 246 sts and 14 ch-1 sps. Each stitch in the joined section counts once.
Why the math works: Each convex corner gains 2 stitches per round so its point stays flat. Each concave notch loses 2 so it doesn’t ruffle. The net gain is 2 x (14 − 8) = 12 per round. That’s exactly what one hexagon gains each round (6 corners x 2), so the outline grows evenly.
Slot finish: Sl st loosely across the front’s 9 free bottom sts.
Pocket Rim Row (Front Only)
Join in the front’s L3 Top/UL ch-1 sp, ch 1, and sc in the same sp. Work across the 53 rim sts:
– (sc, ch 1, sc) in C3’s 2 convex ch-1 sps
– sc3tog at the 2 notches
– sc in every other st
End with a sc in the R3 UR/Top ch-1 sp. (55 sc, 2 ch-1 sps)
Sl st into the joined edge and fasten off.
Hanging Tab
The back’s C1 Top edge now has 13 sts between its two ch-1 sps (11 from Round 1, plus 1 corner sc at each end).
- Row 1 (RS): Join in the first of these 13 sts. Ch 1, then sc in the same st and each st across. Turn. (13 sc)
- Rows 2–8: Ch 1, sc in each st across. Turn. (13 sc)
The tab is 1.7 in (4.3 cm) wide and 1 in (2.5 cm) long. Fold it to the WS over the dowel and whipstitch the last row to the base of Row 1.
Cord: Hold 2 strands together and chain until the cord is 14 in (35.6 cm) long. Tie each end around the dowel just outside the tab. If you like, wrap the exposed dowel with yarn to match.
Final Blocking
- Lightly mist the holder until it’s damp, not soaked.
- Pin the back flat to 6.5 in x 8.9 in (16.5 cm x 22.6 cm). Pin every convex point.
- Slip a piece of card about 3.3 in (8.4 cm) wide into the pocket so the pocket dries open.
- Straighten the pocket rim and the tab with your fingers.
- Let it dry completely, then remove the pins and the card.
Final Quality-Control Checklist
- All 14 hexagons measure 2.1 in (5.3 cm) flat to flat.
- Every hexagon side has 9 sc.
- The back has 19 seams and the front has 5, all lying flat.
- Border Round 1 has 234 sts on the back and 150 on the front.
- Round 2 has 246 sts, and its joined section lines up with no gaps.
- The cord slot is open and 1.2 in (3.0 cm) wide.
- The pocket rim has 55 sc.
- The tab has 13 sc and holds the dowel snugly.
- The holder measures 6.5 in x 8.9 in (16.5 cm x 22.6 cm).
- All ends are woven in.
Troubleshooting
- The hexagon points curl: Your corner chains are too tight. Ch a little more loosely, or block harder.
- Seams pucker: You’re pulling too tight or skipping a pair. Re-stitch the seam with all 11 pairs.
- The border ruffles at the notches: You skipped the sc2tog or sc3tog. Work it at every notch.
- The border pulls in at the points: You worked a single sc at a convex corner. Use (sc, ch 1, sc).
- The layers don’t line up: Count 97 sts on each layer and mark both ends before you start Round 2.
- The phone is loose: Use the 2.25 mm hook for the front hexagons only.
- The pocket sags: Re-block it with the card insert.
Care
Hand wash in cool water with mild soap. Press out the water, then dry flat in shape. Remove the dowel before washing.
Final Notes
Everything builds from one checked hexagon. It measures 2.1 in (5.3 cm) flat to flat and has 9 sc per side. Fourteen hexagons give a back of 6.0 in x 8.4 in (15.2 cm x 21.3 cm) and a matching 4-hexagon pocket.
The two border rounds bring the holder to 6.5 in x 8.9 in (16.5 cm x 22.6 cm). Round 2 joins the pocket along 97 matched stitches. If you check your measurements at each stage, the pocket, slot and tab will line up.
Happy crocheting!