

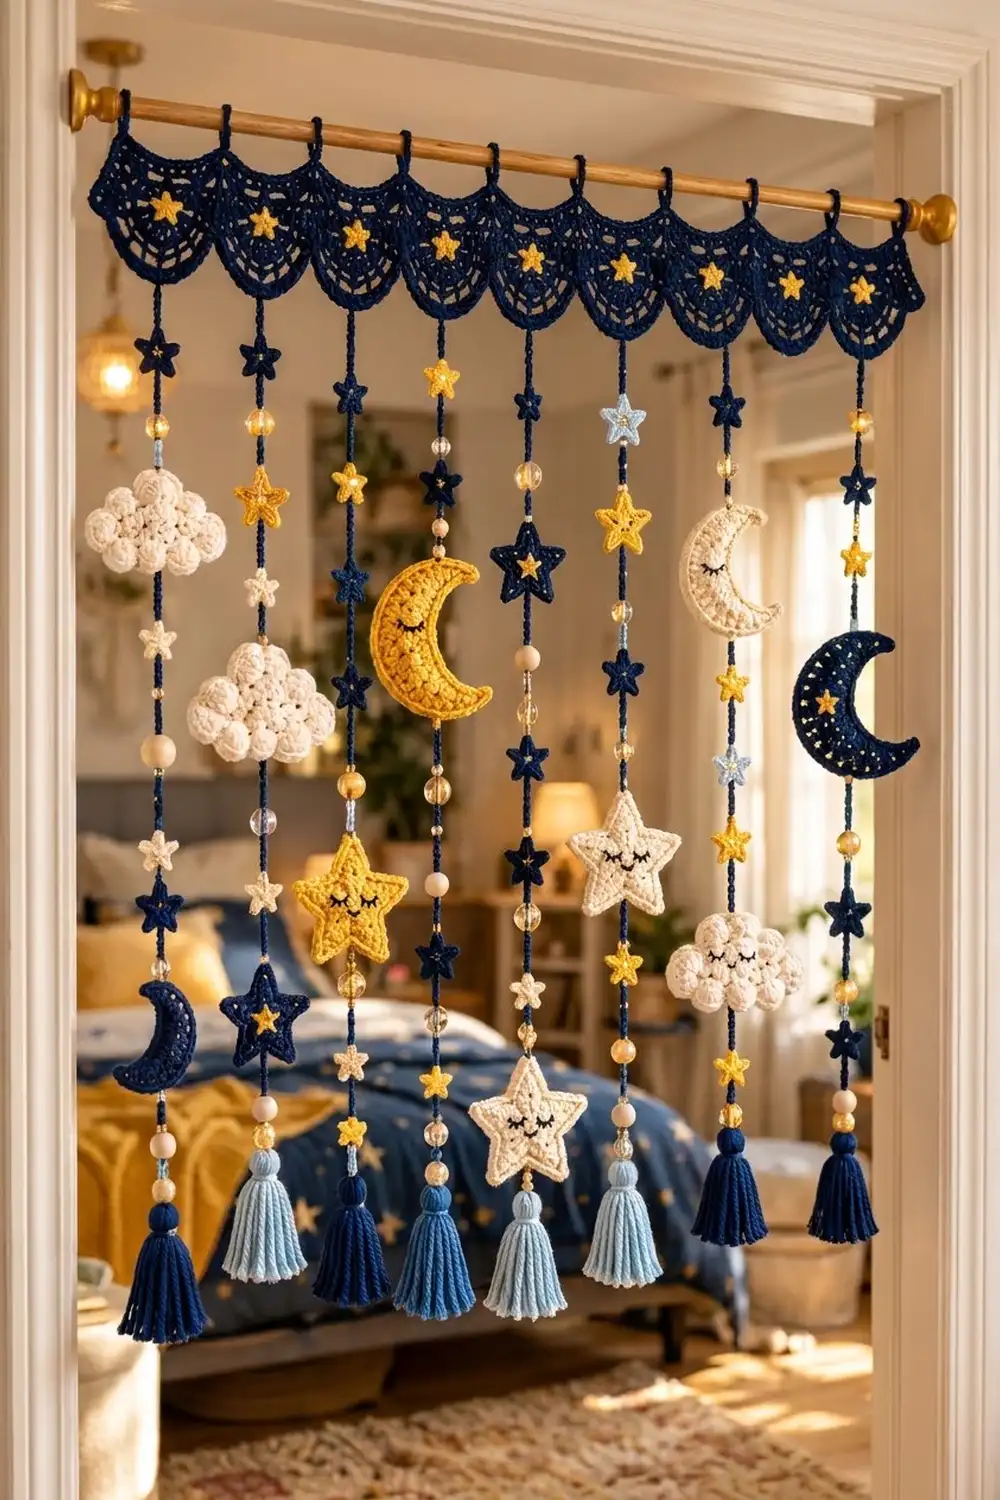
This doorway curtain brings a bedtime sky into any room. A navy scalloped valance runs across the top, and eight beaded cords hang from it carrying stars, crescent moons and puffy clouds, each cord finished with a soft tassel.
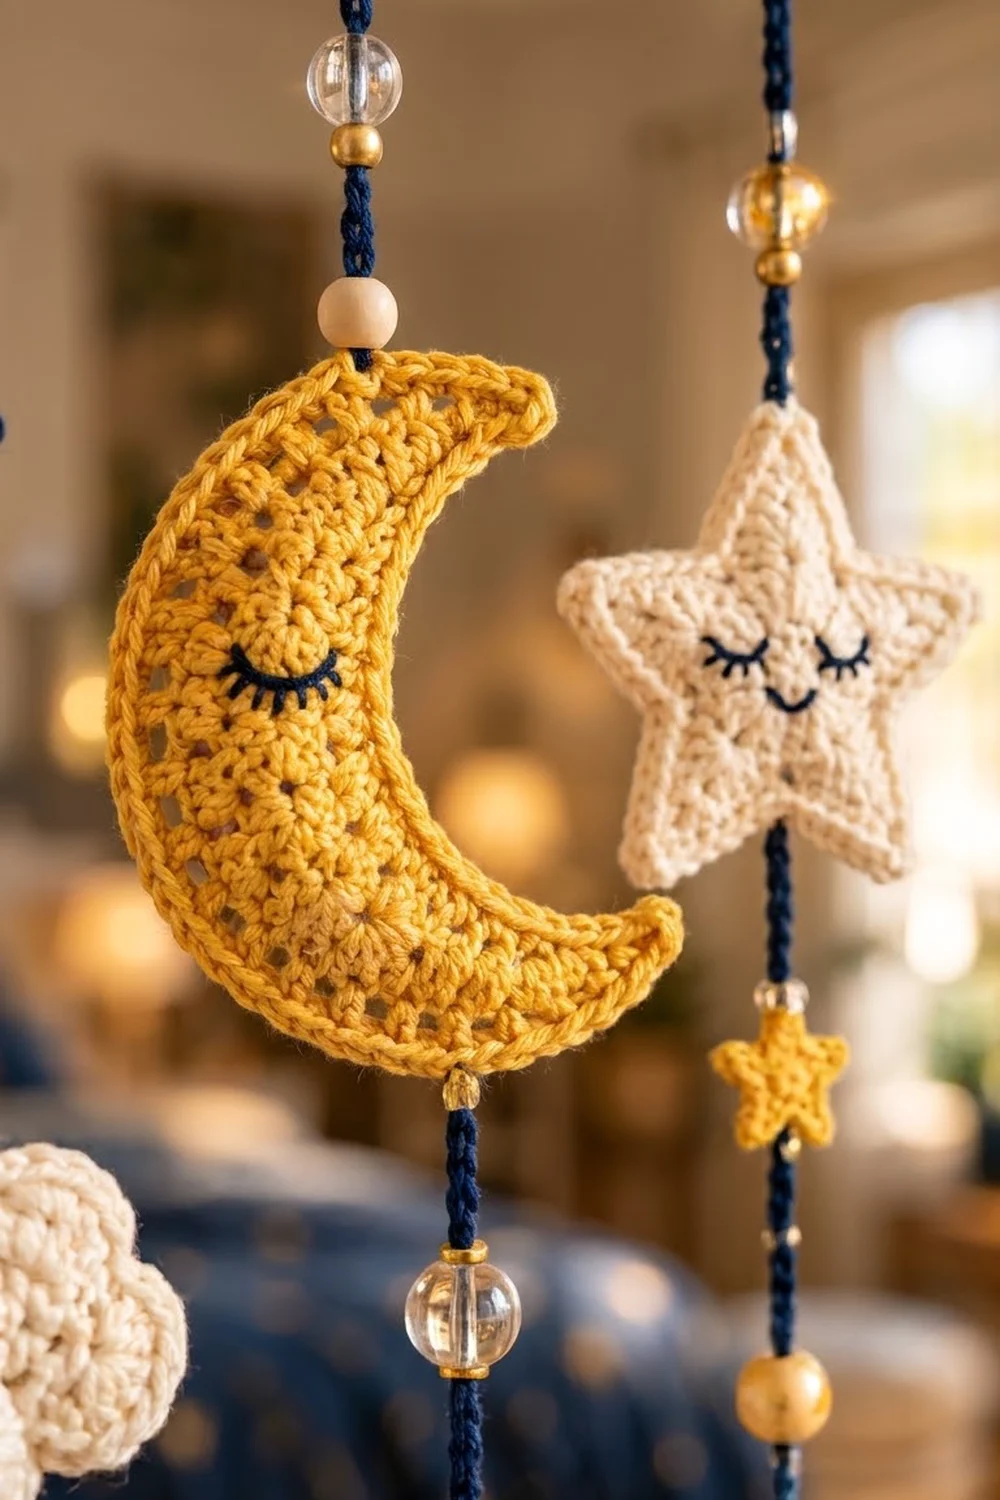
The palette is navy, golden yellow, cream and light blue, with clear, wooden and gold beads catching the light. Some moons, stars and clouds have small embroidered sleeping faces, which gives the piece a calm, storybook feel.
The pattern uses US crochet terms. The finished curtain measures 36 in (91.4 cm) wide and 38 in (96.5 cm) long, not counting the hanging tabs.
You’ll make eight scallops, join them with the first row of the header, and finish the header with hanging tabs. Then you’ll chain eight beaded cords, sew the motifs onto them, and tie a tassel to the end of each one.
Finished Size and Construction
- Finished size: 36 in (91.4 cm) wide x 38 in (96.5 cm) long
- Skill level: Intermediate
- Terminology: US
- Yarn weight: Worsted (#4)
- Hook: 4.0 mm (G-6)
- Number of pieces: 8 scallops, 8 cords, 16 feature motifs, 40 small stars, 8 tassels
- Layout: 8 scallops in a single row, with one cord hanging from the center of each
- Scallop size: 4.5 in (11.4 cm) wide x 2.25 in (5.7 cm) deep
- Size before border: 36 in (91.4 cm) wide x 2.25 in (5.7 cm) deep
- Border (header) depth: 1.25 in (3.2 cm), for a valance 3.5 in (8.9 cm) deep
- Cord length: 30 in (76.2 cm), plus a 4.5 in (11.4 cm) tassel
Materials
Use a smooth worsted-weight cotton or cotton blend. It shows the stitches clearly and doesn’t stretch much on the cords. These amounts assume about 200 m per 100 g.
- Navy: 150 g / 300 m (valance, cords, navy stars and moons, tassels)
- Golden yellow: 50 g / 100 m (stars, moons, embroidery)
- Cream: 80 g / 160 m (clouds, stars, moon)
- Light blue: 25 g / 50 m (small stars, tassels)
- Black or dark navy embroidery yarn: 5 g / 10 m (faces)
All quantities include a margin of about 15%.
Tools and notions:
- 4.0 mm (G-6) hook
- Tapestry needle
- Big-eye beading needle or floss threader
- 24 clear glass beads, 8 mm
- 16 wooden beads, 10 mm
- 16 gold beads, 6 mm
- All beads need holes of at least 2.5 mm (0.1 in)
- Small amount of fiberfill
- Stitch markers
- 5 in (12.7 cm) piece of cardboard
- Measuring tape, pins, spray bottle
- Wooden dowel, 3/4 in (1.9 cm) thick and 40 in (101.6 cm) long, with end caps (or a café tension rod)
Abbreviations (US Terms)
- ch – chain
- sl st – slip stitch
- sc – single crochet
- hdc – half double crochet
- dc – double crochet
- tr – treble crochet
- sk – skip
- st(s) – stitch(es)
- sp – space
- MR – magic ring
- RS/WS – right side/wrong side
Special stitches:
- Picot: ch 3, sl st in 3rd ch from hook.
- Bobble: (yarn over, insert hook in st, pull up a loop, yarn over, pull through 2 loops) 5 times in the same st; yarn over and pull through all 6 loops on hook.
- Bead-ch (B): slide the next bead up against the hook, then ch 1 around it to lock it in place. Each bead-ch counts as 1 ch.
Gauge and Checkpoints
Gauge: 16 sc and 16 rows = 4 in (10.2 cm). Each dc row is about 0.5 in (1.3 cm) tall. A loose chain gives 4 ch per 1 in (2.5 cm).
Make one scallop before you start anything else.
- After Row 4: the straight edge measures 4 in (10.2 cm).
- After Row 5: the scallop is 4.5 in (11.4 cm) wide and 2.25 in (5.7 cm) deep.
If your scallop is too big, go down half a hook size. If it’s too small, go up half a size. Even 1/4 in (0.6 cm) of error per scallop adds up to 2 in (5.1 cm) across the valance.
Scallops (Make 8, Navy)
Row 1 (RS): MR, ch 3 (counts as dc), 6 dc in ring, pull the ring closed, turn. (7 dc)
Row 2: ch 3 (counts as dc), dc in the first st, 2 dc in each st across. (14 dc)
Row 3: ch 4 (counts as dc + ch 1), dc in next st, ch 1, dc in next st across. (14 dc, 13 ch-1 sps)
Row 4: ch 3 (counts as dc), 2 dc in each ch-1 sp across, dc in 3rd ch of the turning ch. (1 + 26 + 1 = 28 dc)
Row 5: ch 1, sc in first 2 sts, picot, (sc in next 4 sts, picot) 6 times, sc in last 2 sts. (28 sc, 7 picots) Fasten off.
The 4th picot sits exactly at the bottom center of the curve. Mark it, because this is where the cord will hang.
Star embroidery: With yellow, stitch a five-point star about 0.75 in (1.9 cm) across, centered over Rows 2–3. Use five straight stitches that radiate from a center point, then go over each one a second time so it stands out.
Motifs
Small Star (Make 40: 16 navy, 16 yellow, 5 cream, 3 light blue)
Rnd 1: MR, ch 1, 10 sc in ring, sl st to first sc. (10 sc)
Rnd 2: ch 3, sl st in 2nd ch from hook, hdc in next ch, sk 1 sc, sl st in next sc 5 times. (5 points)
The star measures about 1.25 in (3.2 cm) across.
Medium Star (Make 3, Yellow Center, Navy Points)
Rnd 1: With yellow, MR, ch 1, 10 sc in ring, sl st to first sc. (10 sc) Change to navy.
Rnd 2: ch 1, 2 sc in each st, sl st to first sc. (20 sc)
Rnd 3: ch 5, sl st in 2nd ch from hook, sc in next ch, hdc in next ch, dc in next ch, sk 3 sc, sl st in next sc 5 times. (5 points)
The star measures about 2.25 in (5.7 cm) across.
Large Sleepy Star (Make 3: 2 cream, 1 yellow; each star has 2 layers)
Rnd 1: MR, ch 1, 10 sc in ring, sl st to first sc. (10 sc)
Rnd 2: ch 1, 2 sc in each st, sl st to first sc. (20 sc)
Rnd 3: ch 1, (sc in next st, 2 sc in next st) 10 times, sl st to first sc. (30 sc)
Rnd 4: ch 7, sl st in 2nd ch from hook, then sc, hdc, dc, dc, tr in the next 5 ch, sk 5 sc, sl st in next sc 5 times. (5 points)
Make 2 layers for each star. Embroider the face on one layer: two closed eyes as small curves with three tiny lashes each, and a short smile.
Hold the layers WS together and whipstitch around the edge. Add a little fiberfill before you close the last point. The finished star measures about 3.5 in (8.9 cm) across.
Crescent Moon (Make 5: 2 yellow, 1 cream, 2 navy)
Row 1: ch 19. Starting in the 2nd ch from hook, work: sc in next 2 ch, hdc in next 2, dc in next 2, 2 dc in each of next 2, 2 tr in each of next 4, 2 dc in each of next 2, dc in next 2, hdc in next 2. (18 ch worked, 26 sts)
Row 2: Turn, ch 1, sc in first 8 sts, 2 sc in each of next 10 sts, sc in last 8 sts. (36 sc)
Edging: Don’t turn. Work 2 sc down the row ends, 18 sc along the foundation ch, and 2 sc up the other row ends. Sl st to the first sc of Row 2. (22 edging sc) Fasten off.
The increases are all on the outer edge, so the foundation edge curves inward and forms the crescent. The moon is about 3.5 in (8.9 cm) tall.
Embroider a sleeping eye on each yellow and cream moon. On each navy moon, stitch three tiny yellow cross-stitch stars instead.
Cloud (Make 5, Cream)
Row 1 (RS): ch 13, sc in 2nd ch from hook and in each ch across. (12 sc)
Row 2 (WS): ch 1, sc in first st, (bobble in next st, sc in next st) 5 times, sc in last st. (7 sc, 5 bobbles = 12 sts)
Row 3: ch 1, sc in each st across. (12 sc)
Rows 4–5: Repeat Rows 2–3.
Rnd 6 (RS): Don’t turn. Work the outline as follows. (54 sts)
- First side: sl st in Row 5 end, 7 dc in Row 3 end, sl st in Row 1 end.
- Bottom: sc in each of the 12 foundation ch.
- Second side: sl st in Row 1 end, 7 dc in Row 3 end, sl st in Row 5 end.
- Top: (sk 1, 7 dc in next st, sk 1, sl st in next st) 3 times.
This count is 9 per side, 12 along the bottom and 24 along the top. Fasten off.
The cloud measures 4 in (10.2 cm) x 2 in (5.1 cm). Add a sleeping face to 3 of the 5 clouds.
Tassels (Make 8: 5 navy, 3 light blue)
- Wrap the yarn 30 times around the 5 in (12.7 cm) card.
- Tie the wraps together at the top with a 10 in (25.4 cm) strand, and cut through the loops at the bottom.
- Wrap the neck 8 times, 0.75 in (1.9 cm) below the top, and knot.
- Trim the tassel to 4.5 in (11.4 cm).
Make All Pieces
Here are the totals by color:
- Navy: 8 scallops, 16 small stars, 3 medium star points, 2 moons, 5 tassels, 8 cords
- Yellow: 16 small stars, 3 medium star centers, 1 large star (2 layers), 2 moons, 8 embroidered valance stars
- Cream: 5 small stars, 2 large stars (4 layers), 1 moon, 5 clouds
- Light blue: 3 small stars, 3 tassels
Each cord follows the same order from top to bottom: S1, S2, F1, S3, S4, F2, S5, then the tassel. S = small star; F = feature motif. On every cord, S1 and S3 are navy and S2 and S5 are yellow. S4 is shown in the grid.
Cord | F1           | F2           | S4    | Tassel
  1  | Cloud        | Navy moon    | Cream | Navy
  2  | Yellow moon  | Cloud        | Lt bl | Lt blue
  3  | Medium star  | Cream star   | Cream | Navy
  4  | Yellow star  | Cloud        | Lt bl | Lt blue
  5  | Medium star  | Cream star   | Cream | Navy
  6  | Cream moon   | Cloud        | Lt bl | Lt blue
  7  | Yellow moon  | Medium star  | Cream | Navy
  8  | Navy moon    | Cloud        | Cream | Navy
Cords are numbered left to right, and each one hangs from its matching scallop.
Joining
The scallops are joined by the first row of the header. This row also sets the width of the whole valance.
Lay the 8 scallops in a row, RS facing, with the straight edges at the top and the corners touching.
Header Row 1 (joining row): Join navy at the top right corner of the first scallop. Work across its straight edge as follows:
- 1 sc in the Row 5 end
- 2 sc in each of the 4 dc row ends (8 sc)
- Skip the ring center
- 2 sc in each of the 4 dc row ends on the other side (8 sc)
- 1 sc in the Row 5 end
That gives 18 sc per scallop. Move straight on to the next scallop without adding any sts at the seams. (8 x 18 = 144 sc)
Keep your tension even and don’t pull tight where two scallops meet. Use the tail to tack the touching corners together with two small stitches.
Checkpoint: The row should measure 36 in (91.4 cm). If it’s off by more than 1/2 in (1.3 cm), rework that row.
Border (Header and Tabs)
The border is the header band, which is worked across the top edge only, because the scallops already form the bottom edge. The border gauge is the same as the main gauge: 4 sc = 1 in (2.5 cm), and 4 rows = 1 in (2.5 cm).
Rows 2–3: ch 1, turn, sc in each st across. (144 sc)
Row 4 (tabs): ch 1, turn, sc in next 9 sts, ch 16, sc in next 9 sts 8 times. (144 sc + 8 ch-16 loops)
Row 5: ch 1, turn, sc in next 9 sc, 18 sc in the ch-16 loop, sc in next 9 sc 8 times. Count: 144 worked 1 per st, plus 8 x 18 = 144 added in the loops, for 288 sc. Fasten off.
Each side edge of the header has 5 row ends. Weave in the ends there neatly.
Why the math works: Each scallop gives 18 sc, and at 4 sc per inch that is 4.5 in (11.4 cm). Eight of them make 144 sc, or 36 in (91.4 cm). Each tab sits over the center of a scallop, between sts 9 and 10 of its 18-st section, so the tabs line up with the cords. Five header rows add 1.25 in (3.2 cm), which makes the valance 3.5 in (8.9 cm) deep.
Cords
String the beads onto the navy ball for one cord in this order: clear, wood, gold, clear, wood, gold, clear. The bead strung last is used first.
Join with a sl st in the center picot of the scallop.
Cord: ch 13, B, ch 13, B, ch 19, B, ch 13, B, ch 13, B, ch 19, B, ch 15, B, ch 8. (120 ch including 7 bead-ch) Fasten off and leave an 8 in (20.3 cm) tail.
Hang the curtain and let the cords settle for a few hours. Each cord should measure 30 in (76.2 cm). Add or remove ch at the bottom if needed.
Center each motif over the cord at these distances from the top of the cord, and sew it on with 3–4 tacks at its top and bottom:
- S1: 2 in (5.1 cm)
- S2: 5 in (12.7 cm)
- F1: 9.5 in (24.1 cm)
- S3: 14 in (35.6 cm)
- S4: 17 in (43.2 cm)
- F2: 21.5 in (54.6 cm)
- S5: 26 in (66.0 cm)
Thread the cord tail through the tassel’s top tie, knot it, and bury the tail inside the tassel.
Final Blocking
- Lightly mist the valance and pin it flat to 36 in x 3.5 in (91.4 cm x 8.9 cm).
- Pin each scallop into an even half-circle, with the picots pointing outward.
- Pin the moons and stars flat, open up the star points, and let them dry.
- Steam the tassels and comb them straight.
- Hang the curtain from the dowel and check that the cords are evenly spaced 4.5 in (11.4 cm) apart.
Final Quality-Control Checklist
- 8 scallops, each with 28 sc and 7 picots
- Header measures 144 sc and 36 in (91.4 cm)
- 8 tabs, each centered over a scallop
- Every cord is 30 in (76.2 cm) and has 7 beads
- Motifs match the layout grid
- All faces and stars are embroidered securely
- Tassels are all 4.5 in (11.4 cm)
- All ends are woven in
Troubleshooting
- Scallops cup: Your Row 4 tension is too tight. Go up half a hook size.
- Scallops ruffle: Check the Row 3 count. It should be 14 dc.
- Header waves: You added sts at a seam. Recount to 144.
- Cords stretch unevenly: Shorten the long ones at the bottom after the cords settle.
- Beads won’t pass over the yarn: Use beads with larger holes, or thread them with a floss threader.
- Motifs twist: Add a tack at the center back of the motif.
Care
Dust the curtain gently or shake it out. If it needs cleaning, hand wash it in cool water, press out the water in a towel, and dry it flat.
Final Notes
Each measurement builds on the one before it. One scallop is 18 sc and 4.5 in (11.4 cm), so eight scallops make 144 sc and 36 in (91.4 cm). The header adds 1.25 in (3.2 cm) for a 3.5 in (8.9 cm) valance. Add the 30 in (76.2 cm) cords and the 4.5 in (11.4 cm) tassels, and you get a curtain 38 in (96.5 cm) long. If you measure at each checkpoint, the finished curtain will hang straight and evenly.
Happy crocheting!