

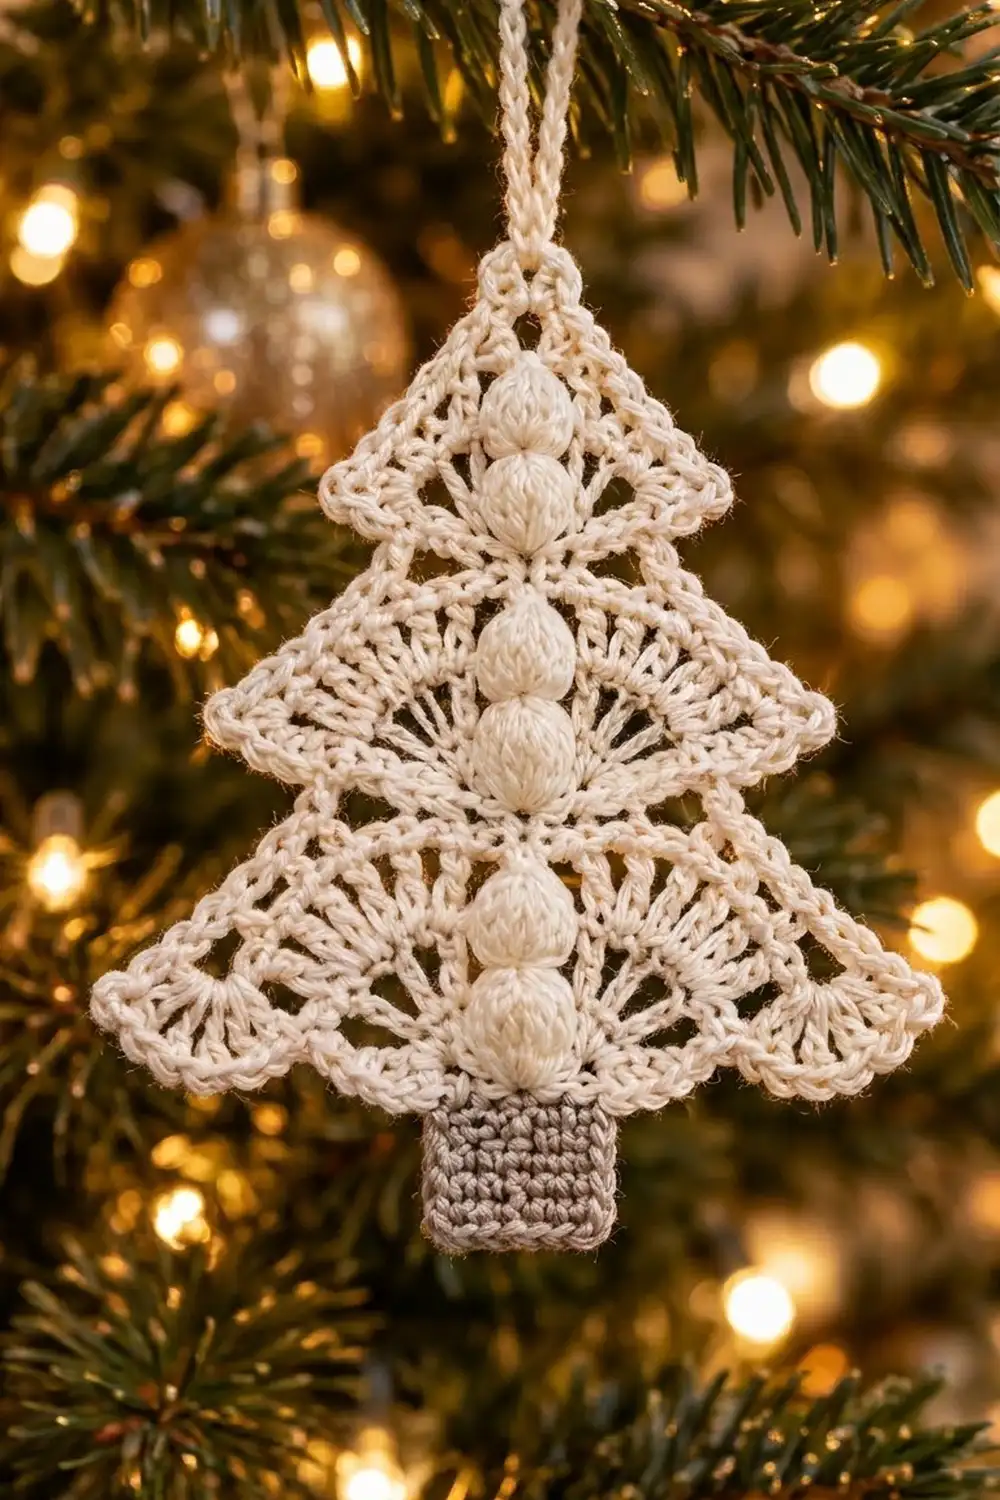
This Snow Lace Puff Tree is a flat, lacy Christmas ornament with three fan-shaped tiers, a column of six plump puff stitches down the center, and a tiny taupe trunk. Every tier ends in a soft edge of chain-loop scallops, so the tree looks like vintage lace hanging on the branches.
The palette stays quiet: creamy white thread for the tree and a warm taupe-gray for the trunk. It looks at home with gold baubles, natural wood, or a fully white tree. It also works as a gift tag or package topper.
The pattern uses US crochet terms. The finished ornament measures 4½ in (11.4 cm) wide by 5⅛ in (13.0 cm) tall, not counting the hanging loop.
You’ll work the whole ornament as one piece. First comes the top tier, made from a ring. Then each lower tier grows from free back loops hidden behind the tier above, so the tiers overlap naturally. The trunk is worked straight off the bottom edge. Last, a short chain-loop border runs along the slanted sides and you add the hanging cord.
Finished Size and Construction
- Finished size: 4½ in (11.4 cm) wide x 5⅛ in (13.0 cm) tall
- Skill level: Intermediate
- Terminology: US
- Yarn weight: Size 3 cotton crochet thread (CYC 1, super fine)
- Hook: 2.25 mm (US B/1)
- Number of pieces: 1, worked continuously
- Layout: 3 stacked tiers, trunk centered below
- Tier widths (before border): 2 in (5.1 cm), 3¼ in (8.3 cm), 4¼ in (10.8 cm)
- Size before border: 4¼ in (10.8 cm) x 5 in (12.7 cm)
- Border depth: ⅛ in (0.3 cm) on each slanted side and at the tip
Materials
Use mercerized cotton thread. It gives crisp spokes, round puffs, and lace that blocks well. Avoid fuzzy or very soft thread, which blurs the scallops.
- Cream (main): 25 g, about 40 m
- Taupe-gray (trunk): 3 g, about 5 m
These amounts include a margin for a gauge swatch and blocking tests.
Tools:
– 2.25 mm (US B/1) hook
– Fine tapestry needle
– Scissors
– Stitch markers
– Rustproof pins and a blocking board
– Spray starch or stiffener
– Ruler
Abbreviations (US Terms)
- ch – chain
- sl st – slip stitch
- sc – single crochet
- dc – double crochet
- st(s) – stitch(es)
- sp – space
- tch – turning chain
- FLO – front loop only
- RS / WS – right side / wrong side
Puff stitch (puff): [Yarn over, insert hook in the indicated st, yarn over, pull up a loop to dc height] 5 times (11 loops on hook). Yarn over, draw through all 11 loops, then ch 1 to close. The closing ch does not count as a stitch. Each puff is about ¼ in (0.6 cm) across.
Turning chains: A ch 3 counts as a dc throughout. A ch 4 counts as a dc plus a ch-1 sp.
Gauge and Checkpoints
- Single crochet: 7 sc and 8 rows = 1 in (2.5 cm)
- Double crochet rows: 7 rows = 2 in (5.1 cm)
Test Tier 1 first. It is small and quick, and it shows your gauge right away.
Checkpoints (before border, lightly blocked):
– Tier 1: 2 in (5.1 cm) wide, 1⅛ in (2.9 cm) from tip to bottom of scallops
– After Tier 2: 3¼ in (8.3 cm) wide, 2¼ in (5.7 cm) from the tip
– After Tier 3: 4¼ in (10.8 cm) wide, 4 in (10.2 cm) from the tip
– With trunk: 5 in (12.7 cm) total height
If Tier 1 is too big by more than ⅛ in (0.3 cm), go down a hook size. If it’s too small, go up a hook size. If the fan cups instead of lying flat, your dc are short, so pull each loop up a little taller.
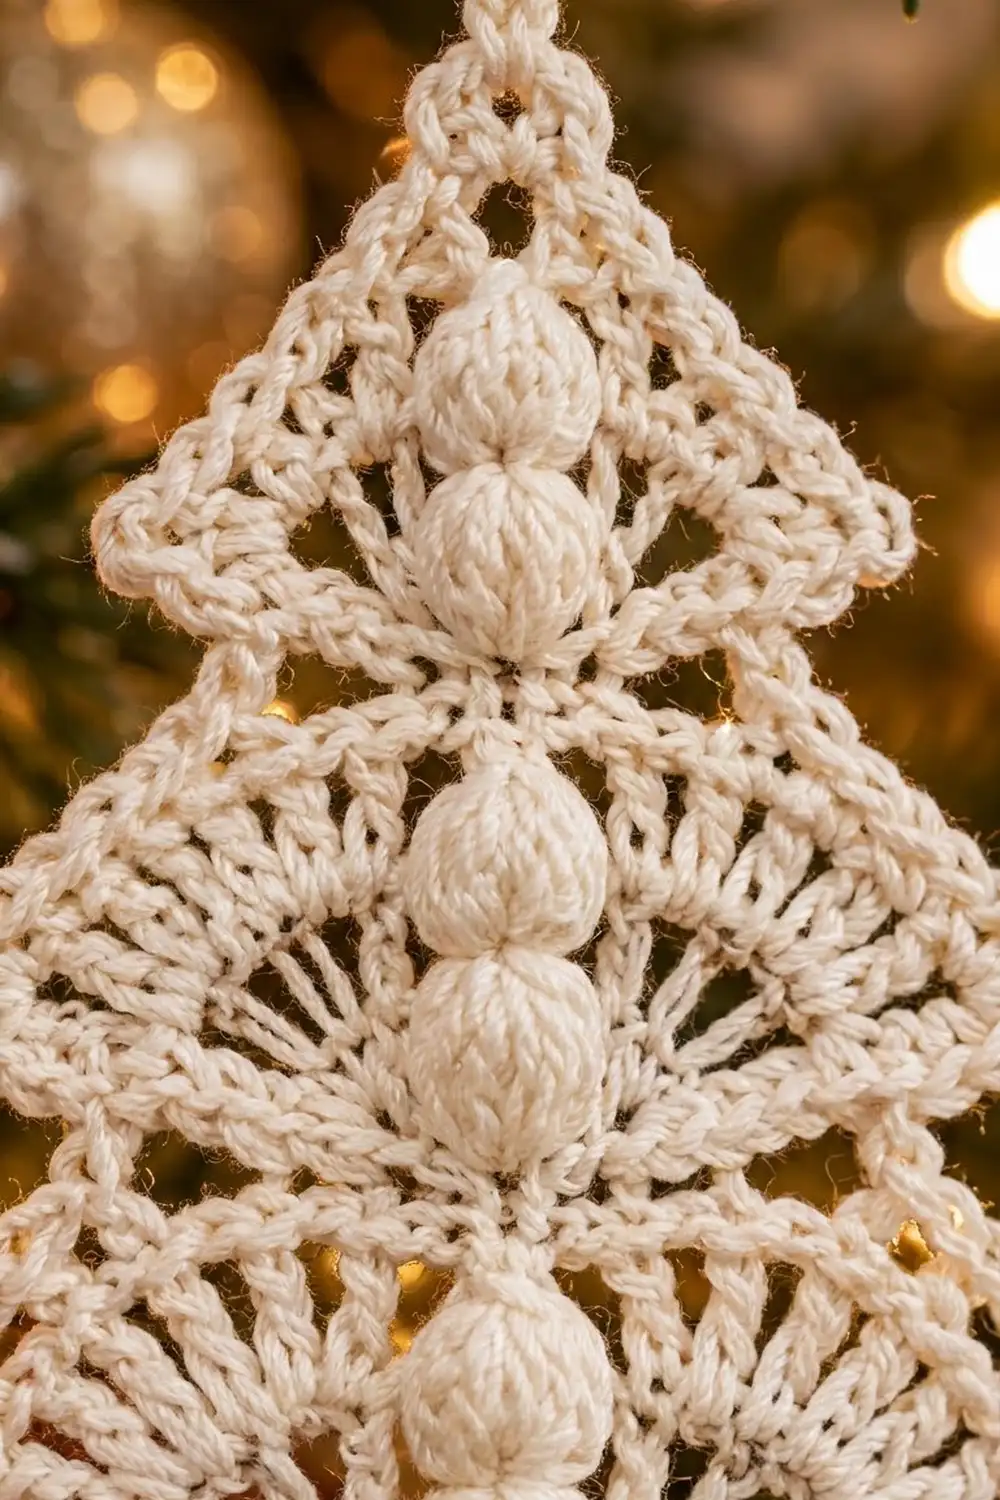
Tier 1 (Top)
Use cream.
Foundation: Ch 5, sl st in first ch to form a ring.
Row 1 (RS): Ch 3, 2 dc in ring, puff in ring, 3 dc in ring. Turn. (7 sts: 6 dc, 1 puff)
Row 2 (WS): Ch 3, dc in same st, 2 dc in each of next 2 dc, dc in top of puff, 2 dc in each of next 2 dc, 2 dc in top of tch. Turn. (13 dc)
Row 3 (RS): Work this row in FLO, which leaves the back loops of Row 2 free for Tier 2. Ch 4, [dc in next st, ch 1] 5 times, puff in next st (the center st), [ch 1, dc in next st] 6 times. The last dc goes in the top of the tch. Turn. (13 sts, 12 ch-1 sps)
Row 4 (WS), scallops: Ch 1, sc in first dc, [ch 3, skip ch-1 sp, sc in next st] 12 times. The last sc goes in the 3rd ch of the tch. Fasten off. (13 sc, 12 ch-3 loops)
Check your Tier 1 gauge now.
Tier 2 (Middle)
Setup: With RS facing, fold Rows 3–4 of Tier 1 up toward you. This shows the free back loops of Row 2. Mark the center 5 back loops (sts 5–9 of 13).
Row 1 (RS): Join cream with a sl st in the first marked back loop. Ch 3, dc in same loop, 2 dc in next loop, 3 dc in next (center) loop, 2 dc in next loop, 2 dc in last marked loop. Turn. (11 dc)
This row sits behind Tier 1, and every row of Tier 2 hangs downward from it.
Row 2 (WS): Ch 3, dc in same st, [dc in next st, 2 dc in next st] 5 times. Turn. (17 dc)
Row 3 (RS): Ch 3, dc in same st, dc in next 7 sts, puff in next st (center), dc in next 7 sts, 2 dc in top of tch. Turn. (19 sts: 18 dc, 1 puff)
Row 4 (WS): Ch 3, dc in same st, [dc in next 3 sts, 2 dc in next st] twice, dc in top of puff, [2 dc in next st, dc in next 3 sts] twice, 2 dc in top of tch. Turn. (25 dc)
Row 5 (RS): Work this row in FLO. Ch 4, [dc in next st, ch 1] 11 times, puff in next st (center, the 13th st), [ch 1, dc in next st] 12 times. Turn. (25 sts, 24 ch-1 sps)
Row 6 (WS), scallops: Ch 1, sc in first dc, [ch 3, skip ch-1 sp, sc in next st] 24 times. Fasten off. (25 sc, 24 ch-3 loops)
The Row 3 puff should sit just below Tier 1’s scallops, so the center column continues without a gap.
Tier 3 (Bottom)
Setup: With RS facing, fold Rows 5–6 of Tier 2 up and mark the center 5 free back loops of Tier 2 Row 4 (sts 11–15 of 25).
Rows 1–4: Work exactly as Tier 2 Rows 1–4. (Row 1: 11 dc; Row 2: 17 dc; Row 3: 19 sts with center puff; Row 4: 25 dc)
Row 5 (RS): Ch 3, dc in same st, dc in next 11 sts, puff in next st (center), dc in next 11 sts, 2 dc in top of tch. Turn. (27 sts: 26 dc, 1 puff)
Row 6 (WS): Ch 3, dc in same st, [dc in next 3 sts, 2 dc in next st] 3 times, dc in top of puff, [2 dc in next st, dc in next 3 sts] 3 times, 2 dc in top of tch. Turn. (35 dc)
Row 7 (RS): Work through both loops. Ch 4, [dc in next st, ch 1] 33 times, dc in top of tch. Turn. (35 sts, 34 ch-1 sps)
Row 8 (WS), scallops: Ch 1, sc in first dc, [ch 3, skip ch-1 sp, sc in next st] 34 times. Fasten off. (35 sc, 34 ch-3 loops)
The 18th sc is the center bottom point of the tree.
Trunk
Use taupe-gray. With RS facing, find the center sc (18th of 35) on Tier 3 Row 8. Count two ch-3 loops to the right of it.
Row 1 (RS): Join with a sl st in that loop. Ch 1, sc in same loop, sc in next sc, sc in next loop, sc in center sc, sc in next loop, sc in next sc, sc in next loop. Turn. (7 sc)
That is 3 sc on each side of the center sc, so the trunk sits exactly centered.
Rows 2–8: Ch 1, sc in each st across. Turn. (7 sc)
Fasten off. The trunk measures 1 in (2.5 cm) square.
Border
Border gauge: 7 loops = 1 in (2.5 cm) along a slanted side.
Each border loop is [ch 3, sc]. Work 2 loops around the post of each dc row-end. Because 7 dc rows = 2 in (5.1 cm), 2 loops per row-end gives 14 loops per 2 in, which matches the border gauge. The edge stays flat with no ruffling and no pulling. Hold the piece with RS facing throughout.
Pass A, Tier 1 (worked continuously):
1. Join cream with a sl st in the right-hand corner sc of Row 4.
2. Work 2 loops around each row-end post of Rows 3, 2, and 1 (6 loops).
3. Ch 3, sc into the ring in the gap between the first and last sts of Row 1. This is the tip loop.
4. Work 2 loops around each row-end of Rows 1, 2, and 3 down the left side (6 loops).
5. Ch 3, sl st in the left corner sc.
(7 loops per side, 14 total) Fasten off.
Pass B, Tier 2 (each side worked separately):
– Right side: Sl st in the corner sc of Row 6, then work 2 loops around each row-end of Rows 5, 4, 3, and 2. Fasten off. (8 loops)
– Left side: Join with a standing sc around the Row 2 row-end and ch 3. Sc around the same post, then work 2 loops around each of Rows 3, 4, and 5. Ch 3, sl st in the corner sc. (8 loops)
(16 total) Rows 1 and 2 at the top sit hidden behind Tier 1.
Pass C, Tier 3: Work the same way as Pass B, but cover the row-ends of Rows 7 through 3. (10 loops per side, 20 total)
Total border: 50 loops. The border adds ⅛ in (0.3 cm) to each slanted side and the tip:
– Width: 4¼ in (10.8 cm) + ⅛ in (0.3 cm) on each side = 4½ in (11.4 cm)
– Height: 5 in (12.7 cm) + ⅛ in (0.3 cm) at the tip = 5⅛ in (13.0 cm)
Hanging loop: With cream, ch 31. Sl st in 2nd ch from hook and in each ch across. (30 sl sts, about 3 in (7.6 cm) long) Fold the cord in half and push both ends through the tip ring from front to back. Sew them securely to the WS of Tier 1 Row 1. The loop stands about 1¼ in (3.2 cm) tall.
Final Blocking
- Weave in all ends along the WS spokes, staying behind the tiers above.
- Soak the ornament in cool water for 10 minutes. Gently press out the water in a towel.
- Pin it RS up on a blocking board to 4½ in (11.4 cm) wide by 5⅛ in (13.0 cm) tall.
- Pin each tier’s bottom corners first. Then pin the center bottom point and the tip.
- Open each ch-3 scallop with one pin so it forms a clean arch.
- Push each puff into a round dome from the back with a fingertip.
- Spray with starch, let it dry completely, then remove the pins.
Final Quality-Control Checklist
- Six puffs sit in one straight vertical line, two per tier.
- Each tier’s scallops overlap the tier below evenly on both sides.
- Stitch counts: Tier 1 Row 4 has 12 loops, Tier 2 Row 6 has 24, Tier 3 Row 8 has 34.
- The trunk has 7 sc and 8 rows, with 3 sc on each side of the center.
- The border has 50 loops: 14 on Tier 1, 16 on Tier 2, 20 on Tier 3.
- The ornament measures 4½ in (11.4 cm) x 5⅛ in (13.0 cm).
- The ornament hangs straight from its loop.
Troubleshooting
- Tier ruffles: Your dc are too loose or too tall. Go down a hook size or shorten each dc slightly.
- Tier cups: Your dc are too tight. Go up a hook size, and keep the ch-1 sps relaxed.
- Puffs look flat: Pull every loop up to full dc height, then close the puff firmly with the ch 1.
- Puff column drifts sideways: Recount the center stitch on the row before. Each increase row is symmetric around the center.
- The next tier is visible above the scallops: You joined into the wrong row. Lower tiers start in Row 2 of Tier 1 and Row 4 of Tier 2.
- Trunk is off-center: Re-find the 18th sc of Tier 3 Row 8 before joining.
- Border puckers: Work exactly 2 loops per row-end. Don’t add extra loops.
Care
Hand wash in cool water, then reshape and dry flat. Re-starch the ornament if it softens after storage.
Final Notes
The measurement chain is short. Tier 1 measures 2 in (5.1 cm) wide. Tier 2 brings the width to 3¼ in (8.3 cm), and Tier 3 brings it to 4¼ in (10.8 cm). The trunk adds 1 in (2.5 cm) of height, for 5 in (12.7 cm) before the border. The ⅛ in (0.3 cm) border then gives the finished 4½ in (11.4 cm) x 5⅛ in (13.0 cm) ornament.
If Tier 1 hits its checkpoint, the rest of the tree will follow. Make one, check it, and then fill your branches.
Happy crocheting!