

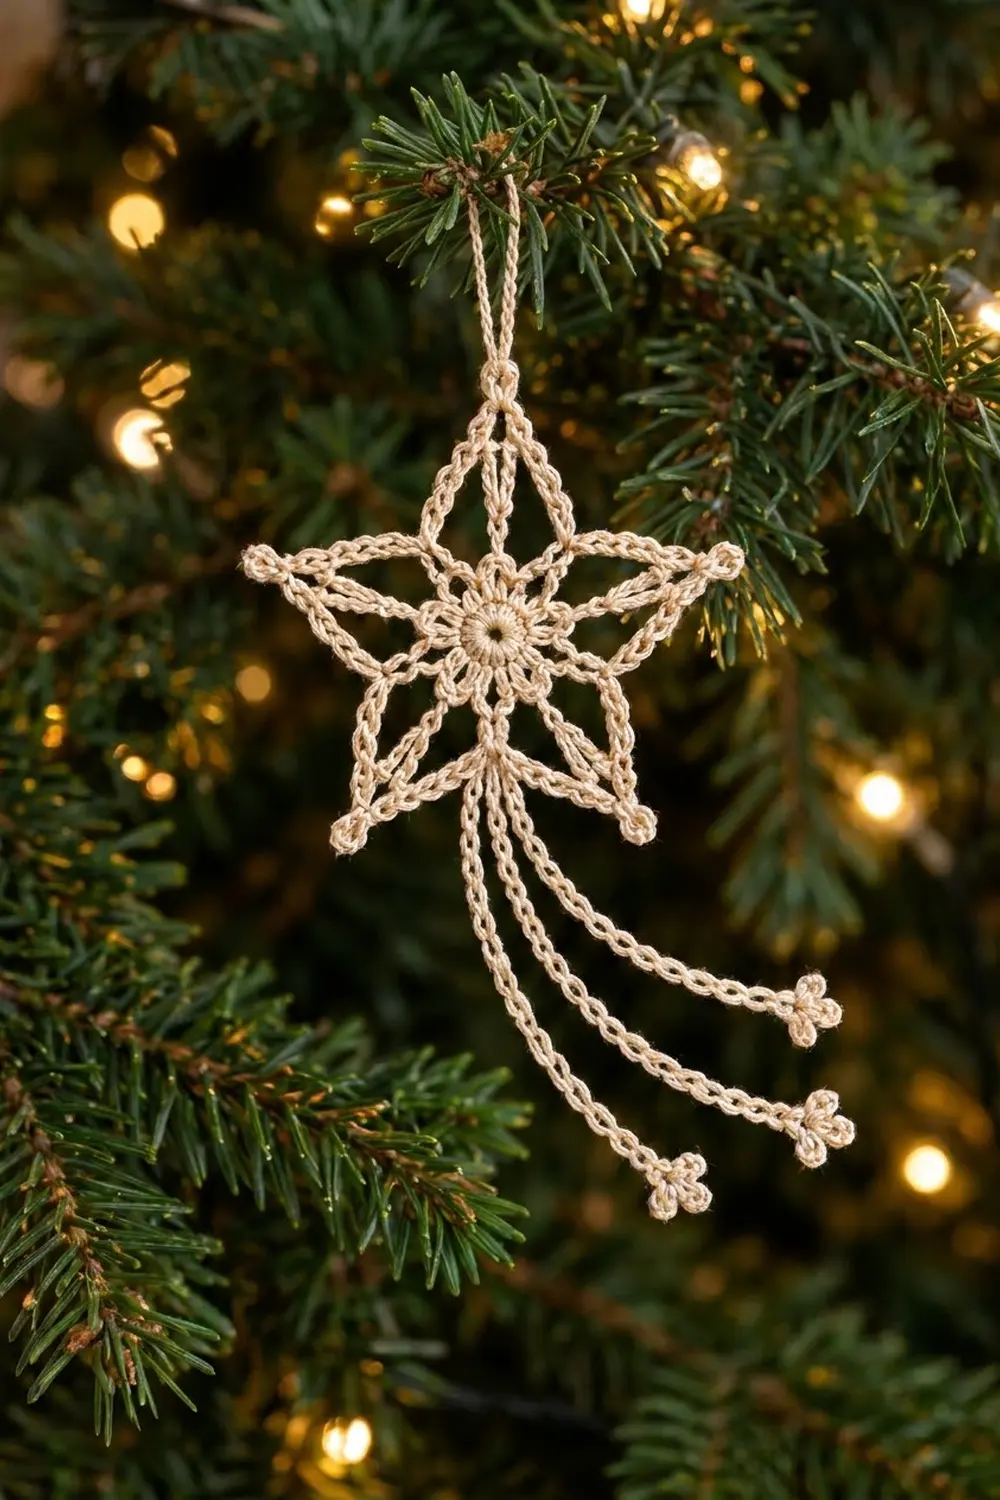
The Stardust Trail Shooting Star is a delicate thread-crochet ornament. Its five-pointed lace star trails three curving tails, each ending in a tiny trefoil. It looks light and airy on a tree branch and still keeps a crisp shape once it’s starched.
The sample is worked in one color, a soft cream cotton thread. The style is classic and a little vintage, like an heirloom snowflake but shaped as a falling star. It looks just as good with gold baubles as with plain fir and white lights.
This pattern uses US crochet terms. The finished star measures about 3.5 in (8.9 cm) from point to point and 3.25 in (8.3 cm) tall. With the hanging loop and the longest tail, the full ornament hangs about 7.75 in (19.7 cm) long.
The construction is simple. You start with a ten-petal center ring, chain five pointed spokes out to the tips, chain an outline round, and then cover that outline with single crochet. Last, you add a hanging loop and the three tails.
Finished Size and Construction
- Finished star size: 3.5 in (8.9 cm) wide x 3.25 in (8.3 cm) tall
- Total hanging length: about 7.75 in (19.7 cm), loop to lowest trefoil
- Skill level: Intermediate (fine thread, chain counting)
- Terminology: US crochet terms
- Yarn weight: Size 10 crochet cotton thread (Lace / 0)
- Hook: 1.75 mm steel hook
- Number of pieces: 1 (single piece, no joining)
- Layout: One standalone ornament
- Center size: 0.9 in (2.3 cm) across after Round 2
- Size before border: about 3.25 in (8.3 cm) point to point after Round 4
- Border depth: 1 round of single crochet, about 0.125 in (0.3 cm)
Materials
Yarn: Use a mercerized size 10 cotton crochet thread. Mercerized cotton has a slight sheen, takes starch well, and keeps the tips sharp. Avoid fuzzy or acrylic threads, because they won’t hold the star shape after blocking.
- Cream / ecru: 6 g, about 30 m (33 yd)
This quantity includes about a 30% margin for gauge swatching and weaving in ends.
Tools:
– 1.75 mm steel crochet hook
– Fine tapestry needle
– Small sharp scissors
– Stitch marker or a short length of contrast thread
– Fabric stiffener or homemade starch
– Foam blocking board and rustproof pins
– Plastic wrap to cover the board
Abbreviations (US Terms)
- ch – chain
- sl st – slip stitch
- sc – single crochet
- dc – double crochet
- sp – space
- st(s) – stitch(es)
- rnd – round
- rep – repeat
Special stitches
- Tip picot: Ch 3, sl st in the 3rd ch from the hook.
- Trefoil: Ch 4, sl st in the base stitch where the trefoil started; rep from * 2 more times. This makes 3 small picot loops clustered at one point.
Gauge and Checkpoints
Thread work is small, so you only need a short gauge swatch. Make Rounds 1–2 first and measure them before you commit to the full star.
- Single crochet gauge: 11 sc = 1 in (2.5 cm)
- Chain gauge: 12 ch = 1 in (2.5 cm)
Checkpoints:
1. After Round 2, the center measures 0.9 in (2.3 cm) across.
2. After Round 3, each point loop reaches about 1.75 in (4.4 cm) from the center of the ring.
3. After Round 4, the star measures about 3.25 in (8.3 cm) point to point.
4. After Round 5 (border), the star measures 3.5 in (8.9 cm) point to point.
If your center is too big (over 1 in / 2.5 cm), go down to a 1.5 mm hook. If it’s too small (under 0.75 in / 1.9 cm), go up to a 2 mm hook. Change the hook rather than the chain counts, because the stitch math below depends on the counts.
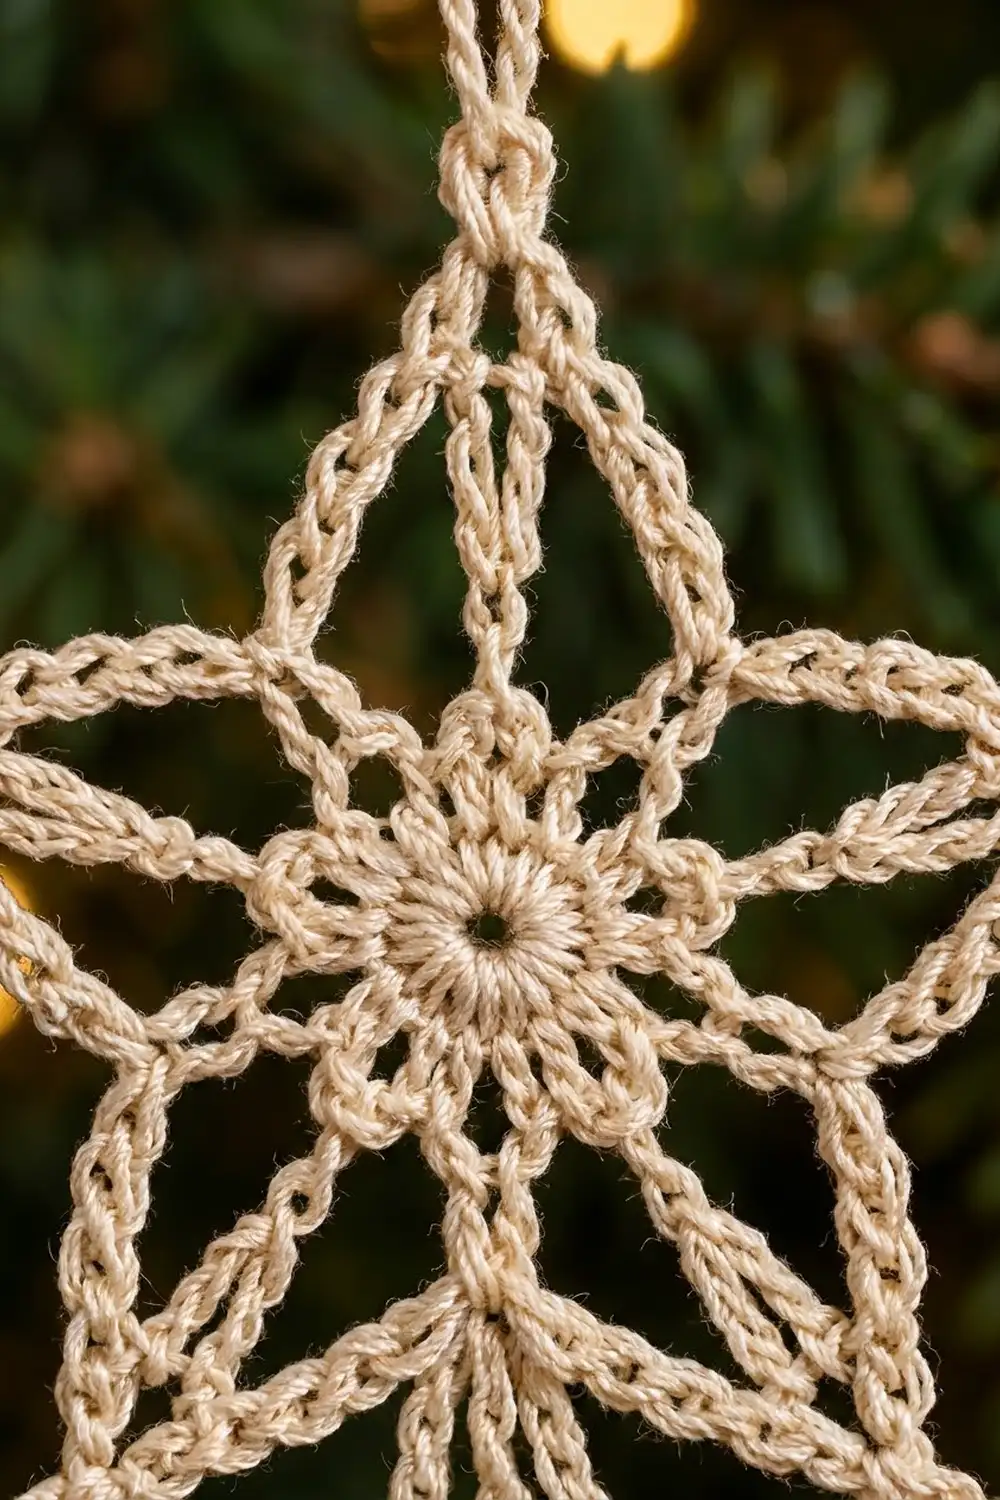
Pattern: Star Center
Round 1: Make a magic ring. Ch 1, work 10 sc into the ring, then sl st in the first sc to join. Pull the ring tight. (10 sc)
Round 2: Ch 3 (counts as the first dc). Work 1 dc in the same st, then ch 1. Work 2 dc in the next st, ch 1; rep from * 8 more times. Sl st in the top of the beginning ch-3 to join. (20 dc in 10 pairs, 10 ch-1 sps)
The ten dc pairs make the little flower center. Measure now: 0.9 in (2.3 cm) across.
Pattern: Star Points
Each point uses two neighboring ch-1 spaces. You chain out of the first space, make the tip picot, and chain back into the second space. A short ch-5 loop then sits over the next dc pair, and later becomes the anchor for an inner corner of the star.
Round 3: Sl st into the first ch-1 sp. Ch 1, then sc in the same sp.
Ch 16, make a tip picot, ch 16, sc in the next ch-1 sp, ch 5, sc in the next ch-1 sp; rep from * 3 more times.
Then ch 16, make a tip picot, ch 16, sc in the next ch-1 sp, ch 5, and sl st in the first sc to join.
(10 sc, 10 ch-16 arms, 5 tip picots, 5 ch-5 loops)
Lay the piece flat. You should see five long, narrow loops radiating out like pointed petals, with a small ch-5 loop between each pair. Checkpoint: each loop reaches about 1.75 in (4.4 cm) from the center. Fasten off.
Pattern: Star Outline
Round 4: Join the thread with a sl st in any tip picot (this will be the top point). Ch 1, then work (sc, ch 3, sc) in the same picot.
Ch 12, sc in the next ch-5 loop, ch 12, (sc, ch 3, sc) in the next tip picot; rep from * 3 more times.
Then ch 12, sc in the next ch-5 loop, ch 12, and sl st in the first sc to join.
(15 sc: 10 at the tips and 5 at the inner corners; 5 ch-3 tip sps; 10 ch-12 sps)
The sc worked into each ch-5 loop pulls the outline inward and creates the V-shaped inner corners of the star. Checkpoint: about 3.25 in (8.3 cm) point to point. Don’t fasten off.
Border
The border is a single round of sc worked into the outline’s chain spaces. It thickens and smooths the star’s edges and sharpens each tip.
Border gauge: 11 sc = 1 in (2.5 cm), worked 1 sc per chain into each space.
Round 5: Sl st into the first ch-3 tip sp. Ch 1, then work (2 sc, ch 3, 2 sc) in the same sp.
Work 12 sc in the next ch-12 sp, sl st in the inner-corner sc, 12 sc in the next ch-12 sp, then (2 sc, ch 3, 2 sc) in the next ch-3 tip sp; rep from * 3 more times.
Then work 12 sc in the next ch-12 sp, sl st in the inner-corner sc, 12 sc in the last ch-12 sp, and sl st in the first sc to join.
Counts per edge: Each star edge runs from an inner corner to a tip. It holds 12 sc along the chain plus the 2 sc on that side of the tip, for 14 sc per edge. The tip ch-3 picot and the inner-corner sl st are not included in those 14.
Round total: 10 edges x 14 sc = 140 sc, plus 5 ch-3 tip picots and 5 inner-corner sl sts.
Why the math works: Each ch-12 space gets exactly 12 sc, one per chain, so the edge neither ruffles nor pulls tight. The sc at the bases of the tips from Round 4 are covered rather than worked into, so no stitches are added there. At the tips, 4 sc around a ch-3 point keep the tip sharp. At the inner corners, a sl st instead of a full sc keeps the V tight. At 11 sc per inch, each 14-sc edge measures about 1.25 in (3.2 cm), which gives the 3.5 in (8.9 cm) finished width.
Don’t fasten off. Your hook is now at the top tip.
Hanging Loop
Sl st into the top ch-3 tip sp. Ch 30, then sl st in the same tip sp to form a loop.
Work 36 sc into the ch-30 loop, then sl st in the tip sp. Fasten off and weave in the end.
(36 sc over 30 ch)
Six extra sc over 30 chains gently round the loop so it stands up without twisting. The loop hangs about 1.25 in (3.2 cm) above the top tip.
Shooting-Star Tails
All three tails start from the same spot: the inner-corner sl st directly opposite the top point, between the two lower points.
Long tail: Join the thread with a sl st in the bottom inner corner. Ch 42, then make a trefoil in the last ch. Sl st in the back bump of each ch back to the star. (42 ch, 42 sl st, 1 trefoil)
Middle tail: Without cutting, sl st in the same inner corner. Ch 36, make a trefoil, then sl st in the back bump of each ch back to the star. (36 ch, 36 sl st, 1 trefoil)
Short tail: Sl st in the same inner corner. Ch 30, make a trefoil, then sl st in the back bump of each ch back to the star. (30 ch, 30 sl st, 1 trefoil)
Fasten off and weave in the end. Slip stitching back along the chain doubles each tail’s thickness, so it holds a curve after starching.
Tail lengths, not counting the trefoil: 3.5 in (8.9 cm), 3 in (7.6 cm), and 2.5 in (6.4 cm).
Final Blocking
- Weave in every tail end along the outline sc, not through the open chains, so the ends don’t show.
- Soak the ornament in fabric stiffener, or in starch mixed to a medium-firm strength.
- Gently squeeze out the excess. Never wring the thread.
- Cover the foam board with plastic wrap and lay the star face up.
- Pin the top tip first, then the two lower tips, then the two side tips, spacing them evenly to 3.5 in (8.9 cm) point to point.
- Pin each tip picot open, and pin each inner-corner V into a crisp point.
- Shape the five inner spoke loops into narrow points and pin through each tip picot.
- Lay the three tails in a gentle sweep to one side, fanned so they don’t touch, and pin each trefoil open.
- Pin the hanging loop into a neat teardrop shape.
- Let it dry completely, usually 12–24 hours, before removing the pins.
Final Quality-Control Checklist
- [ ] The center has 10 even dc pairs with no gaps between them
- [ ] All 5 spoke loops have exactly 16 ch on each side of the picot
- [ ] Each inner corner sits in a sharp V, not a rounded curve
- [ ] Each star edge has 14 sc, for a total of 140 sc
- [ ] All 5 tip picots are open and the same size
- [ ] The star measures 3.5 in (8.9 cm) point to point
- [ ] The hanging loop has 36 sc and doesn’t twist
- [ ] The tails measure 3.5 in, 3 in, and 2.5 in (8.9 cm, 7.6 cm, and 6.4 cm)
- [ ] All three trefoils have 3 visible picots
- [ ] No ends are visible, and the ornament is fully dry and stiff
Troubleshooting
Star points are uneven: Recount the 16 ch on each side of every spoke. One extra chain makes a noticeably longer point.
Outline ruffles: You probably worked more than 12 sc into a ch-12 space. Rip back and work exactly 12.
Outline pulls the points inward: Your sc are tighter than your chains. Loosen your sc slightly, or make the Round 4 chains with a hook one size larger.
Inner corners look rounded: Make sure you worked a sl st (not an sc) into each inner-corner sc in Round 5, and pin the V firmly while blocking.
Tails curl into spirals: Slip stitch back more loosely, or pin the tails straighter while the starch dries.
Trefoil picots collapse: Work each sl st back into the same base stitch, not into the chain.
Center ring opens up: Pull the magic-ring tail snug again and weave it in securely.
Care
Hand wash in cool water with mild soap, then re-starch and re-block to restore the shape. Store flat in tissue paper so the tails don’t tangle.
Final Notes
The measurement chain runs like this:
– The 0.9 in (2.3 cm) center leads to point loops 1.75 in (4.4 cm) long.
– Those loops lead to a 3.25 in (8.3 cm) outline.
– The 140-sc border then finishes the star at 3.5 in (8.9 cm) point to point.
– The loop and tails bring the hanging length to about 7.75 in (19.7 cm).
If you hit every checkpoint along the way, the finished shape will follow. Make one, check it, and then make a whole sky of them for your tree.
Happy crocheting!