

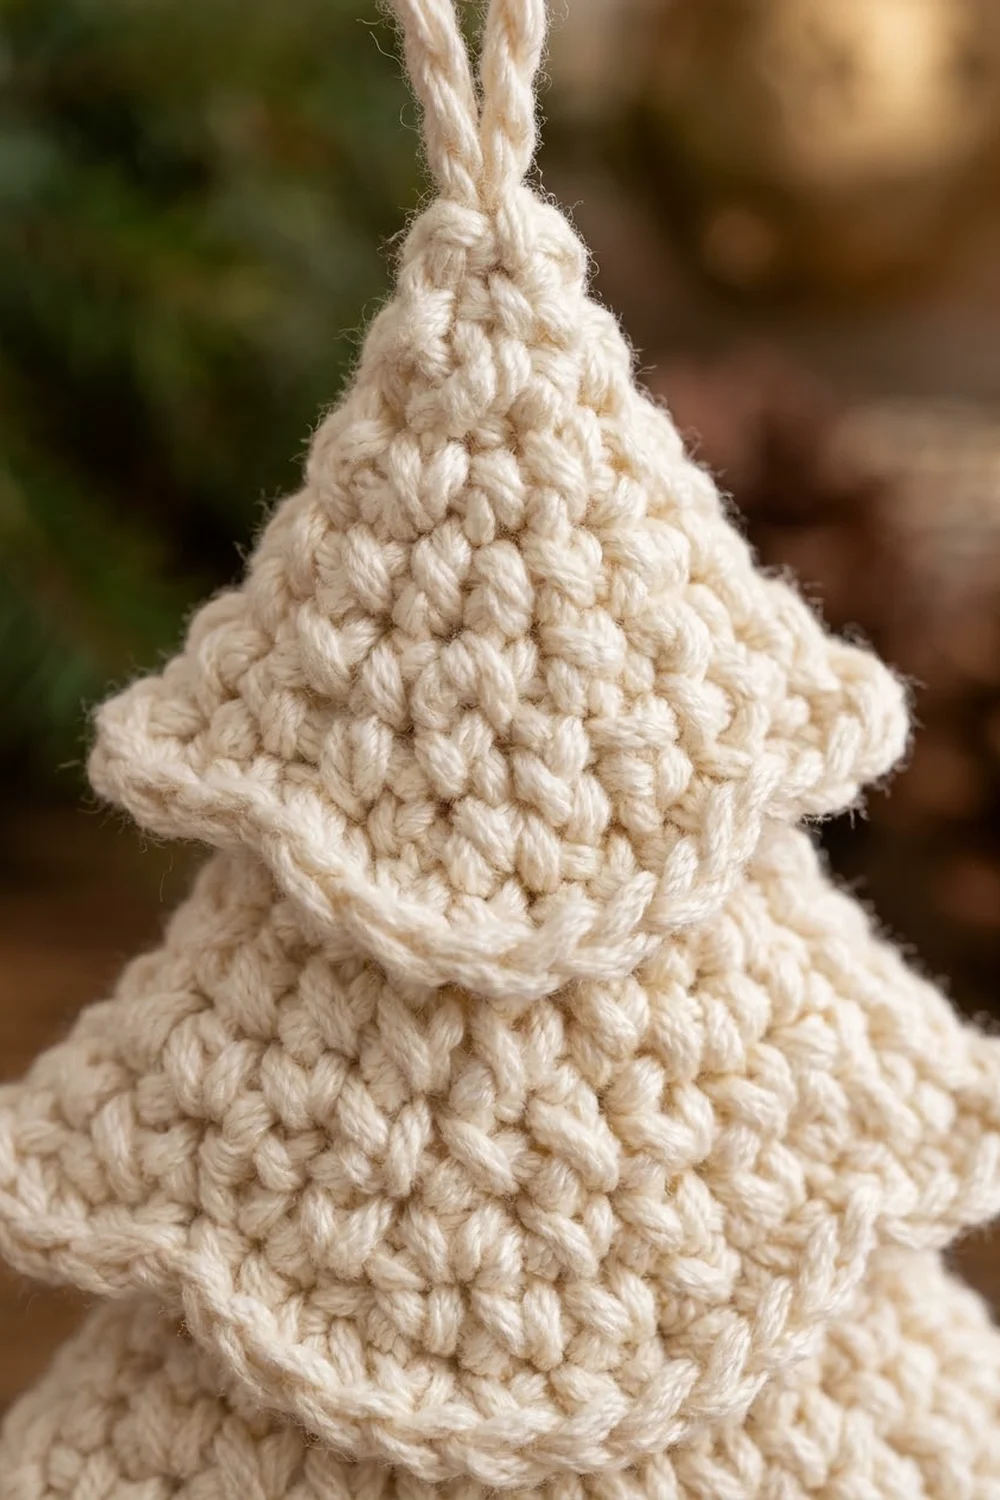
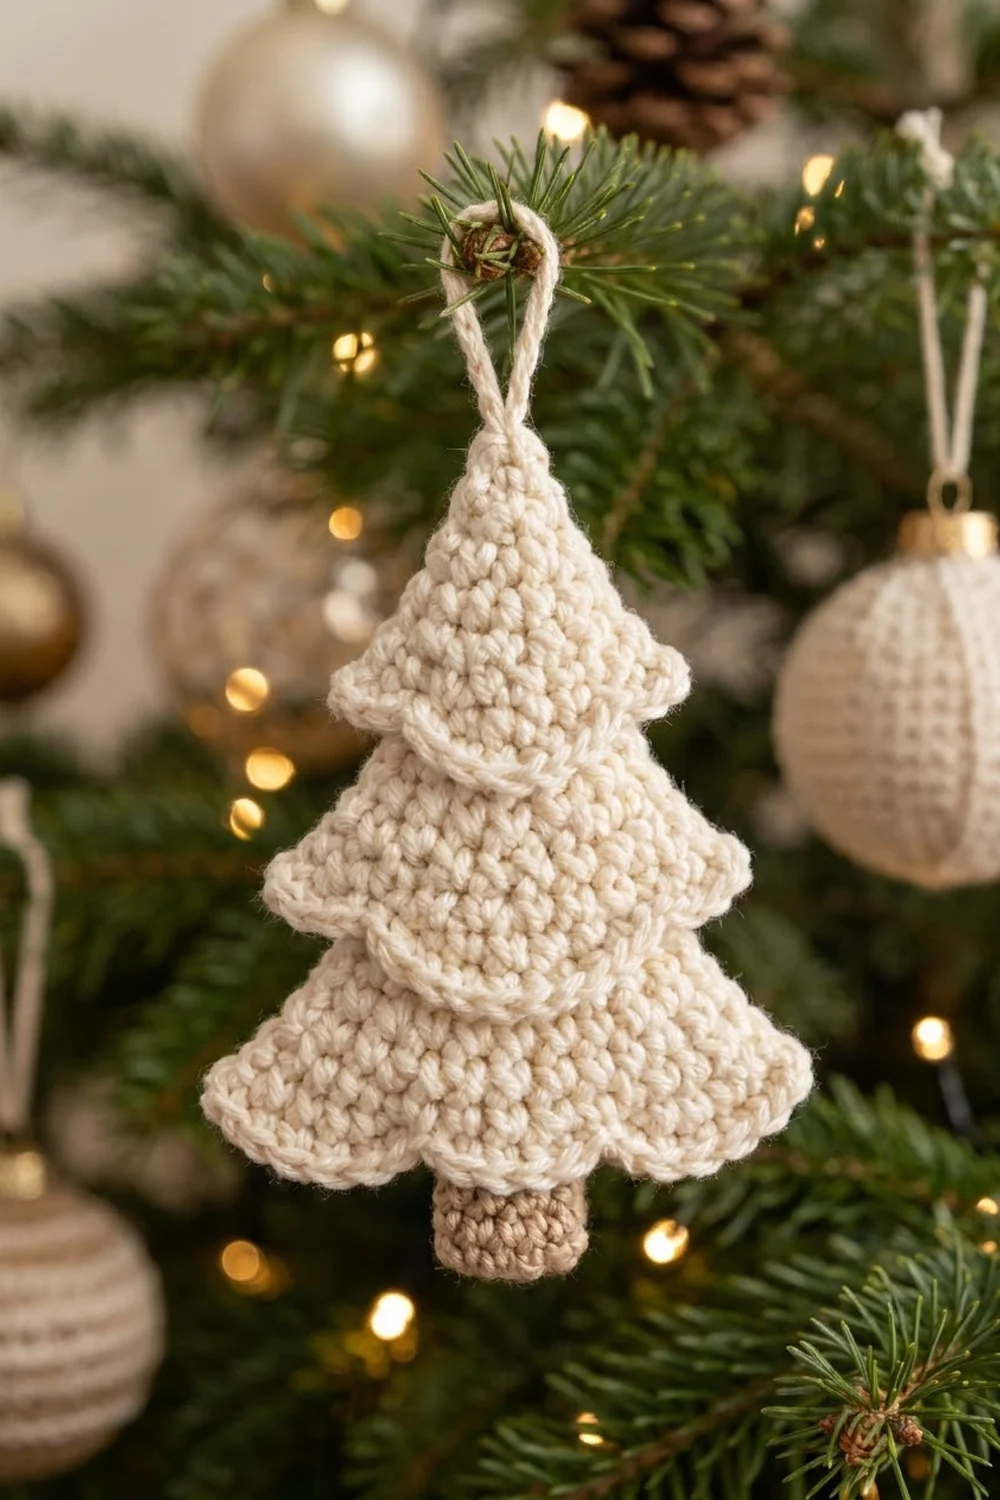
The Snowdrift Tiered Tree is a small, flat Christmas tree ornament with a soft, cozy look. It has three stepped tiers of firm single crochet. Each tier ends in a rolled, scalloped hem that hangs a little over the tier below, so the tree looks layered even though it is one piece.
The palette is plain and warm: cream for the tree and hanging loop, and light tan for the short trunk. It looks right on a natural-themed tree, tied to a gift, or hung in a row from a rod or garland.
This pattern uses US crochet terms. The finished ornament is about 4.2 in (10.7 cm) wide at the bottom tier and 5.1 in (13.0 cm) tall from the tip to the bottom of the trunk. The hanging loop adds about 1.5 in (3.8 cm).
You work the tree flat from the tip down, in rows of single crochet. The first row of each new tier is worked in back loops only, which leaves a ridge of free front loops. Later you crochet the scalloped hems into those front loops. The trunk is worked straight down from the center of the last row. A slip-stitch outline and a sturdy hanging loop finish the piece.
Finished Size and Construction
- Finished size: 4.2 in (10.7 cm) wide x 5.1 in (13.0 cm) tall, plus a 1.5 in (3.8 cm) loop
- Skill level: Easy / advanced beginner
- Terminology: US crochet terms
- Yarn weight: DK (#3), cotton or cotton blend
- Hook: 3.5 mm (E-4)
- Number of pieces: 1 (single, standalone ornament)
- Layout: Three tiers stacked from top to bottom, with the trunk centered below
- Piece size: Tier widths of 2.6 in (6.6 cm), 3.4 in (8.6 cm), and 4.2 in (10.7 cm)
- Size before border: 4.2 in (10.7 cm) wide x 4.2 in (10.7 cm) tall for the tree body, plus a 0.9 in (2.3 cm) trunk
- Border depth: Scalloped hems hang about 0.25 in (0.6 cm). The side outline adds less than 0.1 in (0.3 cm).
Materials
Yarn: Use a smooth DK cotton or cotton-acrylic blend. Cotton gives crisp stitch definition and keeps the scallops firm. Avoid fuzzy or very splitty yarn, because it hides the hem ridges.
- Cream (Color A): 10 g, about 23 m, for the tree body, hems, outline, and loop
- Light tan (Color B): 2 g, about 5 m, for the trunk
These quantities include a margin for the gauge swatch and weaving in ends.
Tools:
– 3.5 mm (E-4) crochet hook
– Tapestry needle
– Scissors
– 2 locking stitch markers
– Ruler or tape measure
– Pins and a blocking mat or folded towel
– Spray bottle with water
Abbreviations (US Terms)
- ch – chain
- sl st – slip stitch
- sc – single crochet
- hdc – half double crochet
- sc2tog – single crochet 2 together
- inc – 2 sc in the same stitch
- BLO – back loop only
- FL – front loop
- RS / WS – right side / wrong side
- st(s) – stitch(es)
Special stitch – Scallop: Skip 1 FL, work 5 hdc in the next FL, skip 1 FL, sl st in the next FL. One scallop uses 4 front loops.
Gauge and Checkpoints
Gauge: 20 sc and 22 rows = 4 in (10.2 cm) in sc worked in rows. That is 5 sts and 5.5 rows per inch.
Work a small swatch first, or simply crochet the first tier and measure it. The ornament is small, so gauge mainly affects size and stiffness. Firm stitches help the tree lie flat and keep the hems standing out.
Checkpoints:
– After Row 10 (end of Tier 1): 2.6 in (6.6 cm) wide, 1.8 in (4.6 cm) tall
– After Row 16 (end of Tier 2): 3.4 in (8.6 cm) wide, 2.9 in (7.4 cm) tall
– After Row 23 (end of Tier 3): 4.2 in (10.7 cm) wide, 4.2 in (10.7 cm) tall
– Trunk: 1 in (2.5 cm) wide, 0.9 in (2.3 cm) tall
If your tree is too big: Go down to a 3.25 mm (D-3) hook, or crochet a little tighter.
If it is too small or stiff: Go up to a 3.75 mm (F-5) hook.
Tree Body
Work in rows. Ch 1 at the start of each row; it does not count as a stitch. Turn at the end of each row. Odd-numbered rows are RS rows. This matters because the hems need their free front loops on the RS.
Increase row: Inc in the first st, sc in each st to the last st, inc in the last st. Each increase row adds 2 sts.
Tier 1
With Color A:
- Row 1 (RS): Ch 2, work 3 sc in the 2nd ch from the hook. Turn. (3 sts)
- Row 2: Ch 1, inc, sc 1, inc. Turn. (5 sts)
- Row 3: Ch 1, sc in each st across. Turn. (5 sts)
- Row 4: Ch 1, work an increase row. Turn. (7 sts)
- Row 5: Ch 1, sc across. Turn. (7 sts)
- Row 6: Increase row. (9 sts)
- Row 7: Sc across. (9 sts)
- Row 8: Increase row. (11 sts)
- Row 9: Sc across. (11 sts)
- Row 10: Increase row. (13 sts)
Place a stitch marker in the tip stitch of Row 1. Check the size: about 2.6 in (6.6 cm) wide.
Tier 2
Row 11 is a conversion row. Working in BLO changes the fabric and leaves the 13 front loops of Row 10 free on the RS for the first hem.
- Row 11 (RS, BLO): Ch 1, working in BLO only: sc2tog, sc 9, sc2tog. Turn. (11 sts: 13 existing sts worked as 2 + 9 + 2, decreased to 1 + 9 + 1)
- Row 12: Increase row. (13 sts)
- Row 13: Sc across. (13 sts)
- Row 14: Increase row. (15 sts)
- Row 15: Sc across. (15 sts)
- Row 16: Increase row. (17 sts)
Check the size: about 3.4 in (8.6 cm) wide. Starting Tier 2 narrower than the bottom of Tier 1 creates the stepped side edge seen on the finished tree.
Tier 3
- Row 17 (RS, BLO): Ch 1, working in BLO only: sc2tog, sc 13, sc2tog. Turn. (15 sts: 17 existing sts worked as 2 + 13 + 2)
- Row 18: Increase row. (17 sts)
- Row 19: Sc across. (17 sts)
- Row 20: Increase row. (19 sts)
- Row 21: Sc across. (19 sts)
- Row 22: Increase row. (21 sts)
- Row 23 (RS): Sc across. (21 sts)
Fasten off, leaving a 6 in (15.2 cm) tail. The body should now be 4.2 in (10.7 cm) wide and 4.2 in (10.7 cm) tall.
Trunk
The trunk is worked into the back loops of the 5 center stitches of Row 23. This keeps their front loops free for the bottom hem.
Count the stitches of Row 23 from right to left with the RS facing. The center 5 sts are stitches 9 to 13. Mark stitch 9.
- Row 1 (RS): Join Color B with a sl st in the BLO of stitch 9. Ch 1, sc in the BLO of stitches 9 to 13. Turn. (5 sts)
- Rows 2–5: Ch 1, sc across. Turn. (5 sts each row)
Fasten off, leaving a 6 in (15.2 cm) tail. The trunk is 1 in (2.5 cm) wide and 0.9 in (2.3 cm) tall.
Border
The border has two parts: the three scalloped tier hems, then a slip-stitch outline with the hanging loop. All border work uses Color A.
Border Gauge
Each scallop uses exactly 4 front loops, and each hem begins with 1 sl st. So a hem fits a row of (4 x number of scallops) + 1 stitches. The bottom row of each tier was planned to match:
- Tier 1: 13 = (4 x 3) + 1, so 3 scallops
- Tier 2: 17 = (4 x 4) + 1, so 4 scallops
- Tier 3: 21 = (4 x 5) + 1, so 5 scallops
The side outline uses 1 sl st per row-end. That gives 10 row-ends on the Tier 1 side, 6 on Tier 2, and 7 on Tier 3, for 23 sl sts per side.
Hem 1 (Tier 1)
Hold the tree with the RS facing and the tip pointing down, so the free front loops of Row 10 are on top.
Join Color A with a sl st in the first free FL at the right end. Work 3 scallops across the remaining FLs. The last scallop ends with a sl st in the 13th FL. Fasten off.
Count: 1 sl st + 3 scallops = 13 FLs used, with 15 hdc and 4 sl sts in total.
Hem 2 (Tier 2)
Into the 17 free FLs of Row 16: join with a sl st in the first FL, then work 4 scallops. Fasten off.
Count: 1 + (4 x 4) = 17 FLs used, with 20 hdc and 5 sl sts.
Hem 3 (Tier 3)
Into the 21 free FLs of Row 23: join with a sl st in the first FL, then work 5 scallops. Fasten off.
The 5 center FLs sit above the trunk, so the middle scallop rolls over the top of the trunk, as it does on the finished tree.
Count: 1 + (4 x 5) = 21 FLs used, with 25 hdc and 5 sl sts.
Turn the tree tip-up and press each hem down with your fingers. The scallops should hang slightly over the tier below and form a soft rolled edge.
Side Outline and Hanging Loop
With the RS facing, join Color A with a sl st at the row-end of Row 23 on the left side. Sl st loosely up the left edge, 1 sl st per row-end, until you reach the tip. Work under each hem’s end as you pass it. (23 sl sts)
Loop: At the tip, ch 20 and sl st into the same tip stitch to form a ring. Work 26 sc over the ch-20 ring for a firm cord, then sl st into the tip again.
Sl st loosely down the right edge, 1 sl st per row-end, to Row 23. (23 sl sts)
Fasten off. The loop should measure about 1.5 in (3.8 cm) from the tip.
Why the math works: Each tier ends on an odd number of stitches that is 1 more than a multiple of 4. That is exactly what a whole number of 4-loop scallops plus one starting sl st needs, so every hem starts and ends on a full scallop, and the scallops sit in the same place on both sides. The outline matches the row count, so the sides stay straight without stretching.
Final Blocking
- Weave in all ends on the WS. Run the trunk tails up into the tree body and away from the scallops.
- Mist the ornament lightly with water until it is damp but not wet.
- Lay it RS up on a blocking mat or folded towel.
- Pin the tip, the two bottom corners of Tier 3, and the trunk corners. The tree body should measure 4.2 in (10.7 cm) wide and 4.2 in (10.7 cm) tall.
- Shape each hem with your fingers so the scallops curl gently downward. Do not pin through the scallops; that flattens them.
- Straighten the loop and pin it upright.
- Let it dry completely, usually 4 to 6 hours. For a stiffer ornament, brush a little diluted fabric stiffener on the WS before drying.
Final Quality-Control Checklist
- The tree body measures 4.2 in (10.7 cm) wide and 4.2 in (10.7 cm) tall.
- The tier widths are 2.6 in (6.6 cm), 3.4 in (8.6 cm), and 4.2 in (10.7 cm).
- The hems have 3, 4, and 5 scallops, in that order from the top.
- Each hem starts and ends cleanly at the tier corners.
- The trunk is centered under stitches 9 to 13, and is 1 in (2.5 cm) wide and 0.9 in (2.3 cm) tall.
- The side outlines have 23 sl sts each, with no puckering.
- The loop is firm, centered, and about 1.5 in (3.8 cm) tall.
- No ends show on the RS.
Troubleshooting
The hems are on the wrong side. Rows 11 and 17 must be worked in BLO on RS rows. Check that the free front-loop ridges are on the same face as the RS.
The scallops don’t fit. Count the tier’s bottom row again: it must be 13, 17, or 21 sts. If you are one stitch off, fix the last increase row.
The tree is curling. Your tension is too tight. Go up a hook size, or block it more firmly.
The sides are wavy. You are working more than 1 sl st per row-end. Work exactly 1 per row-end and keep the sl sts loose.
The trunk is off-center. Count Row 23 again from the right edge. The trunk should start in stitch 9.
The loop is floppy. Pack the sc snugly over the chain. Work 28 sc instead of 26 if needed.
Care
Hand wash in cool water with mild soap, press out the water in a towel, and dry flat, reshaping the scallops. Store flat or hang it so the hems don’t get crushed.
Final Notes
The measurement chain is simple. A gauge of 5 sts and 5.5 rows per inch gives Tier 1 at 13 sts and 2.6 in (6.6 cm), Tier 2 at 17 sts and 3.4 in (8.6 cm), and Tier 3 at 21 sts and 4.2 in (10.7 cm). The 23 body rows make a 4.2 in (10.7 cm) tall tree, and the 5-row trunk adds 0.9 in (2.3 cm), for a total of 5.1 in (13.0 cm). Each tier’s stitch count fits its scallops exactly, and the outline matches the 23 row-ends on each side.
Make one ornament for a gift tag, or several for a matching set on the tree.
Happy crocheting!