

This holder turns a cupboard-door bag stash into a small winter decoration. The cream lace body is worked in staggered fans with open arches, so you can see the bags inside. Three snow-topped evergreen branches with red berry clusters run down the front.
The colors are creamy white for the body, snow, and ring; deep pine green for the needles; and bright holly red for the berries. The look is cozy and farmhouse-style, and it also works year-round in a plain beige with no appliqués.
The pattern uses US crochet terms. The finished body is 7.5 in (19.1 cm) wide when flat and 16 in (40.6 cm) tall. With the hanging ring, the total length is 20 in (50.8 cm).
The body is one seamless piece worked bottom-up in joined rounds. You start with a thick single-crochet rim around the bag opening, then increase, then work the fan lace, and finish with a single-crochet top band. A covered ring is sewn to a short tab on the back, and the three branches and nine berries are sewn on last.
Finished Size and Construction
- Finished size: 7.5 in (19.1 cm) wide flat × 16 in (40.6 cm) tall body; 20 in (50.8 cm) including the ring
- Skill level: Intermediate
- Terminology: US crochet terms
- Yarn weight: Worsted (#4), cotton or cotton blend
- Hook: 5.0 mm (US H-8)
- Number of pieces: 1 body, 1 covered ring, 3 branch appliqués, 9 berries
- Layout: Single tube; ring centered on the back top edge; branches stacked down the front
- Piece size: Body circumference 15 in (38.1 cm); bottom opening rim 9 in (22.9 cm) around, 4.5 in (11.4 cm) flat
- Size before border: 7.5 in (19.1 cm) × 15.25 in (38.7 cm)
- Border depth: 0.75 in (1.9 cm) top band
Materials
Use a smooth, mercerized or combed cotton in worsted weight. Cotton holds the fan shapes, doesn’t stretch much under the weight of the bags, and can be washed. Acrylic will work, but the lace will sag more.
- Cream: 130 g, about 220 m (body, ring, snow)
- Pine green: 20 g, about 34 m (needles)
- Holly red: 6 g, about 10 m (berries)
Tools:
– 5.0 mm (US H-8) crochet hook
– Metal or plastic ring, 2.5 in (6.4 cm) diameter
– Tapestry needle
– 4 stitch markers
– Rust-proof pins
– Scissors
– Blocking mat or towel
All quantities include a margin of about 15 percent for your gauge swatch and small tension differences.
Abbreviations (US Terms)
- ch – chain
- sl st – slip stitch
- sc – single crochet
- hdc – half double crochet
- dc – double crochet
- sc2tog – single crochet 2 together
- sk – skip
- sp – space
- MR – magic ring
- st(s) – stitch(es)
Special stitches:
– Fan: 7 dc worked into the same stitch.
– Puff: (Yarn over, insert hook in stitch, pull up a loop) 3 times, then yarn over and pull through all 7 loops on the hook.
Gauge and Checkpoints
Single crochet gauge: 16 sc and 16 rounds = 4 in (10.2 cm), which is 4 sc and 4 rounds per inch.
Lace gauge: One fan repeat (fan plus sc) = 1.5 in (3.8 cm) wide. Four pattern rounds = 3 in (7.6 cm) tall, so each pattern round is 0.75 in (1.9 cm).
Test one section first. Work Rounds 1–8 and then check these measurements:
- After Rnd 1: rim circumference 9 in (22.9 cm), 4.5 in (11.4 cm) flat
- After Rnd 4: circumference 15 in (38.1 cm), 7.5 in (19.1 cm) flat; height 1 in (2.5 cm)
- After Rnd 8: height 4 in (10.2 cm) from the bottom edge
- After Rnd 23: height 15.25 in (38.7 cm)
- After Rnd 26: height 16 in (40.6 cm)
If your piece is too big, go down 0.5 mm in hook size. If it’s too small, go up 0.5 mm. Don’t change stitch counts, because the fan repeat depends on exactly 60 stitches.
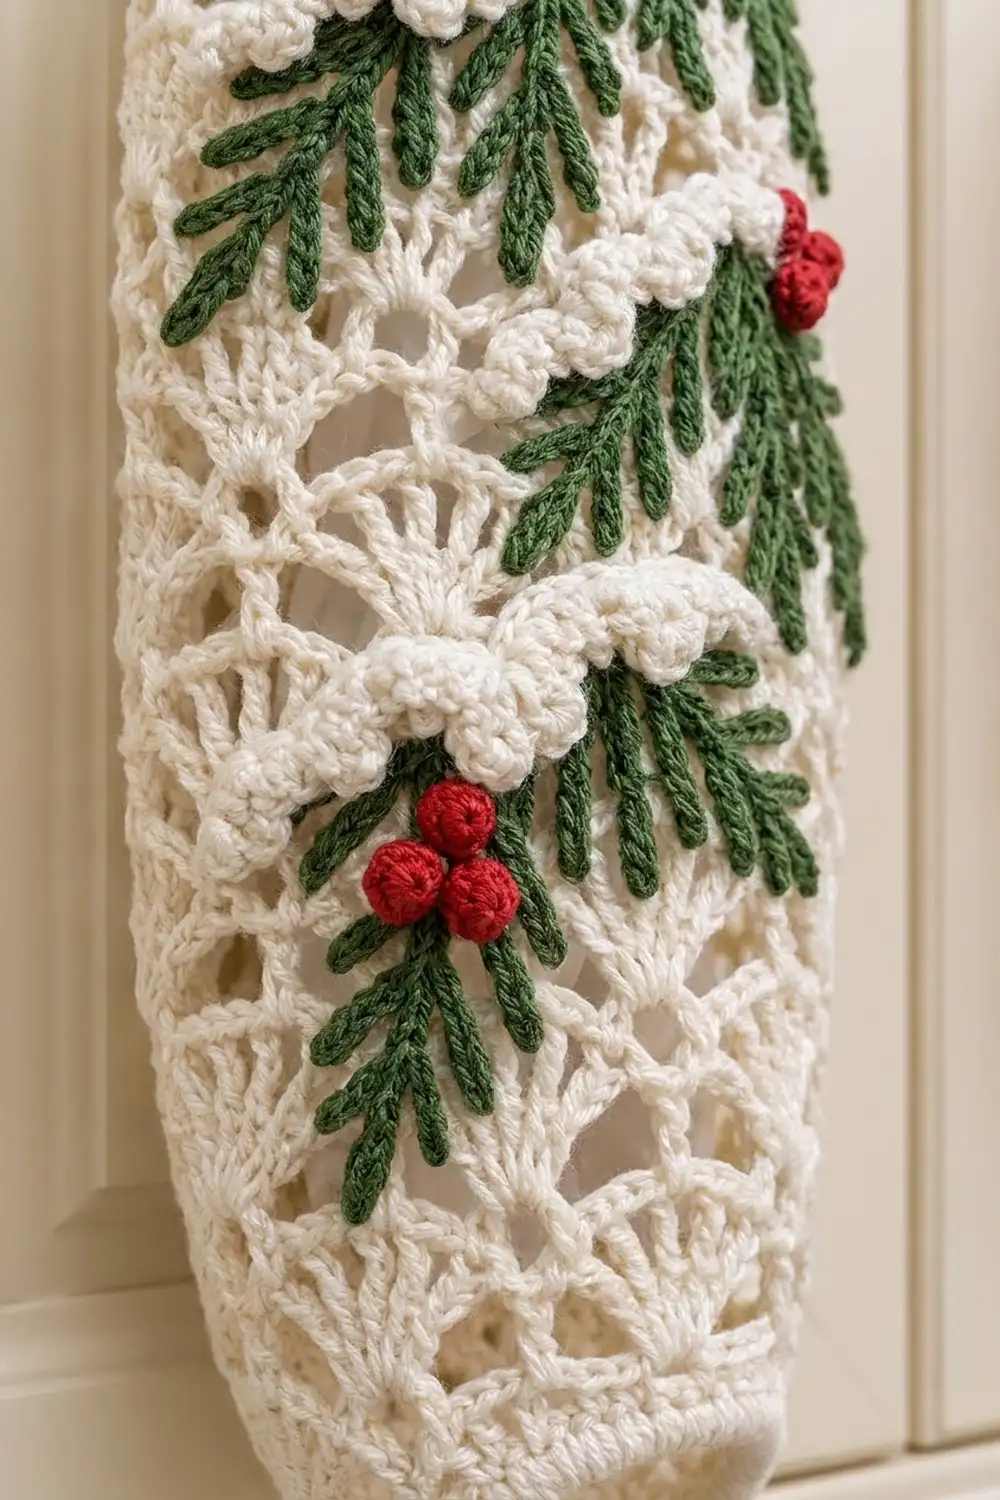
Body
The body is worked in joined rounds with the right side always facing you. Don’t turn your work.
Bottom rim
With cream, ch 36 and join with a sl st to the first ch to form a ring. Don’t twist the chain.
Rnd 1: Ch 1, sc in each ch around, join to first sc. (36 sc)
Rnd 2: Ch 1, sc in each st around, join. (36 sc)
Rnd 3: Ch 1, *sc in next 2 sts, 2 sc in next st; rep from * 11 more times, join. (48 sc)
Rnd 4: Ch 1, *sc in next 3 sts, 2 sc in next st; rep from * 11 more times, join. (60 sc)
Rounds 1–2 form the thick oval rim. Rounds 3–4 flare out to the full body width.
Fan lace
Rnd 5 (Round A, first time): Ch 1, sc in first st, *sk 2 sts, fan in next st, sk 2 sts, sc in next st; rep from * 8 more times, sk 2 sts, fan in next st, sk 2 sts, join to first sc. (10 fans, 10 sc = 80 sts)
Rnd 6 (Round B): Sl st in each of the next 4 dc so you land in the center dc of the first fan. Ch 1, sc in the same dc, ch 3, dc in next sc, ch 3, *sc in center (4th) dc of next fan, ch 3, dc in next sc, ch 3; rep from * 8 more times, join to first sc. (10 sc, 10 dc, 20 ch-3 sps)
Rnd 7 (Round A): Ch 1, sc in first sc, *sk ch-3 sp, fan in next dc, sk ch-3 sp, sc in next sc; rep from * 8 more times, sk ch-3 sp, fan in next dc, sk ch-3 sp, join to first sc. (10 fans, 10 sc = 80 sts)
Each new fan sits in the dc between two old fans, so the rows of fans stagger like brickwork. The chain arches leave the open gaps you see between them.
Rnds 8–23: Alternate Round B and Round A, starting with Round B in Rnd 8 and ending with Round A in Rnd 23. Even rounds have 10 sc, 10 dc, and 20 ch-3 sps. Odd rounds have 80 sts.
In total you work 19 pattern rounds (Rnds 5–23): 10 A rounds and 9 B rounds. That’s 19 × 0.75 in = 14.25 in (36.2 cm) of lace. Added to the 1 in (2.5 cm) rim, the body measures 15.25 in (38.7 cm) before the border.
Checkpoint: Lay the tube flat. It should measure 7.5 in (19.1 cm) wide with 5 fans across each face.
Border (Top Band)
The border is worked directly onto the last fan round. Border gauge is the same as the sc gauge: 4 sc and 4 rounds per inch.
Rnd 24 (conversion round): Ch 1, *sc in next sc, sc in 1st dc of fan, sk 2nd dc, sc in 3rd, 4th, and 5th dc, sk 6th dc, sc in 7th dc; rep from * 9 more times, join.
That’s 60 sc worked 1-per-stitch into 60 of the 80 existing stitches (20 dc skipped), plus 0 extra stitches, for a total of 60 sc.
Rnd 25: Ch 1, sc in each st around, join. (60 sc)
Rnd 26: Ch 1, sc in each st around, join. (60 sc) Fasten off and weave in the end.
Counts per side: Flatten the tube with the join at one side fold. Stitches 1–30 make the front (30 sc) and stitches 31–60 make the back (30 sc). There are no corners, so there are no extra corner stitches.
Why the math works: 10 fan repeats × 1.5 in = 15 in (38.1 cm) around. At 4 sc per inch, 60 sc = 15 in (38.1 cm), so the band matches the lace exactly without flaring or pulling in. Three rounds at 4 rounds per inch = 0.75 in (1.9 cm), which brings the body to exactly 16 in (40.6 cm).
Hanging Ring and Tab
Covered ring: Join cream to the 2.5 in (6.4 cm) ring. Work 44 sc over the ring, pushing the stitches together so no metal or plastic shows, then join and fasten off. If your stitches crowd or leave gaps, add or remove sc in pairs. The covered ring measures about 3 in (7.6 cm) across.
Tab: Find the back stitches (31–60). Skip the first 11 back stitches and place a marker in stitch 42. Join cream there and work in rows:
Row 1: Ch 1, sc in sts 42–49. (8 sc)
Row 2: Ch 1, turn, sc2tog, sc in next 4 sts, sc2tog. (6 sc)
Row 3: Ch 1, turn, sc2tog, sc in next 2 sts, sc2tog. (4 sc)
Row 4: Ch 1, turn, sc in each st. (4 sc)
The tab is 1 in (2.5 cm) tall and has 11 stitches free on each side of it (11 + 8 + 11 = 30). Leave a 12 in (30.5 cm) tail. Whipstitch Row 4 around the bottom of the covered ring, catching the ring stitches on both the front and the back.
Branch Appliqués (Make 3)
Needles: With green, ch 22.
Sl st in 2nd ch from hook to make the branch tip. Then repeat the following 10 times: ch 7, sl st in 2nd ch from hook and in each of the next 5 ch (one needle made), then sl st in each of the next 2 stem ch.
That uses 1 skipped ch + 1 tip sl st + 20 stem ch = 22, and gives 10 needles hanging along one side of the stem. Fasten off.
Each needle is 1.5 in (3.8 cm) long, and the stem is about 4.5 in (11.4 cm).
Snow: Join cream at the tip, working into the free loops along the top of the stem.
Row 1: Ch 1, *sc in next loop, puff in next loop; rep from * 9 more times. (10 sc, 10 puffs = 20 sts)
Row 2: Ch 1, turn, *3 hdc in next puff, sl st in next sc; rep from * 9 more times. (40 sts)
Fasten off and leave a 24 in (61.0 cm) tail. The finished branch is about 4.5 in (11.4 cm) wide and 2.25 in (5.7 cm) tall.
Berries (Make 9)
With red:
Rnd 1: 6 sc in MR. (6 sc)
Rnd 2: Sc in each st. (6 sc)
Tuck the starting tail inside as stuffing.
Rnd 3: Sc2tog 3 times. (3 sts)
Close the top and leave an 8 in (20.3 cm) tail. Each berry is about 0.6 in (1.5 cm) across.
Assembly
Pin the branches only to the front face, with each one tilted slightly downward toward the right:
- Branch 1: snow 1.25 in (3.2 cm) below the top band
- Branch 2: centered 6 in (15.2 cm) below Branch 1
- Branch 3: centered 4.5 in (11.4 cm) below Branch 2
Sew along the stem and under the snow ridge. Tack every second needle tip so the branches drape without catching on the bags.
Sew one cluster of 3 berries onto each branch: at the top center of Branch 1, the right end of Branch 2, and the left end of Branch 3.
Final Blocking
- Wash or spray the body (before adding the appliqués if you can) until it’s evenly damp.
- Roll it in a towel to remove the extra water.
- Lay it flat on the mat with the join at the left fold.
- Pin the width to 7.5 in (19.1 cm) and the length to 16 in (40.6 cm).
- Pin each fan open so the arches are round and even.
- Shape the bottom rim into a smooth oval 4.5 in (11.4 cm) across.
- Let it dry completely, then add the ring and appliqués.
- Steam the branches lightly to set the needles and fluff the snow. Don’t press them.
Final Quality-Control Checklist
- 10 fans in every Round A, 5 visible across each face
- 60 sc in the top band and the widest bottom round
- 36 sc in the bottom rim
- Body 7.5 in × 16 in (19.1 × 40.6 cm)
- Tab centered with 11 sts free on each side
- Ring fully covered, with no gaps
- 3 branches with 10 needles each, and 9 firm berries
- All tails woven in, with nothing loose on the inside to snag the bags
Troubleshooting
- Fans ruffle or cup: Your dc are too loose. Go down a hook size, or shorten your chain-3 arches by pulling them snug.
- The tube twists: Join at the same fold every round, and check that the first sl sts in Round B land on the center dc.
- Fans don’t stagger: In Round A, put the fan into the dc, not the sc.
- The top band flares: Make sure you skipped the 2nd and 6th dc of every fan in Rnd 24.
- The bottom opening is too tight for bags: Start with ch 40 and work Rnd 3 as (sc in next 2, 2 sc in next) for the first 8 repeats and sc in the last 4. That keeps 60 sts after Rnd 4.
- Branches curl: Block them pinned flat, or tack the needles more often.
Care
Hand wash in cool water and lay flat to dry, reshaping the fans while the piece is damp. Don’t tumble dry, because the berries and snow can pill or deform.

Final Notes
The measurement chain is simple:
- A 36-sc rim gives a 4.5 in (11.4 cm) opening.
- 60 sc gives the 7.5 in (19.1 cm) width.
- 19 lace rounds at 0.75 in (1.9 cm) each add 14.25 in (36.2 cm) of lace.
- With the rim, that’s 15.25 in (38.7 cm), and the 0.75 in (1.9 cm) band brings the body to 16 in (40.6 cm).
- The tab and ring bring the total to 20 in (50.8 cm).
If your checkpoints match, the finished holder will match. For an everyday version, make the body in beige and leave off the branches.
Happy crocheting!