

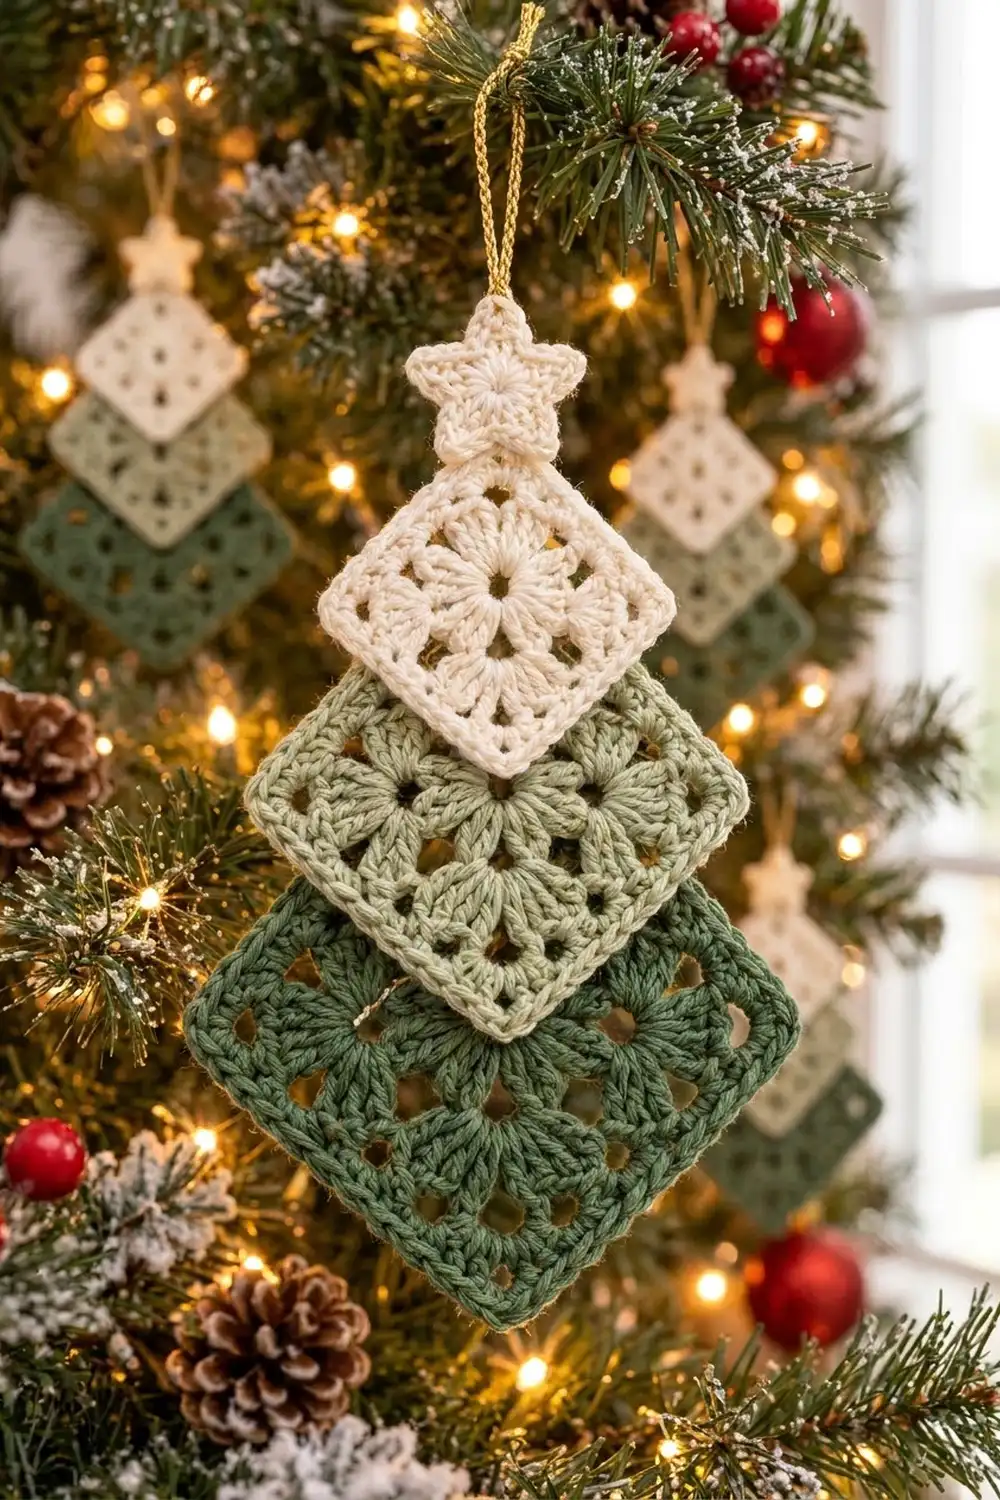
This little tree is built from three granny squares turned on point and layered from small to large, with a tiny star on top. The squares overlap like stepped branches, so the ornament reads as a tree from across the room and as lace up close.
The colors are soft and natural: cream at the top, light sage green in the middle, and deep forest green at the base. The star is cream to match the top tier, and a gold cord loop finishes it for hanging.
This pattern uses US crochet terms. The finished ornament measures about 9.8 in (24.9 cm) tall from the star tip to the bottom tip, not counting the loop, and 5.9 in (15.0 cm) wide at the widest point.
You will make all three squares from the same center, adding one lace round for each larger size. Each square gets a single crochet edge. Then you make the star, layer the pieces, sew them together, and add the loop.
Finished Size and Construction
- Finished ornament: 9.8 in (24.9 cm) tall x 5.9 in (15.0 cm) wide
- Skill level: Easy+
- Terminology: US
- Yarn weight: Sport (#2) cotton or cotton blend
- Hook: 3.25 mm (US D-3)
- Number of pieces: 4 crocheted pieces (3 squares + 1 star), plus a cord loop
- Layout: squares on point, stacked vertically, each upper tip resting on the center of the square below
- Piece sizes (side length after edging): small 2.6 in (6.6 cm), medium 3.4 in (8.6 cm), large 4.2 in (10.7 cm)
- Size before edging: small 2.3 in (5.8 cm), medium 3.1 in (7.9 cm), large 3.9 in (9.9 cm)
- Edging depth: about 0.15 in (0.4 cm) per side
- Star: about 1.4 in (3.6 cm) across
Materials
Choose a smooth, mercerized sport-weight cotton. It shows stitch definition, keeps the square corners crisp, and blocks flat. A typical skein is about 50 g / 155 m.
- Cream (small square + star): 8 g / 25 m
- Light sage green (medium square): 8 g / 25 m
- Deep forest green (large square): 12 g / 37 m
- Gold metallic cord or twisted thread: 7 in (17.8 cm) for the loop
Tools:
- 3.25 mm (US D-3) hook
- Tapestry needle
- Scissors
- Stitch marker
- Rust-proof pins and a blocking mat
- Ruler or tape measure
- Spray bottle
Quantities include a margin of roughly 30 percent for a gauge swatch, weaving in ends, and sewing.
Abbreviations (US Terms)
- ch – chain
- sl st – slip stitch
- sc – single crochet
- hdc – half double crochet
- dc – double crochet
- sk – skip
- sp – space
- st(s) – stitch(es)
- rep – repeat
- beg – beginning
Special stitch – corner group: (3 dc, ch 2, 3 dc) worked into the same corner ch-2 sp. On the first corner of a round, the beg ch-3 counts as the first dc.
Gauge and Checkpoints
Gauge is not critical for an ornament, but it controls how the tiers overlap. Make the small square first and measure it before going on.
- After Round 1: about 0.9 in (2.3 cm) across
- After Round 2: about 1.6 in (4.1 cm) across
- After Round 3: 2.3 in (5.8 cm) per side
- Edge gauge: 13 sc = 2 in (5.1 cm)
- Small square with edging: 2.6 in (6.6 cm) per side
If your square is too big, go down to a 3.0 mm hook. If it is too small, go up to a 3.5 mm (US E-4) hook. Change one hook size at a time and measure again. Use the same hook for all three squares so the tiers grow evenly.
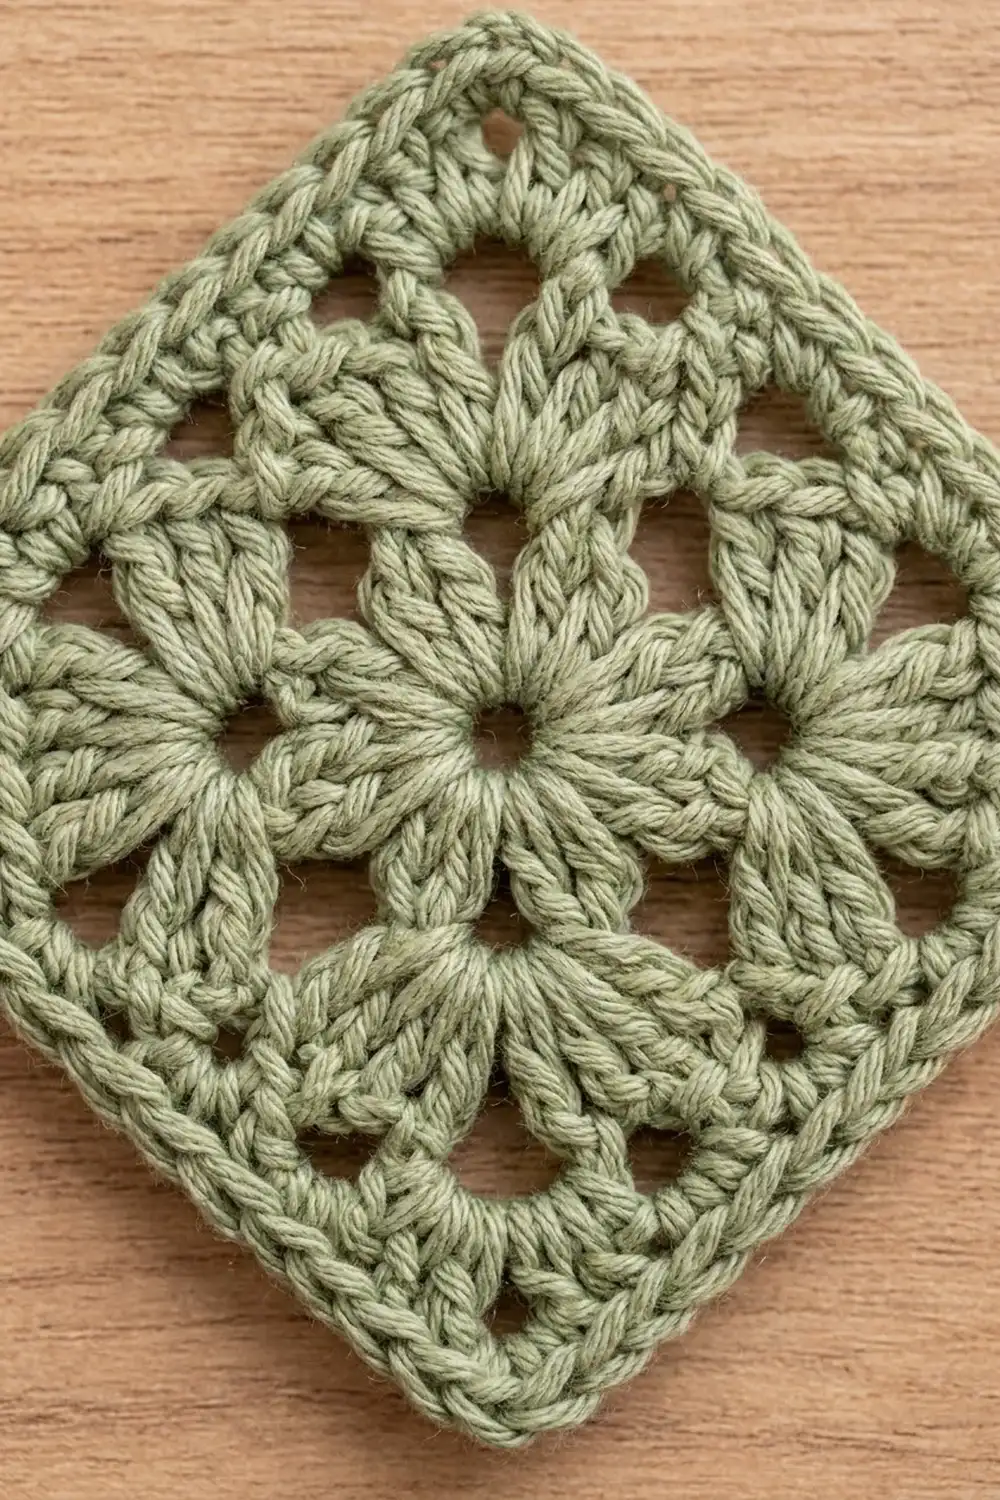
Squares (Make 1 of Each Size)
All three squares share Rounds 1–3. Stop after Round 3 for the small square, after Round 4 for the medium, and after Round 5 for the large. Then work the edging.
Use cream for the small square, sage for the medium, and forest green for the large. Each square is worked in one color.
Round 1: Make a magic ring. Ch 3 (counts as dc), 15 dc in ring. Pull the ring closed and join with sl st to top of beg ch-3. (16 dc)
Round 2 (petals): Ch 3 (counts as dc), dc in same st, 2 dc in next st, ch 2. [2 dc in next st] twice, ch 2. Rep from * 6 more times. Join with sl st to top of beg ch-3. (32 dc in 8 petals of 4 dc; 8 ch-2 sps)*
The ch-2 spaces between the petals become the corners and the side eyelets in the next round.
Round 3 (squaring round): Sl st in next 3 dc and into the next ch-2 sp. Ch 3, (2 dc, ch 2, 3 dc) in same sp to complete the first corner group. *Ch 2, sk next 4 dc, 3 dc in next ch-2 sp, ch 2, sk next 4 dc, corner group in next ch-2 sp. Rep from * 2 more times. Ch 2, sk next 4 dc, 3 dc in next ch-2 sp, ch 2. Join with sl st to top of beg ch-3.
Round 3 count: 4 corner groups of 6 dc (24) + 4 side groups of 3 dc (12) = 36 dc, plus 4 corner ch-2 sps and 8 side ch-2 sps. Each side has 9 dc between corner spaces: 3 + 3 + 3.
Measure now: 2.3 in (5.8 cm) per side. Small square: go to the edging.
Round 4 (medium and large only): Sl st in next 2 dc and into the corner ch-2 sp. Ch 3, (2 dc, ch 2, 3 dc) in same sp. *[Ch 2, 3 dc in next ch-2 sp] twice, ch 2, corner group in next corner sp. Rep from * 2 more times. [Ch 2, 3 dc in next ch-2 sp] twice, ch 2. Join with sl st to top of beg ch-3.
Round 4 count: 48 dc (12 per side: 3 + 3 + 3 + 3), 3 side ch-2 sps per side (12 total), and 4 corner ch-2 sps.
Measure: 3.1 in (7.9 cm) per side. Medium square: go to the edging.
Round 5 (large only): Sl st in next 2 dc and into the corner ch-2 sp. Ch 3, (2 dc, ch 2, 3 dc) in same sp. *[Ch 2, 3 dc in next ch-2 sp] 3 times, ch 2, corner group in next corner sp. Rep from * 2 more times. [Ch 2, 3 dc in next ch-2 sp] 3 times, ch 2. Join with sl st to top of beg ch-3.
Round 5 count: 60 dc (15 per side: 3 + 3 + 3 + 3 + 3), 4 side ch-2 sps per side (16 total), and 4 corner ch-2 sps.
Measure: 3.9 in (9.9 cm) per side. Large square: go to the edging.
Star Topper (Make 1)
Use cream.
Round 1: Make a magic ring. Ch 1, 10 sc in ring. Pull closed and join with sl st to first sc. (10 sc)
Round 2 (points): Ch 4, sl st in 2nd ch from hook, sc in next ch, hdc in next ch, sk next sc, sl st in next sc. Rep from * 4 more times, ending the last rep with sl st in the joining st. (5 points)*
Fasten off, leaving a 10 in (25.4 cm) tail for sewing. The star should measure about 1.4 in (3.6 cm) from point to point.
Make All Pieces
Before assembly, check that you have:
- Cream: 1 small square + 1 star
- Light sage: 1 medium square
- Forest green: 1 large square
- Gold cord: one 7 in (17.8 cm) length
Layout, top to bottom (each square on point):
        [ star – cream ]
      < small – cream  >
    <  medium – sage    >
  <   large – forest     >
Leave a 12 in (30.5 cm) tail on the small and medium squares for sewing.
Joining
Lay the large square on point. Place the medium square on top, also on point, so its bottom tip sits on the center hole of the large square. The vertical overlap is 3.0 in (7.6 cm), which is half the large square’s diagonal of 5.9 in (15.0 cm).
Place the small square on the medium square the same way, with its bottom tip on the medium square’s center. The overlap is 2.4 in (6.1 cm), which is half the medium diagonal of 4.8 in (12.2 cm). Pin both layers and check that all three tips line up on one vertical line.
Stitch-to-stitch logic: Only the lower part of each upper square’s two bottom edges lies over the square below. The side corners hang slightly past the lower square’s edge, which gives the tiered look.
- Small onto medium: Using the cream tail, whipstitch through the back loop of each edge sc and into the sage fabric directly under it. Sew the bottom-tip corner st plus the next 10 sts up each side. (21 sts sewn)
- Medium onto large: Using the sage tail, sew the bottom-tip corner st plus the next 13 sts up each side. (27 sts sewn)
Leave the side corners and top edges free.
Tension: Keep every stitch snug but flat. Pulling too hard puckers the lower square and bends the tree. Hide your stitches in the sc edge so they don’t show from the front.
Star: Center the star over the small square’s top tip so its bottom two points cover the tip. Its top point should sit 0.8 in (2.0 cm) above the cream tip. Sew around the star’s center through the cream square only.
Loop: Fold the gold cord in half, knot the ends, and sew the knot to the back of the star. The loop should stand about 2.5 in (6.4 cm) tall.
Size checkpoint: The stack measures 9.0 in (22.9 cm) from the small square’s top tip to the large square’s bottom tip (3.7 + 4.8 + 5.9 − 2.4 − 3.0). Add 0.8 in (2.0 cm) for the star, for a total of 9.8 in (24.9 cm).
Border (Single Crochet Edging on Each Square)
Work this round on each square before joining, in the same color as the square.
Border gauge: 13 sc = 2 in (5.1 cm).
N is the number of bracket repeats: N = 2 for the small square, N = 3 for the medium, and N = 4 for the large.
Edging round: Ch 1. Sc in same st as join and in next 2 dc. *3 sc in corner ch-2 sp, sc in next 3 dc, [2 sc in next ch-2 sp, sc in next 3 dc] N times. Rep from * 2 more times. 3 sc in last corner sp, sc in next 3 dc, [2 sc in next ch-2 sp, sc in next 3 dc] N − 1 times, 2 sc in last ch-2 sp. Join with sl st to first sc. Fasten off.
Counts:
- Small: 36 sc into dc + 16 sc into side sps + 12 sc into corners = 64 sc. Each side has 17 sts, including both corner sts.
- Medium: 48 sc into dc + 24 sc into side sps + 12 sc into corners = 84 sc. Each side has 22 sts, including both corner sts.
- Large: 60 sc into dc + 32 sc into side sps + 12 sc into corners = 104 sc. Each side has 27 sts, including both corner sts.
Check: 4 sides x (17 − 1) = 64; 4 x (22 − 1) = 84; 4 x (27 − 1) = 104. Each corner st is shared by two sides, so it is counted only once.
Why the math works: Each dc gets 1 sc. Each ch-2 sp gets 2 sc, which matches its width. Each corner gets 3 sc, and the middle sc turns the corner while keeping it flat. At 13 sc per 2 in, 17 sts gives 2.6 in (6.6 cm), 22 sts gives 3.4 in (8.6 cm), and 27 sts gives 4.2 in (10.7 cm).
Final Blocking
- Weave in all ends except the sewing tails before assembly.
- Pin each square to its finished size on the blocking mat: 2.6 in (6.6 cm), 3.4 in (8.6 cm), and 4.2 in (10.7 cm). Put one pin in each corner and one at the middle of each side.
- Spray until damp, not soaked.
- Pin the star with one pin per point so the points stay sharp.
- Let everything dry completely, about 4 to 6 hours.
- Assemble the ornament, lay it flat, mist it lightly, and press the tiers flat with your palms.
- Let it dry flat before hanging.
Final Quality-Control Checklist
- Each square has 4 sharp corners and straight sides.
- Each side has 17, 22, or 27 sts for the small, medium, and large squares.
- The tips of the star and all three squares line up vertically.
- Each upper tip sits on the center of the square below.
- No sewing stitches show on the front.
- The star points are even and the loop is secure.
- The ornament is 9.8 in (24.9 cm) tall and 5.9 in (15.0 cm) wide.
Troubleshooting
- Square cups or ruffles: Check that Round 3 has 36 dc. If it still ripples, use a smaller hook for the edging only.
- Corners round off: Make sure each corner ch-2 is a full ch 2 and the edging puts 3 sc in each corner.
- Petals look crowded: Pull the magic ring fully closed and check that Round 1 has exactly 16 dc.
- Tree leans: Unpick the joining and pin again with all tips on one vertical line.
- Star curls: Pin it flat to block. Skipping one sc between points keeps it flat.
Care
Hand wash in cool water with mild soap, press the water out in a towel, and dry flat. Store the ornament flat or hanging so the tiers keep their shape.
Final Notes
The measurement chain is simple. Round 3 measures 2.3 in (5.8 cm), and each lace round adds 0.8 in (2.0 cm) per side. The edging brings the squares to 2.6 in (6.6 cm), 3.4 in (8.6 cm), and 4.2 in (10.7 cm). With each tip placed on the center below and the star on top, the tree measures 9.8 in (24.9 cm) tall. If the small square measures correctly, the rest will follow.
Make one for every branch, or try a different color for each tier.
Happy crocheting!