

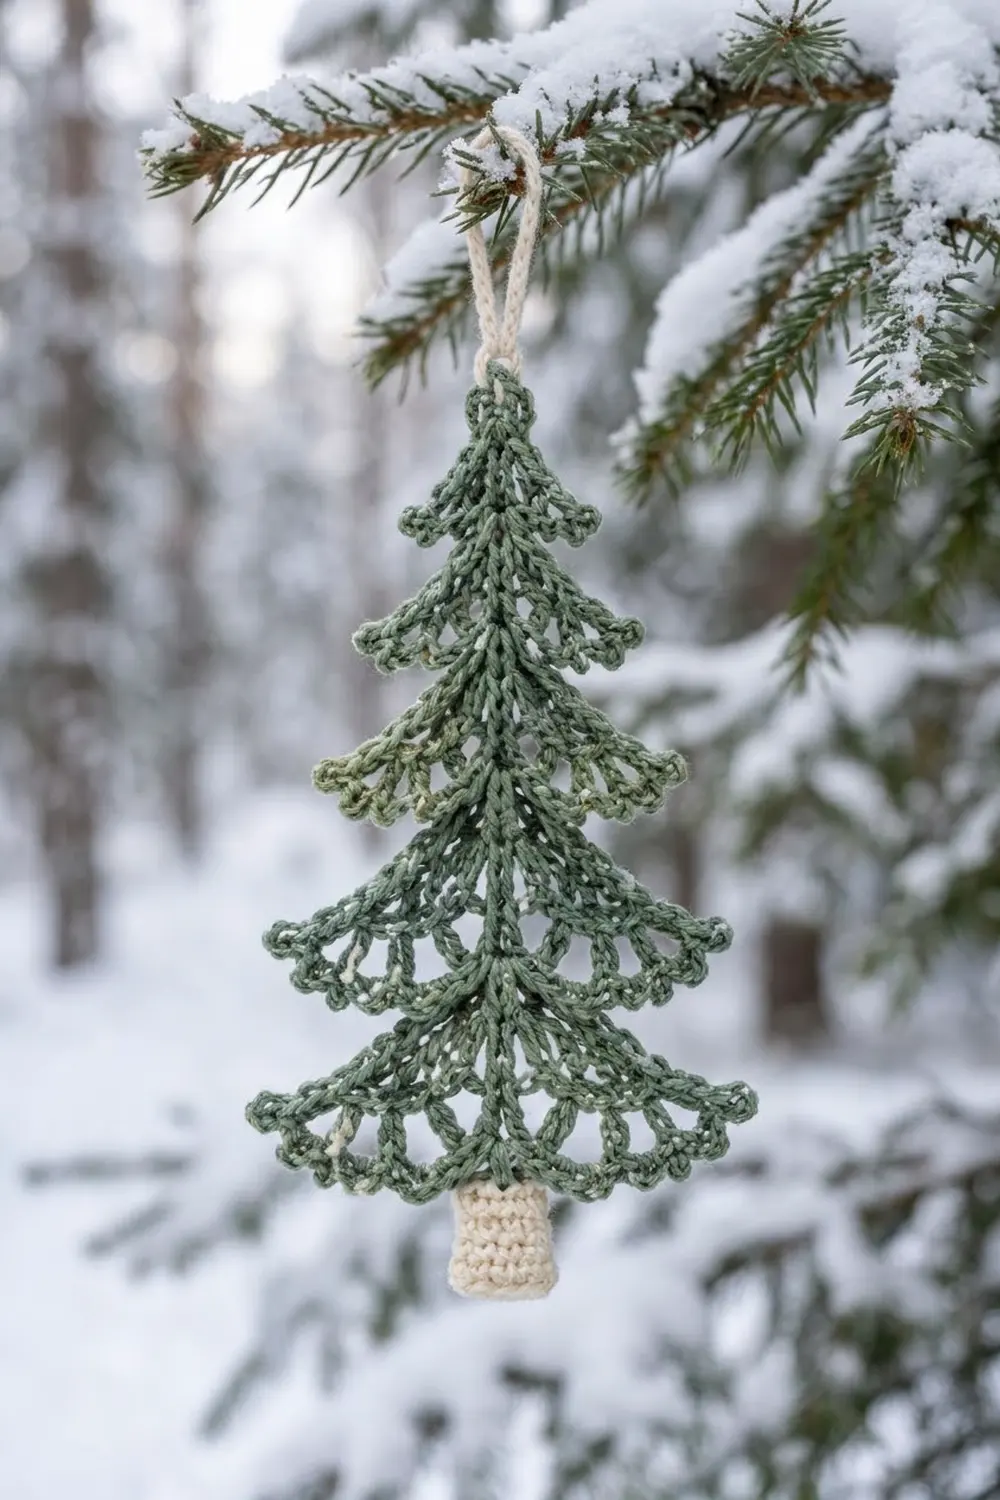
This little ornament is a lacy tree made of five fan-shaped tiers stacked down a slim green spine. Each tier opens from a center point into long spokes, a row of open mesh, and a soft scalloped edge, so the tree looks layered like real pine branches.
The palette is simple: sage green for the tree and cream for the trunk and hanging loop. The style is light, open, and a little vintage. It looks good on a tree, in a window, or tied onto a gift.
The pattern uses US crochet terms. The finished ornament is about 6.25 in (15.9 cm) tall without the loop, 7.75 in (19.7 cm) tall with the loop, and 3.5 in (8.9 cm) wide across the bottom tier.
You’ll make five separate fan tiers, a chain spine, a small cream trunk tube, and a cream loop. Then you sew the tiers to the spine in overlapping layers to make one finished ornament.
Finished Size and Construction
- Finished size: 6.25 in (15.9 cm) tall × 3.5 in (8.9 cm) wide; 7.75 in (19.7 cm) tall with loop
- Skill level: Easy+ (confident beginner)
- Terminology: US
- Yarn weight: DK / light (#3) cotton or cotton blend
- Hook: 3.0 mm (US C/2–D/3)
- Number of pieces: 1 ornament, made from 5 tiers, 1 spine, 1 trunk, and 1 loop
- Layout: 5 tiers stacked vertically on the spine, each one overlapping the next
- Tier widths (finished): 1.75 in (4.4 cm), 2.25 in (5.7 cm), 2.5 in (6.4 cm), 3 in (7.6 cm), 3.5 in (8.9 cm)
- Tier widths before scallop edge (Tiers 2–5): 1.75 in (4.4 cm), 2 in (5.1 cm), 2.5 in (6.4 cm), 3 in (7.6 cm)
- Scallop edge depth: 0.25 in (0.6 cm), which adds 0.5 in (1.3 cm) to each tier’s width
Materials
Choose a smooth, mercerized or matte DK cotton. Cotton holds the spokes crisp and shows off the scallops. Avoid fuzzy acrylic, which blurs the lace.
- Sage green (MC): 10 g, about 21 m
- Cream (CC): 3 g, about 6 m
- 3.0 mm crochet hook
- Tapestry needle
- Scissors
- Stitch markers (5)
- A pinch of fiberfill for the trunk
- Pins and a foam blocking mat
- Optional: spray starch
The quantities include a margin of about 20% for gauge swatching and tails.
Abbreviations (US Terms)
- ch – chain
- sl st – slip stitch
- sc – single crochet
- dc – double crochet
- tr – treble crochet
- dtr – double treble crochet
- sp – space
- st(s) – stitch(es)
- BLO – back loop only
- MR – magic ring
- Rnd – round
Special stitch – Scallop: (sc, ch 3, sc) all in the same loop.
Gauge and Checkpoints
Gauge: 20 sc and 22 rows = 4 in (10.2 cm) in sc.
Gauge matters less for an ornament than for a garment, but it does control whether the tiers stack neatly. Make Tier 1 first and treat it as your swatch.
Checkpoints:
- Tier 1: 1.75 in (4.4 cm) wide, measured flat across the tips of the loops
- Tier 3 spokes: each tr reaches about 0.6 in (1.5 cm) out from the ring
- Spine: 26 sl sts = 5.2 in (13.2 cm)
- Trunk: 0.75 in (1.9 cm) wide and 1 in (2.5 cm) tall
If your pieces come out too big: go down to a 2.75 mm hook, or chain more tightly in the mesh rows.
If they come out too small: go up to a 3.25 mm hook. Make sure your tall stitches (tr, dtr) are pulled up to full height and not squashed.

Tier 1 (Top Tier)
Use MC. Every tier starts from a small chain ring, and the spokes fan out to form a half circle. Turn at the end of every row.
Ring: Ch 4, then sl st into the first ch to form a ring.
Row 1 (spokes): Ch 3 (counts as dc), work (ch 1, dc) into the ring 5 times. Turn. (6 dc, 5 ch-1 sps)
Row 2 (mesh edge): Ch 1, sc in the first dc. Ch 3, sc in the next ch-1 sp, ch 3, sc in the next dc. Repeat from * 5 times, working the last sc into the top of the turning ch. (11 sc, 10 ch-3 loops)*
Fasten off, leaving a 6 in (15.2 cm) tail for sewing.
Checkpoint: 1.75 in (4.4 cm) wide. On this tier, the mesh row is also the edge.
Tier 2
Ring: Ch 4, sl st to the first ch.
Row 1: Ch 3 (counts as dc), work (ch 1, dc) into the ring 6 times. Turn. (7 dc, 6 ch-1 sps)
Row 2 (mesh): Ch 1, sc in the first dc. Ch 3, sc in the next ch-1 sp, ch 3, sc in the next dc. Repeat from * 6 times. Turn. (13 sc, 12 ch-3 loops)*
Don’t fasten off. Leave the loop on your hook and continue with the Tier 2 edge in the Border section.
Checkpoint before the edge: 1.75 in (4.4 cm) wide.
Tier 3
Ring: Ch 5, sl st to the first ch.
Row 1: Ch 4 (counts as tr), work (ch 1, tr) into the ring 8 times. Turn. (9 tr, 8 ch-1 sps)
Row 2 (mesh): Ch 1, sc in the first tr. Ch 3, sc in the next ch-1 sp, ch 3, sc in the next tr. Repeat from * 8 times. Turn. (17 sc, 16 ch-3 loops)*
Checkpoint before the edge: 2 in (5.1 cm) wide.
Tier 4
Ring: Ch 6, sl st to the first ch.
Row 1: Ch 4 (counts as tr), work (ch 1, tr) into the ring 9 times. Turn. (10 tr, 9 ch-1 sps)
Row 2 (mesh): Ch 1, sc in the first tr. Ch 3, sc in the next ch-1 sp, ch 3, sc in the next tr. Repeat from * 9 times. Turn. (19 sc, 18 ch-3 loops)*
Row 3 (loop row): Ch 1, sc in the first ch-3 loop. Ch 4, sc in the next ch-3 loop. Repeat from * 17 times. Turn. (18 sc, 17 ch-4 loops)*
Checkpoint before the edge: 2.5 in (6.4 cm) wide.
Tier 5 (Bottom Tier)
Ring: Ch 6, sl st to the first ch.
Row 1: Ch 5 (counts as dtr), work (ch 1, dtr) into the ring 10 times. Turn. (11 dtr, 10 ch-1 sps)
Row 2 (mesh): Ch 1, sc in the first dtr. Ch 3, sc in the next ch-1 sp, ch 3, sc in the next dtr. Repeat from * 10 times. Turn. (21 sc, 20 ch-3 loops)*
Row 3 (loop row): Ch 1, sc in the first ch-3 loop. Ch 4, sc in the next ch-3 loop. Repeat from * 19 times. Turn. (20 sc, 19 ch-4 loops)*
Checkpoint before the edge: 3 in (7.6 cm) wide.
The spoke stitches get taller as you go down the tree (dc, then tr, then dtr), which is what gives the outline its smooth triangular slope.
Spine
Use MC.
Ch 27. Sl st in the back bump of the 2nd ch from the hook and in each ch across. (26 sl sts)
Fasten off, leaving a 10 in (25.4 cm) tail.
Checkpoint: 5.2 in (13.2 cm) long. Each sl st is about 0.2 in (0.5 cm).
Place markers at sl sts 1, 5, 9, 14, and 20, counting from the top. These mark where the tier rings will sit: 0 in, 0.8 in (2.0 cm), 1.6 in (4.1 cm), 2.6 in (6.6 cm), and 3.8 in (9.7 cm) from the top.
Trunk
Use CC. Work in continuous rounds.
- Rnd 1: 6 sc in MR. (6)
- Rnd 2: 2 sc in each st. (12)
- Rnd 3: Sc in BLO around. This turns the base into a flat bottom. (12)
- Rnds 4–7: Sc around. (12)
Sl st to the next st and fasten off, leaving a 10 in (25.4 cm) tail. Stuff lightly so the trunk stays cylindrical.
Checkpoint: 0.75 in (1.9 cm) wide and 1 in (2.5 cm) tall.
Hanging Loop
Use CC.
Ch 16. Sl st in the back bump of the 2nd ch from the hook and in each ch across. (15 sl sts, about 3 in / 7.6 cm)
Fasten off and leave both tails long.
Assembly
- Lay the spine vertically with its wrong side up. The tiers go on top of it, so the spine ends up behind them.
- Sew the ring of Tier 1 over marker 1. The fan should open downward, with the center spoke lined up over the spine.
- Sew Tier 2 at marker 5, Tier 3 at marker 9, Tier 4 at marker 14, and Tier 5 at marker 20. Stitch only through each ring and the spine so that the lower edges hang free.
- Check the overlap. Each tier’s center should reach down just past the ring of the tier below, hiding it.
- Push the last spine sl st into the center of the trunk’s open top and sew around the trunk opening. The top of the trunk sits about 5.2 in (13.2 cm) below the treetop, partly tucked under the Tier 5 edge.
- Fold the hanging loop in half. Sew both ends to the back of the Tier 1 ring so the loop rises 1.5 in (3.8 cm) above the tree.
Border: Scalloped Tier Edges
Tier 1’s mesh row is already its edge. Tiers 2–5 each get one scallop row worked across their last row, ideally before assembly.
Border gauge: One scallop row adds 0.25 in (0.6 cm) at every point of the edge, so each tier gets 0.5 in (1.3 cm) wider.
Tier 2 edge: Ch 1. Work 1 Scallop in each ch-3 loop across. (12 Scallops, 24 sc; 6 on each side of center)
Width goes from 1.75 in (4.4 cm) to 2.25 in (5.7 cm).
Tier 3 edge: Ch 1. Work 1 Scallop in each ch-3 loop across. (16 Scallops, 32 sc; 8 on each side)
Width goes from 2 in (5.1 cm) to 2.5 in (6.4 cm).
Tier 4 edge: Ch 1. Work 1 Scallop in each ch-4 loop across. (17 Scallops, 34 sc; 8 on each side plus 1 center Scallop)
Width goes from 2.5 in (6.4 cm) to 3 in (7.6 cm).
Tier 5 edge: Ch 1. Work 1 Scallop in each ch-4 loop across. (19 Scallops, 38 sc; 9 on each side plus 1 center Scallop)
Width goes from 3 in (7.6 cm) to 3.5 in (8.9 cm).
Fasten off after each tier and weave in the ends.
Why the math works:
- A mesh row always makes 2 loops for every gap between spokes, so mesh loops = 2 × (spokes − 1). That gives 2 × 6 = 12 for Tier 2, 2 × 8 = 16 for Tier 3, 2 × 9 = 18 for Tier 4, and 2 × 10 = 20 for Tier 5.
- The loop row on Tiers 4 and 5 links neighboring loops, so it has 1 fewer loop: 17 and 19.
- The Scallop row places exactly 1 Scallop per loop, so nothing is added or skipped, and each Scallop adds 2 sc.
- An even loop count splits evenly on each side of center. An odd count puts 1 Scallop exactly on the center spoke line, which keeps the tree symmetrical.
Final Blocking
- Lightly mist the whole ornament with water. You can also use diluted spray starch for a crisper hang.
- Lay it face up on the blocking mat.
- Pin the spine straight and vertical.
- Open each tier into an even half fan. Pin the center spoke straight down and the outer spokes angled out.
- Pin the tip of each Scallop, starting at the center and working out to each side evenly.
- Check the widths: 1.75, 2.25, 2.5, 3, and 3.5 in (4.4, 5.7, 6.4, 7.6, and 8.9 cm).
- Roll the trunk gently to round it.
- Let it dry completely, at least 6 hours, before unpinning.
Final Quality-Control Checklist
- Stitch counts match on every tier: 6, 7, 9, 10, and 11 spokes.
- Each tier opens symmetrically around its center spoke.
- Each tier covers the ring of the tier below it.
- The Scallop counts per side match on every tier.
- The spine is hidden behind the tiers and hangs straight.
- The trunk is centered, firm, and 0.75 in (1.9 cm) wide.
- The loop is centered and sewn securely.
- All ends are woven in invisibly.
- Total height is 6.25 in (15.9 cm), or 7.75 in (19.7 cm) with the loop.
Troubleshooting
Tiers ruffle: Your spokes are short or your chains are loose. Pull the tall stitches up to full height, or chain more tightly.
Tiers cup and won’t open flat: The ring is too tight. Make a looser starting chain, or add 1 ch to the ring.
The tree leans: A tier is sewn off center. Re-sew the ring so the center spoke sits over the spine.
Gaps between tiers: Your tiers are smaller than the checkpoints. Move the markers up by 1 sl st, or go up a hook size.
The trunk is floppy: Add a little more stuffing, or work it with a smaller hook.
The Scallop counts are uneven: Recount the loops in the previous row. A missed sc in the mesh row is the usual cause.
Care
Hand wash in cool water and lay flat to dry, pinning the tiers back into shape if needed. Store it flat or hanging, away from crushing.
Final Notes
Everything here follows one measurement chain. Gauge controls the spoke height, the spoke height sets each tier’s width before the edge, and the scallop edge adds a steady 0.5 in (1.3 cm). The five tiers finish at 1.75 to 3.5 in (4.4 to 8.9 cm) wide and stack along a 5.2 in (13.2 cm) spine, with a 1 in (2.5 cm) trunk below. Check each step as you go and the finished tree will come out at 6.25 in (15.9 cm). Make one for a single window, or a few for a matching set.
Happy crocheting!