
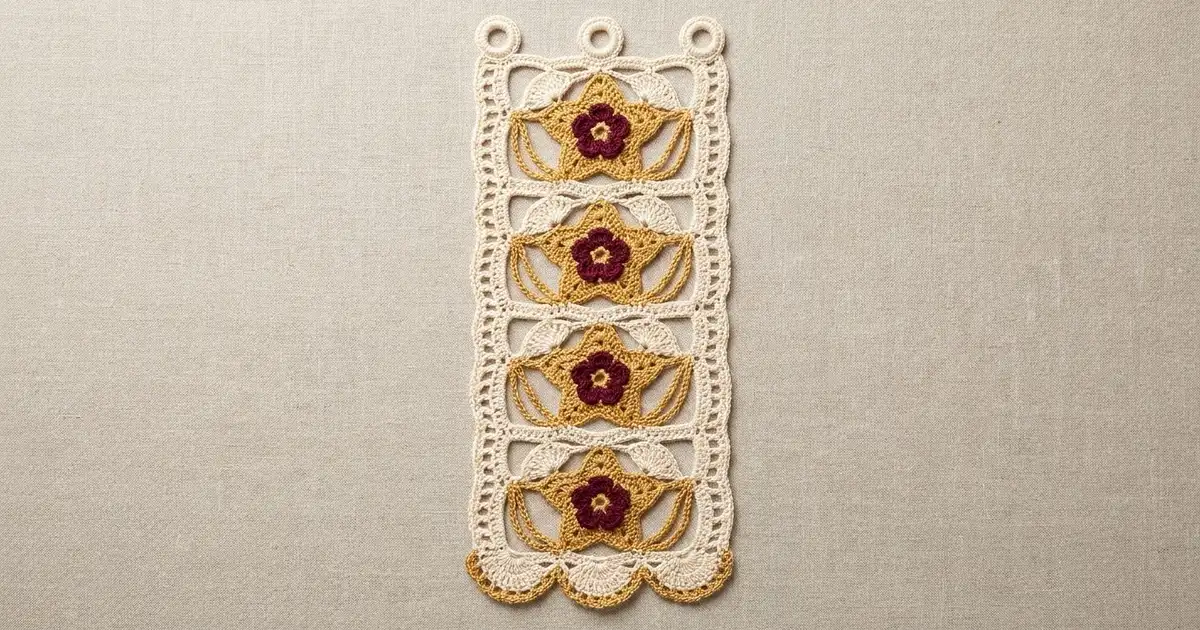
The Starlight Lace Strip is a long, narrow ribbon of cream lace with four gold stars stacked down the center. A small burgundy flower sits in the middle of each star. Draped chain swags hold each star in place inside an open frame, so the strip looks light and airy while the stars stay crisp and bold.
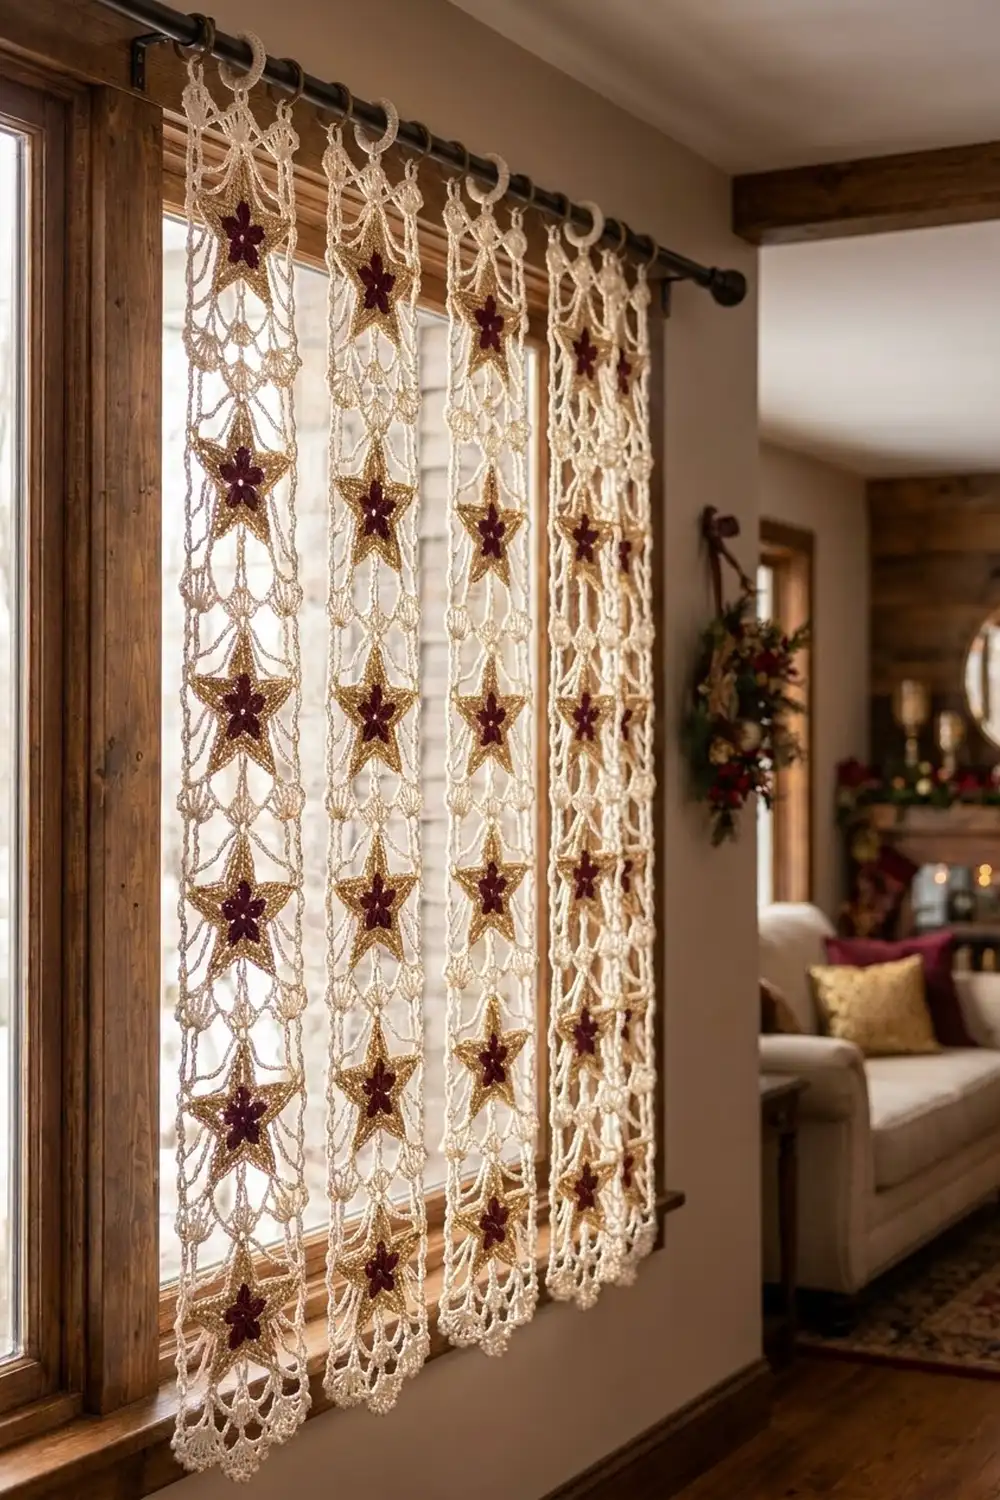
The colors are classic holiday: cream, antique gold, and deep burgundy. It looks great hung alone in a narrow window, tied to a door handle, or hung as one strip in a row of identical strips on a curtain rod. Each strip is fully finished on its own and doesn’t need to be joined to anything.
This pattern uses US crochet terms. After blocking, the strip measures 4.25 in (10.8 cm) wide and 18.4 in (46.7 cm) long, counting the hanging rings and the bottom scallops.
You’ll make the four star motifs first. Then you’ll crochet the cream strip in rows from the top down and join each star at its five points as you go. Last, you’ll add the scalloped bottom, the top hanging rings, and a slim edging along the sides.
Finished Size and Construction
- Finished size: 4.25 in (10.8 cm) wide × 18.4 in (46.7 cm) long
- Skill level: Intermediate
- Terminology: US crochet terms
- Yarn weight: Sport weight (#2) mercerized cotton
- Hook: 3.0 mm
- Number of pieces: 1 strip with 4 star motifs joined in as you go
- Layout: 1 column of 4 stars, each set in its own lace section
- Section size: 4 in (10.2 cm) wide × 4 in (10.2 cm) tall
- Star size: 3 in (7.6 cm) from point to point
- Size before edging: 4 in (10.2 cm) wide × 16.4 in (41.7 cm) long, measured from the foundation row through the last section
- Edging depth: 0.125 in (0.3 cm) on each side, 0.8 in (2.0 cm) of hanging rings at the top, and 1.2 in (3.0 cm) of scallops at the bottom
Materials
Use a smooth, mercerized sport-weight cotton. It gives clean stitch definition, holds a crisp star shape, and blocks well. Avoid fuzzy or very stretchy yarns, because the long chain swags will droop.
Yarn (one strip):
– Cream (Color A): 30 g / 96 m
– Gold (Color B): 12 g / 38 m
– Burgundy (Color C): 4 g / 13 m
These quantities include a margin of about 15% for a gauge swatch and weaving in ends. To make several strips for a curtain, multiply each color by the number of strips.
Tools:
– 3.0 mm crochet hook
– Tapestry needle
– 4 locking stitch markers
– Scissors
– Blocking mat, rust-proof pins, and a spray bottle
– Measuring tape
Abbreviations (US Terms)
- ch: chain
- sl st: slip stitch
- sc: single crochet
- hdc: half double crochet
- dc: double crochet
- dtr: double treble crochet (yarn over 3 times, then work off the loops in pairs)
- sp: space
- st(s): stitch(es)
- RS / WS: right side / wrong side
Special stitches:
– Shell: 7 dc in the same stitch. The 4th dc is the center of the shell.
– V-st: (dc, ch 3, dc) in the same stitch.
– Spike: ch 5, sl st in the 2nd ch from the hook, sc in the next ch, hdc in the next ch, dc in the next ch. This makes a tapered point 4 stitches long. The skipped ch at the end is its tip.
Gauge and Checkpoints
Gauge: 21 dc × 10 rows of dc = 4 in (10.2 cm) square, after blocking.
A dc row is 0.4 in (1.0 cm) tall and a dtr row is 0.8 in (2.0 cm) tall. Each section uses 2 rows of dc and 4 rows of dtr: 0.8 in + 3.2 in = 4 in (10.2 cm).
Make one star and the first section of the strip, then check them before you go on:
- Star after Rnd 4: 1.75 in (4.4 cm) across.
- Finished star: 3 in (7.6 cm) from point to point.
- Foundation row: 4 in (10.2 cm) wide.
- After the first section: 4.4 in (11.2 cm) long.
- After all 4 sections: 16.4 in (41.7 cm) long.
- After the scallops: 17.6 in (44.7 cm) long.
If your piece is too big, go down 0.25 mm in hook size. If it’s too small, go up 0.25 mm. Keep the star and the strip on the same hook, or the stars won’t fit inside their frames.
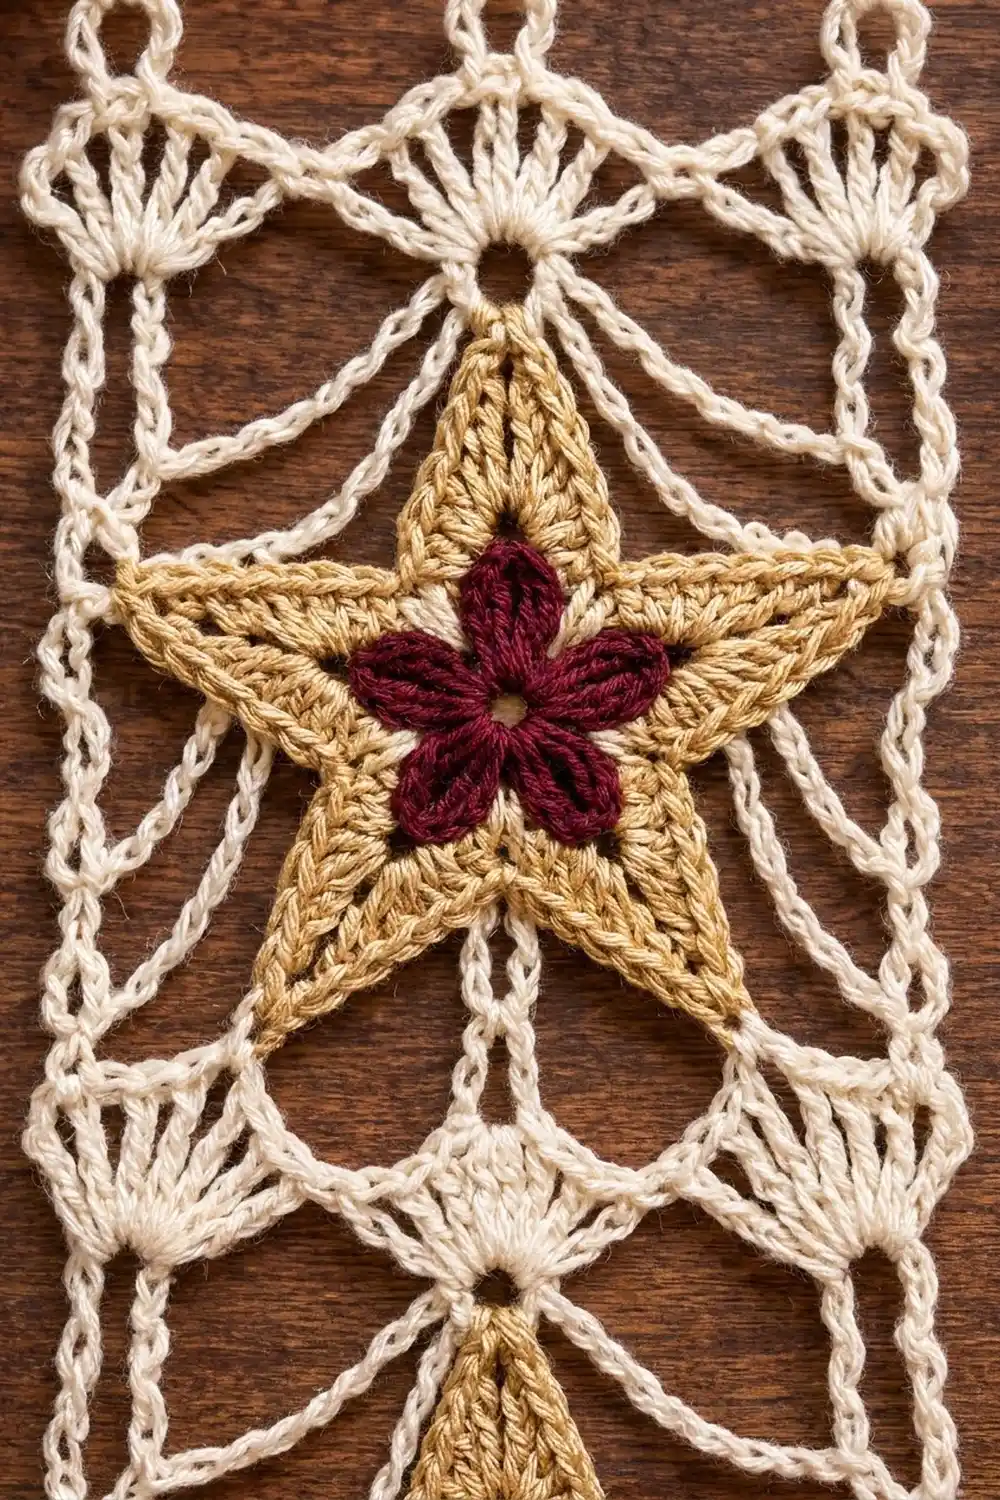
Star Motifs (Make 4)
Rnd 1 (Color C): Ch 4 and join with a sl st to form a ring. Ch 1, then work 10 sc in the ring. Join with a sl st to the first sc. (10 sc)
Rnd 2 (petals): *(Hdc, 2 dc, hdc) in the next sc, sl st in the next sc*. Repeat from * 4 more times. (5 petals: 20 petal sts + 5 sl st = 25 sts) Fasten off Color C.
The ring stays slightly open and becomes the small hole in the center of the flower.
Rnd 3 (Color B): Join Color B with a sl st in any sl st between two petals. Ch 1 and sc in the same st. *Ch 4, passing behind the next petal, then sc in the next sl st between petals*. Repeat from * 3 more times. Ch 4 behind the last petal, then join to the first sc. (5 sc + 5 ch-4 sps)
Rnd 4: Sl st into the first ch-4 sp. Ch 3 (counts as dc) and work 5 dc in the same sp. Work 6 dc in each of the remaining 4 ch-4 sps, then join to the top of the ch-3. (30 dc; 6 per side of the pentagon)
Rnd 5 (points): Ch 1. *Sc in the next st, hdc in the next st, dc in the next st, work a spike, dc in the next st, hdc in the next st, sc in the next st*. Repeat from * 4 more times, then join to the first sc. (30 base sts + 5 spikes of 4 sts each)
Each group of 6 Rnd 4 stitches now has a spike rising from its center, and the sc stitches at each end form the inner corners of the star.
Rnd 6 (outline): Ch 1. *Sc in the next 3 sts, then 4 sc along the first side of the spike (1 per ch or st). In the tip ch, work (sc, ch 2, sc). Work 4 sc along the second side of the spike, then sc in the next 3 sts*. Repeat from * 4 more times, then join. (16 sc per point × 5 = 80 sc + 5 ch-2 tip sps)
Fasten off and weave in the ends. Steam or pin each star flat to 3 in (7.6 cm).
You’ll join the strip to the ch-2 sp at each star tip. For each star, the top point, the two side points (arms), and the two lower points (legs) all get joined.
Lace Strip
Always hold the star with its RS facing the same way as the RS of the strip. On WS rows, the star faces away from you, and that’s fine.
Foundation Row (RS, Color A): Ch 23. Dc in the 4th ch from the hook and in each ch across. (21 sts, counting the skipped ch-3 as a dc) Turn.
Section (Rows 1–6, Work 4 Times)
Row 1 (WS, shells): Ch 3 (counts as dc in st 1). Ch 2, skip the next 4 sts, and work a Shell in st 6. Ch 2, skip 4 sts, and work a V-st in st 11. Ch 2, skip 4 sts, and work a Shell in st 16. Ch 2, skip 4 sts, and dc in the top of the turning ch (st 21). Turn.
(2 edge dc + 14 shell dc + 2 V-st dc = 18 dc, plus 4 ch-2 sps and 1 ch-3 sp)
Row 2 (RS, joins the star’s top point): Ch 5 (counts as dtr). Ch 4 and sc in the center dc of the next Shell. Ch 4, then in the V-st ch-3 sp work: sc, ch 1, sl st in the tip ch-2 sp of a star’s top point, ch 1, sc. Ch 4 and sc in the center dc of the next Shell. Ch 4, then dtr in the 3rd ch of the turning ch. Turn.
(2 dtr + 4 ch-4 swags + 1 top-point join)
Row 3 (WS, joins the arms): Ch 5 (counts as dtr). Ch 4 and sl st in the tip sp of the nearest arm. Ch 16 (this chain lies behind the star) and sl st in the tip sp of the other arm. Ch 4, then dtr in the 5th ch of the turning ch. Turn.
(2 dtr + 2 ch-4 swags + 1 ch-16 behind the star)
Row 4 (RS, joins the legs): Ch 5 (counts as dtr). Ch 7 and sc around the first ch-4 swag. Ch 7 and sl st in the tip sp of the nearest leg. Ch 10 (behind the star) and sl st in the tip sp of the other leg. Ch 7 and sc around the next ch-4 swag. Ch 7, then dtr in the 5th ch of the turning ch. Turn.
(2 dtr + 4 ch-7 swags + 1 ch-10)
Row 5 (WS, gathers the swags): Ch 5 (counts as dtr). Ch 6 and sc around the next ch-7. Ch 6 and sc around the next ch-7. Ch 4 and sc around the ch-10. Ch 4 and sc around the next ch-7. Ch 6 and sc around the next ch-7. Ch 6, then dtr in the 5th ch of the turning ch. Turn.
(2 dtr + 5 sc + 6 swags of ch 6, ch 6, ch 4, ch 4, ch 6, ch 6)
Row 6 (RS, solid band): Ch 3 (counts as dc). Work 4 dc in the next ch-6 sp, 3 dc in the next ch-6 sp, and 2 dc in the next ch-4 sp. Dc in the center sc. Work 2 dc in the next ch-4 sp, 3 dc in the next ch-6 sp, and 4 dc in the last ch-6 sp. Dc in the 5th ch of the turning ch. Turn.
(1 + 4 + 3 + 2 + 1 + 2 + 3 + 4 + 1 = 21 dc)
Row 6 gives you back the 21 stitches from the foundation row, so the next section starts on the same count. Repeat Rows 1–6 three more times, joining a new star in each section. You’ll have 4 sections. Don’t fasten off.
Checkpoint: The strip is 4 in (10.2 cm) wide and 16.4 in (41.7 cm) long.
Bottom Scallops
Row S1 (WS): Ch 1 and sc in the first st. *Ch 5, skip 4 sts, sc in the next st*. Repeat from * 3 more times. Turn.
(5 sc at sts 1, 6, 11, 16, and 21, plus 4 ch-5 sps)
Row S2 (RS): Ch 1 and sc in the first sc. *Work 9 dc in the next ch-5 sp, sc in the next sc*. Repeat from * 3 more times. Turn.
(4 fans: 36 dc + 5 sc = 41 sts)
Row S3 (WS, loop trim): Ch 1 and sl st in the first sc. *[Sc in the next dc, ch 3] 8 times, sc in the next dc, sl st in the next sc*. Repeat from * 3 more times. Fasten off.
(36 sc + 32 ch-3 loops + 5 sl st)
Checkpoint: The strip is 17.6 in (44.7 cm) long.
Border
The border has two parts: the top hanging rings and a sc edging down each side.
Border gauge: 5 sc = 1 in (2.5 cm) along the side edges.
Part 1: Top edge and hanging rings. With the RS facing, turn the strip so the foundation chain is at the top. Join Color A in the free loop at the base of st 1.
- Ch 1. In the same st, work (sc, ch 10, sl st in the same sc) to form the first ring.
- Sc in each of the next 9 sts (sts 2–10).
- In st 11, work (sc, ch 10, sl st in the same sc).
- Sc in each of the next 9 sts (sts 12–20).
- In st 21, work (sc, ch 10, sl st in the same sc).
- Fill each ch-10 ring with 14 sc to pad it.
Fasten off.
(21 sc along the top + 3 rings of 14 sc each)
Part 2: Side edging (work on each side). With the RS facing, join Color A at the top corner and work down the side into the row ends:
- 2 sc in the end of the foundation row.
- For each section:
- 2 sc in the end of Row 1
- 4 sc in the end of each dtr row (Rows 2–5), for 16 sc
- 2 sc in the end of Row 6
- 20 sc per section in total
- Sl st in the first sc of Row S1 and fasten off.
Per side: 2 + (4 × 20) = 82 sc.
Why the math works:
– On the sides, each dc row is 0.4 in (1.0 cm) tall, and 2 sc at 5 sc per inch also covers 0.4 in. Each dtr row is 0.8 in (2.0 cm) tall, and 4 sc covers 0.8 in. So 82 sc spans exactly the 16.4 in (41.7 cm) body. The edging sits slightly below the natural 5.25 sts per inch, which keeps the sides from rippling.
– On the top edge, there’s one sc per foundation stitch. The rings sit at sts 1, 11, and 21, with 9 sc between each pair, so they’re evenly spaced.
Final Blocking
- Weave in all the ends along the stitches of matching color. Don’t weave cream ends through the gold.
- Wet the strip in cool water, press out the water gently, and roll it in a towel.
- Pin the side rails straight on the mat, 4.25 in (10.8 cm) apart.
- Pin the length to 18.4 in (46.7 cm), measured from the top of the rings to the bottom of the scallop loops.
- Pin each star point outward to 3 in (7.6 cm) across, so the swags pull gently and evenly.
- Pin each of the 8 loops on each fan into a smooth curve.
- Mist the strip lightly and let it dry completely before unpinning.
Final Quality-Control Checklist
- [ ] Each star has 5 points, a burgundy flower, and an open center.
- [ ] All 5 points of every star are joined, and no point floats loose.
- [ ] Each Row 6 counts 21 dc.
- [ ] All 4 sections are 4 in (10.2 cm) tall.
- [ ] Each side edge has 82 sc and lies flat.
- [ ] The 3 rings are evenly spaced and fully padded.
- [ ] All 4 bottom fans are the same size.
- [ ] The finished strip is 4.25 in (10.8 cm) × 18.4 in (46.7 cm).
- [ ] No knots or ends show on the RS.
Troubleshooting
The star buckles or cups. Your Rnd 6 tension is too tight. Redo the round with a looser hand, or with a 3.25 mm hook for that round only.
The star sags inside the frame. The swags are too long. Work the ch-16 and ch-10 two stitches shorter.
The star is pulled out of shape. The swags are too short. Add 1–2 ch to the side swags.
The side rails wave. Check your edging count (82 sc). Also make sure each dtr is pulled up to its full height.
Row 6 doesn’t come out to 21 dc. Recount the dc going into each sp: 4, 3, 2, 1, 2, 3, 4, plus 1 at each end.
The fans curl. Block the fans with the strip still damp. Pin each ch-3 loop separately.
The rings twist. Work all 14 sc into each ring in the same direction, then steam it flat.
Care
Hand wash the strip in cool water with a mild soap and lay it flat to dry. Reshape the stars and fans while the strip is still damp.
Final Notes
Everything in this pattern depends on one gauge:
- 21 dc = 4 in (10.2 cm).
- Each dc row is 0.4 in (1.0 cm) and each dtr row is 0.8 in (2.0 cm).
- That makes each section 4 in (10.2 cm) tall, and 4 sections plus the foundation row come to 16.4 in (41.7 cm).
- The scallops bring the strip to 17.6 in (44.7 cm), and the rings to 18.4 in (46.7 cm).
- The side edging adds 0.125 in (0.3 cm) on each side, for a final width of 4.25 in (10.8 cm).
Check your first star and first section against these numbers, and the rest of the strip will match. For a curtain, make as many strips as your rod needs and hang them side by side by their rings.
Happy crocheting!