

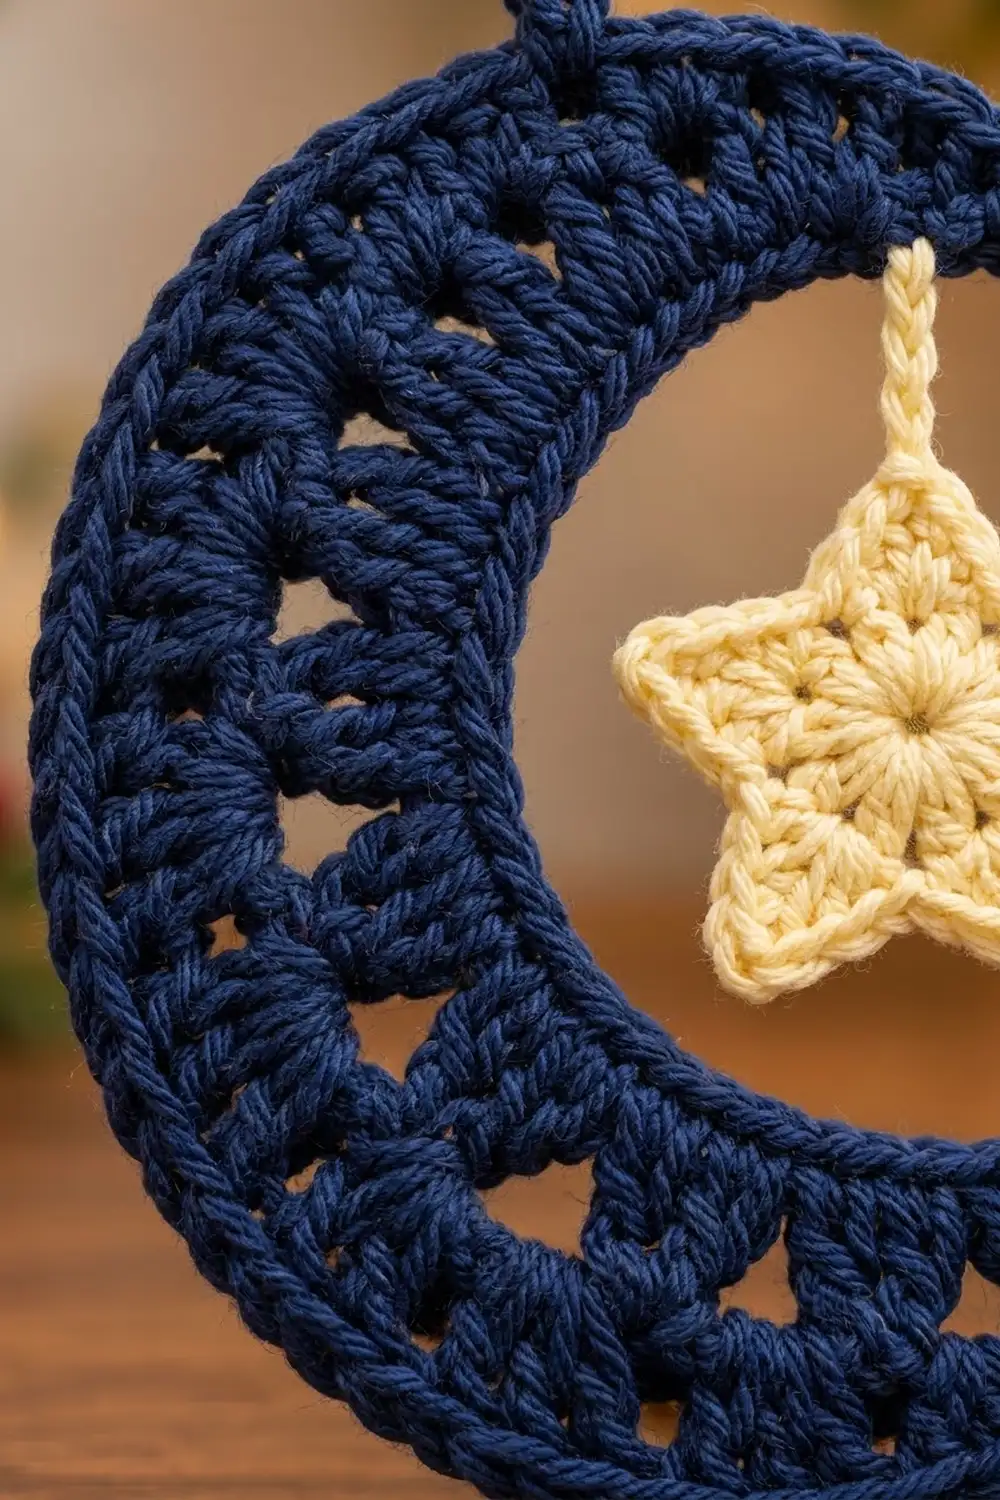
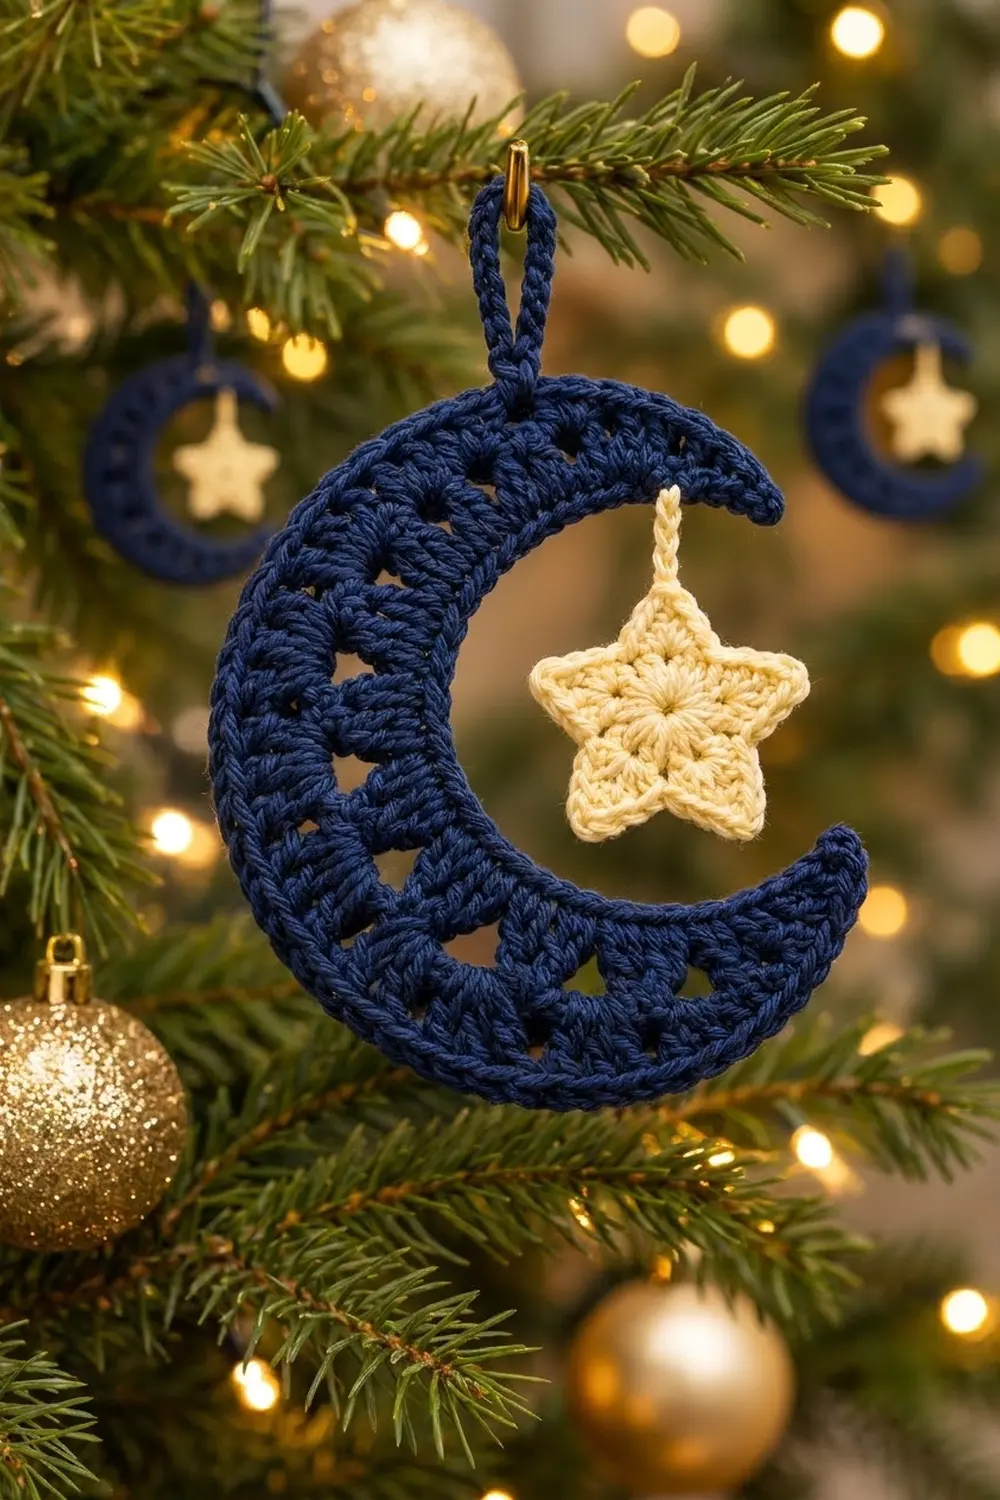
The Starlit Crescent is a small hanging ornament. It is a deep navy crescent moon with a row of small triangular openings (“windows”) through the middle and a soft cream star hanging inside the curve. It is quick to make, uses very little yarn, and works on a tree, in a window, or tied to a gift.
The moon is worked in navy and the star in cream. The colors contrast clearly without being harsh, so the ornament looks cozy rather than flashy. A crisp single crochet edge outlines the moon. The star has a dense double crochet center, a neat single crochet rim and pointed tips.
This pattern uses US crochet terms. The finished moon is about 4.5 in (11.4 cm) tall and 4 in (10.2 cm) wide, not counting the hanging loop. The star is about 1.75 in (4.4 cm) from point to point.
The moon is worked flat in four short rows, starting from the inner curve. Each row is longer than the one before, so the strip bends into a crescent by itself. An edging round then outlines both tips and the inner edge, and a chain loop is added at the top. The star is worked in the round from a magic ring and hangs from the moon on a short cream chain.
Finished Size and Construction
- Finished size (moon): about 4.5 in (11.4 cm) tall x 4 in (10.2 cm) wide
- Finished size (star): about 1.75 in (4.4 cm) point to point
- Skill level: Easy / advanced beginner
- Terminology: US crochet terms
- Yarn weight: DK (light worsted, #3)
- Hook: 3.5 mm (E-4)
- Number of pieces: 2 (one moon, one star), joined by a short chain
- Layout: the star hangs freely inside the hollow of the moon from the inner edge of the upper horn
- Moon band width: about 1 in (2.5 cm) at the widest point, narrowing to pointed tips
- Moon size before edging: about 4.25 in (10.8 cm) tall
- Edging depth: one round of single crochet, about 0.25 in (0.6 cm)
Materials
Choose a smooth DK cotton or cotton blend. Cotton holds the crescent shape well and shows the stitches clearly, which helps the windows stand out. A soft acrylic DK also works, but it may need firmer blocking to keep the tips sharp.
- Navy (Color A): 15 g, about 35 m (moon, edging, hanging loop)
- Cream (Color B): 4 g, about 9 m (star and star hanger)
These amounts include a small extra margin for your gauge swatch and for weaving in ends.
Tools:
- 3.5 mm (E-4) crochet hook
- Tapestry needle
- Small scissors
- Stitch markers (2)
- Blocking mat and rust-proof pins
- Spray bottle with water
- Optional: ornament hook or ribbon for hanging
Abbreviations (US Terms)
- ch – chain
- sl st – slip stitch
- sc – single crochet
- hdc – half double crochet
- dc – double crochet
- sp – space
- st(s) – stitch(es)
- RS / WS – right side / wrong side
- [ ] – repeat the steps inside the brackets the number of times stated
Special technique – magic ring: Wrap the yarn around two fingers to make a loop. Insert the hook, pull up a loop, and ch 1 to secure. Work the first round into the ring, then pull the tail to close the center tightly.
Gauge and Checkpoints
Gauge: 20 sc and 24 rows = 4 in (10.2 cm) in sc with a 3.5 mm hook.
Gauge matters here because the curve of the crescent comes from the stitch counts, not from blocking alone. Make the star first and use it as your test piece. It is small and fast, and it shows your tension before you start the moon.
Checkpoints:
- Star, after Rnd 1: about 1 in (2.5 cm) across.
- Star, after Rnd 3: about 1.75 in (4.4 cm) point to point.
- Moon, after Row 1: the straight sc strip is about 5.8 in (14.7 cm) long.
- Moon, after Row 3: the strip curls into a C shape by itself.
- Moon, after Row 4: the outer edge is about 10.8 in (27.4 cm) long when laid flat along its curve.
- Moon, finished: about 4.5 in (11.4 cm) tall x 4 in (10.2 cm) wide.
If your pieces are too big: go down to a 3.25 mm (D-3) hook. If they are too small: go up to a 3.75 mm (F-5) hook. Change hooks before you start the moon, not partway through, so both pieces match.
The Star (Make 1)
With Color B (cream).
Rnd 1 (RS): Make a magic ring. Ch 3 (counts as first dc), then work 14 dc into the ring. Pull the ring closed. Sl st to the top of the beginning ch-3. (15 dc)
The center should lie flat with only a tiny hole. If it cups, your dc are too short. If it ruffles, they are too tall.
Rnd 2 (points): Ch 1. [Sc in next st, (hdc, dc, ch 2, dc, hdc) in next st, sc in next st] 5 times. Sl st to the first sc. (30 sts and 5 ch-2 sps)
Each repeat uses 3 stitches of Rnd 1, and 5 x 3 = 15, so the repeats fit exactly. Each repeat makes 6 stitches plus one ch-2 tip, so 5 x 6 = 30.
Rnd 3 (edging): Ch 1. [Sc in next sc, sc in next hdc, sc in next dc, (sc, ch 2, sc) in ch-2 sp, sc in next dc, sc in next hdc, sc in next sc] 5 times. Sl st to the first sc. (40 sc and 5 ch-2 tips)
This round puts 1 sc in each of the 30 existing stitches, plus 2 extra sc at each of the 5 tips: 30 + 10 = 40 sc. The two sc side by side in each valley pull in slightly, which gives the star its gently curved inner corners.
Star hanger: Do not fasten off. Sl st into the next 3 sc and into the ch-2 sp of the next point. Ch 8. Fasten off, leaving an 8 in (20.3 cm) tail for sewing. The chain should be about 1 in (2.5 cm) long.
Weave in the starting tail on the WS.
The Moon (Make 1)
With Color A (navy). The moon is worked flat in rows, starting from the inner curve. Each row is longer than the one before, so the piece bends into a crescent without any extra shaping.
Foundation: Ch 30.
Row 1 (RS, inner edge): Sc in the 2nd ch from the hook and in each ch across. (29 sc)
Lay it flat and measure it: about 5.8 in (14.7 cm). Place a marker in the first sc to mark the RS.
Row 2 (WS, window row): Ch 1, turn. Sc in the first sc, hdc in the next sc, [2 dc in next sc, ch 2, skip next sc] 12 times, 2 dc in next sc, hdc in next sc, sc in the last sc. (30 sts and 12 ch-2 sps)
Check the math: 1 + 1 + (12 x 2) + 1 + 1 + 1 = 29 stitches used from Row 1. The new row has 1 sc + 1 hdc + 26 dc + 1 hdc + 1 sc = 30 stitches, plus 12 ch-2 spaces. The short sc and hdc at each end start the narrowing of the tips.
Row 3 (RS, solid row): Ch 1, turn. Sc in the first sc, hdc in the next hdc, dc in each of the next 2 dc, [2 dc in the next ch-2 sp, dc in each of the next 2 dc] 12 times, hdc in the next hdc, sc in the last sc. (54 sts)
This row puts 1 stitch in each of the 30 existing stitches, plus 2 dc in each of the 12 spaces: 30 + 24 = 54. The spaces under the new dc stay open and form the triangular windows. The strip now curls into a clear C shape.
Row 4 (WS, outer edge): Ch 1, turn. Sc in each st across. (54 sc)
This row makes the smooth outer edge of the moon. Lay it flat along its curve and measure it: about 10.8 in (27.4 cm). Do not fasten off.
Moon size before edging: about 4.25 in (10.8 cm) tall.
Edging and Hanging Loop
The edging is the border for this ornament. It goes around the first tip, along the inner curve, and around the second tip, so the inner edge gets the same clean outline as the outer edge.
Edging gauge: one sc in each row end and one sc in each foundation chain, worked at the same tension as Row 1.
Rnd 5 (edging): Ch 1. Turn the piece so you can work down the row ends of the tip where Row 4 ended (Tip 1).
- Tip 1: Sc in the row end of Row 3, Row 2, and Row 1. (3 sc)
- Inner edge: Sc in the free loop of each foundation ch across. (29 sc)
- Tip 2: Sc in the row end of Row 1, Row 2, and Row 3. (3 sc)
Sl st into the first sc of Row 4 to join. (35 sc total: 3 + 29 + 3)
Why the math works: The inner edge gets exactly one sc in each foundation chain, so its count matches Row 1 (29). No stitches are added there, which keeps the inner curve snug and holds the crescent shape. Each tip gets one sc per row end, so the tips stay narrow and pointed instead of flaring. Row 4 already finishes the outer edge, so it is not worked again.
Hanging loop: Your hook is now at the first sc of Row 4, at Tip 2. This tip becomes the top of the moon. Ch 14, then sl st into the same st to form a loop. Sl st into each of the 14 ch around the loop to strengthen it. Fasten off. The loop stands about 1 in (2.5 cm) tall.
Weave in all navy ends on the WS. Run them through navy stitches so they don’t show through the windows.
Attaching the Star
- Lay the moon flat, RS up, with the hanging loop at the top.
- Find the inner edge of the upper horn, about 1 in (2.5 cm) below the top tip.
- Thread the cream tail from the star hanger onto your tapestry needle.
- Sew the end of the ch-8 hanger to the WS of the inner edging at that point. Use 3 or 4 small stitches through the edging only.
- Let the star hang. It should sit centered in the hollow of the moon without touching the lower horn.
- If it touches the lower horn, sew the hanger on one chain higher. If it hangs too high, sew it one chain lower.
- Weave in the cream tail on the WS of the moon, hiding it under navy stitches.
Final Blocking
- Lightly spray both pieces with water until they are damp, not wet.
- Pin the moon RS up on a blocking mat. Pin the two tips first.
- Pin the inner edge into a smooth curve. Pin the outer edge evenly, with pins about 0.5 in (1.3 cm) apart.
- Check the size: about 4.5 in (11.4 cm) tall and 4 in (10.2 cm) wide.
- Open each window with the tip of a pin so all 12 look even.
- Pin the star flat with one pin at each of its 5 tips. Check that it measures about 1.75 in (4.4 cm).
- Pin the hanging loop into a neat teardrop shape.
- Let everything dry completely before you remove the pins, usually 4 to 6 hours.
Final Quality-Control Checklist
- Moon Row 1 has 29 sc, Row 2 has 30 sts and 12 ch-2 sps, and Rows 3 and 4 have 54 sts each.
- The edging round has 35 sc (3 + 29 + 3).
- All 12 windows are open and evenly spaced.
- Both tips are pointed and about the same size.
- The star has 40 sc and 5 sharp tips.
- The star hangs centered and does not touch the lower horn.
- The hanging loop is firm and centered on the top tip.
- All ends are woven in on the WS and trimmed.
- The moon measures about 4.5 in (11.4 cm) x 4 in (10.2 cm), and the star about 1.75 in (4.4 cm).
Troubleshooting
The moon stays straight instead of curving. Your Row 3 dc may be too tight. Check that you worked 2 dc into every ch-2 space and that the row has 54 stitches.
The moon curls into almost a full circle. Row 1 is probably tight while your dc rows are loose. Redo Row 1 a little looser, or make the foundation chain with a hook one size larger.
The windows close up. Make sure you made ch 2 (not ch 1) in Row 2. Open the windows with a pin during blocking.
The tips are blunt. Work the edging sc into the row ends firmly, and don’t add extra stitches there.
The star cups. Your Rnd 1 dc are too short or too tight. Loosen your tension, or work the star with a hook one size larger.
The star points are rounded. Pull the ch-2 tips firmly when pinning, and check that each tip has (sc, ch 2, sc).
The star spins or twists. Sew the hanger with stitches on both sides of the chain so the star hangs flat.
Care
Spot clean with cool water and mild soap, then reshape the ornament and lay it flat to dry. Store it flat or hanging, away from heavy ornaments that could crush the curve.
Final Notes
Every measurement in this ornament builds on the one before it. A gauge of 20 sc per 4 in (10.2 cm) gives a 29-sc inner edge of about 5.8 in (14.7 cm). Increasing to 54 stitches in Rows 3 and 4 gives an outer edge of about 10.8 in (27.4 cm). That difference in length is what bends the strip into a crescent. The 35-sc edging adds no stitches to the inner curve, so the shape holds, and the finished moon blocks to about 4.5 in (11.4 cm) by 4 in (10.2 cm). The star’s 15-dc center grows to a 40-sc star about 1.75 in (4.4 cm) across, which hangs inside the curve on a 1 in (2.5 cm) chain.
Happy crocheting!