
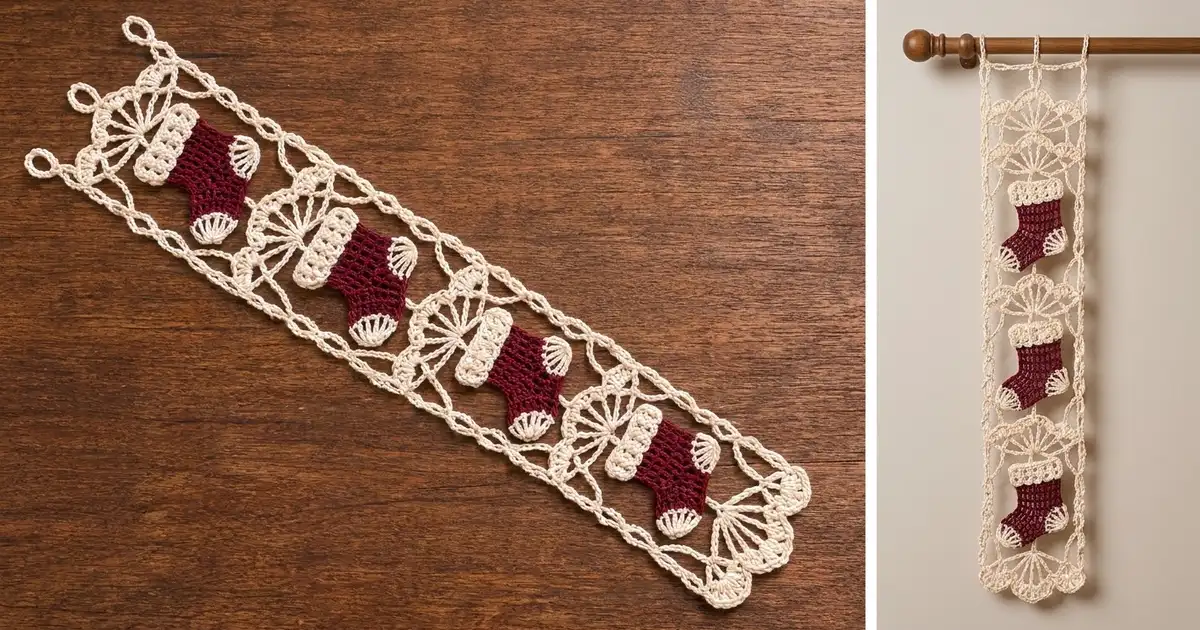
This vertical lace strip has a row of little Christmas stockings, each hanging from a cream fan. Four burgundy stockings in open filet mesh have puffy cream cuffs and fan-shaped cream toes. Each one hangs below a half-circle fan with spokes and a scalloped shell edge. A fifth fan, turned upside down, finishes the bottom.
The palette is just two colors: deep wine red for the stockings and soft cream for everything else. Light, open lacework, a classic holiday color pair, and a frame of chain-ladder rails give the strip a vintage, airy look. You can hang it on a door, in a window, or from a rod with its three top loops.
The pattern uses US crochet terms. The finished strip measures 5 in (12.7 cm) wide by 29.4 in (74.7 cm) long, including the hanging loops.
Here is the construction in short. You make four stockings and five fans separately, then sew each stocking to the center of a fan. The border joins everything into one strip: a chain round links the fan corners, forms the top bar, and runs back down. A ladder round then builds the rails and the hanging loops.
Finished Size and Construction
- Finished size: 5 in (12.7 cm) wide × 29.4 in (74.7 cm) long
- Skill level: Intermediate
- Terminology: US
- Yarn weight: Sport (#2) mercerized cotton
- Hook: 3.25 mm (US D/3)
- Number of pieces: 9 motifs (4 stockings and 5 fans) joined into one strip
- Layout: 1 column. Fan with stocking, repeated 4 times, then 1 upside-down fan
- Piece size: each stocking is 2.8 in (7.1 cm) wide × 4.2 in (10.7 cm) tall; each fan is 4 in (10.2 cm) wide × 2 in (5.1 cm) tall
- Size before border: 4 in (10.2 cm) × 28 in (71.1 cm), measured from the scallop tip of Fan 1 to the scallop tip of Fan 5
- Border depth: 0.5 in (1.3 cm) of ladder rail on each long side; the top bar sits 0.4 in (1.0 cm) above Fan 1, with 1 in (2.5 cm) hanging loops
Materials
Choose a smooth, mercerized sport-weight cotton, about 155 m per 50 g. Mercerized cotton gives crisp stitch definition, holds a blocked shape well, and won’t fuzz over the mesh.
- Cream: 25 g (about 78 m), for the fans, cuffs, toes, and border
- Wine red: 10 g (about 31 m), for the stocking bodies
- 3.25 mm (US D/3) crochet hook
- Tapestry needle
- Stitch markers
- Rustproof pins and a blocking board
- Spray bottle
- Measuring tape
All quantities include a margin of roughly 40% for gauge swatching and tails.
Abbreviations (US Terms)
- ch: chain
- sl st: slip stitch
- sc: single crochet
- dc: double crochet
- tr: treble crochet
- sk: skip
- sp(s): space(s)
- st(s): stitch(es)
- RS: right side
Puff stitch (puff): (Yarn over, insert hook in the stitch, pull up a loop to 0.4 in / 1.0 cm) 3 times, yarn over, and pull through all 7 loops on the hook.
Gauge and Checkpoints
- Single crochet: 5 sc = 1 in (2.5 cm)
- Chain (relaxed): 5 ch = 1 in (2.5 cm)
- Filet mesh: 5 ch-1 sps × 5 rows = 2 in (5.1 cm)
Make one complete stocking first and treat it as your gauge swatch.
Checkpoints:
- Leg after Row 5: 1.6 in (4.1 cm) wide × 2 in (5.1 cm) tall
- Body after Row 7: 2.4 in (6.1 cm) wide × 2.8 in (7.1 cm) tall
- After the toe: 2.8 in (7.1 cm) wide
- After the cuff: 4.2 in (10.7 cm) tall
- Cuff width: 2.2 in (5.6 cm)
- Fan after Row 4: 4 in (10.2 cm) across the straight edge and 2 in (5.1 cm) tall
If your pieces come out more than 0.2 in (0.5 cm) too big, go down 0.25 mm in hook size. If they are too small, go up 0.25 mm. Check your chain gauge separately. Border chains that are too tight will pull the rails into curves.
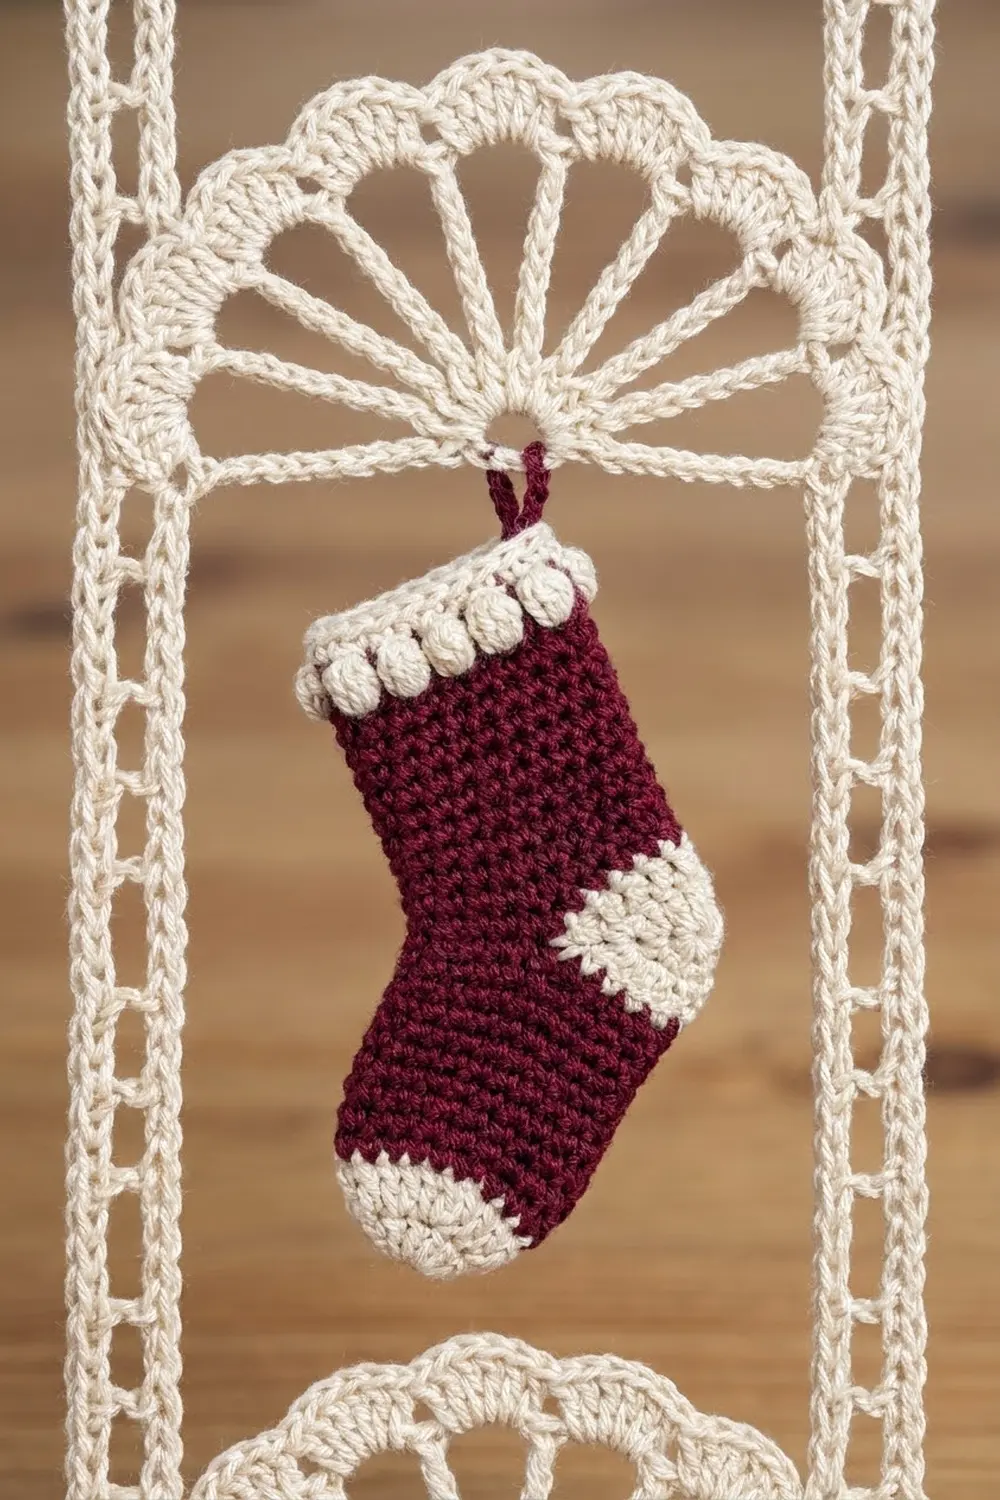
Stocking (Make 4)
With wine, ch 12.
Row 1: Dc in the 6th ch from the hook (the skipped chs count as dc, ch 1, and a skipped ch). Then ch 1, sk 1 ch, dc in the next ch 3 times. Turn. (5 dc posts, 4 ch-1 sps)
Rows 2–5: Ch 4 (counts as dc and ch 1), dc in the next dc, ch 1, dc in the next dc 2 times, ch 1, dc in the 3rd ch of the turning ch. Turn. (5 posts, 4 sps)
The leg should now measure 1.6 in (4.1 cm) × 2 in (5.1 cm).
Row 6 (foot extension): Ch 7. Dc in the 6th ch from the hook, ch 1, sk the next ch, dc in the edge dc. Then ch 1, dc in the next dc 3 times, ch 1, dc in the 3rd ch of the turning ch. Turn. (7 posts, 6 sps)
The 5 skipped chs form a new edge post and space, so this row adds 2 posts and 2 sps to the leg’s 5 posts and 4 sps. This side of the work is now the toe side.
Row 7: Ch 4, dc in the next dc, ch 1, dc in the next dc 4 times, ch 1. Work the last dc in the 3rd skipped ch of Row 6’s beginning chain (the top of that edge post). (7 posts, 6 sps) Fasten off.
The body should now measure 2.4 in (6.1 cm) × 2.8 in (7.1 cm).
Toe: With RS facing, join cream with a sl st at the top corner of the toe edge. Ch 3 (counts as dc), work 4 dc around the Row 6 edge post, then 4 dc around the last dc of Row 7. Sl st into the bottom corner. Fasten off. (9 dc)
This makes a small fan that adds 0.4 in (1.0 cm) to the width, for 2.8 in (7.1 cm) total.
Cuff Row 1: Turn the stocking upside down. Join cream in the free loop at the base of the first post along the foundation chain. Ch 1. Work 2 sc at the base of the first post, then 1 sc in each of the next 7 bases (the ch-1 sps and posts), then 2 sc at the base of the last post. Turn. (9 bases worked + 2 extra sc = 11 sc)
Cuff Row 2: Ch 2 (does not count), puff in the first sc, ch 1, sk 1 sc, puff in the next sc 5 times. Turn. (6 puffs, 5 ch-1 sps)
Cuff Row 3: Ch 1, sc in the first puff, sc in the ch-1 sp, sc in the next puff 5 times. Turn. (11 sc)
Cuff Rows 4–5: Repeat Rows 2 and 3. Fasten off. (11 sc)
The cuff measures 2.2 in (5.6 cm) wide × 1.4 in (3.6 cm) tall, and the stocking is 4.2 in (10.7 cm) tall overall.
Fan (Make 5)
With cream, ch 4 and sl st in the first ch to form a ring.
Row 1: Ch 4 (counts as tr), then (ch 2, tr) 9 times into the ring. Turn. (10 tr, 9 ch-2 sps, spread in a half circle)
Row 2: Ch 1, sc in the first tr, then ch 3, sc in the next tr 9 times, working the last sc in the top of the ch-4. Turn. (10 sc, 9 ch-3 sps)
Row 3: Ch 3 (counts as dc), 3 dc in the first ch-3 sp (half shell), sc in the next sp. Then 7 dc in the next sp, sc in the next sp 3 times, and work 4 dc in the last sp. (29 dc, 4 sc: 3 full shells plus 2 half shells)
The center of the fan is the 4th dc of the middle shell.
Row 4 (straight edge): Ch 1 and rotate the fan to work across the flat side. Work:
- 3 sc along the side of the last dc
- 2 sc along the side of the Row 2 end sc
- 4 sc around the end tr of Row 1
- 2 sc over the ring
- 4 sc around the beginning ch-4
- 2 sc along the side of the first sc of Row 2
- 3 sc along the beginning ch-3
Fasten off. (3+2+4+2+4+2+3 = 20 sc)
At 5 sc per inch, 20 sc gives a straight edge of 4 in (10.2 cm). The first and last sc of Row 4 are the fan corners. Mark them.
Make All Pieces
- Wine: 4 stocking bodies
- Cream: 4 cuffs, 4 toes, 5 fans
Lay the pieces out in one column, with all toes pointing left:
[loop]-----[loop]-----[loop]
|          top bar          |
|     Fan 1 (scallops up)   |
|        Stocking 1         |
|     Fan 2 (scallops up)   |
|        Stocking 2         |
|     Fan 3 (scallops up)   |
|        Stocking 3         |
|     Fan 4 (scallops up)   |
|        Stocking 4         |
|    Fan 5 (scallops down)  |
Joining
Each stocking hangs from the straight edge of the fan above it.
With cream and a tapestry needle, whipstitch cuff Row 5 sc 5, 6 and 7 to Fan Row 4 sc 10 and 11. This centers the stocking under the ring. Make 4 stitches and pull each one snug, but not tight enough to pucker. Join Stockings 1–4 to Fans 1–4.
Fan 5 stays loose until the border goes on.
Space the fans down the column so their straight edges are these distances apart:
- Fan 1 to Fan 2: 6.4 in (16.3 cm)
- Fan 2 to Fan 3: 6.4 in (16.3 cm)
- Fan 3 to Fan 4: 6.4 in (16.3 cm)
- Fan 4 to Fan 5: 4.8 in (12.2 cm), measured to Fan 5’s straight edge
Size checkpoint: Fan 1’s scallop tip to Fan 5’s scallop tip should measure 28 in (71.1 cm). Each stocking should clear the scallops below it by about 0.2 in (0.5 cm). Stocking 4 sits 0.6 in (1.5 cm) above Fan 5.
Border
Border gauge: 5 ch = 1 in (2.5 cm). Each ladder cell is 4 ch, or 0.8 in (2.0 cm), and each tr rung stands 0.5 in (1.3 cm) tall.
The border is made of chains and touches the motifs only at the fan corners. Because of that, the side counts come from the chain lengths, not from stitches along the motif edges.
Round 1 (inner rails and top bar): Join cream with a sl st in Fan 5’s right corner sc.
- Ch 24, sl st in Fan 4’s right corner.
- Ch 32, sl st in Fan 3’s right corner.
- Ch 32, sl st in Fan 2’s right corner.
- Ch 32, sl st in Fan 1’s right corner.
- Ch 12. The 12th ch is corner C1.
- Right side: 24+32+32+32+12 = 132 ch, including C1.
- Ch 9, then ch 1 more. This ch is the center ch (M).
- Ch 2, sl st in the center dc of Fan 1’s middle shell, then sl st back up the 2 ch to M. These connector chs are not counted in the bar.
- Ch 9, ch 1. This ch is corner C2.
- Top bar: 20 new ch. From C1 to C2 is 20 links, or 4 in (10.2 cm), and M sits exactly halfway.
- Ch 11, sl st in Fan 1’s left corner.
- Ch 32, sl st in Fan 2’s left corner. Ch 32, sl st in Fan 3’s left corner. Ch 32, sl st in Fan 4’s left corner. Ch 24, sl st in Fan 5’s left corner.
- Left side: 11+32+32+32+24 = 131 new ch, which makes 132 counting C2.
Keep the rails straight without stretching them.
Round 2 (ladders and loops): Turn. Skip the joining sl sts whenever you count chains.
- Left side: Ch 3, sk 3 ch, tr in the next ch 33 times. (33 rungs; the last tr lands in C2)
- Left loop: Ch 10, sl st in C2.
- Across the bar: Sl st in each of the next 9 ch, then sl st in M.
- Center loop: Ch 10, sl st in M.
- Sl st in each of the next 9 ch, then sl st in C1.
- Right loop: Ch 10, sl st in C1.
- Right side: Ch 4 (counts as tr), then ch 3, sk 3 ch, tr in the next ch 32 times. Ch 3, sl st in Fan 5’s right corner. (33 rungs) Fasten off.
Keep all the rungs on the outer side of the rails.
Why the math works:
- Each side has 132 ch, and 132 = 4 × 33, so every 4-ch cell fits with nothing left over.
- On the left side, rungs land on the 24th, 56th, 88th and 120th ch, right next to each fan join, so the rails stay square.
- Rungs sit 4 ch from Fan 5 on both sides, so the ladders mirror each other.
- The center loop, the bar center, and the Fan 1 connector all come from the same ch (M), so they line up vertically.
Final Blocking
- Wet the strip and press out the water in a towel. Don’t wring it.
- Pin the rails as two straight lines 4 in (10.2 cm) apart. The finished width across the ladders is 5 in (12.7 cm).
- Pin each fan corner to its rail join.
- Open each fan into a half circle 2 in (5.1 cm) tall and pin every shell tip.
- Square each stocking’s mesh and fan out the toe.
- Pin the top three loops to 1 in (2.5 cm) each.
- Check the overall length: 29.4 in (74.7 cm).
- Spray lightly and let it dry completely before you unpin.
Final Quality-Control Checklist
- All 4 toes point the same way.
- Each cuff has 2 rows of 6 puffs.
- Each fan has 3 full shells and 2 half shells.
- Each fan’s straight edge measures 4 in (10.2 cm).
- Each long side has 33 rungs.
- The center loop lines up with Fan 1’s middle shell.
- All tails are woven in through same-color stitches.
Troubleshooting
- Rails curve inward: Your chains are too tight. Rework Round 1 with a hook one size larger, keeping the same counts.
- Fan cups instead of lying flat: Loosen the Row 2 ch-3s or block harder.
- Fan ruffles: Work 6 dc instead of 7 in each full shell.
- Mesh is slanting: Make sure every turning ch-4 is worked into its 3rd ch.
- Stocking twists: Add a 5th whipstitch at the cuff join.
- Puffs look flat: Pull every loop up to the full 0.4 in (1.0 cm).
Care
Hand wash cool with mild soap, roll it in a towel, and dry it flat, re-pinning if needed. Store it flat or loosely rolled so the shells keep their shape.

Final Notes
The measurement chain runs like this:
- Your gauge (5 sc or 5 ch = 1 in / 2.5 cm) sets the size of each motif: a 2.8 in × 4.2 in (7.1 cm × 10.7 cm) stocking and a 4 in × 2 in (10.2 cm × 5.1 cm) fan.
- The motifs lay out as a 4 in × 28 in (10.2 cm × 71.1 cm) column.
- The 132-chain rails and 0.5 in (1.3 cm) ladders bring the strip to 5 in (12.7 cm) wide.
- The bar and loops finish it at 29.4 in (74.7 cm) long.
Check your stitches at each stage and the strip will hang straight. Several strips side by side make a beautiful doorway curtain.
Happy crocheting!