

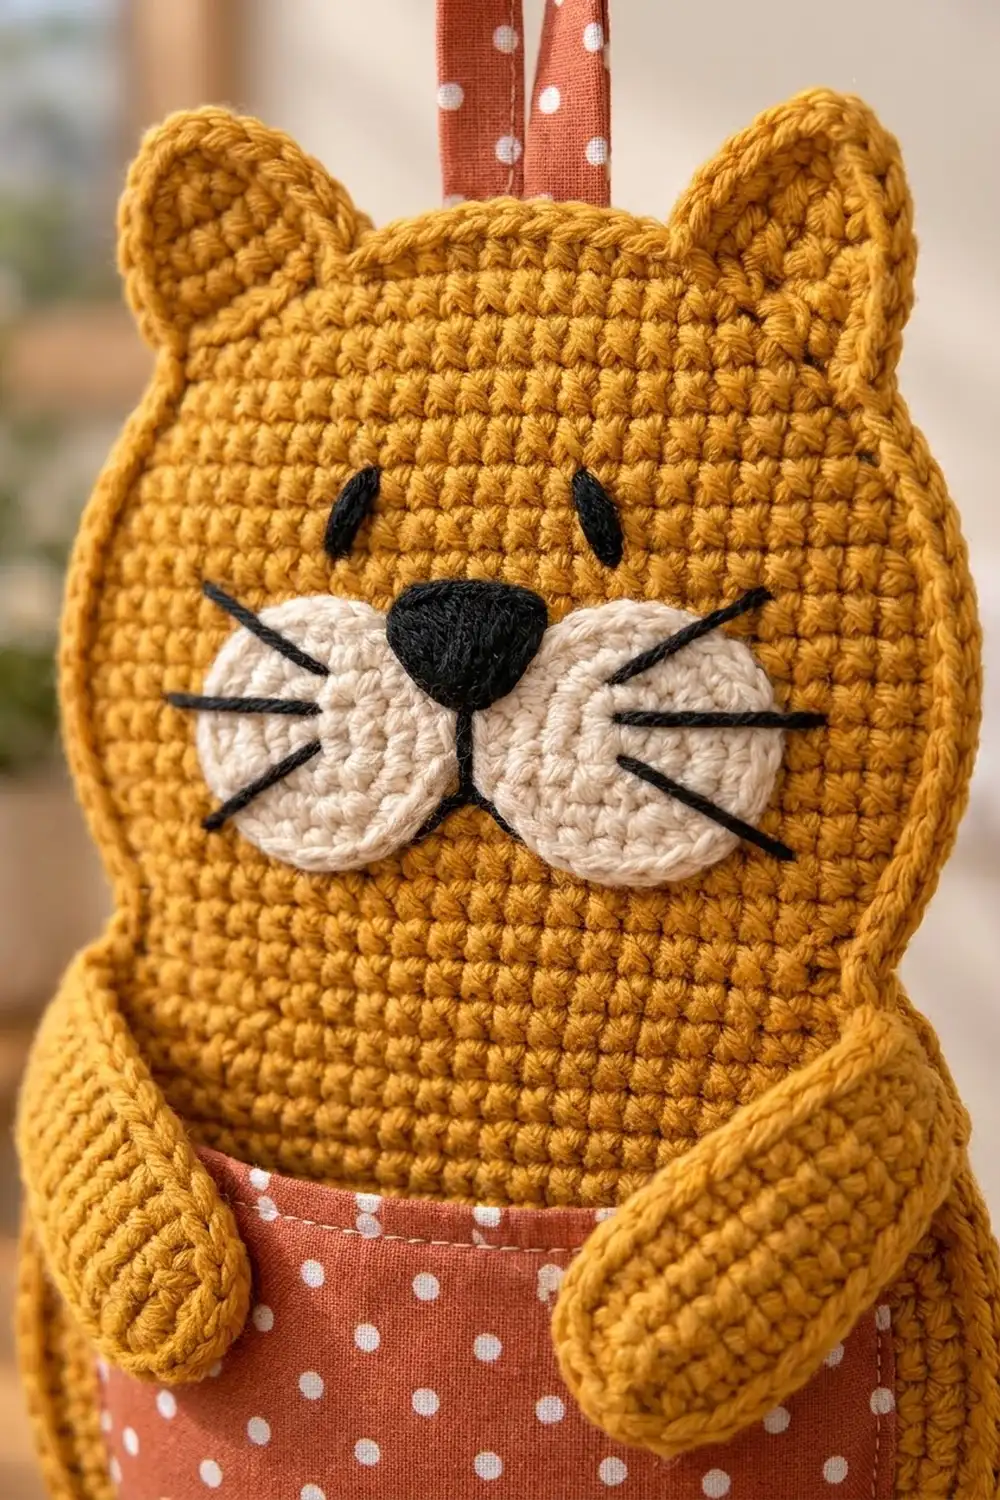
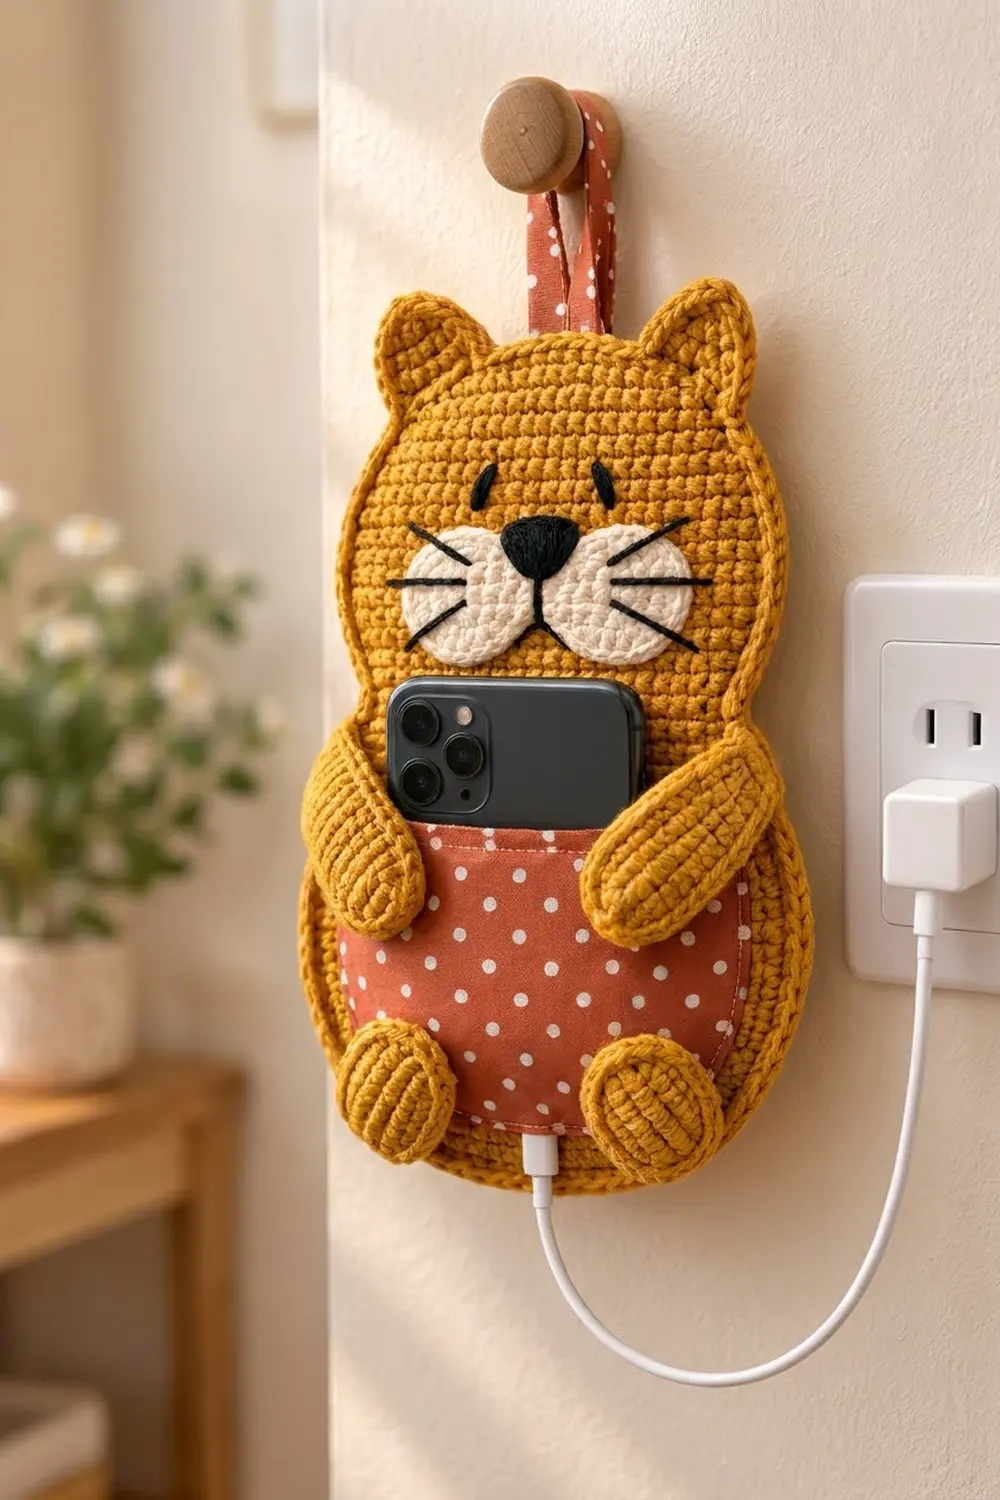
This cat phone holder hangs on the wall beside an outlet and holds your phone upright while it charges. A round mustard head with pointed ears sits on a round mustard belly. A polka-dot fabric pocket on the belly holds the phone. Two padded arms rest over the pocket edges, and two round feet sit at the bottom.
The face is simple and friendly. Two cream whisker pads sit side by side with a black crocheted nose on top. The eyes, mouth and whiskers are embroidered in black yarn. A polka-dot fabric loop at the top hangs the holder on a hook. A small gap at the bottom of the pocket lets the charging cable out.
The pattern uses US crochet terms. The finished holder measures 6.4 in (16.3 cm) wide and 12.0 in (30.5 cm) tall from the ear tips to the bottom edge, not counting the loop.
You make two matching body panels. Each panel is a head circle overlapping a belly circle, with the ears worked straight onto the head. Then you add the face, pocket, arms and feet to the front panel. Last, you join the front and back with a round of single crochet and finish with a round of reverse single crochet.
Finished Size and Construction
- Finished size: 6.4 in (16.3 cm) wide x 12.0 in (30.5 cm) tall
- Skill level: Intermediate
- Terminology: US crochet terms
- Yarn weight: Worsted (#4), cotton or cotton blend
- Hook: 4.5 mm (US 7)
- Number of pieces: 11 crocheted pieces (2 bellies, 2 heads with ears, 2 whisker pads, 1 nose, 2 arms, 2 feet), plus a sewn fabric pocket and a fabric loop
- Layout: front and back panels placed wrong sides together; head above belly with a 0.8 in (2.0 cm) overlap
- Piece sizes: belly circle 5.6 in (14.2 cm); head circle 5.2 in (13.2 cm); ears 1.2 in (3.0 cm) tall
- Size before border: 5.6 in (14.2 cm) wide x 11.2 in (28.4 cm) tall
- Border depth: 0.4 in (1.0 cm) on every side
Materials
Choose a smooth cotton or cotton blend. It holds its shape better than soft acrylic, and the panel has to carry the weight of a phone. Avoid fuzzy or very stretchy yarns.
Yarn:
– Mustard (main color): 50 g, about 95 m
– Cream (whisker pads): 10 g, about 19 m
– Black (nose and embroidery): 5 g, about 10 m
These amounts include a margin for a gauge test and seaming.
Fabric and notions:
– Red-orange polka-dot cotton fabric, 10 x 10 in (25.4 x 25.4 cm)
– Matching sewing thread and a sharp sewing needle
– Optional: stiff craft felt, 6 x 11 in (15.2 x 27.9 cm), to firm up the back
– A small handful of fiberfill
Tools:
– 4.5 mm (US 7) crochet hook
– Tapestry needle
– Stitch markers
– Scissors, pins and a ruler
– Iron and blocking mat
Abbreviations (US Terms)
- ch – chain
- sc – single crochet
- inc – 2 sc in the same stitch
- sc2tog – single crochet 2 together
- sl st – slip stitch
- st(s) – stitch(es)
- BLO – back loop only
- rev sc – reverse single crochet
- RS / WS – right side / wrong side
Special stitch – reverse single crochet (rev sc): Work from left to right (if you crochet right-handed). Insert the hook in the next st to the right, yarn over, pull up a loop, then yarn over and pull through both loops. This makes a twisted, corded edge.
Gauge and Checkpoints
Gauge: 16 sc and 17 rows = 4 in (10.2 cm) with a 4.5 mm hook.
Test one piece first. Make one belly circle before anything else and measure it flat.
- After Rnd 6, the circle measures 2.8 in (7.1 cm) across.
- A finished head circle (Rnd 11) measures 5.2 in (13.2 cm).
- A finished belly circle (Rnd 12) measures 5.6 in (14.2 cm).
If your circle is too big, go down a hook size. If it is too small, go up a hook size. A ruffled circle means your stitches are too loose, and a cupped circle means they are too tight. Fix this before you make any other pieces, because every later count depends on these sizes.
Body Circles (make 2 bellies and 2 heads)
Work in joined rounds. Sl st to the first sc at the end of each round. The ch 1 at the start of a round does not count as a stitch. Stagger the increases exactly as written so the circle stays round and doesn’t turn into a hexagon.
With mustard, make a magic ring.
- Rnd 1: Ch 1, 6 sc in ring. (6 sts)
- Rnd 2: Inc in each st around. (12 sts)
- Rnd 3: [Sc 1, inc] 6 times. (18 sts)
- Rnd 4: Sc 1, inc, [sc 2, inc] 5 times, sc 1. (24 sts)
- Rnd 5: [Sc 3, inc] 6 times. (30 sts)
- Rnd 6: Sc 2, inc, [sc 4, inc] 5 times, sc 2. (36 sts)
- Rnd 7: [Sc 5, inc] 6 times. (42 sts)
- Rnd 8: Sc 3, inc, [sc 6, inc] 5 times, sc 3. (48 sts)
- Rnd 9: [Sc 7, inc] 6 times. (54 sts)
- Rnd 10: Sc 4, inc, [sc 8, inc] 5 times, sc 4. (60 sts)
- Rnd 11: [Sc 9, inc] 6 times. (66 sts)
For a head, fasten off here. It measures 5.2 in (13.2 cm).
For a belly, continue:
- Rnd 12: Sc 5, inc, [sc 10, inc] 5 times, sc 5. (72 sts)
Fasten off. It measures 5.6 in (14.2 cm).
Ears (work 2 on each head)
On each head, the joining sl st of Rnd 11 marks the bottom center. Count counterclockwise from the join. The 66 sts of Rnd 11 divide like this:
- Sts 1-6 and 61-66: bottom overlap, hidden behind the belly (12 sts)
- Sts 7-20: right side (14 sts)
- Sts 21-28: first ear (8 sts)
- Sts 29-38: top center (10 sts)
- Sts 39-46: second ear (8 sts)
- Sts 47-60: left side (14 sts)
First ear: With RS facing, join mustard in st 21.
- Row 1: Ch 1, sc in sts 21-28. (8 sts)
- Row 2: Ch 1, turn, sc2tog, sc 4, sc2tog. (6 sts)
- Row 3: Ch 1, turn, sc2tog, sc 2, sc2tog. (4 sts)
- Row 4: Ch 1, turn, [sc2tog] twice. (2 sts)
- Row 5: Ch 1, turn, sc2tog. (1 st)
Fasten off. The ear is 1.2 in (3.0 cm) tall.
Second ear: Join in st 39 and repeat Rows 1-5 over sts 39-46. Then work both ears on the second head so the two heads match.
Face Pieces
Whisker pads (make 2, cream): Work Rnds 1-3 of the body circle. (18 sts) Fasten off and leave a 10 in (25.4 cm) tail. Each pad measures 1.4 in (3.6 cm) across.
Nose (make 1, black):
- Row 1: Ch 5, sc in 2nd ch from hook and in each ch across. (4 sts)
- Row 2: Ch 1, turn, [sc2tog] twice. (2 sts)
- Row 3: Ch 1, turn, sc2tog. (1 st)
Fasten off and leave a tail. The nose is a triangle 1.0 in (2.5 cm) wide and 0.7 in (1.8 cm) tall.
Arms and Feet
Arms (make 2, mustard):
- Rnd 1: 6 sc in magic ring. (6 sts)
- Rnd 2: Inc in each st around. (12 sts)
- Rnds 3-12: Sc in each st around. (12 sts)
Stuff lightly. Flatten the opening and sc through both layers. (6 sts) Fasten off and leave a long tail. Each arm measures 3.0 in (7.6 cm) long and 1.5 in (3.8 cm) wide.
Feet (make 2, mustard):
- Rnd 1: 6 sc in magic ring. (6 sts)
- Rnd 2: Inc in each st around. (12 sts)
- Rnd 3: [Sc 1, inc] 6 times. (18 sts)
- Rnd 4: In BLO, sc in each st around. (18 sts) This makes the ridge around the sole.
- Rnd 5: Sc in each st around. (18 sts)
- Rnd 6: [Sc 1, sc2tog] 6 times. (12 sts) Stuff lightly.
- Rnd 7: [Sc2tog] 6 times. (6 sts)
Fasten off and close the hole. Press each foot flat. It measures 1.5 in (3.8 cm) across.
Fabric Pocket and Loop
Pocket: Cut two fabric rectangles, each 5.0 x 4.75 in (12.7 x 12.1 cm). Round both bottom corners to a 1.25 in (3.2 cm) radius. Place the pieces RS together and sew around with a 0.25 in (0.6 cm) seam, leaving a 2 in (5.1 cm) gap in the bottom edge. Clip the curves, then turn the pocket right side out, press it and close the gap. Topstitch the top edge. The finished pocket is 4.5 in (11.4 cm) wide and 4.25 in (10.8 cm) tall.
Loop: Cut a strip 2 x 9 in (5.1 x 22.9 cm). Fold both long edges to the center, then fold the strip in half again and press it to 0.5 in (1.3 cm) wide. Edgestitch both long edges.
Make All Pieces
- Mustard: 2 bellies (72 sts each), 2 heads (66 sts each) with 4 ears, 2 arms, 2 feet
- Cream: 2 whisker pads (18 sts each)
- Black: 1 nose, plus embroidery
- Fabric: 1 pocket, 1 loop
Front panel layout:
          [loop]
    [ear]        [ear]
   [ eye       eye ]
   [ pad ][nose][ pad ]    <- head
  [arm][  POCKET  ][arm]   <- belly
    [foot]      [foot]
Joining
Head to belly. Block all four circles flat before you assemble them. Lay a belly RS up with its Rnd 12 join at the top center. Belly sts 1-6 and 67-72 are the overlap zone. Place a head RS up above it, with its join at the bottom center, so the head’s 12 hidden sts lie over the belly’s 12 overlap sts, 0.8 in (2.0 cm) deep. Whipstitch the head edge to the belly with mustard, then tack the belly’s overlap edge to the back of the head. Repeat for the second panel.
Checkpoint: each panel measures 5.6 in (14.2 cm) wide and 11.2 in (28.4 cm) tall including the ears. Use the neater panel as the front.
Face. Center the whisker pads side by side, with their tops 0.2 in (0.5 cm) below the center of the head, and sew them down. Sew the nose point-down where the pads meet. With black yarn, embroider two slanted eyes 0.4 in (1.0 cm) long and 1.2 in (3.0 cm) apart, about 0.6 in (1.5 cm) above the pads. Add a short mouth line below the nose and three whiskers on each side, each 1.4 in (3.6 cm) long, fanning out past the pads.
Pocket. Center the pocket on the belly with its top edge 0.3 in (0.8 cm) below the lower edge of the head. Use sewing thread to stitch the sides and bottom to the front panel only. Leave a 1 in (2.5 cm) opening at the bottom center for the cable.
Arms and feet. Sew each arm along its outer side. The top end goes just below the head, and the arm angles so its lower end rests over the side edge of the pocket. Tack the lower end in one spot only so the phone still slides in easily. Sew on the feet 1.25 in (3.2 cm) from the center, overlapping the bottom corners of the pocket.
Tension advice: keep sewing stitches small and slightly loose. If the panel puckers, take out the last few stitches and sew them again with less pull.
Border
Border gauge: 4 sc = 1 in (2.5 cm) along the edge, the same as the panel gauge.
Place the panels WS together with the edges matching. If you’re using felt, cut it 0.4 in (1.0 cm) smaller than the panel all around and slip it between the panels. Fold the loop in half and insert both ends 0.75 in (1.9 cm) deep at the top center, so 3.5 in (8.9 cm) of loop shows above the head.
Rnd 1 (joining round): Work every st through both panels. With the front RS facing, join mustard at the right waist, where the head meets the belly.
- Belly: Over the 60 visible sts, [sc 11, inc] 5 times. (65 sts)
- Head side: Over 14 sts, sc 7, inc, sc 6. (15 sts)
- Ear: Work 5 sc evenly up the row ends, 3 sc in the tip st, then 5 sc evenly down the other side. (13 sts)
- Top center: Over 10 sts, sc 5, inc, sc 4, catching both loop ends in the middle stitches. (11 sts)
- Ear: Same as the first ear. (13 sts)
- Head side: Same as the first head side. (15 sts)
Sl st to the first sc. (132 sts: 65 + 15 + 13 + 11 + 13 + 15)
Rnd 2: Ch 1, rev sc in each st around. (132 sts) Sl st to join and fasten off.
Why the math works: The border starts from the 114 visible edge sts of one panel: 60 on the belly, 38 plain head sts and 16 ear-base sts. The 12 overlap sts on each circle are inside the outline, so they are never counted. Each ear replaces its 8 base sts with 13 edge sts, which adds 10 sts across both ears. The 8 increases (5 on the belly, 3 on the head) match how much the next circle round would grow, so the edge lies flat instead of cupping. That gives 114 + 10 + 8 = 132. The two rounds add 0.4 in (1.0 cm) on each side, so the holder grows to 6.4 x 12.0 in (16.3 x 30.5 cm).
Final Blocking
- Lay the holder face up on a blocking mat.
- Pin the border to 6.4 x 12.0 in (16.3 x 30.5 cm). Put pins in the border only.
- Hold a steam iron 1 in (2.5 cm) above the crochet. Don’t steam the arms, feet or nose.
- Press the fabric pocket and loop lightly on a cotton setting.
- Let everything dry completely before you unpin it.
Final Quality-Control Checklist
- The circles match the checkpoint sizes.
- The ears are the same height and evenly spaced.
- The face is centered and the whiskers match on both sides.
- The pocket is level and open at the bottom center.
- The arms don’t block the pocket opening.
- Border Rnd 1 has 132 sts and lies flat.
- The loop is caught securely and the holder hangs straight.
- The finished size is 6.4 x 12.0 in (16.3 x 30.5 cm).
Troubleshooting
- Circle cups: Your stitches are too tight; go up a hook size.
- Circle looks like a hexagon: Check that you staggered the increases on the even rounds.
- Border ripples: Leave out the head-side increases.
- Border pulls in: Add one more increase on the belly.
- Holder tilts: Center the loop between the ears.
- Panel sags under the phone: Add the felt insert.
Care
Spot clean with a damp cloth and mild soap. If it needs washing, hand wash in cold water, then reshape it and dry it flat.
Final Notes
Here is the measurement chain. A 5.2 in (13.2 cm) head overlaps a 5.6 in (14.2 cm) belly by 0.8 in (2.0 cm), which makes a 10.0 in (25.4 cm) body. The ears add 1.2 in (3.0 cm), bringing the height to 11.2 in (28.4 cm). The 0.4 in (1.0 cm) border finishes the holder at 6.4 x 12.0 in (16.3 x 30.5 cm). Check each stage as you go, and the cat will hang neat and straight beside your charger.
Happy crocheting!