

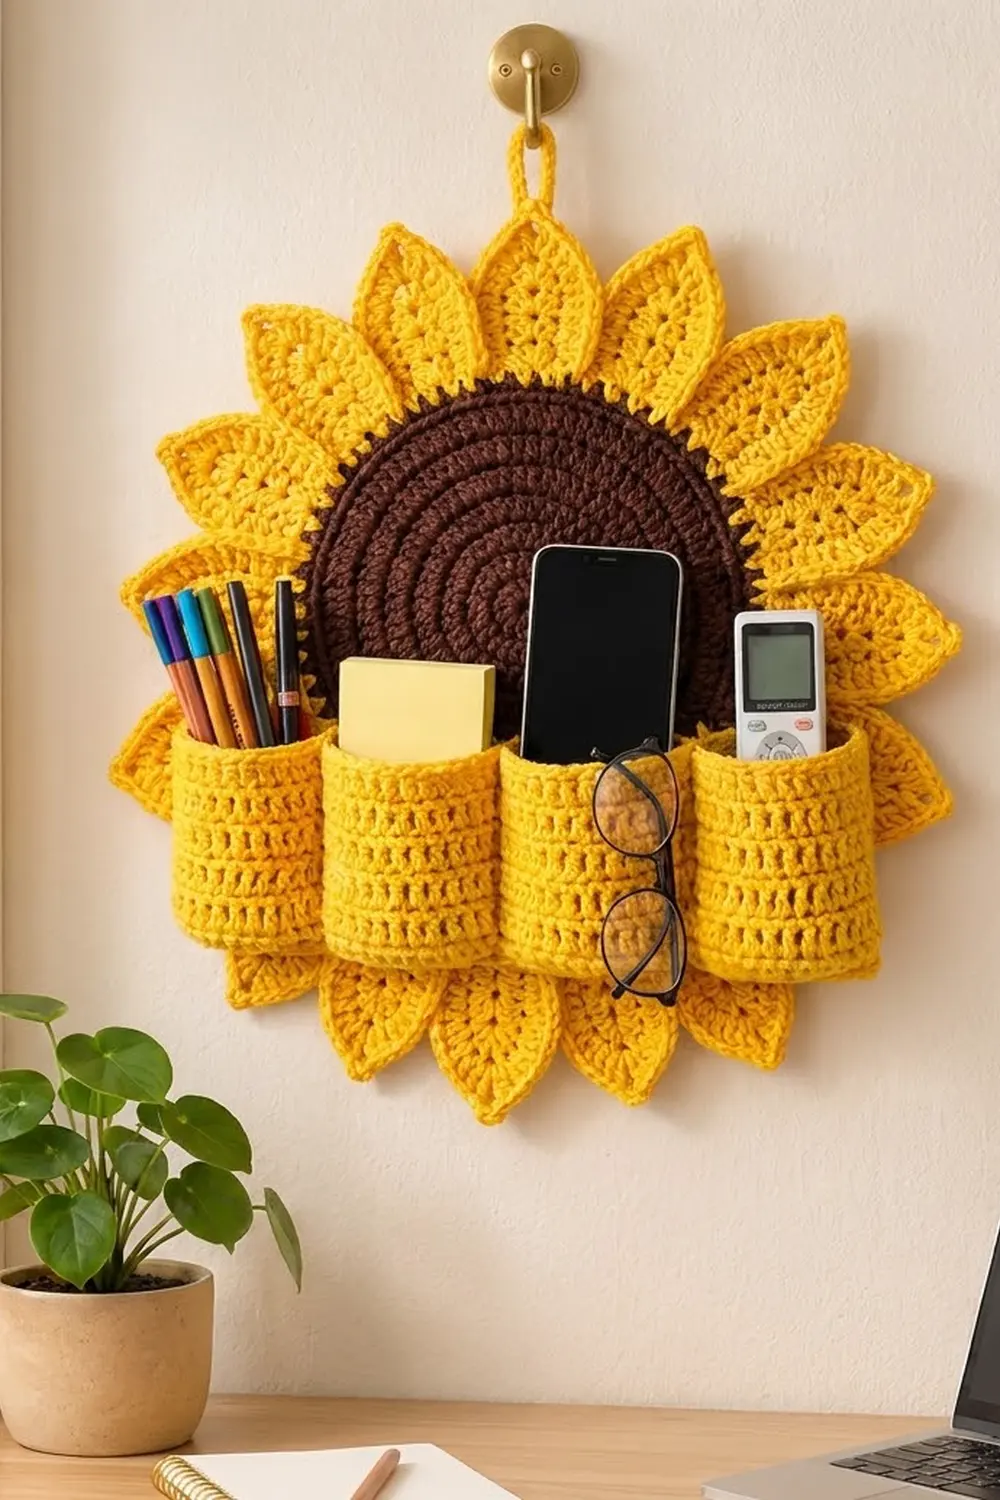
This sunflower keeps your desk clear by hanging all the small things on the wall. A chocolate-brown spiral center is ringed by 18 pointed golden petals. Across the lower half sits a row of four plump pockets, sized for pens, sticky notes, a phone, glasses or a remote.
The pattern uses only two colors, brown and bright yellow, in worsted-weight cotton. Cotton keeps the petals crisp and the pockets firm. All instructions use US crochet terms.
The finished flower measures about 11.7 in (29.7 cm) across. With the hanging loop it is about 13.5 in (34.3 cm) tall. The pocket unit, including its band, is about 10.9 in (27.7 cm) wide and 3.7 in (9.4 cm) tall.
Here is how it comes together. You crochet a brown disc in a continuous spiral and finish it with one yellow round. Next you make 18 petals and sew them behind the disc. You then crochet four tubes, flatten them, and join them with a band worked straight across their bottom edges. Last, you sew the pocket unit and hanging loop to the flower.
Finished Size and Construction
- Finished size: 11.7 in (29.7 cm) across the petals; 13.5 in (34.3 cm) tall including the loop
- Skill level: Intermediate
- Terminology: US
- Yarn weight: Worsted (#4) cotton
- Hook: 4.0 mm (G-6)
- Number of pieces: 24 (1 disc, 18 petals, 4 pocket tubes, 1 hanging loop)
- Layout: Petals evenly spaced around the disc; 4 pockets in one horizontal row
- Piece sizes: disc 7.2 in (18.3 cm); petal 2.75 × 1.25 in (7.0 × 3.2 cm); tube 2.7 in (6.9 cm) wide when flattened × 2.5 in (6.4 cm) tall
- Pocket row before border: 10.7 in (27.2 cm) wide
- Border (pocket band) depth: 1.2 in (3.0 cm)
Materials
Use a smooth, mercerized or combed worsted-weight cotton, about 95 m per 50 g. Acrylic is softer and droops more, so the pockets may sag when you fill them.
- Brown: 40 g (about 76 m)
- Golden yellow: 110 g (about 209 m)
These amounts include a margin of roughly 15% for gauge swatches and sewing tails.
Tools:
– 4.0 mm (G-6) crochet hook
– Tapestry needle
– 6 or more locking stitch markers
– Rustproof pins
– Measuring tape
– Blocking mat and spray bottle
– A wall hook for hanging
Abbreviations (US Terms)
- ch – chain
- sl st – slip stitch
- sc – single crochet
- hdc – half double crochet
- dc – double crochet
- st(s) – stitch(es)
- sp – space
- RS / WS – right side / wrong side
- Rnd – round
Special technique – sc through both layers: put the hook through a stitch on the front layer and then through the matching stitch on the back layer. Yarn over, pull through both layers, and complete the sc as usual. This joins the two layers with one stitch.
Gauge and Checkpoints
Gauge: 18 sc and 20 sc rounds = 4 in (10.2 cm). Each hdc round is about 0.3 in (0.8 cm) tall.
Use the disc as your gauge test. All the other measurements depend on it.
- After Rnd 6: 36 sts, 2.4 in (6.1 cm) across
- After Rnd 12: 72 sts, 4.8 in (12.2 cm) across
- After Rnd 17: 102 sts, 6.8 in (17.3 cm) across
- After Rnd 18: 108 sts, 7.2 in (18.3 cm) across
If your disc is larger by 0.25 in (0.6 cm) or more at Rnd 12, change to a 3.75 mm hook. If it is smaller by that much, change to a 4.5 mm hook. Do not change the stitch counts. The petal spacing and pocket width depend on them.
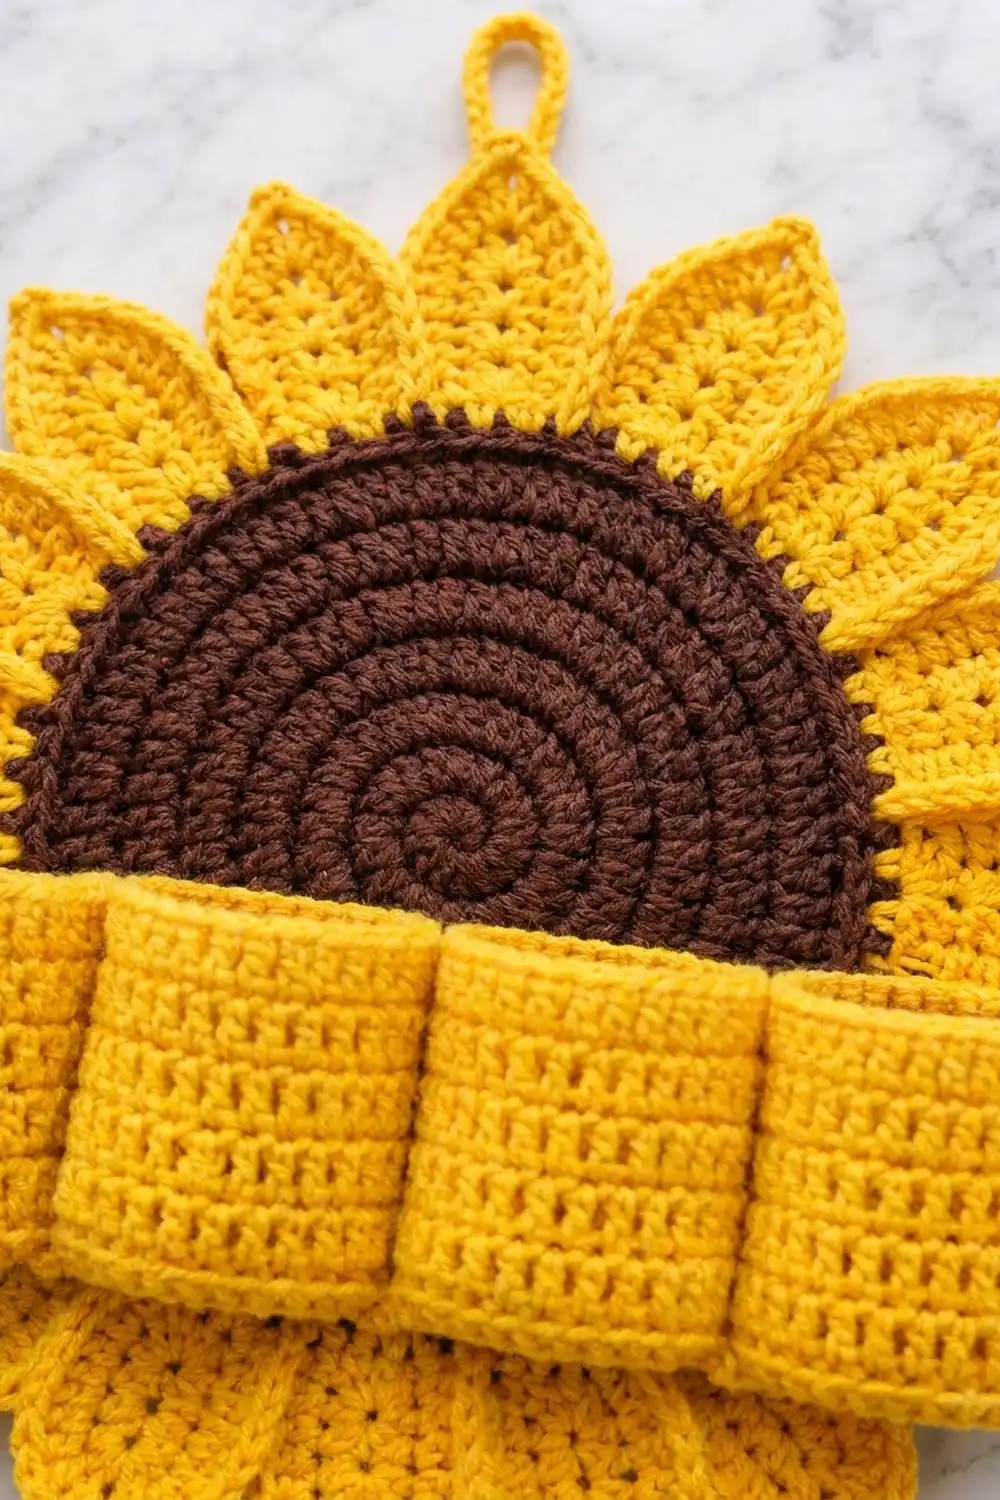
Center Disc
With brown, work in continuous rounds without joining. Put a marker in the first stitch of each round and move it up as you go. To keep the disc round instead of hexagonal, shift where the increases fall from round to round, as shown below.
Rnd 1: Make a magic ring, then work 6 sc into the ring. (6 sts)
Rnd 2: 2 sc in each st around. (12 sts)
Rnd 3: Sc in next st, 2 sc in next st; repeat 6 times. (18 sts)
Rnd 4: Sc in next st, 2 sc in next st, sc in next 2 sts, 2 sc in next st; repeat 5 times, sc in next st. (24 sts)
Rnd 5: Sc in next 3 sts, 2 sc in next st; repeat 6 times. (30 sts)
Rnd 6: Sc in next 2 sts, 2 sc in next st, sc in next 4 sts, 2 sc in next st; repeat 5 times, sc in next 2 sts. (36 sts)
Rnds 7–17: Keep increasing by 6 sts in every round. In Rnd n, work sc in next (n − 2) sts, 2 sc in next st 6 times. On even rounds, start with half the plain stitches and work the other half at the end of the round, as in Rnds 4 and 6.
Totals: Rnd 7 is 42, Rnd 8 is 48, Rnd 9 is 54, Rnd 10 is 60, Rnd 11 is 66, Rnd 12 is 72, Rnd 13 is 78, Rnd 14 is 84, Rnd 15 is 90, Rnd 16 is 96 and Rnd 17 is 102 sts.
Change to yellow on the last yarn-over of Rnd 17. Cut the brown and leave a 6 in (15.2 cm) tail.
Rnd 18 (yellow increase round): Sc in next 16 sts, 2 sc in next st; repeat 6 times. That is 102 sts worked one per existing stitch, plus 6 added, for 108 sts in total. Sl st into the next st to smooth the color jog, then fasten off.
108 ÷ 18 petals = 6 sts for each petal. Place a marker every 6 sts, for 18 sections in total.
Petals (make 18)
With yellow, ch 12.
Rnd 1: Sc in the 2nd ch from the hook. Then hdc in the next ch, dc in each of the next 7 ch, hdc in the next ch, and (sc, ch 2, sc) in the last ch for the tip.
Turn the work so you can crochet along the free loops on the other side of the chain. Work hdc in the next ch, dc in each of the next 7 ch, hdc in the next ch, and sc in the last ch. Sl st to the first sc. (22 sts and 1 ch-2 sp)
Rnd 2: Ch 1. Sc in each of the next 11 sts, (sc, ch 2, sc) in the ch-2 sp, and sc in each of the next 11 sts. Ch 2 to make the base point, then sl st to the first sc. (24 sc and 2 ch-2 sps)
The petal now has 12 sc along each side, a point at the tip and a point at the base. Fasten off and leave a 12 in (30.5 cm) tail for sewing. The petal should measure 2.75 in (7.0 cm) long and 1.25 in (3.2 cm) wide.
Pocket Tubes (make 4)
With yellow, ch 24. Join with a sl st to the first ch, making sure the chain is not twisted.
Rnd 1 (top rim): Ch 1, sc in each ch around, sl st to the first sc. (24 sts)
Rnds 2–8: Ch 2 (this does not count as a stitch), hdc in each st around, sl st to the first hdc. (24 sts in each round)
Rnd 9 (lower edge): Ch 1, sc in each st around, sl st to the first sc. (24 sts)
Fasten off and weave in the ends. Each tube is 5.3 in (13.5 cm) around and 2.5 in (6.4 cm) tall.
Flatten each tube so that the joining seam sits on the left fold. Sts 1–12 of Rnd 9 now lie on the front layer and sts 13–24 lie on the back layer. Each flattened tube is 2.7 in (6.9 cm) wide.
Hanging Loop
With yellow, ch 21.
Row 1: Sc in the 2nd ch from the hook and in each ch across. (20 sts)
Fasten off and leave a 10 in (25.4 cm) tail. The strip measures 4.4 in (11.2 cm) long.
Make All Pieces
- Brown with a yellow final round: 1 center disc
- Yellow: 18 petals, 4 pocket tubes, 1 hanging loop
Layout (front view):
              [loop]
        petals around full ring
     (   brown disc, 18 sections   )
     [T1]  [T2]  [T3]  [T4]   <- pockets, open at top
     [========= band ========]
Joining
Petals to disc. Lay the disc RS down. Slide each petal’s base point 0.5 in (1.3 cm) under the yellow Rnd 18 so that it is centered on one 6-stitch section.
Whipstitch the petal to the back loops of those 6 sts, then make a second line of stitches about 0.5 in (1.3 cm) further in. Each petal sticks out 2.25 in (5.7 cm) past the disc: 7.2 + 2.25 + 2.25 = 11.7 in (29.7 cm).
Keep your stitches snug but not tight. If you pull too hard, the disc edge will ripple.
Tubes to each other (band Row 1). Line up T1 to T4 RS up, with their Rnd 9 edges touching side by side. Join yellow at the right fold of T1.
Row 1: Ch 1. Work sc through both layers 12 times across T1, pairing st 1 with st 24, st 2 with st 23, and so on, ending with st 12 and st 13. Go straight on to T2 without making a chain or skipping a stitch, and work the same way across T2, T3 and T4. Turn. (48 sts)
This row closes the bottom of each pocket and joins all four tubes. It works out because 4 tubes × 12 sts = 48 sts, and nothing extra is added at the seams.
Checkpoint: the pocket row should measure 10.7 in (27.2 cm) wide. That matches 48 sts ÷ 4.5 sts per inch.
Border (Pocket Band)
Border gauge: the same as the main sc gauge, 4.5 sts and 5 rows per inch.
Rows 2–5: Ch 1, sc in each st across, turn. (48 sts in each row)
Fasten off after Row 5. The band now measures 1.0 in (2.5 cm) deep.
Edging: With RS facing, join yellow at the top of the left short edge, just below T1.
- Left side: 5 sc, one in each row end.
- Bottom: 3 sc in the first st of Row 5, sc in each of the next 46 sts, 3 sc in the last st. That is 48 sts worked one per existing stitch plus 4 extra at the corners, for 52 sts.
- Right side: 5 sc up the row ends.
Fasten off. (62 sts in total: 5 + 52 + 5)
Why the math works:
– The top edge of the band is exactly 4 × 12 sts, so the band is the same width as the pockets.
– One sc per row end suits sc rows, which are about as tall as they are wide.
– The 3-sc corners turn the corner without making it cup.
The finished band is 1.2 in (3.0 cm) deep and 10.9 in (27.7 cm) wide.
Attaching the pocket unit. Center it across the disc, with the top edge of the band 0.75 in (1.9 cm) above the lowest point of the brown disc. Pin it in place.
Whipstitch the band’s edging to the flower along the sides and bottom. Then tack the back layer of each tube to the disc at 2 points just under the rim, keeping the front layers free so the pockets open.
Loop: Fold the strip in half. Sew both ends to the WS behind the top petal, overlapping it by 1 in (2.5 cm). About 1.75 in (4.4 cm) of loop should show above the petal tip.
Final Blocking
- Spray the whole piece lightly until it is damp but not soaked.
- Lay it RS up on the mat.
- Pin the disc into a true 7.2 in (18.3 cm) circle.
- Pin each petal tip straight out from the center, so the flower measures 11.7 in (29.7 cm) across in every direction.
- Stuff each pocket with rolled paper so it dries rounded.
- Leave it until completely dry, at least 12 hours.
- Remove the pins and check the measurements again.
Final Quality-Control Checklist
- The disc measures 7.2 in (18.3 cm) and has 108 sts in Rnd 18.
- There are 18 petals, each with 24 sc and 2 points.
- The petals are evenly spaced, one per 6-stitch section.
- Each tube has 24 sts in every round.
- The band has 48 sts in each row, and the edging has 62 sts.
- The pocket unit is centered and level.
- The loop is secure and centered above the top petal.
- All ends are woven in on the WS.
Troubleshooting
- Disc ruffles: You have too many stitches or your hook is too big. Count each round and go down a hook size.
- Disc cups: Your increases are missing or your tension is too tight. Recount the rounds and loosen up.
- Disc looks hexagonal: Your increases are stacked. Stagger them as shown in Rnds 4 and 6.
- Petals curl: Block them flat, and check that the dc section is 7 sts on each side.
- Gaps between pockets: You skipped a stitch at a tube changeover in Row 1. Undo that row and redo it.
- Pockets sag forward: Add another tack point to the back of each tube.
- Band is wider than the pockets: Check that Row 1 has exactly 48 sts.
Care
Spot clean with mild soap and cool water. If it needs a full wash, hand wash it, press out the water in a towel, and dry it flat with the pockets stuffed so they keep their shape.
Final Notes
Every measurement in this pattern builds on the one before it:
– Your gauge of 18 sc per 4 in (10.2 cm) produces a 7.2 in (18.3 cm) disc with 108 sts in Rnd 18.
– 108 sts divide evenly into 18 petals of 6 sts each.
– Each petal extends 2.25 in (5.7 cm) past the disc, so the flower is 11.7 in (29.7 cm) across.
– 4 tubes × 12 flattened sts give 48 band sts, for a pocket row 10.7 in (27.2 cm) wide.
– The edging finishes the band at 10.9 in (27.7 cm) wide and 1.2 in (3.0 cm) deep.
If you check each of these numbers as you go, your sunflower will hang flat, sit level and hold a desk’s worth of small things.
Happy crocheting!