

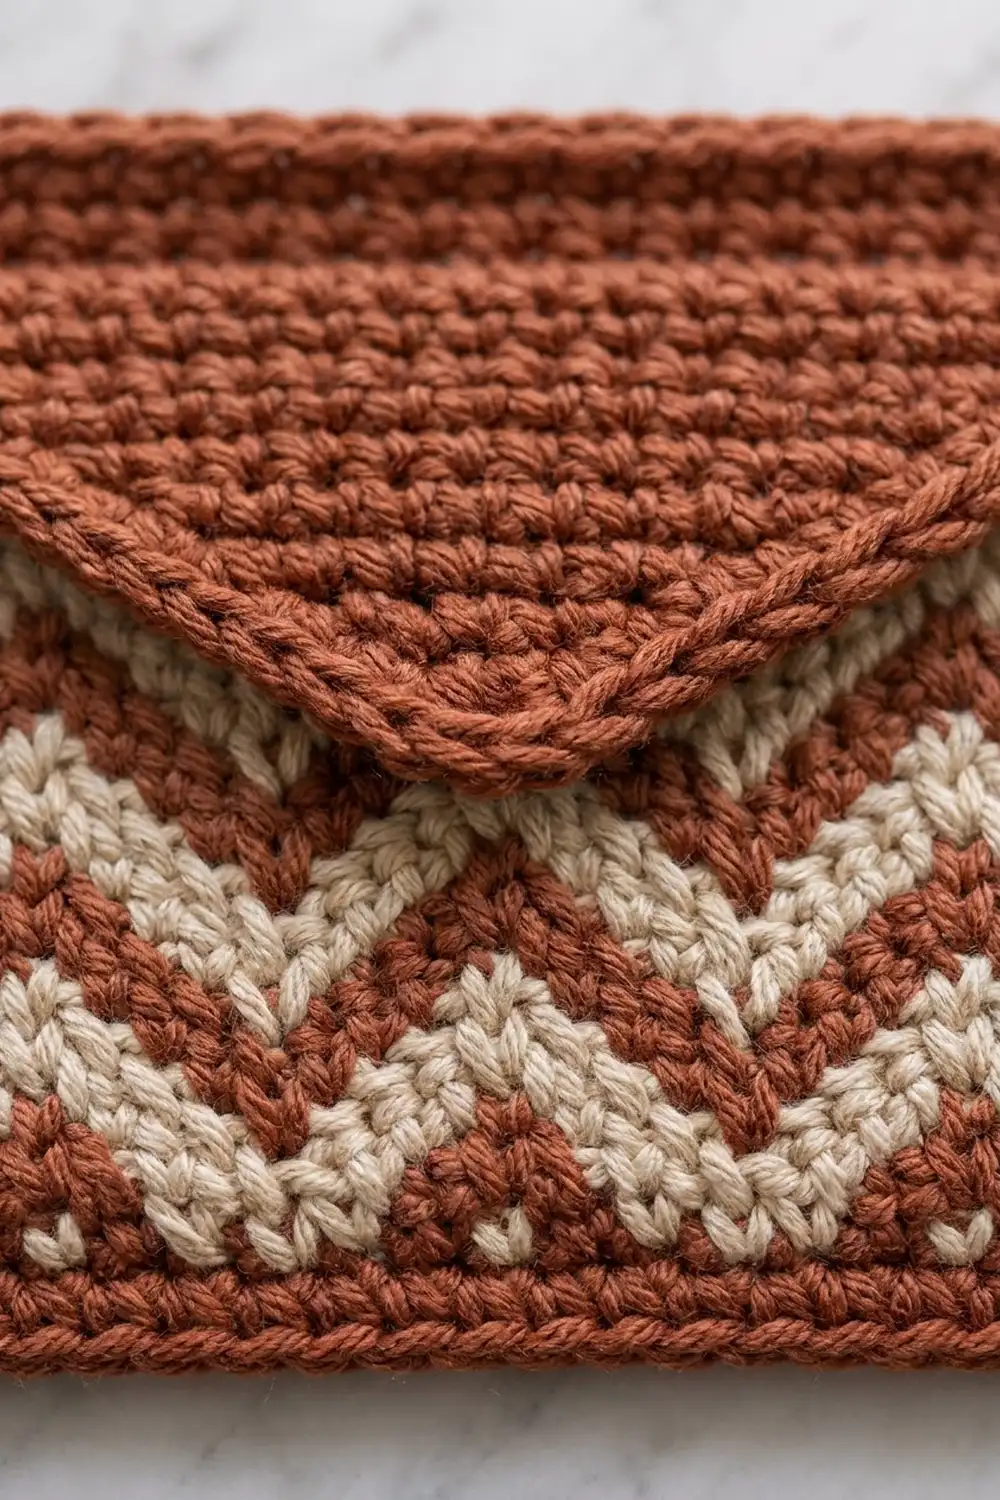
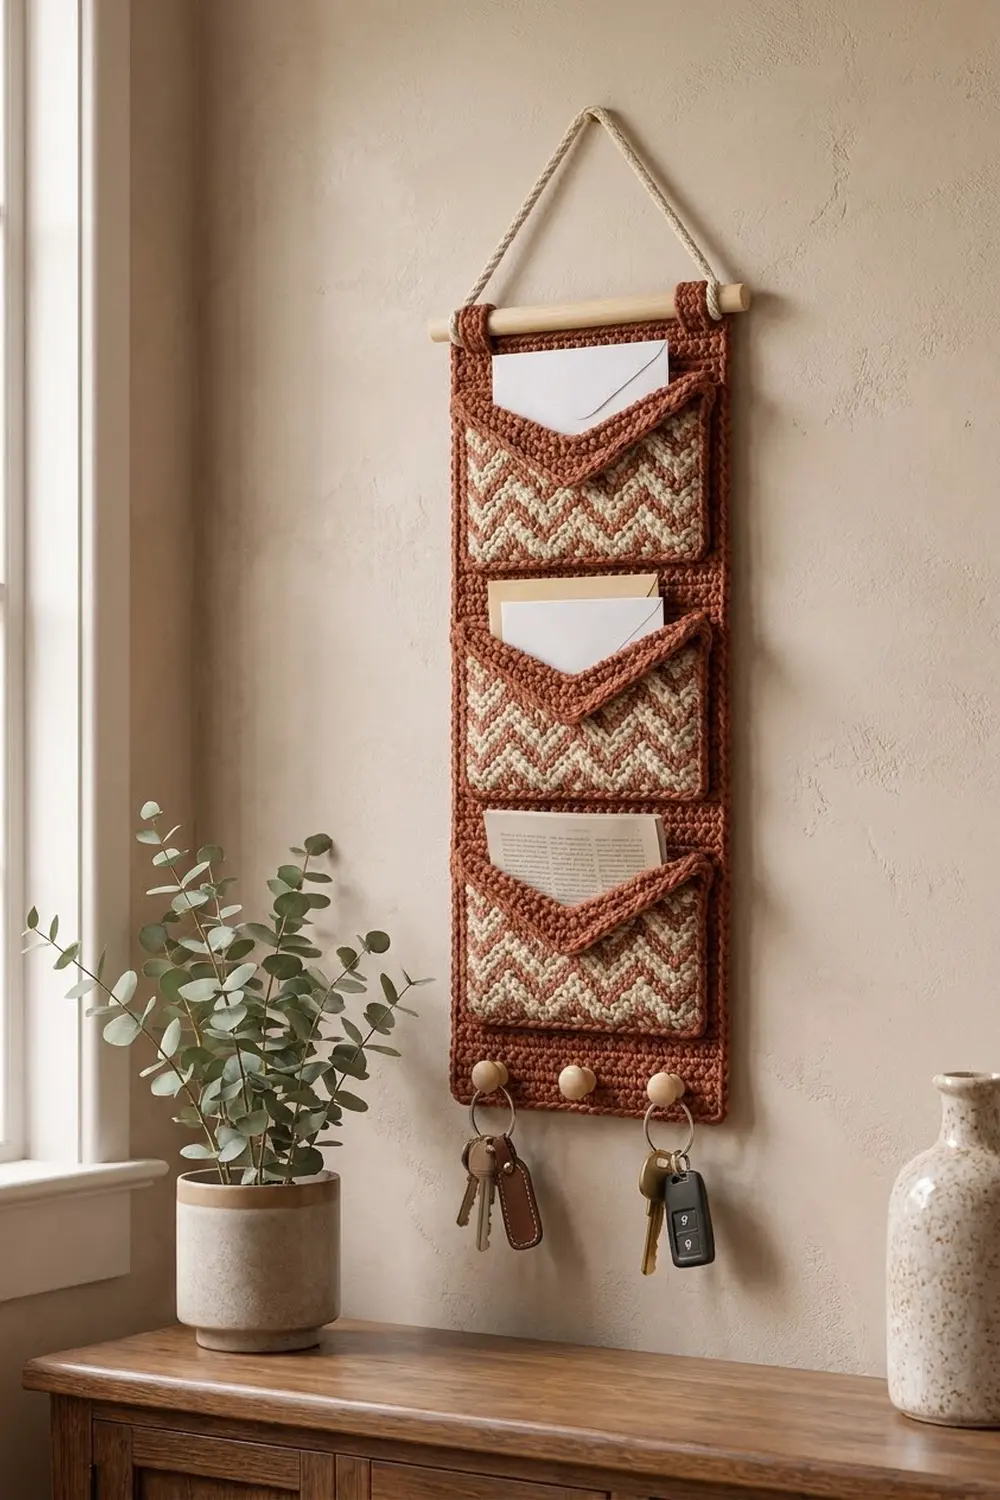
This wall organizer has three envelope-style pockets on a sturdy rust back panel. Each pocket front has a crisp rust-and-cream chevron in tapestry crochet, and a solid rust triangular flap folds down over it like a sealed letter. A strip with three wooden pegs at the bottom holds your keys.
The palette is warm terracotta and soft oatmeal, finished with natural wood. The style is modern boho and works well in an entryway, a home office, or beside a desk.
The pattern uses US crochet terms. The finished panel measures 11 x 23 in (27.9 x 58.4 cm), not counting the dowel and hanging cord. The dowel is 12 in (30.5 cm) long.
You’ll crochet seven pieces: one back panel, three pockets with the flap worked directly onto each pocket, one peg strip, and two hanging tabs. The pockets and strip are whipstitched to the panel, a two-round border frames the panel, and the tabs fold over the dowel.
Finished Size and Construction
- Finished size: 11 x 23 in (27.9 x 58.4 cm) panel with border
- Skill level: Intermediate (tapestry crochet, seaming)
- Terminology: US
- Yarn weight: Worsted (#4)
- Hook: 5.0 mm (H-8)
- Number of pieces: 7 (1 panel, 3 pockets, 1 peg strip, 2 tabs)
- Layout: 3 pockets stacked vertically, 1 peg strip below them
- Pocket size: 8.5 x 4.9 in (21.6 x 12.4 cm) with edging
- Panel size before border: 10 x 22 in (25.4 x 55.9 cm)
- Border depth: about 0.5 in (1.3 cm) per side
Materials
Pick a smooth worsted yarn in cotton or a cotton blend. It holds shape well and shows the chevron clearly. Acrylic also works, but the panel will be softer.
- Color A, Rust: 220 g / 400 m (437 yd)
- Color B, Cream: 50 g / 90 m (98 yd)
Both quantities include a margin of roughly 20% for gauge swatching, seaming, and tapestry carries.
Tools and notions:
– 5.0 mm (H-8) crochet hook
– Tapestry needle
– Stitch markers
– Wooden dowel, 12 in (30.5 cm) long, 0.5 in (1.3 cm) in diameter
– Cream twisted cotton cord, 3 mm, 24 in (61.0 cm)
– 3 wooden peg knobs with a shank about 3/8 in (1.0 cm) wide
– 3 wooden discs, 0.75 in (1.9 cm), plus wood glue
– Blocking mats and pins
Abbreviations (US Terms)
- ch – chain
- sc – single crochet
- sc2tog – single crochet 2 together
- sc3tog – single crochet 3 together
- BLO – back loop only
- rev sc – reverse single crochet (crab stitch)
- sp – space
- st(s) – stitch(es)
- RS / WS – right side / wrong side
Tapestry sc: Work sc with the active color while laying the inactive color along the tops of the stitches and enclosing it. To change color, complete the last stitch of the old color with the new color at the final yarn-over.
Rev sc: Working left to right, insert the hook into the next stitch to the right, pull up a loop, yarn over, and pull through both loops.
Gauge and Checkpoints
Gauge: 16 sc and 18 rows = 4 in (10.2 cm) in solid sc.
Make one pocket first. Tapestry sc tends to run tight, so it’s the most reliable test.
- Pocket after Row 20: 8 x 4.4 in (20.3 x 11.2 cm)
- Pocket with edging: 8.5 x 4.9 in (21.6 x 12.4 cm)
- Flap height: about 2.9 in (7.4 cm)
- Panel after Row 20: 10 x 4.4 in (25.4 x 11.2 cm)
- Panel after Row 99: 10 x 22 in (25.4 x 55.9 cm)
- Panel after border: 11 x 23 in (27.9 x 58.4 cm)
If the pocket is too small, go up 0.5 mm. If it’s too big, go down 0.5 mm. If only the tapestry pocket runs tight while the solid panel is on gauge, use the larger hook for the pockets only.
Back Panel
Use Color A.
Foundation: Ch 41.
Row 1 (RS): Sc in 2nd ch from hook and in each ch across. (40 sc)
Rows 2–99: Ch 1, turn, sc in each st across. (40 sc)
Checkpoint: 10 x 22 in (25.4 x 55.9 cm). Don’t fasten off. Leave the loop on a stitch marker for the border.
Envelope Pocket (make 3)
Pocket Front
Using Color B, ch 33. Join Color A at the start of Row 2 and carry it throughout.
Row 1 (RS): Sc in 2nd ch from hook and in each ch across. (32 sc)
Rows 2–20: Ch 1, turn, and work tapestry sc following the chevron chart rows below. Each row has 32 sts. Repeat the section between * and * 4 times across.
- Chart Row 1: all B (32 B)
- Chart Row 2: 3 B, 2 A, 3 B
- Chart Row 3: 2 B, 4 A, 2 B
- Chart Row 4: 1 B, 6 A, 1 B
- Chart Row 5: all A (32 A)
- Chart Row 6: 3 A, 2 B, 3 A
- Chart Row 7: 2 A, 4 B, 2 A
- Chart Row 8: 1 A, 6 B, 1 A
Pocket Row 1 is Chart Row 1. Work Chart Rows 1–8 twice (pocket Rows 1–16), then Chart Rows 1–4 once (pocket Rows 17–20).
Each 8-stitch repeat is symmetrical, so you read it the same way on RS and WS rows. The point of each V shifts up one row at a time, which forms the zigzag bands. Fasten off Color B after Row 20 and keep Color A.
Checkpoint: 8 x 4.4 in (20.3 x 11.2 cm).
Pocket Edging
Continue with Color A. Don’t turn.
Rnd 1: Ch 1 for the corner.
– Left side: Work 18 sc evenly down the row ends. That’s 1 sc per row end for 20 rows, skipping the row ends of Rows 7 and 14.
– Bottom corner: Ch 1.
– Bottom edge: 32 sc across the foundation chain.
– Bottom corner: Ch 1.
– Right side: 18 sc up the row ends.
– Top corner: Ch 1.
– Top edge: 32 sc across the top.
– Last corner: Ch 1 and join with a sl st to the first sc.
Count: 100 sc + 4 ch-1 corner sps.
Checkpoint: 8.5 x 4.9 in (21.6 x 12.4 cm). Don’t fasten off.
Triangular Flap
The flap grows upward from the pocket’s top edge and is then folded down over the chevron.
Row 1: Sl st into the top-right corner ch-1 sp. Ch 1, sc in the same sp, sc BLO in each of the 32 top sc, then sc in the top-left corner ch-1 sp. (34 sc)
On every row after that, ch 1 and turn first.
| Row | Instructions | Count |
|---|---|---|
| 2 | sc3tog, sc to last 3, sc3tog | 30 |
| 3 | sc2tog, sc to last 2, sc2tog | 28 |
| 4 | Rep Row 2 | 24 |
| 5 | Rep Row 3 | 22 |
| 6 | Rep Row 2 | 18 |
| 7 | Rep Row 3 | 16 |
| 8 | Rep Row 2 | 12 |
| 9 | Rep Row 3 | 10 |
| 10 | Rep Row 2 | 6 |
| 11 | Rep Row 3 | 4 |
| 12 | sc2tog twice | 2 |
| 13 | sc2tog | 1 |
Each pair of rows takes 3 sts off each side. This gives a wide, shallow V that ends about 2.9 in (7.4 cm) below the pocket top, a little past the middle of the pocket.
Flap edging: Don’t turn. Work rev sc along both slanted edges: 12 rev sc down the first edge, 3 rev sc at the point, and 12 rev sc along the second edge. (27 rev sc) Fasten off.
Fold the flap down onto the RS of the pocket and steam lightly so the fold stays crisp. The unworked front loops of the pocket’s top edge make a neat ridge along the fold.
Peg Strip
Use Color A.
Foundation: Ch 35.
Row 1: Sc in 2nd ch from hook and across. (34 sc)
Rows 2–4: Ch 1, turn, sc across. (34 sc)
Row 5 (holes): Ch 1, turn, then work:
– sc 6, ch 2, skip 2
– sc 8, ch 2, skip 2
– sc 8, ch 2, skip 2
– sc 6
Count: 28 sc + 3 ch-2 sps. Check the row: 6 + 2 + 8 + 2 + 8 + 2 + 6 = 34.
Row 6: Ch 1, turn, sc in each sc and 2 sc in each ch-2 sp. (34 sc)
Rows 7–9: Ch 1, turn, sc across. (34 sc)
Fasten off and leave a long tail for sewing. The strip measures 8.5 x 2 in (21.6 x 5.1 cm).
Hanging Tabs (make 2)
Use Color A. Ch 7.
Row 1: Sc in 2nd ch from hook and across. (6 sc)
Rows 2–14: Ch 1, turn, sc across. (6 sc)
Fasten off and leave a long tail. Each tab measures 1.5 x 3.1 in (3.8 x 7.9 cm).
Make All Pieces
- Color A only: 1 back panel, 1 peg strip, 2 tabs
- Colors A + B: 3 pockets, each with its edging and flap worked in Color A
Layout (panel rows counted from the top, Row 99 down to Row 1):
| Rows 99–91 | clear (tabs + dowel)  |
| Rows 90–69 | POCKET 1              |
| Rows 68–66 | gap                   |
| Rows 65–44 | POCKET 2              |
| Rows 43–41 | gap                   |
| Rows 40–19 | POCKET 3              |
| Rows 18–17 | gap                   |
| Rows 16–8  | PEG STRIP             |
| Rows 7–1   | clear                 |
The rows add up: 9 + 22 + 3 + 22 + 3 + 22 + 2 + 9 + 7 = 99.
Joining
Block all pieces lightly before joining (see Final Blocking). Pin each pocket on the RS of the panel, centered. The pocket spans 34 panel stitches, which leaves 3 sts (0.75 in / 1.9 cm) clear on each side.
Stitch-to-stitch logic:
– Pocket bottom: The 32 sc plus the 2 bottom corner ch-1 sps make 34 edge positions. Whipstitch 1 position to each of the 34 panel stitches in that row.
– Pocket sides: The 18 sc plus 2 corner sps make 20 edge positions, but the pocket covers 22 panel rows. Sew 1 position per row, and catch 2 rows on the 6th and 15th positions.
– Pocket top: Leave open. Letters slide in between the pocket and the panel, behind the flap.
Peg strip: It’s 34 sts by 9 rows and lines up 1:1 with 34 panel stitches across panel Rows 16–8. Whipstitch all four sides.
Tension: Sew with Color A through both loops of the pocket edging and one strand of the panel stitch. Pull each stitch snug but not puckered, and check that the pocket still lies flat after every 5 stitches.
Pegs: Push each peg shank through a strip hole and on through the panel between stitches. On the back, glue a wooden disc onto the shank and let it cure for 24 hours.
Checkpoint: The panel should still measure 10 x 22 in (25.4 x 55.9 cm). Pulling in usually means the seams are too tight.
Border
Border gauge matches the panel: 4 sc per inch.
Rnd 1: Use the live loop at the end of Row 99 and work with the RS facing. Ch 1.
– Top: 40 sc across.
– Corner: Ch 2.
– Side: 88 sc down the row ends, working 8 sc for every 9 rows.
– Corner: Ch 2.
– Bottom: 40 sc across the foundation.
– Corner: Ch 2.
– Side: 88 sc up the second side.
– Last corner: Ch 2 and join.
Count: 256 sc + 4 ch-2 corner sps.
Rnd 2: Ch 1. Work 1 rev sc in each sc and 2 rev sc in each ch-2 corner sp. Join and fasten off.
Count: 40 per short side, 88 per long side, and 2 at each of the 4 corners, for 264 rev sc.
Why the math works: The panel is 99 rows at 4.5 rows per inch, which is 22 in. At 4 sc per inch, 22 in needs 88 sc. Working 8 sc per 9 rows gives 99 ÷ 9 × 8 = 88 exactly. The short sides reuse the 40 panel stitches 1:1. Two rounds add about 0.5 in (1.3 cm) on each side, so 10 x 22 in becomes 11 x 23 in (27.9 x 58.4 cm).
Tabs: Fold each tab in half over the dowel. Sew both tab ends to the WS of the panel’s top border, lined up with the outer edges. Tie the cord to the dowel ends just outside the tabs with an overhand knot on each side.
Final Blocking
- Remove the dowel. Lay the organizer face up on blocking mats.
- Pin the outer border to 11 x 23 in (27.9 x 58.4 cm) and keep the corners square.
- Pin each pocket’s sides straight. Smooth each flap so its point sits centered.
- Hover steam over cotton, or mist and pat for acrylic. Don’t press the pegs.
- Let it dry completely, at least 12 hours.
- Reinsert the dowel and check that it hangs level.
Final Quality-Control Checklist
- Every pocket is 8.5 x 4.9 in (21.6 x 12.4 cm), with 4 full chevron repeats across.
- Every flap has 13 rows and a centered point.
- The pockets are centered with 3 clear panel stitches each side.
- The pocket tops are open, and the sides and bottom are fully sewn.
- The border counts are 40 / 88 / 40 / 88, with corners turned cleanly.
- The pegs are firm and the glue has cured.
- All tails are woven in on the WS.
Troubleshooting
- Cream shows through the rust (or the reverse): Keep the carried strand tight against the stitch tops, and tug the carry gently every few stitches.
- Pocket narrower than 8 in (20.3 cm): The tapestry tension is too tight. Go up 0.5 mm for the pockets.
- Chevrons are slanted, not V-shaped: Check that each row starts at the chart’s first stitch and repeats exactly 4 times.
- Flap is crooked: You probably decreased unevenly. Count to make sure both sides lose the same number of stitches.
- Border ruffles: You have too many side stitches. Recount to 88.
- Border cups: You have too few. Make sure you didn’t skip extra row ends.
- Panel sags under keys: Reinforce behind the peg strip with an extra row of whipstitch.
Care
Spot clean with mild soap and cool water, then lay flat to dry. Remove the dowel and pegs before any deeper wash.
Final Notes
The measurement chain runs like this:
– Gauge: 16 sc x 18 rows = 4 in (10.2 cm)
– Pocket: 32 sts x 20 rows = 8 x 4.4 in (20.3 x 11.2 cm), or 8.5 x 4.9 in (21.6 x 12.4 cm) after edging
– Panel: 40 sts x 99 rows = 10 x 22 in (25.4 x 55.9 cm)
– Border: 2 rounds add 0.5 in (1.3 cm) per side, for 11 x 23 in (27.9 x 58.4 cm)
Check gauge on the first pocket, count every border side, and the organizer will hang straight and square.
Happy crocheting!