

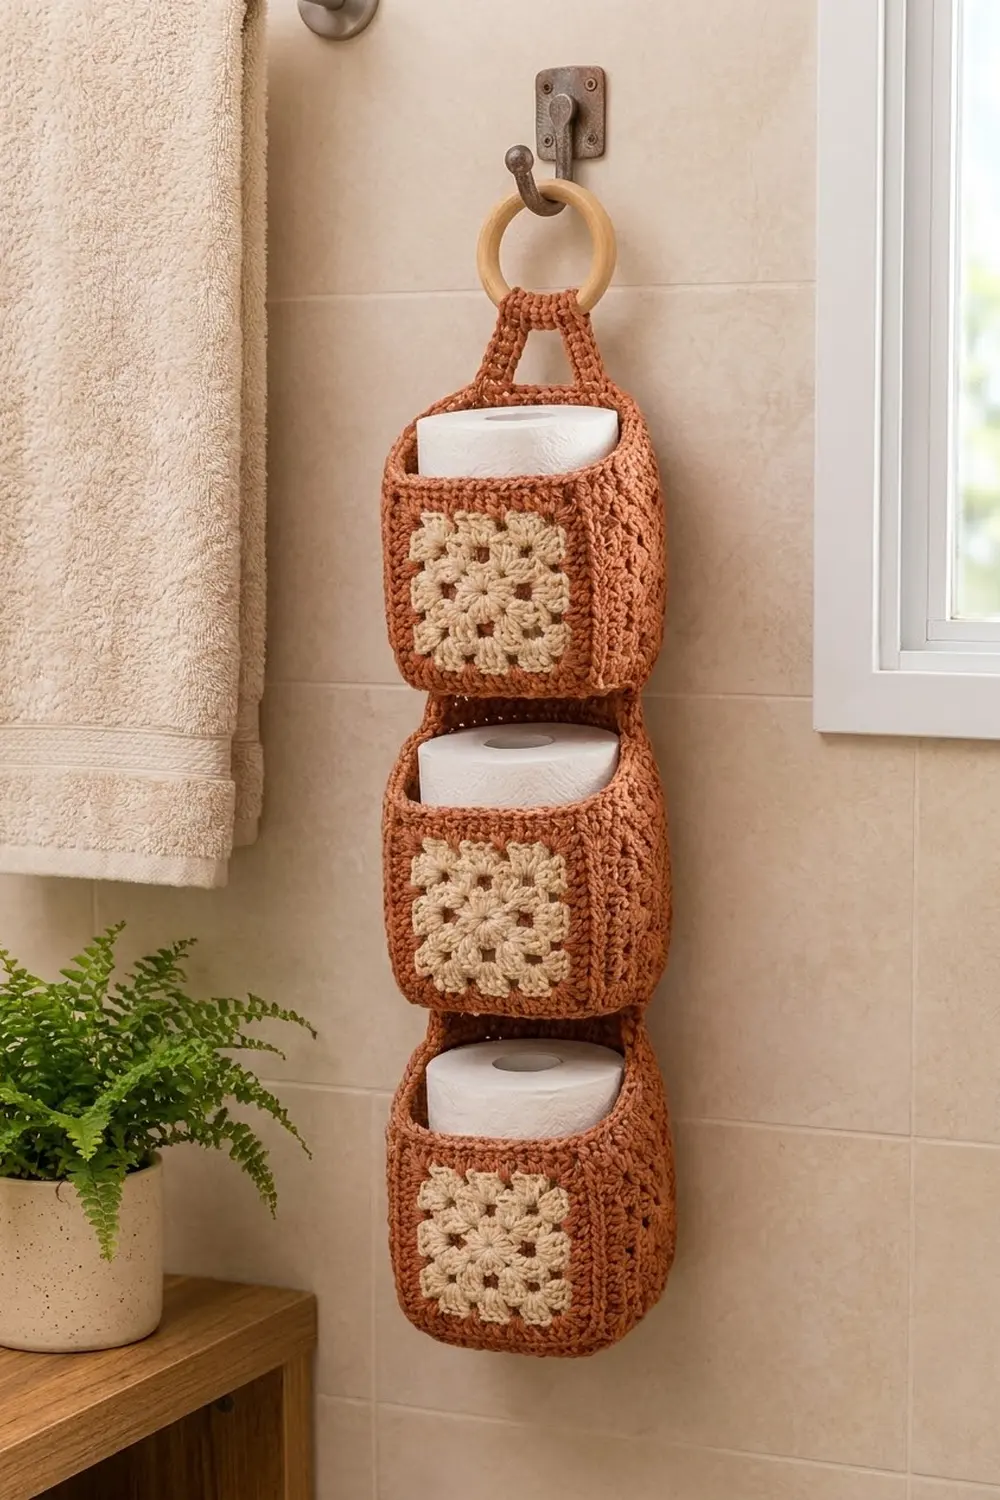
The Terracotta Trio is a hanging bathroom organizer made of three square crochet pockets, stacked in a column and hung from a natural wooden ring. Each pocket has a cream granny square on the front, framed by a deep rust wall. Each pocket holds one standard toilet paper roll.
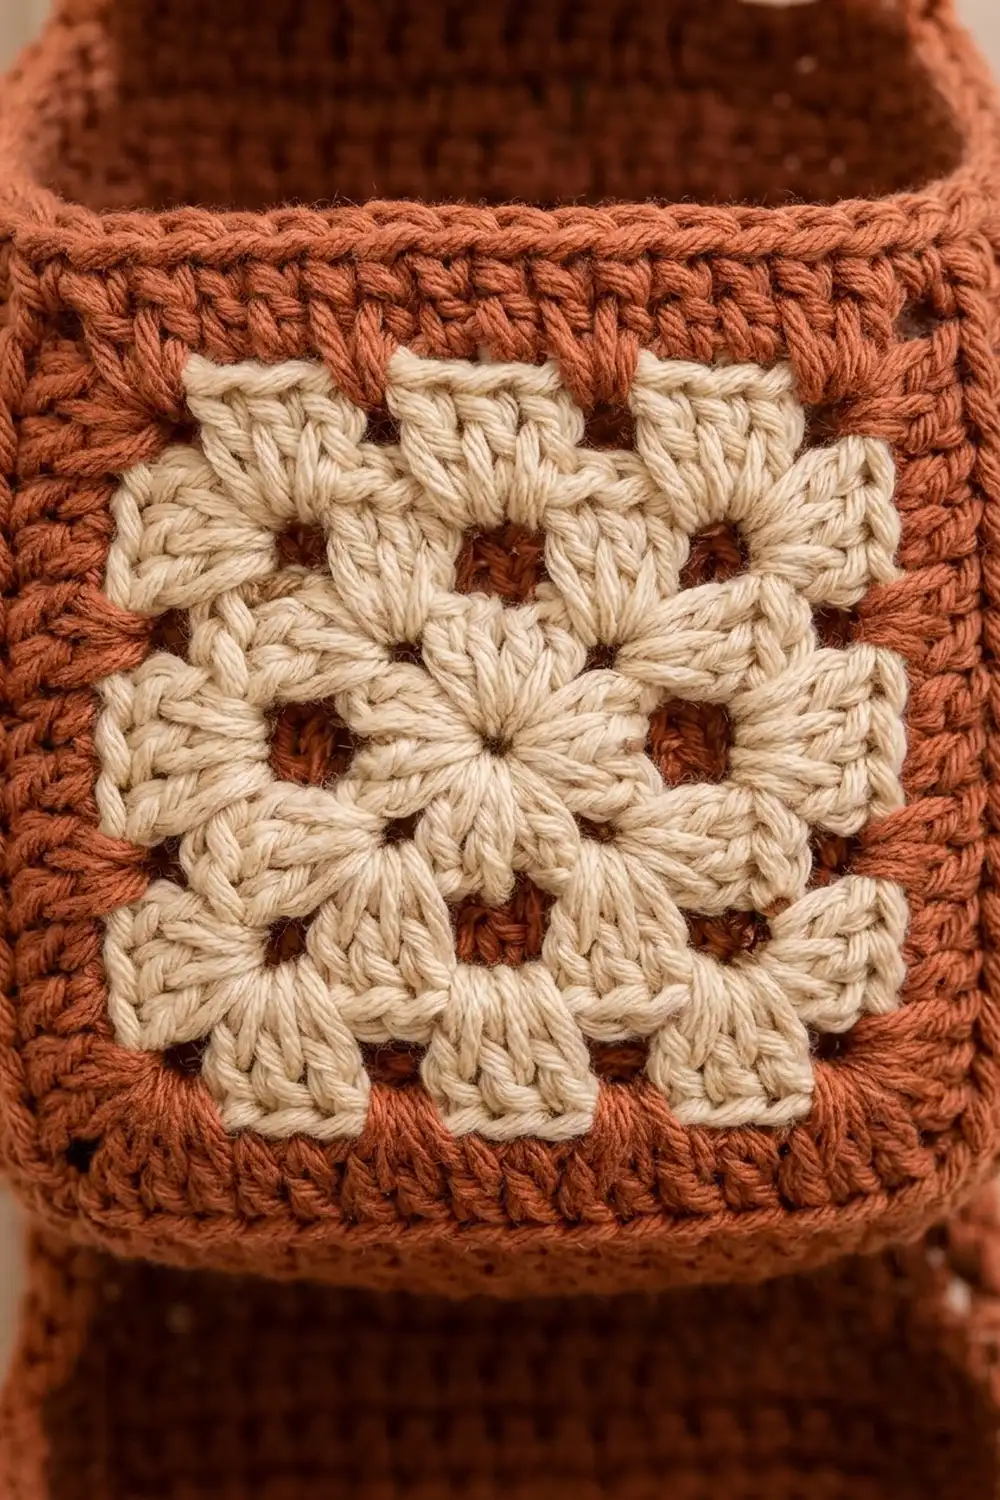
The palette is warm and earthy: rust or terracotta for the pocket bodies, straps and hanging tab, and cream for the three granny motifs. The solid half double crochet walls make a sturdy, slightly textured fabric, so the open granny motif stands out as the focal point. Rust shows through the motif’s chain spaces because the motif is sewn on top of the wall.
This pattern uses US crochet terms. Each pocket measures 5.5 in wide x 5 in deep x 5.5 in tall (14.0 x 12.7 x 14.0 cm). The finished organizer is about 5.5 in (14.0 cm) wide and 19.5 in (49.5 cm) long, measured from the bottom of the lowest pocket to the top rim of the highest pocket. The hanging loop adds about 3 in (7.6 cm).
Construction overview: each pocket starts as a flat rectangular base worked in rows. The walls are then worked in joined rounds, and a 2-round sc border finishes the rim. A separate cream granny motif is sewn to the front of each pocket. The pockets are joined by short straps worked up from the back rim, and the top pocket gets a longer tab that folds around the ring.
Finished Size and Construction
- Finished size: 5.5 in (14.0 cm) wide x 19.5 in (49.5 cm) long, plus a 3 in (7.6 cm) hanging loop
- Skill level: Easy+ (rounds, back-loop work, simple seaming)
- Terminology: US crochet terms
- Yarn weight: Medium / worsted (#4) cotton
- Hook: 4.5 mm (US 7)
- Number of pieces: 6 crocheted pieces (3 pockets with their straps worked in, 3 granny motifs), plus 1 wooden ring
- Layout: 1 pocket wide x 3 pockets tall, in a vertical column
- Piece size: each pocket is 5.5 in wide x 5 in deep x 5.5 in tall (14.0 x 12.7 x 14.0 cm); each motif is 3.75 in (9.5 cm) square
- Size before border: pocket walls are 5 in (12.7 cm) tall
- Border depth: 0.5 in (1.3 cm), 2 rounds of sc around the rim
Materials
Use a smooth, firm worsted-weight cotton or cotton blend. Cotton holds its shape, doesn’t stretch much under the weight of the rolls and copes well with bathroom humidity. The amounts below assume about 1.5 m per gram, which is typical for worsted cotton.
- Color A, rust/terracotta: 320 g, about 490 m (pocket bodies, borders, straps, hanging tab)
- Color B, cream: 40 g, about 60 m (granny motifs)
These quantities include a margin of about 10% for your gauge swatch and tails.
Tools:
- 4.5 mm (US 7) crochet hook
- 1 wooden ring, 2 in (5.1 cm) outer diameter
- Tapestry needle
- 4 locking stitch markers
- Scissors
- Measuring tape
- Spray bottle, plus a small box or folded towel for blocking
Abbreviations (US Terms)
- ch – chain
- sl st – slip stitch
- sc – single crochet
- hdc – half double crochet
- dc – double crochet
- sp – space
- st(s) – stitch(es)
- BLO – back loop only
- FLO – front loop only
- rep – repeat
- Rnd – round
Special technique – row-end pick-up: when you work along the side of the base, insert the hook under 2 strands of the edge stitch of each row. This keeps the fabric from gaping.
Gauge and Checkpoints
Body gauge: 16 hdc x 12 rows = 4 in (10.2 cm), worked flat or in the round.
Border and strap gauge: 16 sc x 16 rows = 4 in (10.2 cm).
Both gauges give 4 stitches per inch, so the sc border sits 1:1 on the hdc walls without rippling.
Make one complete pocket and check it before you make the other two. Checkpoints:
- Base after Row 15: 5.5 x 5 in (14.0 x 12.7 cm).
- Base edging (Rnd 1): 84 hdc, with a perimeter of 21 in (53.3 cm).
- Walls after Rnd 16: 5 in (12.7 cm) tall from the base fold.
- After the border (Rnd 18): 5.5 in (14.0 cm) tall.
- Granny motif after Rnd 4: 3.75 in (9.5 cm) square.
If your base comes out too big, go down 0.5 mm in hook size. If it’s too small, go up 0.5 mm. A roll needs about 4.5 in (11.4 cm) of space inside, so a base under 5 in (12.7 cm) in either direction will feel tight. Check gauge in the hdc base, not in a chain, because cotton chains tighten noticeably once they’re worked into.
Pocket (Make 3)
Use Color A.
Base
Ch 24.
Row 1: Hdc in 3rd ch from hook and in each ch across, turn. (22 hdc; the skipped 2 ch do not count.)
Rows 2–15: Ch 1 (does not count), hdc in each st across, turn. (22 hdc)
Checkpoint: 5.5 x 5 in (14.0 x 12.7 cm). The foundation edge becomes the front of the pocket, and Row 15 becomes the back.
Walls
Don’t turn at the end of Row 15. You’ll now work around all four edges of the base.
Rnd 1 (base edging): Ch 1, then rotate to work along the row ends of the first side. Hdc in each of next 2 row ends, 2 hdc in next row end; rep from * 4 more times (20 hdc, Side A). Work along the foundation chain: hdc in each of the 22 free loops (22 hdc, front). Along the second row-end side, repeat the Side A sequence (20 hdc, Side B). Along the Row 15 edge: hdc in each of the 22 sts (22 hdc, back). Sl st to first hdc. (84 hdc: 20 + 22 + 20 + 22)*
Place a marker in the first and last st of each side. The stitches are numbered 1–20 (Side A), 21–42 (front), 43–62 (Side B) and 63–84 (back).
Rnd 2 (turning round): Ch 1, hdc in BLO of each st around, sl st to first hdc. (84 hdc)
This BLO round folds the fabric up into a wall and makes the crisp base edge. It also leaves a ridge of free front loops from Rnd 1 around the base, which you’ll use later for joining.
Rnds 3–16: Ch 1, hdc in both loops of each st around, sl st to first hdc. (84 hdc per round)
Checkpoint: the 15 wall rounds (Rnds 2–16) measure 5 in (12.7 cm) tall. Move the markers up every few rounds so the corners stay lined up over the base corners.
Border
Rnd 17: Ch 1, sc in each st around, sl st to first sc. (84 sc: 20 Side A, 22 front, 20 Side B, 22 back)
Rnd 18: Ch 1, sc in each st around, sl st to first sc. (84 sc, same per-side counts)
Fasten off and weave in the ends on the inside.
Why the math works: at 4 sc per inch, 84 sc measures 21 in (53.3 cm). That matches the base perimeter of 2 x (5.5 + 5) = 21 in. Each side keeps its own count from Rnd 1 to Rnd 18: 22 for the front and back, and 20 for each side. No stitches are added at the corners. The corners stay square because the base sets them and the markers keep them lined up.
Granny Motif (Make 3)
Use Color B.
Rnd 1: Ch 4, sl st to first ch to form a ring. Ch 3 (counts as dc), 2 dc in ring, ch 2, *3 dc in ring, ch 2; rep from * 2 more times. Sl st to top of beginning ch-3. (12 dc, 4 ch-2 sps)
Rnd 2: Sl st in next 2 dc and into the ch-2 sp. Ch 3, (2 dc, ch 2, 3 dc) in same sp, ch 1. *(3 dc, ch 2, 3 dc) in next ch-2 sp, ch 1; rep from * 2 more times. Sl st to top of ch-3. (24 dc, 4 ch-2 corner sps, 4 ch-1 sps)
Rnd 3: Sl st in next 2 dc and into the corner sp. Ch 3, (2 dc, ch 2, 3 dc) in same sp, ch 1, 3 dc in next ch-1 sp, ch 1. *(3 dc, ch 2, 3 dc) in next corner sp, ch 1, 3 dc in next ch-1 sp, ch 1; rep from * 2 more times. Sl st to top of ch-3. (36 dc, 4 ch-2 corner sps, 8 ch-1 sps)
Checkpoint: about 3.5 in (8.9 cm) square.
Rnd 4: Ch 1, sc in same st as join. Work 1 sc in each dc and each ch-1 sp, and 3 sc in each ch-2 corner sp. Sl st to first sc. (56 sc = 36 + 8 + 12)
Each side has 15 sc, counting the center stitch of both corners (4 x 15 − 4 shared corners = 56). At 4 sc per inch, 15 sts = 3.75 in (9.5 cm).
Fasten off, leaving a 24 in (61.0 cm) tail for sewing.
Attaching the Motif
Center a motif on the front wall of each pocket (sts 21–42). Leave a 0.875 in (2.2 cm) margin on the left and right, and the same 0.875 in (2.2 cm) above the base fold and below the rim. Pin all four corners first. Using the cream tail, whipstitch through the BLO of every Rnd 4 sc and into the wall behind it. Pull each stitch snug but not tight.
Make All Pieces
- Color A: 3 pockets (bottom, middle, top)
- Color B: 3 granny motifs, one sewn to each pocket
Layout (front view):
      ( ring )
        |tab|
   [ Pocket 1 – top    ]
        |strap|
   [ Pocket 2 – middle ]
        |strap|
   [ Pocket 3 – bottom ]
Joining
Connector Straps (Pockets 2 and 3 only)
Hold the pocket with its back facing you. Join Color A in st 70 of Rnd 18, which is on the back, 7 sts in from the corner.
Row 1: Ch 1, sc in sts 70–77, turn. (8 sc; 7 back sts stay unworked on each side)
Rows 2–6: Ch 1, sc in each st across, turn. (8 sc)
The strap measures 2 x 1.5 in (5.1 x 3.8 cm). Don’t fasten off.
Strap-to-Pocket Seam
Hold the upper pocket above the strap, with its back facing you. Find the free front loops of Rnd 1 along its back edge (sts 63–84) and mark the center 8 loops, sts 70–77.
Working through both layers, join one strap stitch to one free loop: sc in each of the 8 strap sts together with the 8 marked free loops. (8 sc) Fasten off.
The counts match 1:1 (8 to 8), so the strap lies flat without gathering. Keep your tension even: a tight seam tilts the upper pocket backward.
Join Pocket 3’s strap to Pocket 2 first, then join Pocket 2’s strap to Pocket 1.
Hanging Tab (Pocket 1 only)
Join Color A in st 70 of Rnd 18 on Pocket 1.
Row 1: Ch 1, sc in sts 70–77, turn. (8 sc)
Rows 2–24: Ch 1, sc in each st across, turn. (8 sc)
The tab is 6 in (15.2 cm) long. Pass it through the wooden ring and fold it toward the inside of the back wall. Whipstitch Row 24 across the tab at Row 1, going through both loops so the seam can carry the weight. This makes a 3 in (7.6 cm) loop.
Size checkpoint: 3 pockets x 5.5 in + 2 straps x 1.5 in = 19.5 in (49.5 cm) long, and 5.5 in (14.0 cm) wide.
Final Blocking
- Mist each pocket evenly with water until it’s damp but not soaked.
- Stuff each pocket firmly with a folded towel or a small box about 5.5 x 5 in (14.0 x 12.7 cm).
- Square up the corners with your fingers, following the base edges.
- Press each motif flat against its wall so its corners lie square.
- Lay the organizer flat, with the straps straight and the pockets lined up in one column.
- Let it dry completely, usually about 24 hours, before you remove the stuffing.
Final Quality-Control Checklist
- Each base measures 5.5 x 5 in (14.0 x 12.7 cm)
- Every wall and border round has 84 sts
- Walls are 5 in (12.7 cm) tall, and each pocket is 5.5 in (14.0 cm) tall at the rim
- Each motif has 56 sc and measures 3.75 in (9.5 cm)
- Motifs are centered, with 0.875 in (2.2 cm) margins
- Straps are 8 sts wide and centered on the back
- The organizer measures 19.5 in (49.5 cm), not counting the loop
- The tab seam is secure, and all ends are woven in on the inside
Troubleshooting
Walls flare outward: your hdc is looser on the walls than on the base. Go down 0.5 mm in hook size for the walls only.
Walls lean inward: you’re pulling too tight at the joins. Recount to make sure you have 84 sts; a missed stitch at the join is the usual cause.
Base fold looks soft: check that Rnd 2 was worked in BLO.
Motif bulges in the center: either Rnd 4 is too loose or the whipstitch is too tight. Re-sew it with even tension.
Pockets tilt forward: loosen the seam tension, or add a second row of whipstitch along the strap edges.
Join line spirals around the pocket: always work the ch 1 and the first hdc into the same stitch as the sl st join.
Care
Hand wash in cool water and lay flat to dry, reshaping the pockets over a towel. Don’t use the dryer, because it can shrink cotton and distort the square shape.
Final Notes
The measurements build on each other. A 5.5 x 5 in (14.0 x 12.7 cm) base gives an 84-stitch round. The 84-stitch walls rise 5 in (12.7 cm), and the 2-round border brings each pocket to 5.5 in (14.0 cm). The 3.75 in (9.5 cm) motifs fit the front with even margins. Three pockets plus two 1.5 in (3.8 cm) straps make a 19.5 in (49.5 cm) organizer. Check each of these measurements on your first pocket, and the other two will match.
Happy crocheting!