

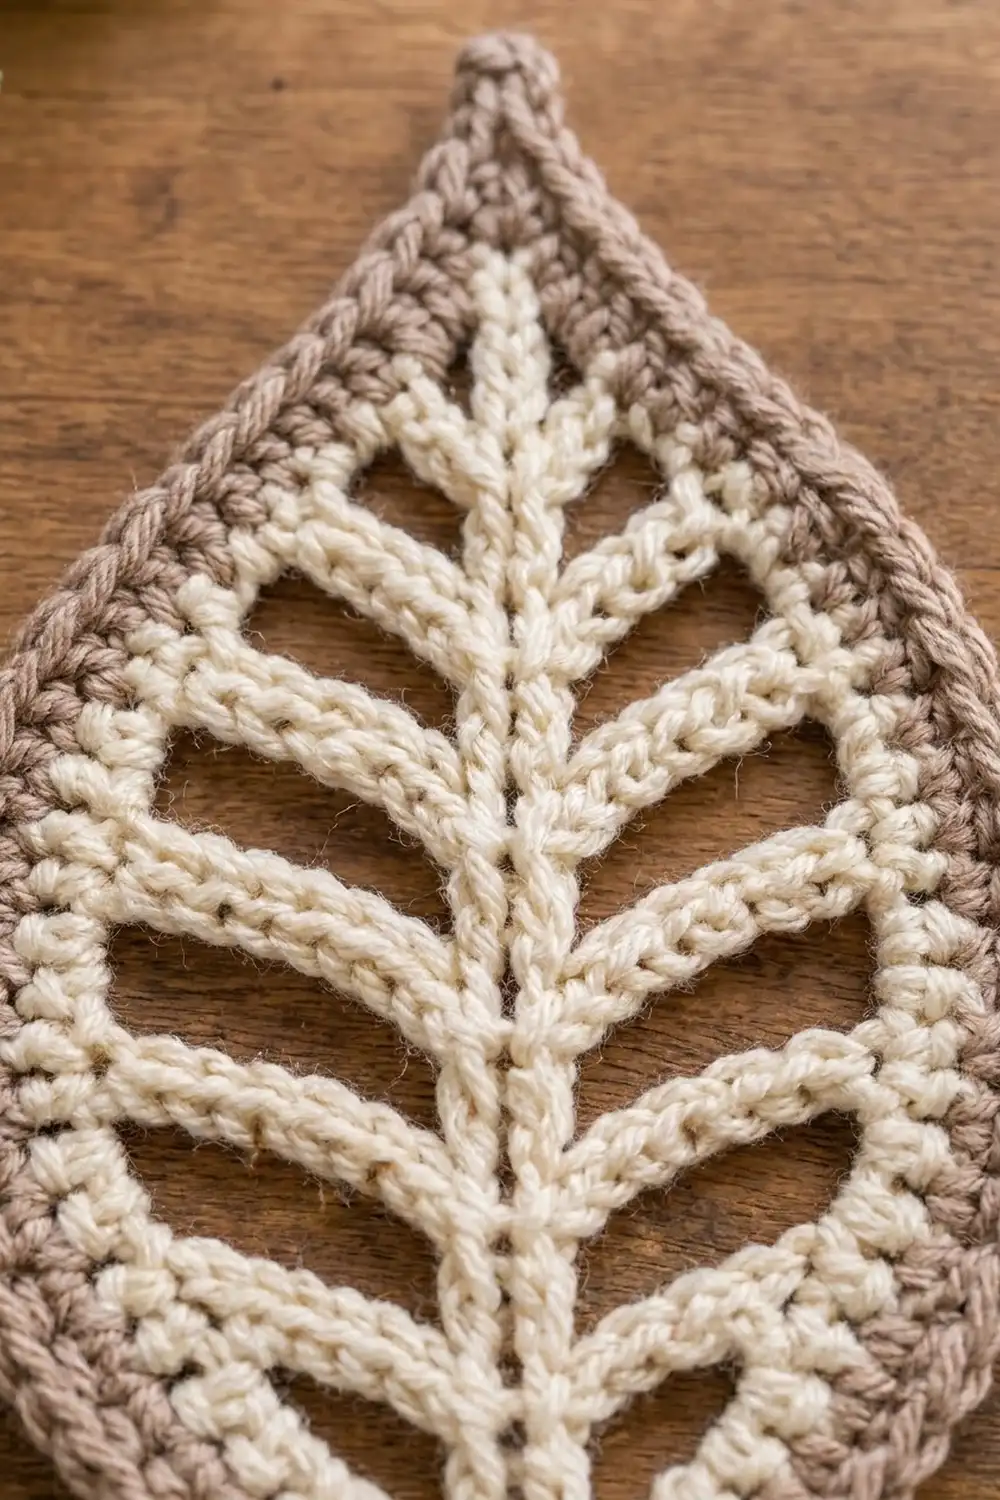
The Willow Vein Leaf is one openwork leaf with a pointed oval shape and a strong graphic outline. A cream spine runs down the center. Slim ribs branch off both sides at an upward angle, and the background shows through the open spaces between them.
The colors are calm and natural: cream for the veins and inner outline, then a warm taupe border that ends in a twisted rope edge. You can use it as a table accent, a wall or gift decoration, a bookmark-style ornament, or a sample of the technique.
This pattern uses US crochet terms. The finished leaf measures about 8.2 in (20.8 cm) long and 4.7 in (11.9 cm) wide.
The leaf is worked in one piece. You chain a spine, then slip stitch along both sides of it, making the ribs as you go. Next you link the rib tips with a chain frame, fill the frame with single crochet, and work three taupe border rounds. You only need two yarn joins: the starting cream and the taupe border.
Finished Size and Construction
- Finished size: 8.2 in (20.8 cm) long x 4.7 in (11.9 cm) wide
- Skill level: Easy-intermediate
- Terminology: US crochet terms
- Yarn weight: Worsted (#4), cotton or cotton blend
- Hook: US H-8 (5.0 mm)
- Number of pieces: 1 (single motif)
- Layout: One leaf, vertical, tip at the top
- Piece size before border: 7 in (17.8 cm) x 3.5 in (8.9 cm)
- Border depth: about 0.6 in (1.5 cm) on every side (3 rounds)
Materials
Choose a smooth, mercerized or combed worsted cotton. Cotton keeps the open ribs crisp and blocks to sharp points. Acrylic also works, but the ribs will be softer and may need more pinning.
- Cream (Color A): 12 g, about 20 m
- Taupe (Color B): 10 g, about 17 m
These quantities include a margin of about 20 percent for tails and any reworking.
Tools:
- US H-8 (5.0 mm) crochet hook
- 2 stitch markers
- Tapestry needle
- Scissors
- Blocking mat and rust-proof pins
- Spray bottle with water
- Ruler or tape measure
Abbreviations (US Terms)
- ch – chain
- sl st – slip stitch
- sc – single crochet
- rev sc – reverse single crochet (crab stitch)
- st(s) – stitch(es)
- sp – space
- rnd – round
Special stitches:
- Rib-L: Ch L + 1. Sc in the 2nd ch from hook and in each remaining ch back toward the spine (L sc made). Sl st in the same spine st as the last sl st. The skipped ch at the end of the rib is the rib tip. Example: Rib-5 = ch 6, 5 sc back, sl st in the same spine st.
- Reverse sc (rev sc): Work from left to right (if you are right-handed). Insert the hook in the next st to the right, yarn over, pull up a loop, yarn over, and pull through both loops. This makes the twisted rope edge.
Gauge and Checkpoints
Gauge: 16 sc x 18 rows = 4 in (10.2 cm) in sc worked flat with the 5.0 mm hook.
Because this is a single motif, the leaf itself is your test piece. Work Row 1 through Rnd 3 and measure. Only continue once the checkpoints match.
- After Row 1: The spine measures 6 in (15.2 cm) long.
- After Rnd 2: The longest ribs (Rib-7) measure 1.75 in (4.4 cm) from spine to tip.
- After Rnd 4: The leaf measures 7 in (17.8 cm) x 3.5 in (8.9 cm), points included.
- After Rnd 7: The leaf measures 8.2 in (20.8 cm) x 4.7 in (11.9 cm).
If your spine is longer than 6 in (15.2 cm), go down one hook size (4.5 mm). If it is shorter, go up one size (5.5 mm). Keep the stitch counts the same, because the shape depends on them.
Pattern
Row 1: Spine (Color A)
With Color A, ch 25.
Sc in the 2nd ch from hook and in each ch across. (24 sc)
The first sc is at the stem end and the last sc is at the leaf tip. From here on, the spine sts are numbered from the tip: st 1 is the last sc made and st 24 is the first. Place a marker in st 1.
Rnd 2: Spine Edge and Ribs (Color A)
This round goes down one side of the spine, around the stem, and up the other side. You make the ribs as you go.
Side A (top loops of Row 1, tip to stem): Turn. Sl st in sts 1 to 3, Rib-3. Sl st in next 3 sts, Rib-5. Sl st in next 3 sts, Rib-6. Sl st in next 3 sts, Rib-7. Sl st in next 3 sts, Rib-7. Sl st in next 3 sts, Rib-6. Sl st in next 3 sts, Rib-4. Sl st in next 3 sts (sts 22 to 24).
The Side A ribs sit on sts 3, 6, 9, 12, 15, 18, and 21. Check: 7 groups of 3 sl sts + 3 final sl sts = 24 sl sts.
Stem point: Ch 2. This is the stem ch-2 sp.
Side B (free loops of the foundation ch, stem to tip): Rotate the work. Sl st in the free loops at positions 24 to 21, Rib-4. Sl st in next 3 loops, Rib-6. Sl st in next 3 loops, Rib-7. Sl st in next 3 loops, Rib-7. Sl st in next 3 loops, Rib-6. Sl st in next 3 loops, Rib-5. Sl st in next 3 loops, Rib-3. Sl st in the last 2 loops (positions 2 and 1).
Check: 4 + (6 x 3) + 2 = 24 sl sts. The Side B ribs mirror Side A exactly.
Tip point: Ch 2, sl st in the first sl st of the round. This is the tip ch-2 sp.
Count: 48 sl sts, 14 ribs (38 rib sc per side, 76 rib sc total), 2 ch-2 point sps.
Gently push all the ribs so they angle toward the tip. The next round holds them in place.
Rnd 3: Chain Frame (Color A)
Ch 1, sc in the tip ch-2 sp. Ch 4, sc in the tip of the first Side A rib (Rib-3). [Ch 3, sc in the next rib tip] 6 times, ending at the Side A Rib-4. Ch 4, sc in the stem ch-2 sp. Ch 4, sc in the tip of the first Side B rib (Rib-4). [Ch 3, sc in the next rib tip] 6 times, ending at the Side B Rib-3. Ch 4, sl st in the first sc.
Count: 16 sc + 52 ch = 68 sts (26 ch per side).
Before you sc into each rib tip, check that the rib isn’t twisted. The open gaps between the ribs are now framed.
Rnd 4: Cream Outline Band (Color A)
Ch 1, 3 sc in the first sc (tip). Sc in each ch and sc along Side A up to the stem sc (7 rib-tip sc + 26 ch = 33 sc). 3 sc in the stem sc. Sc in each ch and sc along Side B (33 sc). Sl st in the first sc.
Count: 68 sts worked once each + 4 extra at the points = 72 sc.
The middle sc of each 3-sc group is now the point st. Each side has 35 sts between the two point sts (1 + 33 + 1). Check: 2 + (2 x 35) = 72.
Fasten off Color A and weave in the tail.
Checkpoint: 7 in (17.8 cm) x 3.5 in (8.9 cm).
Border
Border gauge: Each sc round adds about 0.22 in (0.6 cm) of depth. Together, the three rounds add about 0.6 in (1.5 cm) on every side, including both points.
Rnd 5 (Color B)
Join Color B in the tip point st. Ch 1, 3 sc in the same st. Sc in next 17 sts, 2 sc in next st, sc in next 17 sts. 3 sc in the stem point st. Sc in next 17 sts, 2 sc in next st, sc in next 17 sts. Sl st in the first sc.
Count: 72 sts worked once each + 4 extra at the points + 2 extra at the sides = 78 sc. Each side now has 38 sts between the point sts (17 + 2 + 17, plus the 2 flanking sts from the point groups).
Rnd 6 (Color B)
Ch 1, 3 sc in the tip point st (the middle sc of the 3-sc group). Sc in next 19 sts, 2 sc in next st, sc in next 18 sts. 3 sc in the stem point st. Sc in next 19 sts, 2 sc in next st, sc in next 18 sts. Sl st in the first sc.
Count: 78 sts worked once each + 4 extra at the points + 2 extra at the sides = 84 sc. Each side now has 41 sts between the point sts. Check: 2 + (2 x 41) = 84.
Rnd 7: Rope Edge (Color B)
Ch 1. Rev sc in each st around, working 1 rev sc into each point st with no increases. Sl st in the first rev sc.
Count: 84 rev sc (84 worked once each, 0 added). Fasten off and weave in the tail.
Why the Math Works
Each point gets 2 extra sts per round. This keeps the tip and stem sharp while the border wraps around them. The sides of the leaf are curved, so they also need a little more length as the border grows. One increase near the middle of each side in Rnds 5 and 6 adds that length at the widest part of the leaf. The rev sc round has no increases because crab stitch naturally spreads a little, and extra stitches would make it ruffle.
Final Blocking
- Weave in all ends along the back of the cream outline band or the taupe border. Never carry them across the open gaps.
- Spray the leaf evenly with water until it is damp all the way through. Don’t soak a cotton piece unless the stitches are very uneven.
- Lay it face up on the blocking mat.
- Pin the tip and stem points first, 8.2 in (20.8 cm) apart on a straight line.
- Pin the widest point of each side so the total width is 4.7 in (11.9 cm).
- Pin along the rope edge every 0.75 in (1.9 cm) to form a smooth, symmetrical pointed oval.
- Use a pin or your fingers to open each gap. Angle the ribs evenly toward the tip, matching left and right.
- Let the leaf dry completely before unpinning. This usually takes 6 to 12 hours.
Final Quality-Control Checklist
- The spine is straight and centered from tip to stem.
- There are 7 ribs on each side, mirror-matched in length (3, 5, 6, 7, 7, 6, 4 from the tip).
- Every rib tip is caught in the frame and none are twisted.
- Rnd 4 has 72 sc and Rnd 6 has 84 sc.
- Both points are sharp and lie flat.
- The taupe border is the same depth all around.
- The rope edge is twisted evenly with no gaps.
- The final size is 8.2 in (20.8 cm) x 4.7 in (11.9 cm).
- All ends are hidden and secure.
Troubleshooting
Ribs flop or stick straight out. The chain frame is too loose. Rework Rnd 3 with firmer tension, keeping 3 ch between rib tips.
Leaf cups or curls upward. The border is too tight. Go up one hook size for Rnds 5 to 7 only.
Edge ruffles. Either the border is too loose or you increased in Rnd 7. Rework Rnd 7 with a smaller hook and no increases.
Points look rounded. Make sure the 3 sc of each point group go into the true middle st, and pin the points firmly while blocking.
One side is wider than the other. Check that the Side B ribs follow the mirror order (4, 6, 7, 7, 6, 5, 3 from the stem).
Stitch count is off in Rnd 4. Count the chains in each Rnd 3 gap. It’s easy to add an extra ch next to the stem or tip.
Care
Hand wash in cool water with a mild detergent. Press out the water in a towel and reshape flat to dry, re-pinning the points if they soften over time.

Final Notes
The whole leaf depends on one chain of measurements. A 24-sc spine gives you 6 in (15.2 cm). Fourteen ribs and a 68-st frame turn it into a 72-sc outline at 7 in (17.8 cm) x 3.5 in (8.9 cm). Three taupe rounds of 78, 84, and 84 sts add 0.6 in (1.5 cm) all around, for a finished leaf of 8.2 in (20.8 cm) x 4.7 in (11.9 cm). If each checkpoint matches, the final leaf will match too.
Happy crocheting!