

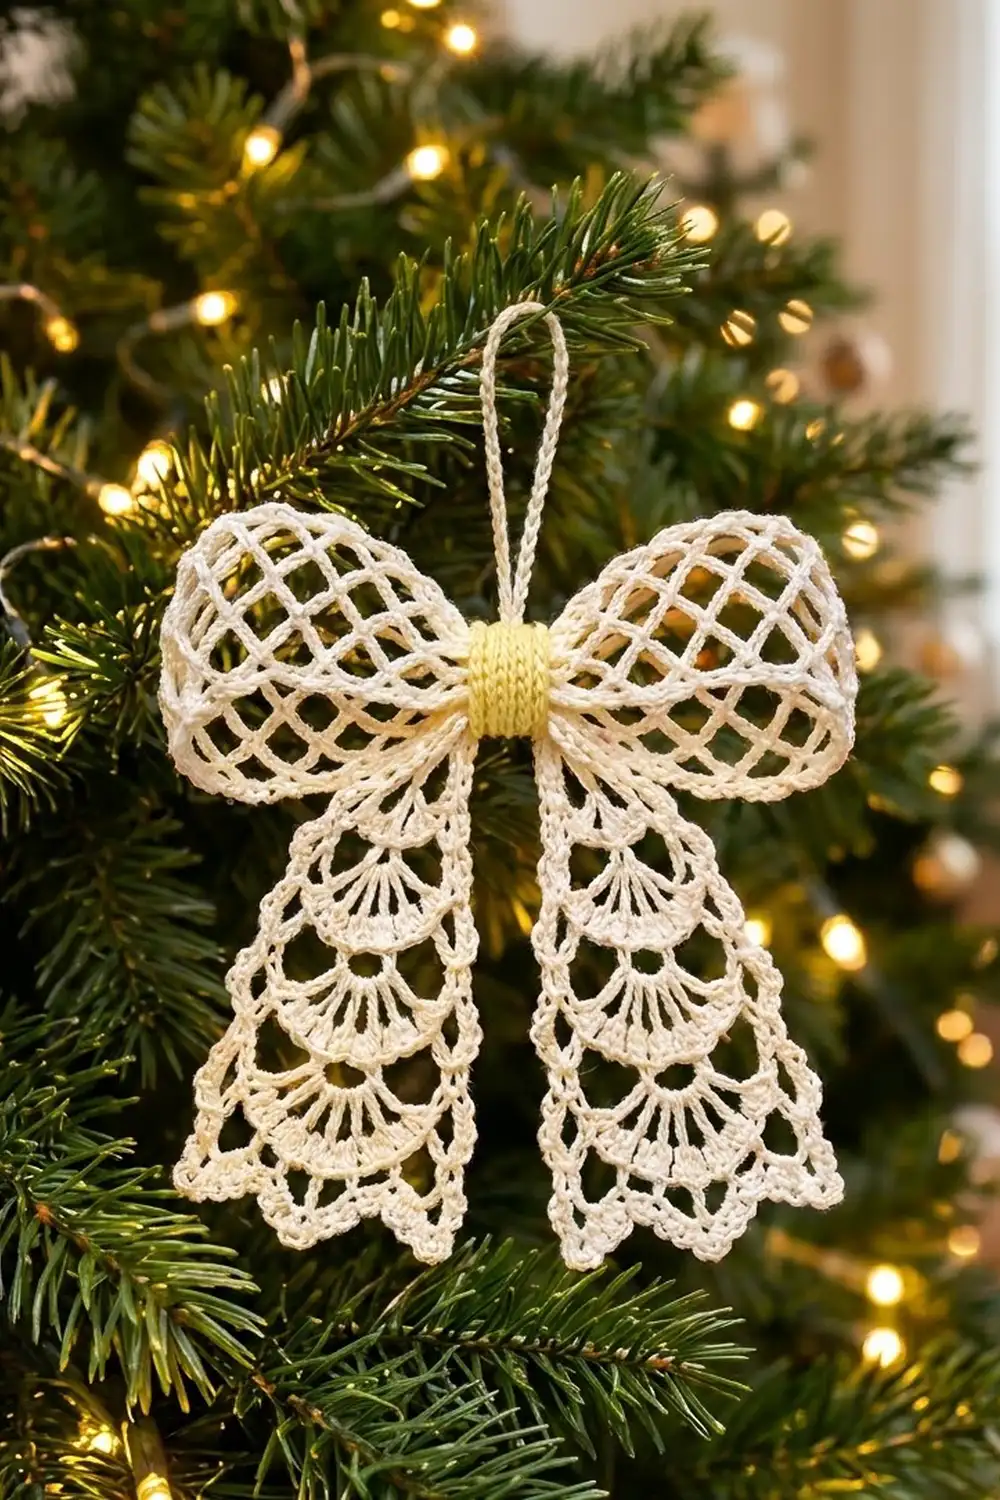
This lace bow ornament has two airy loops in a diagonal diamond mesh, two flared tails made of stacked fan shells, and a ribbed center band. It looks delicate, but every part is a small flat piece that is easy to measure and correct.
The bow is ivory cotton thread with a soft butter-yellow center band. It is a classic heirloom lace style that suits a tree, a gift or a wreath. A slim chain loop at the top makes it ready to hang.
This pattern uses US crochet terms. The finished bow is about 6.75 in (17.1 cm) wide and 5.125 in (13.0 cm) tall. With the hanging loop it is about 7.625 in (19.4 cm) tall.
You will make two mesh strips, add an edging, and sew each one into a ring to form the loops. Then you make two fan tails, a ribbed center band and a chain hanging loop, and assemble everything at the center.
Finished Size and Construction
- Finished size: about 6.75 in (17.1 cm) wide x 5.125 in (13.0 cm) tall, plus a 2.5 in (6.4 cm) hanging loop
- Skill level: Intermediate
- Terminology: US
- Yarn weight: Size 3 crochet thread (Super Fine #1 range)
- Hook: 2.25 mm (US B-1)
- Number of pieces: 6 (2 loop strips, 2 tails, 1 center band, 1 hanging loop)
- Layout: two loops side by side, two tails hanging behind them, band wrapped over the center
- Loop strip size: 1.75 in x 6.75 in (4.4 cm x 17.1 cm); flattened loop 1.75 in x 3.375 in (4.4 cm x 8.6 cm)
- Strip size before border: 1.25 in x 6.25 in (3.2 cm x 15.9 cm)
- Border depth: 0.25 in (0.6 cm) per side
- Tail size: 1.375 in (3.5 cm) wide at the top, 3 in (7.6 cm) wide at the hem, 4.25 in (10.8 cm) long
Materials
Use mercerized cotton thread in size 3. It keeps the mesh crisp, blocks well and has a soft sheen. Avoid fuzzy or very stretchy fibers, because they blur the diamond pattern.
- Ivory (main color): 20 g, about 60 m
- Pale butter yellow (center band): 3 g, about 9 m
Tools:
- 2.25 mm (US B-1) crochet hook
- Tapestry needle with a small eye
- Scissors
- Rust-proof pins and a foam blocking mat
- Spray bottle with water
- Ruler or tape measure
- Optional: fabric stiffener or light spray starch
These amounts include about 20% extra for a test piece and longer tails for weaving in.
Abbreviations (US Terms)
- ch – chain
- sl st – slip stitch
- sc – single crochet
- hdc – half double crochet
- dc – double crochet
- blo – back loop only
- sk – skip
- sp – space
- st(s) – stitch(es)
- rev sc – reverse single crochet (crab stitch)
Special stitches:
- V-st (V): (dc, ch 2, dc) in the same st.
- Fan: 7 dc in the same sp.
- Half fan: 4 dc in the same sp. When a half fan starts a row, the turning ch counts as 1 of the 4 dc.
- Picot: ch 3, sl st in 3rd ch from hook.
- Rev sc: working left to right, insert hook in the next st to the right, yarn over, pull up a loop, yarn over, pull through both loops.
Gauge and Checkpoints
Gauge keeps the loops and tails in proportion, so make one loop strip first and measure it.
- Sc gauge: 8 sc and 9 rows = 1 in (2.5 cm)
- Mesh gauge: 3 ch-5 loops = 1.25 in (3.2 cm); 4 mesh rows = 1 in (2.5 cm)
- Tail gauge: 11 dc = 1.375 in (3.5 cm)
Checkpoints:
- After 8 mesh rows, the strip should be 1.25 in (3.2 cm) wide x 2 in (5.1 cm) long when lightly stretched.
- After the border, the strip should be 1.75 in x 6.75 in (4.4 cm x 17.1 cm).
- After Row 9, the tail should be 3 in (7.6 cm) across the hem.
If your piece is too big, go down to a 2.0 mm hook. If it is too small, go up to a 2.5 mm hook. Mesh stretches easily, so pin it flat with gentle tension to measure. Don’t pull it tight.
Loop Strip (Make 2, Ivory)
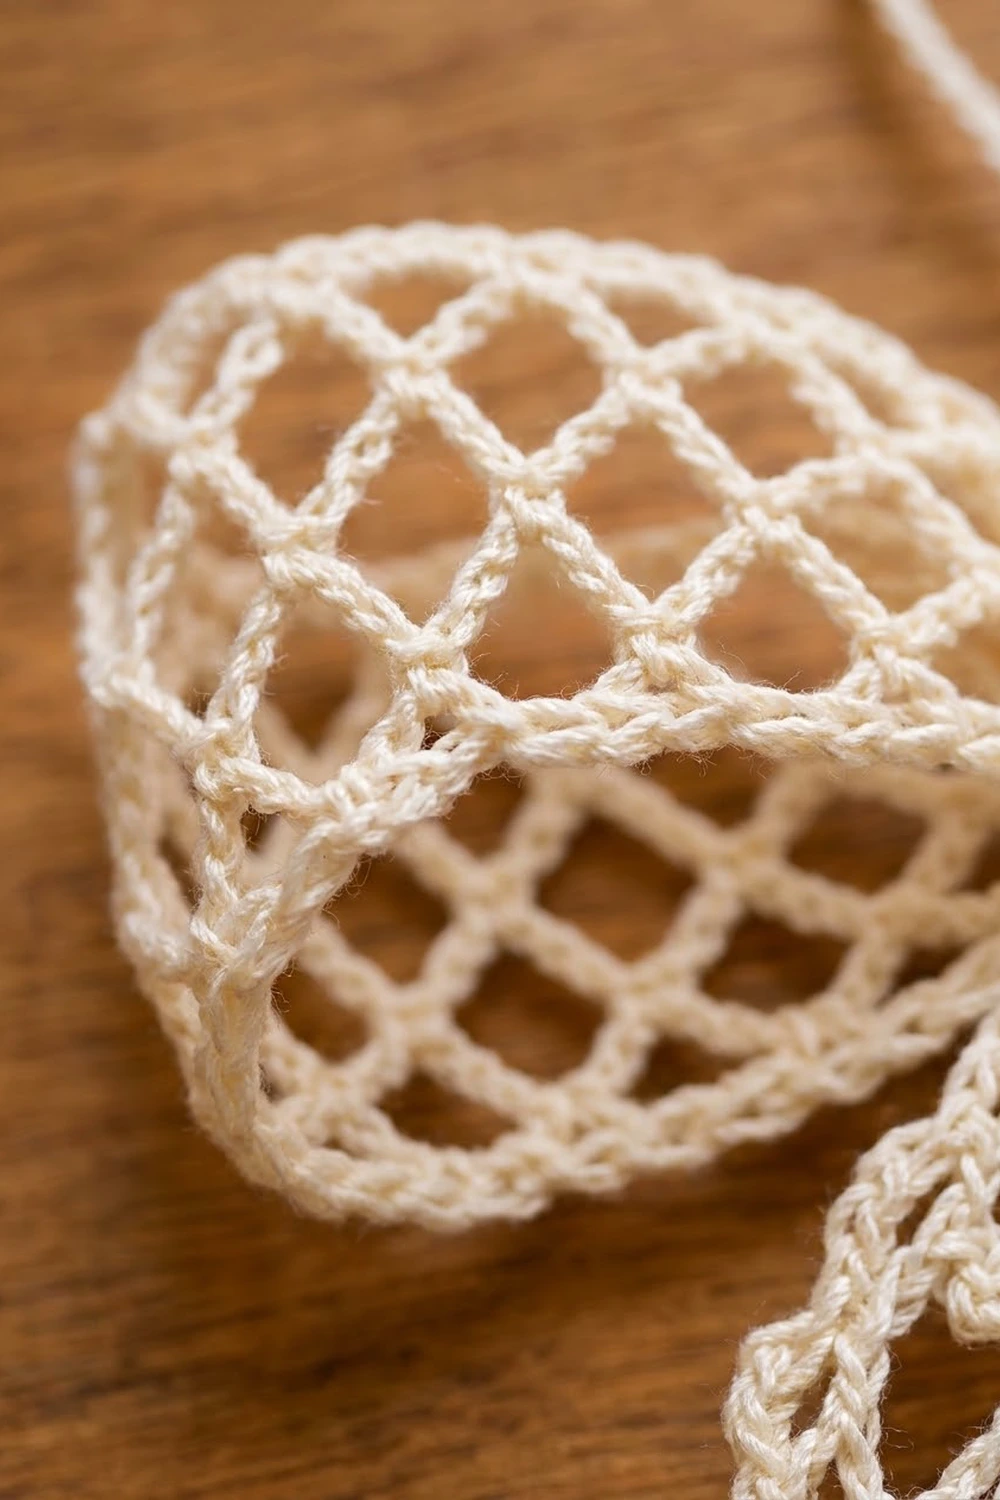
The strip is worked in rows of ch-5 lattice mesh, which forms the diagonal diamonds.
Foundation: Ch 14.
Row 1: Sc in 2nd ch from hook, *ch 5, sk 3 ch, sc in next ch; rep from * 2 more times, turn. (4 sc, 3 ch-5 loops)
Row 2: Ch 5 (counts as first loop), sc in first ch-5 loop, *ch 5, sc in next ch-5 loop; rep from * once more, ch 2, dc in last sc, turn. (3 sc, 3 ch-5 loops, 1 half loop)
Row 3: Ch 1, sc in first dc, *ch 5, sc in next ch-5 loop; rep from * once more, ch 5, sc in 3rd ch of turning ch-5, turn. (4 sc, 3 ch-5 loops)
Rows 4–25: Rep Rows 2 and 3 eleven more times. Do not fasten off.
You now have 25 rows. The last row is worked like Row 3, so the top edge is flat. The strip is 1.25 in x 6.25 in (3.2 cm x 15.9 cm). Go straight on to the Border.
Tail (Make 2, Ivory)
Each tail is worked from the narrow top down. Each tier is one V row plus one fan row, and each tier adds one full fan.
Foundation: Ch 13.
Row 1 (RS): Dc in 4th ch from hook (the skipped ch count as 1 dc) and in each ch across, turn. (11 dc)
Row 2: Ch 5 (counts as dc + ch 2), dc in first dc (edge V made), ch 3, sk 4 dc, V in next dc, ch 3, sk 4 dc, V in top of turning ch, turn. (3 V, 2 ch-3 sps)
Row 3: Ch 3 (counts as dc), 3 dc in ch-2 sp of edge V (half fan), sc in next ch-3 sp, fan in ch-2 sp of center V, sc in next ch-3 sp, half fan in ch-2 sp of last V, turn. (1 fan, 2 half fans: 15 dc, 2 sc)
Row 4: Ch 5 (counts as dc + ch 2), dc in first dc (edge V), ch 2, sk 3 dc, V in next sc, *ch 3, sc in center (4th) dc of next fan, ch 3, V in next sc; rep from * across to last half fan, ch 2, sk 3 dc, V in top of turning ch, turn. (4 V, 1 sc)
Row 5: Ch 3 (counts as dc), 3 dc in ch-2 sp of edge V, sc in next ch-2 sp, *fan in next V, sc in next sc; rep from * until 1 interior V remains, fan in last interior V, sc in next ch-2 sp, half fan in last edge V, turn. (2 fans, 2 half fans: 22 dc, 3 sc)
Row 6: Rep Row 4. (5 V, 2 sc)
Row 7: Rep Row 5. (3 fans, 2 half fans: 29 dc, 4 sc)
Row 8: Rep Row 4. (6 V, 3 sc)
Row 9: Rep Row 5. (4 fans, 2 half fans: 36 dc, 5 sc)
Checkpoint: the hem edge is about 3 in (7.6 cm) wide, and the tail is about 3.75 in (9.5 cm) long.
Row 10 (scallop edging): Ch 1, (sc, picot) in first dc, sc in next 3 dc, sl st in next sc, *[sc in next 2 dc, hdc in next dc, (dc, picot, dc) in center dc, hdc in next dc, sc in next 2 dc], sl st in next sc; rep from * 3 more times, sc in next 3 dc, (sc, picot) in top of turning ch. Fasten off, leaving an 8 in (20.3 cm) tail. (45 sts plus 6 picots: 4 fan scallops of 8 sts each, 5 sl sts, and 2 half-fan edges of 4 sc each)
Each fan becomes a pointed scallop, and the two picot corners finish the outer points. The finished tail is 4.25 in (10.8 cm) long.
Center Band (Make 1, Pale Butter Yellow)
Foundation: Ch 19.
Row 1: Sc in 2nd ch from hook and in each ch across, turn. (18 sc)
Rows 2–6: Ch 1, sc blo in each st across, turn. (18 sc)
Fasten off, leaving a 10 in (25.4 cm) tail for sewing. The band is 2.25 in x 0.75 in (5.7 cm x 1.9 cm). The ridges from working in the back loops run along the length, so they stand vertically once the band is wrapped around the bow.
Hanging Loop (Make 1, Ivory)
Foundation: Ch 40.
Row 1: Sl st in 2nd ch from hook and in each ch across. (39 sl sts)
Fasten off, leaving 6 in (15.2 cm) tails at both ends. The cord is about 5 in (12.7 cm) long and makes a 2.5 in (6.4 cm) loop when folded in half.
Make All Pieces
- Ivory: 2 loop strips (with border), 2 tails, 1 hanging loop
- Pale butter yellow: 1 center band
Layout (front view):
            [ hanging loop ]
[ loop strip ring ][ band ][ loop strip ring ]
      [ tail, angled left ][ tail, angled right ]
Joining
Work the Border on both loop strips before you start joining.
Step 1 – Form the rings. Fold one strip so the two short ends meet. Whipstitch them together through the back loops, joining each of the 14 sts on one end to its matching st on the other. Flatten the ring so the seam sits at one fold. That fold becomes the inner end at the bow center. Repeat with the second strip.
Step 2 – Stack. Lay the two rings side by side with the seams touching at the center. Place both tails behind them so the tops overlap the center by 0.5 in (1.3 cm), angled slightly outward.
Step 3 – Cinch. Wrap a length of ivory thread 4–5 times around the center of all four layers. Pull until the center gathers to about 0.75 in (1.9 cm) tall, then tie securely at the back. Pass the hanging loop ends under the wraps at the back and knot them.
Step 4 – Band. Wrap the yellow band around the center with the ridges vertical. Whipstitch the short ends together at the back, row end to row end (6 rows to 6 rows). Tack the band to the layers underneath with 2–3 hidden stitches.
Tension: Keep seams firm but not tight. A tight ring seam puckers the border, and a loose one leaves gaps.
Size checkpoint: The bow should be about 6.75 in (17.1 cm) across the loops and 5.125 in (13.0 cm) from the top of the loops to the tail tips.
Border (Loop Strips)
Border gauge: 8 sc = 1 in (2.5 cm).
Each corner is 3 sc worked into one spot. The middle sc of the group is the corner stitch, and the 2 outer sc belong to the sides. Each side count includes its 2 corner stitches.
Round 1: Ch 1. Working across Row 25: 3 sc in first sc (corner), 3 sc in next ch-5 loop, sc in next sc, 2 sc in next loop, sc in next sc, 3 sc in last loop, 3 sc in last sc (corner). Along the long edge: 2 sc in each of the 25 row ends. Along the foundation: 3 sc in first ch (corner), sc in next 5 ch, sk 1 ch, sc in next 5 ch, 3 sc in last ch (corner). Along the second long edge: 2 sc in each of the 25 row ends. Sl st to first sc. (132 sc)
Per-side counts: each short side has 14 sc (2 corners + 2 outer corner sc + 10 worked along the edge). Each long side has 54 sc (2 corners + 2 outer corner sc + 50 in the row ends).
Round 2: Ch 1, rev sc in each sc around. Sl st to first st. Fasten off and weave in ends. (132 rev sc)
Why the math works: 2 x 14 + 2 x 54 = 136. Each of the 4 corners is counted on two sides, so subtract 4 to get 132. At 8 sc per inch, 14 sc = 1.75 in (4.4 cm) and 54 sc = 6.75 in (17.1 cm). The two rounds add 0.25 in (0.6 cm) to every side: 1.25 + 0.5 = 1.75 in, and 6.25 + 0.5 = 6.75 in.
Final Blocking
- For the crispest result, block the strips and tails flat before assembly.
- Mist each piece until it is damp, not soaked.
- Pin the strips to 1.75 in x 6.75 in (4.4 cm x 17.1 cm). Put the pins in the mesh loops so the diamonds open evenly.
- Pin each tail to 3 in (7.6 cm) across the hem, with one pin in each scallop point and picot.
- Let everything dry completely.
- After assembly, stuff each loop lightly with tissue so it holds a rounded shape. Mist it, or brush on diluted stiffener if you like.
- Dry overnight, then remove the tissue.
Final Quality-Control Checklist
- Each strip has 25 mesh rows and 132 border sts.
- Each tail has 4 fans in Row 9 and 6 points along the hem.
- The ring seams sit at the inner folds, hidden under the band.
- Both loops match in size within 0.125 in (0.3 cm).
- The band ridges run vertically, and the band seam is at the back.
- The hanging loop is centered and secure.
- All ends are woven in and trimmed.
Troubleshooting
Mesh diamonds look like rectangles. Your ch-5 loops are too tight. Loosen your chains or go up a hook size.
Strip edges ripple. There are too many border sc. Recount: 2 sc per row end and 54 per long side.
Strip edges pull in. There are too few border sc, or the rev sc is too tight. Loosen your tension on Round 2.
Tail curls. Pin it damp and let it dry. A curl usually means the V rows are tight.
Fans crowd each other. Make sure each fan goes into the ch-2 sp of a V, not into a dc.
Loops flop. Use stiffener, or cinch the center tighter in Step 3.
Care
Hand wash in cool water with mild soap, press out the water in a towel, and reshape flat to dry. Re-stiffen if needed, and store flat in tissue.
Final Notes
The measurements build on each other. Three mesh loops make 1.25 in (3.2 cm) of width, and 25 rows make 6.25 in (15.9 cm) of length. The 2-round border brings each strip to 1.75 in x 6.75 in (4.4 cm x 17.1 cm). Each ring flattens to a 3.375 in (8.6 cm) loop, and two loops give the 6.75 in (17.1 cm) bow width. The 4.25 in (10.8 cm) tails bring the bow to 5.125 in (13.0 cm) tall. Check your size at each stage and your bow will match.
Happy crocheting!